|
KIT: |
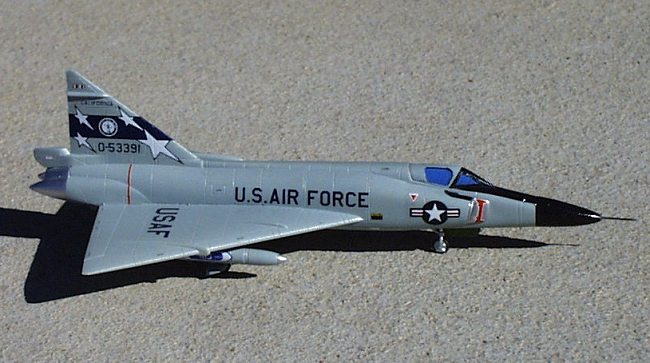
ARII 1/144 F-102A Delta Dagger |
|
KIT # |
23011 |
|
PRICE: |
@$5.00 |
|
DECALS: |
196 FIS California ANG |
|
REVIEW & |
|
|
NOTES: |
Decals unusable |
|
HISTORY |
Designed as a pure interceptor from the start, Convair’s sleek F-102A Delta Dagger first took to the skies in October of 1953. It overcame many of the problems associated with early supersonic jets, and eventually 889 single seat A models, and 111 two seat TF-102s were built. Originally designed as an interm interceptor until the more refined F-106 became available, the "Deuce" was actually built in far greater numbers than the "Six". By the mid 70’s the Deuces days were numbered, and by the early 80’s most were turned into QF-102 drones.
|
THE KIT |
I believe that this kit is a re-issue of the Otaki/Revell kit that’s been around since the early 70’s. Its molded in white plastic, with nicely scribed panel lines, and a clear, one piece canopy/windscreen. The only external stores provided are two wing tank. However, these seem to be a bit long to me. They look like a cross between the 102’s sub-sonic tanks, and the 106’s supersonic tanks. I didn’t realize this until mine were already painted and decaled. Otherwise, you may want to cut them down to size. Overall, the kit looks to be a very good representation of a Case XX wing Deuce in this small scale.
|
CONSTRUCTION |
Fit of this kit is for the most part, pretty good. The main exception being the fit of the exhaust section to the fuselage. My example did have a number of sink holes. Most were on the exhaust section, and speed brakes. I used white out to fill all holes and seams on this kit. This seemed to work quite well, but it does not cover large holes very well, and will sometimes peel up with masking tape. No cockpit interior is provided, so I decided to paint the inside of the canopy blue. As you can imagine, assembly was extremely straight forward, with only the previously mentioned fit problems.
|
PAINT & DECALS |

I chose to do the aircraft in markings of the 196th FIS, California ANG, based at Ontario Airport in the early 70’s. The kit supplies decals for this same unit, but they a virtually useless. The USAF, and US Air Force titles are WAY too big for the kit, and the blue for all the markings is too light. I substituted markings for the same unit form a long out of print Microscale sheet. It is sheet 144-107, and it provides markings for the 317th FIS, along with the Wisconsin, and California ANG.
The aircraft is painted in the standard ADC gray scheme consisting of overall ADC gray FS16473, with a Titanium exhaust section, and black nose and anti-glare panel. I also painted the tips of the fuel tanks, and intakes silver. The wing fences should be painted red, but in this small scale, I knew I’d butcher them, so I decided to leave them as is.
Since the ADC gray was already gloss, I set about applying the decals. They went down beautifully! I had to use the kits fuel tank markings, as the Microscale sheet did not supply them. Unfortunately, it did not supply national insignia either, and these came from an Experts Choice 72nd scale National Insignia sheet. I used some 1/8" black stripe decals for the walkways on the intakes. Unfortunately, I ended up making them a bit shorter than they should be, as they should extend all the way to the end of the canopy. Once all the decals were dry, a coat of Testors Gloss coat followed.
|
FINAL ASSEMBLY |
As mentioned earlier, the inside of the canopy was painted light blue, and once dry, was glued onto the model. I then hand painted the black, and ADC gray frames. The landing gear wells were painted green zinc, while the gear, and wheel hubs got painted sliver. Painting the tires black on those tiny wheels was a bit of a challenge! A few mistakes with the landing gear doors are that the outer fuselage doors are represented twice, while the inner fuselage doors are not represented at all. Since I built mine virtually out of the box, I left them as is. The only addition I made to the kit was to substitute a small pin for the kits pitot tube.
|
CONCLUSIONS |
This was a really neat little kit to build, and was the first 1/144th kit I’ve ever completed. I have since added a number of other a/c in this scale to my "to build" pile. It can be put together, painted, and decaled in just a few evenings time, and looks pleasing when finished. Are you a little burned out on your mega-detailing projects? Try putting a 1/144th kit together one evening…. It’ll feel great to complete something!
If you would like your product reviewed fairly and quickly by a site that has over 900 visits a day, please contact me or see other details in the Note to Contributors.