Classic Airframes 1/48 SBC-3 Helldiver
|
KIT # |
412 |
|
PRICE: |
$39.95 |
|
DECALS: |
One aircraft |
|
REVIEW : |
|
|
NOTES: |
Short run` |
|
HISTORY |
Forever known as the last combat biplane of the US Navy, the Curtiss SBC Helldiver began its gestation in June 1930 when the Bureau of Aeronautics ordered two-seat fighter prototypes from Curtiss, Douglas and Vought. A year later, all three prototypes were in the air, being put through their paces in hopes of garnering a government contract. With the Depression in full swing, any work at all would be a welcome relief. The Curtiss entry in the competition was the sole example of retractable landing gear and, unlike the other two entries, made use of a parasol wing. The prototype later crashed due to prop blade departure causing severe resonance vibrations. The replacement prototype, designated SBC-2, made its first flight on 9 Dec 1935. A few months later, Curtiss was awarded a contract for 83 copies of the SBC-3, after yet another engine change, this time to the Pratt & Whitney R-1535-82.
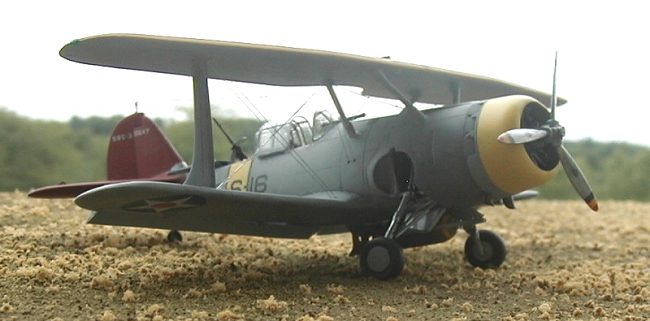
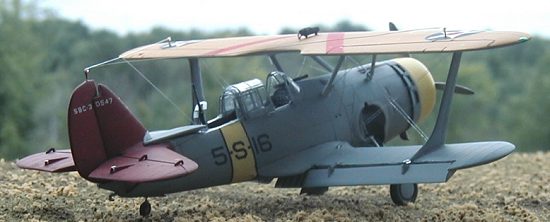
The motivation for my building this kit came from an uncle that built large-scale remote controlled aircraft, mostly from scratch. The last project that he was working on before his health forced him to quit was the SBC-3. Like a fool, someone, and I won’t mention my name, volunteered to build him a representation of that between-the-wars dive-bomber. My uncle provided me the Squadron book and showed me the color profile that depicted the markings for "5 Sally 16" … a Helldiver assigned to VS-5 on the West coast during 1938 (In Action book, centerfold, top profile).
|
THE KIT |
 This model turned out to be
my Kit From Hell. My first "limited run" kit, I was not prepared for the fit
problems: the cabane struts (connecting the fuselage to the upper wing) were
each about 1/8 inch too long; no problem for the aft struts, but the fore struts
required surgery. The thick sprue gates presented little difficulty and the
ever-present flash was easily handled, with the exception of the main landing
gear: getting micro-files (or even the tip of a #11 blade) into the tight spaces
presented some creative approaches. The absence of alignment pins caused me
problems only on the horizontal tail feathers: the top and bottom halves just
didn’t seem to want to line up. The instructions were marginal at best: the lack
of definitive markings for the placement of the wheel well bulkheads presented
problems when it came time to mount the landing gear; location of the cabane
struts was not marked on the fuselage; locator marks for the bomb trapeze or
exhaust pipes were non-existent.
This model turned out to be
my Kit From Hell. My first "limited run" kit, I was not prepared for the fit
problems: the cabane struts (connecting the fuselage to the upper wing) were
each about 1/8 inch too long; no problem for the aft struts, but the fore struts
required surgery. The thick sprue gates presented little difficulty and the
ever-present flash was easily handled, with the exception of the main landing
gear: getting micro-files (or even the tip of a #11 blade) into the tight spaces
presented some creative approaches. The absence of alignment pins caused me
problems only on the horizontal tail feathers: the top and bottom halves just
didn’t seem to want to line up. The instructions were marginal at best: the lack
of definitive markings for the placement of the wheel well bulkheads presented
problems when it came time to mount the landing gear; location of the cabane
struts was not marked on the fuselage; locator marks for the bomb trapeze or
exhaust pipes were non-existent.
|
CONSTRUCTION |
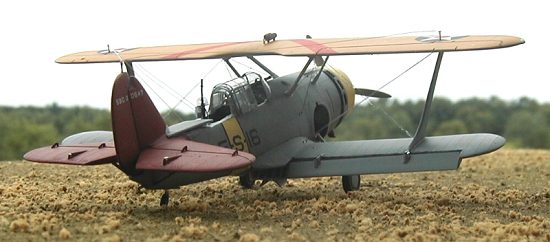
 In wanting to depict the
Helldiver in a "candid" setting, I decided to drop the flaps, deflect the
rudder, fold the turtle deck aft of the rear cockpit and open the canopy. I had
intended to drop the elevators, but my initial attempt was less than successful.
Having the SBC-4 kit in the closet, I cannibalized the pieces from it and left
well enough alone. In dealing with the flaps, the kit’s one piece lower wing
presented problems of it’s own. After cutting the flaps away, I milled the
trailing edge of the wing with a battery powered Dremel (turning on the S-L-O-W
speed) and a small square-tipped bit. This work was taxing, to say the least.
One slip and the wing would be ruined. After two nights of careful milling, I
was satisfied. Cutting away the turtle deck was easily accomplished: I just
followed the panel lines. Later in the assembly process, cardstock replaced the
pieces removed, being folded as seen on the prototype. My uncle had asked that
the cowl flaps be positioned open, so those were removed from the cowling. The
replacements would be added after the engine was installed. I also decided to
add the missing elevator hinges and the elevator trim tab actuators.
In wanting to depict the
Helldiver in a "candid" setting, I decided to drop the flaps, deflect the
rudder, fold the turtle deck aft of the rear cockpit and open the canopy. I had
intended to drop the elevators, but my initial attempt was less than successful.
Having the SBC-4 kit in the closet, I cannibalized the pieces from it and left
well enough alone. In dealing with the flaps, the kit’s one piece lower wing
presented problems of it’s own. After cutting the flaps away, I milled the
trailing edge of the wing with a battery powered Dremel (turning on the S-L-O-W
speed) and a small square-tipped bit. This work was taxing, to say the least.
One slip and the wing would be ruined. After two nights of careful milling, I
was satisfied. Cutting away the turtle deck was easily accomplished: I just
followed the panel lines. Later in the assembly process, cardstock replaced the
pieces removed, being folded as seen on the prototype. My uncle had asked that
the cowl flaps be positioned open, so those were removed from the cowling. The
replacements would be added after the engine was installed. I also decided to
add the missing elevator hinges and the elevator trim tab actuators.
After all of the surgery was completed, construction began with the cockpit. The interior was painted aluminum. Instrument panels and the radio stack were first painted Insignia White. A thin coat of Future was applied and allowed to dry. A coat of flat black was then shot over the panel and before it cured, a sharp #11 blade was used to gently scrape the black away from the bezels and dial details. A wash of Grimy Black was applied the entire cockpit to add depth. A short piece of brass tubing replaced the aft control column. The shelf below the radio stack in the rear cockpit was inadvertently sanded away when being removed from the casting block. That was replaced by card stock. Additional levers were added with drops of white glue for the knobs and painted.
One of the fuselage halves was slightly warped but with careful application of liquid cement, starting from the rear and working forward, the fuselage halves were successfully mated. The lower wing was attached; the fit was acceptable. Matching holes were drilled in the horizontal stabilizers and fuselage for a short piece of tubing to provide strength. The interplane strut attach points were made larger after test fitting showed that either the struts were too big or the holes in the wings too small. After the major components were assembled, the seams filled and sanded, it was off to the paint shop (meaning I covered everything up to prevent over-spray).
My initial intention was to paint the fuselage and metal portions of the wings a natural metal. My uncle insisted that the original planes were actually a very light gray. After painting and masking off the yellow fuselage band Testor’s Light Yellow (in the original small bottle) I shot buffable Aluminum Plate. The polishing of the natural metal finish left much to be desired. So out came the lacquer thinner and cotton balls. In stripping off the paint, the panel lines disappeared … time to grab the scriber and associated guides. Not all panel lines were replaced, just the major ones. Some inspection plates were replaced, others left off. Live and learn, I guess.
 The first coat of Air Command
Gray looked much lighter in the bottle than when it dried, so I found a bottle
of Light Ghost Gray and painted the middle of the panels I had previously
re-scribed. This, in effect, constituted pre-shading. The results are quite
subtle and may not show in the photographs, but it is there. The tail was
painted Insignia Red, the "chrome yellow" of the upper wing was actually RAF
Trainer Yellow, the closest match I could find.
The first coat of Air Command
Gray looked much lighter in the bottle than when it dried, so I found a bottle
of Light Ghost Gray and painted the middle of the panels I had previously
re-scribed. This, in effect, constituted pre-shading. The results are quite
subtle and may not show in the photographs, but it is there. The tail was
painted Insignia Red, the "chrome yellow" of the upper wing was actually RAF
Trainer Yellow, the closest match I could find.
Construction Continues
After installing the upper wing, it was time to fight the cabane struts. As previously mentioned, the aft struts were merely shortened. The forward struts had to have 1/8" removed from the middle of the strut because each end needed to remain as is. After minor paint touchups, it was time to perform that most heinous of acts, rigging the wings. I had already pre-drilled the holes in the wings and fuselage, even the rigging points on the cabane struts (which was quite tricky). I used 2 Lb. monofilament fishing line, which tended to disappear against the gray fuselage side, even under magnification. In process of tightening the rigging, a match head (which was NOT lit) touched one of the double cables between the fuselage side and aft cabane strut attachment point, making the cable WAY too short. And the fact that I’d super glued the ends in place made for pulling the soon-to-be-replaced filament out all that much more difficult. I found that leveraging my hemostats against the upper wing was not a good idea because I ended up popping the cabane struts loose from the fuselage. Were it not for the fact that I was building this model for a family member, that bugger would have been trashed a long time ago.
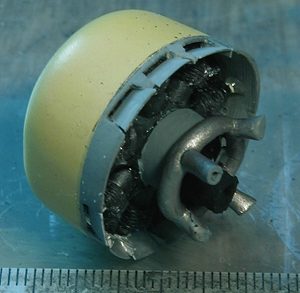
The resin engine cylinders were painted buffable Gunmetal and dry-brushed silver; the crankcase Neutral Gray. The cylinders and the crankcase were then removed from their casting blocks. After assembling the cylinders to the crankcase, small pieces of styrene rod were used to simulate the spark plugs; larger diameter rod was used for the pushrod tubes. The ignition harness is solder with thin wire used for the harness connections. Several pieces of larger rod were used for the magnetos. There are over 120 pieces in the engine. Much of the work may never be seen again, but the builder (and anyone who will listen) knows what’s there. In order to mount the engine inside the cowl (which was somewhat out-of-round) the inside of the cowling was thinned as much as possible. In holding the cowling up to the light, if I saw light, it was time to stop. The rocker covers of the forward cylinders were sanded down as well to allow proper placement of the engine within the cowling. The engine was super glued in place. A simulated accessory section and a portion of the engine mount were added in case any of that could be seen. (They can’t, but do I get points for trying?) The cowling was added to the fuselage after the cowl flaps were added.
The propeller was a real mess: sink holes between the blades on the prop hub. Some were sanded out; the worst offender was filled with Mr. Surfacer (500) and refinished. The hub was painted nonbuffable Steel with the blades being buffable Aluminum Plate. When dry, the Dremel and buffing wheel made short work of polishing the blades. A coat of Future to protect the Aluminum Plate and it was time to add the tip decals. The decals were square … not the shape of the prop blades at all. Tracing around the blade tip left a shape I could deal with. After the tip decals and the "Curtiss" icon were in place, another coat of Future was added to protect and seal the decals.
 The landing gear
installation almost turned into another lesson in frustration: due to the tight
spaces, I could not get an applicator for liquid cement where I needed and using
super glue necessitated precise alignment of the parts before it cured. The drop
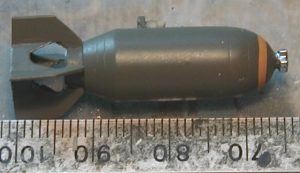
tank supplied in the kit was not used; instead, I used the resin 500 lb. bomb
from the SBC-4 kit. After assembly, the bomb was painted Faded Olive Drab (the
regular OD just seemed a little too stark). Wanting to add a yellow stripe
around the nose of the ordinance, I resorted to an old trick we used to use for
propeller tips: dipping. I added a little Insignia Yellow to the lid and making
sure the bomb was plumb, carefully dipped the nose in the paint. I dabbed the
nose on a paper towel to wick off the surplus paint and set it aside to dry.
Again making sure the bomb was plumb, I dipped the bomb in a spot of Faded OD.
When dry, a touch of silver on the fuse and it was ready to add to the
Helldiver.
The landing gear
installation almost turned into another lesson in frustration: due to the tight
spaces, I could not get an applicator for liquid cement where I needed and using
super glue necessitated precise alignment of the parts before it cured. The drop
tank supplied in the kit was not used; instead, I used the resin 500 lb. bomb
from the SBC-4 kit. After assembly, the bomb was painted Faded Olive Drab (the
regular OD just seemed a little too stark). Wanting to add a yellow stripe
around the nose of the ordinance, I resorted to an old trick we used to use for
propeller tips: dipping. I added a little Insignia Yellow to the lid and making
sure the bomb was plumb, carefully dipped the nose in the paint. I dabbed the
nose on a paper towel to wick off the surplus paint and set it aside to dry.
Again making sure the bomb was plumb, I dipped the bomb in a spot of Faded OD.
When dry, a touch of silver on the fuse and it was ready to add to the
Helldiver.
The dropped flaps were constructed from card stock, measured against the lower wing for length and width. The section of the flaps that are exposed underneath the fuselage had ribs added. A lightening hole was punched in each rib. The interior sections of the flaps were painted Aluminum with exterior being Light Ghost Gray. The flaps were super glued in place with small pieces of PlastiStrut "T" section simulating the actuating mechanisms.
Attaching the canopies to the completed airframe posed problems, as did so much of this kit. After cutting the pieces apart, I noticed that the parts had spread considerably. I added the frames by painting clear decal. I found that Aluminum paint does not stick to clear decal. So I wasted about ½ " of a sheet. Shooting the Ghost Gray and letting it dry overnight, I cut it into thin strips (with a brand new blade) and placed the decal over the hard to see canopy framing. I also found that decals don’t adhere to Future that well. After adding the horizontal frames, I dipped the canopies into Future again to prevent the frames from coming off. After all of the framing was added and the rear two sections shortened (height-wise) to allow them to be "stacked" it was time to add the canopy to the airframe. As with so many other things, this did not work out as planned. I ended up super gluing thin strips of cardstock along the sides, between the pilot and gunner’s positions. I stacked the rear three sections together before adding the whole thing to the fuselage. The pilot’s canopy fit well over the central stack. After adding the wires between the top wing and the tail, this puppy was as finished as it was going to get.
|
PAINT & MARKINGS |
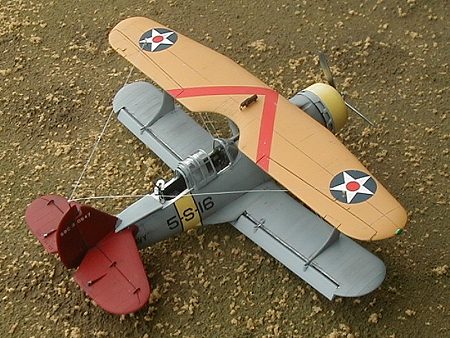
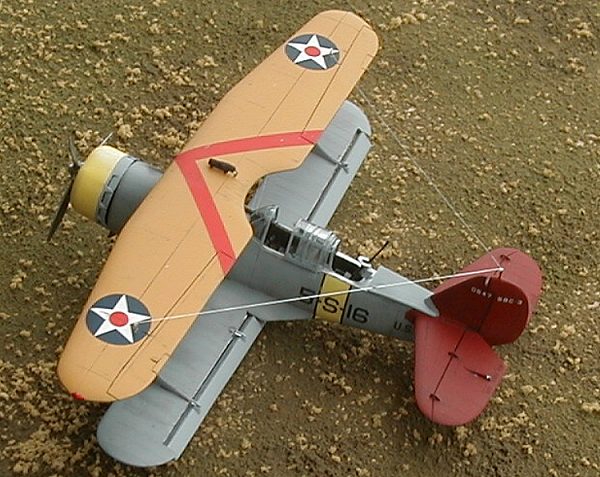
 The markings for this
Helldiver closely resemble those supplied in the kit. However, I needed a serial
number "0547" versus the "0545" of the kit; I also needed "5-S-16" instead of
the kit-supplied "5-S-11". The SBC-4 kit again came to the rescue. I removed the
trailing "1" and replaced it with a "9" from the –4 kit, inverting it to become
the required "6". For the serial number, I left the top bar of the trailing "5"
and trimmed a VERY thin strip from a white decal found in the bone yard. In lieu
of masking and attempting to paint the thin black surround for the yellow
fuselage band, I used a dry-transfer stripe from Woodland Scenes. Getting that
stripe around the compound curve of the fuselage-wing fillet was another lesson
in frustration.
The markings for this
Helldiver closely resemble those supplied in the kit. However, I needed a serial
number "0547" versus the "0545" of the kit; I also needed "5-S-16" instead of
the kit-supplied "5-S-11". The SBC-4 kit again came to the rescue. I removed the
trailing "1" and replaced it with a "9" from the –4 kit, inverting it to become
the required "6". For the serial number, I left the top bar of the trailing "5"
and trimmed a VERY thin strip from a white decal found in the bone yard. In lieu
of masking and attempting to paint the thin black surround for the yellow
fuselage band, I used a dry-transfer stripe from Woodland Scenes. Getting that
stripe around the compound curve of the fuselage-wing fillet was another lesson
in frustration.
Testor’s Model Master enamel paints were used throughout, with the exception of the Light Yellow, which was still Testor’s paint, just not from the Model Master line.
|
CONCLUSIONS |
Frankly, I could not recommend this kit to any but the most experienced, masochistic builder. Granted, it is a limited run kit, but the quality control problems evident, especially manifested in the cabane struts, lead me to not suggest this kit to just anyone. Be that as it may, until any of the mainstream manufacturers produce the between-the-wars aircraft that Classic Airframes has chosen to do, the builder has few choices. There are many that would not have experienced the difficulties that I did with this kit. I am sure that some of the problems I had were self-induced: I do not like biplanes and that undoubtedly affected my feelings while constructing this model. But as long as my uncle likes the results, the pain and frustration will be worth the effort and time. I must say that those that build biplanes, much less enjoy it, have definitely earned my begrudging respect.
|
REFERENCES |
Squadron SBC Helldiver In Action (Number 151)
Copyright ModelingMadness.com. All rights reserved. No reproduction in any form without express permission from the editor.
If you would like your product reviewed fairly and fairly quickly, please contact the editor or see other details in the Note to Contributors.
Back to Reviews Page 2025