| KIT #: | |
| PRICE: | $ |
| DECALS: | Two options |
| REVIEWER: | Michael Rohde |
| NOTES: |
| HISTORY |
In September 1931 work on the company -funded model 248 commenced with the US Army Air Corps contracting to supply engines and instruments for three prototypes with the designation XP -636. These were to become the first all- metal production fighter and the first monoplane to serve with the USAAC . The design still retained an open cockpit , fixed landing gear and externally braced wings.
The first XP- 636 took to the air on 20th March 1932 , and later completed an evaluation programme at Wright Field, where the second airframe had been delivered for static tests. On 25th April the third was sent to Selfridge Field , Michigan for tests with operational squadrons.
 Boeing
received a production order for 111 P-26 A’s, which was later increased to
136. These aircraft were to incorporate some improvements, including revised
wing structure and the addition of floating gear and radio equipment.; later
aircraft had also higher headrests to protect the pilot in a roll-over
crash.
Boeing
received a production order for 111 P-26 A’s, which was later increased to
136. These aircraft were to incorporate some improvements, including revised
wing structure and the addition of floating gear and radio equipment.; later
aircraft had also higher headrests to protect the pilot in a roll-over
crash.
The first production P -26 A made its maiden flight on January 10th 1934; the last of the first batch of 111 aircraft was delivered at the end of June 1934. The need to reduce the landing speed of the P-26 resulted in the development of trailing edge flaps which were retro -fitted to aircraft already in service , and to those on the production line.
These included the additional order of 25 of which two were P-26 B’s with fuel injected Pratt& Whitney Wasp R 1340-33 engines , and 23 P -26 C’s which had minor changes to the fuel system and carburation. Many of the A models were upgraded to model B standard. Production was completed by 12 export Boeing Model 218’s, of which 11 were going to China and one to Spain.
P-26’s were among the aircraft pitted against the aerial onslaught of the Japanese at Pearl Harbour together with machines of the Philippine Army Air Force’s 6th Pursuit Squadron. Guatemala and Panama operated surplus US AAC P 26 ‘s well into the late 1940’s.
| THE KIT |
The kit consists of 3 frames in grey plastic carrying 71 crisply moulded parts and one small clear frame holding the wind shield. Instructions are typical for Academy- printed on one fold out plan depicting 10 distinct steps on how to assemble the model. As usual, a parts locating diagram is included as well as a diagram showing how to rig the model . The drawings are easy to follow and more delicate steps like the exhaust pipe assembly are shown on a separate drawing.
Decals are supplied for aircraft serving with 94th Pursuit Squadron , Selfridge Field , Michigan 1935-36 and markings for an aircraft of the 19th Pursuit Squadron, Wheeler Field ,Hawaii 1940
| CONSTRUCTION |
 Step 1
and 2: As usual , the build begins with the cockpit. The interior is nicely
detailed and is mainly held in a natural metal finish. The seat harness is
home made with masking tape and the seat buckles were fashioned out of thin
copper wire. The fuselage shells fitted together well and little work was
necessary to deal with the seams.
Step 1
and 2: As usual , the build begins with the cockpit. The interior is nicely
detailed and is mainly held in a natural metal finish. The seat harness is
home made with masking tape and the seat buckles were fashioned out of thin
copper wire. The fuselage shells fitted together well and little work was
necessary to deal with the seams.
Step 3 and 4: Here we put the wing upper and lower shells together and clean up the seams. The engine , which in itself is quite complex due to number of parts involved ( 15 incl. cowl ring and propeller) is easy to build . One has to take care of the positioning of the exhaust stacks though. I added the ignition leads ( again made of thin copper wire) . and painted the complete assembly.
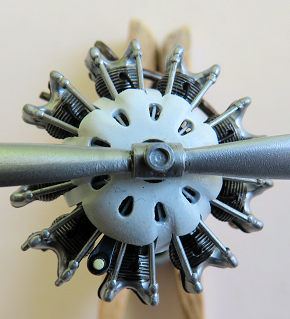 The
tricky part is dealing with the two piece cowl ring. After the engine was
ready I painted the insides of the cowl ring in chrome silver, let dry
thoroughly and then carefully glued the halfes together ,but did not yet
glue the cowl onto the cylinder heads. When the glue had set , I carefully
filled and sanded the seams. Then I glued the cowl ring into place using
super glue. The engine was then carefully masked off and put aside for
later.
The
tricky part is dealing with the two piece cowl ring. After the engine was
ready I painted the insides of the cowl ring in chrome silver, let dry
thoroughly and then carefully glued the halfes together ,but did not yet
glue the cowl onto the cylinder heads. When the glue had set , I carefully
filled and sanded the seams. Then I glued the cowl ring into place using
super glue. The engine was then carefully masked off and put aside for
later.
Step 5 and 6:
Wings ,horizontal stabilizers ,rudder and engine carrier plate were attached to the fuselage. Small ( easy to brake off) bits like the antenna masts pitot / venturi tubes and gun sight were left off to be attached later. Seams did require some putty , sanding and finishing.
Step 7, 8, and 9: Here we are given the option to add bombs and bomb carriers. Two options: either two 100lb or five 30lb bombs. I did not use this option. The last step deals with the assembly of the spatted undercarriage. The parts go together well and the fit onto the wings is good. Good enough to paint these parts separately and add them after the wings and fuselage have been painted. At this point I made sure that all the rigging attachment points were pre drilled using a fine rose head bur.
| COLORS & MARKINGS |
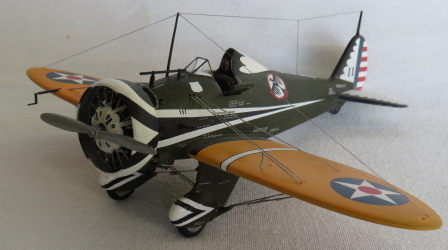
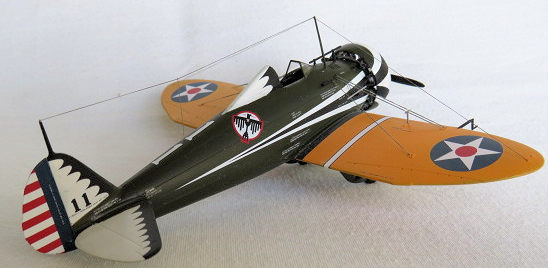
 These
aircraft had chrome yellow wings and olive drab fuselage as a standard peace
time paint scheme. Squadron leaders often had more colourful schemes to
distinguish them from. the rest of the unit. I did not use the decals
supplied because the quality of Academy decals are not good. I used yellow
Wings decals instead and the are very nice to work with.
These
aircraft had chrome yellow wings and olive drab fuselage as a standard peace
time paint scheme. Squadron leaders often had more colourful schemes to
distinguish them from. the rest of the unit. I did not use the decals
supplied because the quality of Academy decals are not good. I used yellow
Wings decals instead and the are very nice to work with.
The markings I have chosen for this model are of the 34 th Pursuit Squadron Selfridge Field Michigan 1935. Weathering was kept to a minimum since these aircraft were well maintained under peace time conditions. The rigging was ( together with the antenna masts , wind shield etc) added after painting was finished.
| CONCLUSIONS |
I can say one thing: Highly recommended. It is a very nice , very much straight forward build of this iconic fighter. The rigging and the engine assembly makes it a subject for more advanced modellers.
(Sorry about the small images. We have to play the cards we're dealt. Ed)
2
5 February 2022
Copyright ModelingMadness.com. All rights reserved. No
reproduction in part or in whole without express permission.
If you would like your product reviewed fairly and fairly quickly, please
contact the editor or see other details in the
Note to
Contributors.