| HISTORY |
LF Models 1/72 Consolidated A-11
| KIT #: | 7249 |
| PRICE: | $30.00 |
| DECALS: | One option |
| REVIEWER: | Joel Hamm |
| NOTES: | Resin with PE Brass and Vacu-formed Canopy |
| HISTORY |
Consolidated Aircraft’s A-11 was one of several variants of the Air Corps’s entry into the era of modern (post-WW I) aircraft design. They are significant for introducing all metal cantilever construction, retractable (hand crank powered !) landing gear, enclosed (sort of) cockpit, and turbo-supercharged engines (deleted in this attack version). They are most significant for demonstrating the uselessness in this type aircraft of the often unconscious rear facing gunner, at least until the Dauntless and Helldiver undemonstrated it.
| THE KIT |
 A previous build review on the BT-8 discussed the joys and challenges of
constructing cast resin multi-media kits, particularly the line of “tweeners”
(between the world wars) produced by the Czech Kora,/ LF company. This build is
a continuation of that discussion, those joys, and especially challenges. Once
again the packaging and instructions are inadequate. But for the availability of
GOOGLE images, the arrangement and placement of many components would remain a
total mystery, rather than merely the matter of conjecture they are by the
indistinctness of those images forced to be. The polyurethane castings are
sharply detailed, cleanly molded, and free of flaws; though not as free as
initial inspection suggested. Interior furnishings are provided as a
photo-etched fret. A single vacu-formed transparency is adequately clear but
heavily framed. A length of soft wire is included for a still undiscerned
purpose.
A previous build review on the BT-8 discussed the joys and challenges of
constructing cast resin multi-media kits, particularly the line of “tweeners”
(between the world wars) produced by the Czech Kora,/ LF company. This build is
a continuation of that discussion, those joys, and especially challenges. Once
again the packaging and instructions are inadequate. But for the availability of
GOOGLE images, the arrangement and placement of many components would remain a
total mystery, rather than merely the matter of conjecture they are by the
indistinctness of those images forced to be. The polyurethane castings are
sharply detailed, cleanly molded, and free of flaws; though not as free as
initial inspection suggested. Interior furnishings are provided as a
photo-etched fret. A single vacu-formed transparency is adequately clear but
heavily framed. A length of soft wire is included for a still undiscerned
purpose.
| CONSTRUCTION |
The molding of the fuselage underside as part of the wing leaves a large
opening in the belly through which the semi-completed interior can be inserted.
That removes the guesswork from positioning the floorboards and instrument
panels 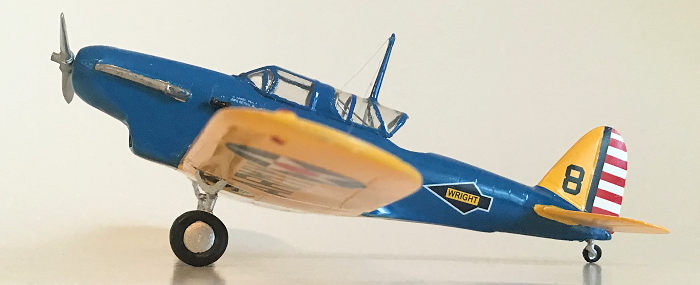 and permits priority one to be assigned to mating the body halves. That
was accomplished after first airbrushing the sidewalls chromate green. Totally
in error as photos suggest everything was left bare metal. Do the research
before loading the schpritz-gun. Only a small seam mismatch resulted on the
underside, which, thanks to the hardness of resin, was easily smoothed.
and permits priority one to be assigned to mating the body halves. That
was accomplished after first airbrushing the sidewalls chromate green. Totally
in error as photos suggest everything was left bare metal. Do the research
before loading the schpritz-gun. Only a small seam mismatch resulted on the
underside, which, thanks to the hardness of resin, was easily smoothed.
The vertical fin is molded as a separate part which allows it to be cast properly thin and sharp, but requires fairing to the fuselage with accelerated CA and sanding. After the fuselage was closed and de-seamed, the floorboards were inserted from below and the wing attached to complete major airframe assembly. The wing is engineered as two outer panels and a center section. A considerable thickness discrepancy results at the joint line, which demands more cyano-filler and 400 grit elbow grease. The same is needed at the millimeter wide wing root gaps; but when all was said and smoothed the wing emerged sans proper dihedral. Since the tail feathers were also slightly out of whack due to repeated snappings off and re-stickings back on, the problem was solved by not viewing the completed model from head on.
| COLORS & MARKINGS |
After stuffing the cockpit with foam rubber, the project was transported
to the paint shop for a disclosure / primer coat of Testors Custom Automotive
Lacquer instant drying flat white. A few strokes with 600 grit wet paper removed
all boogers,  then the dust was washed off and the model rinsed, and sprayed with isopropanol to remove any water. This last treatment revealed TCAL to be not a
true lacquer, but some acrylic concoction turned by alcohol into cottage cheese.
Everything had to be stripped, re-washed, re-dried, and re-primed with Old
Faithful Square Bottle Enamel.
then the dust was washed off and the model rinsed, and sprayed with isopropanol to remove any water. This last treatment revealed TCAL to be not a
true lacquer, but some acrylic concoction turned by alcohol into cottage cheese.
Everything had to be stripped, re-washed, re-dried, and re-primed with Old
Faithful Square Bottle Enamel.
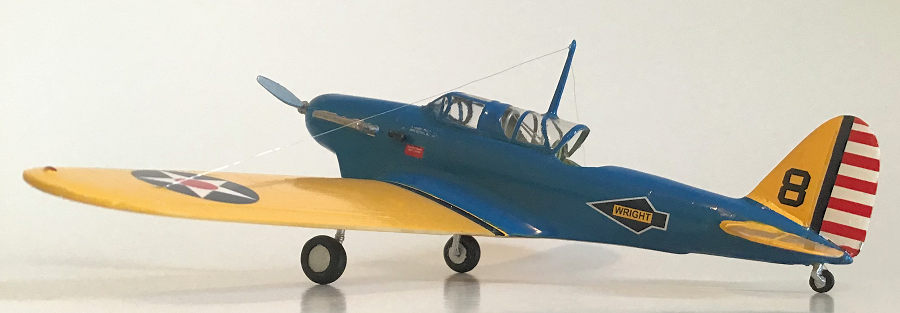
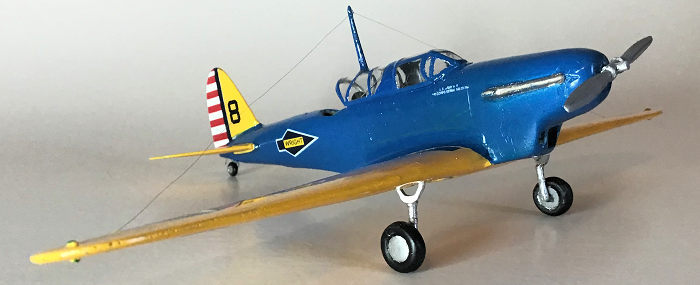
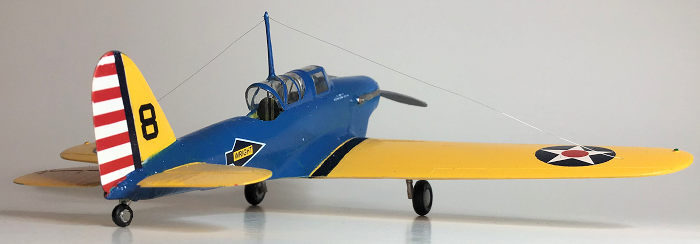
Wings and tail surfaces got covered with Model Master insignia yellow, which doesn’t look yellow enough until a few drops of tangerine orange are added for “scale intensity”. On the fuselage “Light blue #23” is called for by the painting guide. Whatever that may be, it was approximated by Testors generic blue, which looks fine in person, but due to the fluorescent lighting overly purple black in the accompanying photos.
Unlike other LF decals which must be cut from a solid clear base coat, these were individual and settled down sufficiently with the Microscale fluid duet. Solvaset helped in difficult areas, such as the fin stripes. The rudder markings on Kora’s BT-8 were short-shot so the A-11 atoned with harder to fix excess height. Proper placement of the “WRIGHT” arrowhead insignia and several stencils could not be gleaned from the black-on-black Xerox instruction sheet; and no photos of this particular specimen were GOOGLEable, so,”best guess” had to suffice. A dose of Future sealed the decals and made everything nice’n’shiney like I likes ‘em, and as airplanes were kept during this peacetime period.
| FINAL CONSTRUCTION |
Interior details were inserted through the cockpit opening. Seats must
be folded from flat PEB pieces. Various mini bending brakes can be bought from
Micro-mark et al at second mortgage prices, but sandwiching the part between two
razor blades works just fine. Which brings up another tip - For those big
sanding jobs, such as the op-cited fuselage and wing seams I re-purposed an
under-utilized Ryobi oscillating detail sander found in a shop drawer. A snippet
of abrasive 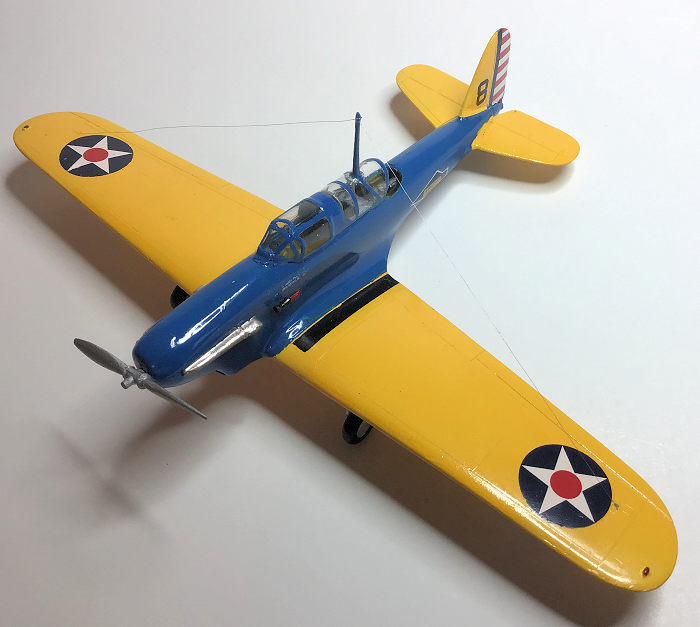 paper gets stuck to the vibrating pad with double sided foam
mounting tape. Plugging the tool into a foot-switch- controlled outlet box adds
a measure of precision.
paper gets stuck to the vibrating pad with double sided foam
mounting tape. Plugging the tool into a foot-switch- controlled outlet box adds
a measure of precision.
I had previously separated and painted the detailed brass belts and stuck them for safe keeping to a length of masking tape. Not safe enough. The Gremlins spirited them off into a parallel universe so they were replaced with pieces from that same safety tape.
The instruction drawing calls for assembling a complex rear gunner’s seat mounting out of multiple parts numbered 13 and 17. The only #17 so labeled on the parts map is the 3” length of wire; so it appears the builder is expected to cut this, bend it into twin curved rails, and affix these to the seat with sub-microscopic resin brackets, all for the privilege of having the assemblage hidden under a cockpit bulkhead. This form of unproductivity is known in hobby circles as “modeling for God”. No doubt, He Who Causes To Be What Is has more pressing concerns. No doubt, chief among them is the eagerness of those created in His image to invoke His name as an excuse to indulge in mutual annihilation. No doubt, such musings violate MM site prohibitions against religious subjects, so this assembly step was omitted and the seat stuck unceremoniously to the rear floor.
Several other parts were left unattached because they could not be found on the pour stubs.; or if they were, appeared to be amorphous casting flash. Conversely, one assembly had to be scratch built. Photos suggested a ROPS (rollover protection stricture) midway between the crew stations. A suitable arched part and diagonal braces popped out of the spare parts bin.
The stretched acetate transparency was masked, painted, separated, and trimmed using the process discussed in my “Care and Feeding of Vacanopies” article archived in MM’s How To section. I thought the semi-circular panels had to be a molding anomaly, but photos confirmed that’s how the canopy was glazed, but with much thinner framing than could be achieved with paint.
The prop was cast as a single piece, requiring delicate dissection from its pour plug. Mating the 2-part gear legs was another exercise in guesswork slash photo analysis. The U shaped strut sections are much more prominent than in real life, but slimming them down would fatally weaken them. Antenna wires from the wing tips to the canopy mounted mast completed the project - almost.
 While doing all the fiddly bits under a magnifying lamp I noticed that
the wing leading edges were heavily pitted with casting bubbles. Secure in the
sure and certain knowledge that no one would ever view the model under
magnification, I nevertheless succumbed to the irresistibility of turning good
enough into better by filling these with a heavy brush coat of paint. Except
such paint no longer existed, the bottle of left over custom mixed yellow
having, like the PEB seat belts, been stolen by The Gremlins; or more likely
mistakenly tossed into the vat of stripping fluid used for reclaiming mixing
jars. An attempt at eyeball mixing a repair batch looked acceptable in the
pallet, but disastrously mismatched when dried in place. Worse, the masking tape
carefully placed to avoid touching any decals was not carefully enough placed
and pulled up part of the wing roundel. We were now entering that well trodden
twilight zone wherein each attempt to save the model brings it inexorably closer
to placement ‘neath a frustrated foot stomp. “Yet on I went, though the trail
was bad and I felt half mad..... “. After hand repainting the boobled roundel I
wet sanded the leading edges and disguised the damage with strips of matching
(close enough) decal film recoated with future. Since for prior mentioned
reasons head-on viewing is verbotten, the repair, and the model, were declared
finito.
While doing all the fiddly bits under a magnifying lamp I noticed that
the wing leading edges were heavily pitted with casting bubbles. Secure in the
sure and certain knowledge that no one would ever view the model under
magnification, I nevertheless succumbed to the irresistibility of turning good
enough into better by filling these with a heavy brush coat of paint. Except
such paint no longer existed, the bottle of left over custom mixed yellow
having, like the PEB seat belts, been stolen by The Gremlins; or more likely
mistakenly tossed into the vat of stripping fluid used for reclaiming mixing
jars. An attempt at eyeball mixing a repair batch looked acceptable in the
pallet, but disastrously mismatched when dried in place. Worse, the masking tape
carefully placed to avoid touching any decals was not carefully enough placed
and pulled up part of the wing roundel. We were now entering that well trodden
twilight zone wherein each attempt to save the model brings it inexorably closer
to placement ‘neath a frustrated foot stomp. “Yet on I went, though the trail
was bad and I felt half mad..... “. After hand repainting the boobled roundel I
wet sanded the leading edges and disguised the damage with strips of matching
(close enough) decal film recoated with future. Since for prior mentioned
reasons head-on viewing is verbotten, the repair, and the model, were declared
finito.
| CONCLUSIONS |
Lottsa work and more than the usual quota of boogers - but ain’t she purty.
5 July 2019
Copyright ModelingMadness.com
If you would like your product reviewed fairly and fairly quickly, please contact the editor or see other details in the Note to Contributors.
Back to the Main Page Back to the Review Index Page Back to the Previews Index Page