Williams Bros 1/32 P-35
| KIT #: | 32-135 |
| PRICE: | $7.00 'used' |
| DECALS: | Two options |
| REVIEWER: | Christopher Campbell |
| NOTES: | Be prepared with a lot of patience and a well-stocked spares box. |
| HISTORY |
The Seversky P-35 was a somewhat inauspicious beginning and progenitor to what would one of the most successful aircraft of World War II, the P-47 Thunderbolt and a company that built some of the toughest warplanes ever designed, Republic Aircraft. The slogan takes a licking and keeps on ticking could aptly have been applied to the Thunderbolt and its own descendent the F-105 Thunderchief, with an honorable mention going to the F-84 family. Still, it was the humble, but ambitious P-35 that started it all.
This aircraft was the brainchild of the synergistic design team of Alexander de Seversky and Alexander Kartveli. Seversky was a former Russian Imerial Air Service ace who had defected to the United States during the Russian Revolution in 1918. Kartvelli, also a Russian immigrant, had come to the U.S. a decade later. Together they would do great things.
Seversky Aircraft cut their teeth on the SEV-3M, a dual float amphibian produced in 1933. It was fast for its time, especially for an aircraft lugging two pontoon floats, setting a speed record for its type of 179+ miles per hour. The design was modified into the SEV-3AXR, with fixed landing gear sporting exaggerated looking wheel pants that made it look not unlike a Fisher Price Toy come to life. Powered by a 420 horsepower Wright 9-cylinder engine, it was somewhat underpowered for an aircraft of its size, but quite practical. Seating two or three, depending on the configuration, it had potential as a light transport, trainer, recon platform, or even light attack platform. It was operated by the Columbian Air Force and one example even found its way to the Republican Forces in the Spanish Civil War. A variant was purchased by the U.S. Army Air Corps as the BT-8 advanced trainer, becoming the first all metal monoplane trainer in U.S. service. Seversky and Kartvelli had bigger and better plans though.
In 1935, in answer to an Army specification for a modern monoplane fight, Severky proposed the SEV-1XP, with and improved Wright engine, now producing 750 horsepower. It was advanced for its time with semi-retractable landing gear, all metal construction, tightly cowled engine, and a variable pitch, two-blade propeller. It elliptical wing platform was similar to that of the Supermarine Spitfire and Heinkel He.112.
At the same time, Curtiss was offering the P-36 Hawk, with a 850 horsepower Pratt & Whitney 1850 9-cylinder Wasp engine. Both aircraft were planned to have a top speed of 300 mph. or better, though neither ever achieved this, both falling short by around 25 miles per hour. Curtiss offered a price on the Hawk more than $5000.00 lower than what Seversky could produce the P-35 for. However, the Army somewhat unwilling to put all of their eggs in one basket, opted to buy seventy-seven P-35’s (As opposed to more than two hundred P-36’s!)
This was enough to keep the design and the Seversky company alive and opened the door to producing export variants as well. A sleek racer was produced in the form of the S2 which competed for the Bedix and Thompson trophies, winning the Bendix in 1939. It was featured as the fictional Drake Bullet in the film Test Pilot, starring Clark Gable as the dashing pilot.
 For its day,
it was a cutting edge aircraft, but like all cutting edge designs, it had its
teething problems. It was fitted with a wet wing, giving it a range of more than
1000 miles, but also an annoying tendency to develop fuel leaks. Air intake
scoops were tried in a number of positions until finally fitted beneath the
fuselage. Armament went through a number of configurations including twin cowl
mounted .30 Brownings, a single .50 Browning and .30 Browning configuration
(which must have been interesting to bore sight and synchronize, to say the
least), and either of the former configuration plus twin wing mount .50 guns
complete with bulbous wing farings outboard of the landing gear to catch spent
shells and links, lest bouncing brass damage the somewhat fragile wet wing.
For its day,
it was a cutting edge aircraft, but like all cutting edge designs, it had its
teething problems. It was fitted with a wet wing, giving it a range of more than
1000 miles, but also an annoying tendency to develop fuel leaks. Air intake
scoops were tried in a number of positions until finally fitted beneath the
fuselage. Armament went through a number of configurations including twin cowl
mounted .30 Brownings, a single .50 Browning and .30 Browning configuration
(which must have been interesting to bore sight and synchronize, to say the
least), and either of the former configuration plus twin wing mount .50 guns
complete with bulbous wing farings outboard of the landing gear to catch spent
shells and links, lest bouncing brass damage the somewhat fragile wet wing.
When all was said and done, the combat ready variant was capable of 282 miles per hour. This was respectable but given the rapid pace of aircraft development during this period, it would soon be outclassed by fighters being developed in Germany, England, and Japan, as well as new designs in the United States. It rate of climb was slower than that of the P-36 Hawk, relegating it to be an also-ran in the Army Air Corps.
Still, this stubby-looking underdog fighter was far from done. By 1939, with war clearly imminent in Europe, the Swedish Air Force was looking to modernize and replace its rapidly antiquating Gloster Gladiator and Gauntlet biplanes with more modern design. Seversky himself personally spearheaded an effort to secure a contract for a modified variant, the P-35A, with a slightly lengthened fuselage twin .30 guns fared into the cowl as well as twin .50’s in the wings and an engine now producing 1,200 horse power. The little fighter had come a long way.
When the Navy issued a new requirement for a monoplane fighter, Seversky fielded and entry in the form of a navalized P-35 variant known as the NF-1. Looking essentially like a P-35 with new and heavier gear fitted to enable it to operate from aircraft carriers, the already somewhat underpowered Seversky design was never considered a serious contender alongside the Brewster F2A Buffalo and the Grumman F4F Wildcat. However, on cannot fault Seversky for trying and making an effort to expand his market and the potential of the aircraft. Still, the sleeker designs of the competitors won out and the rest is history.
More than one hundred aircraft were ordered by Sweden where they would designated J-9’s. There they would protect Swedish neutrality throughout the war, defending their airspace. They remained front line fighters until 1947 and remained in service in secondary roles until 1952. Some were even modified into an recon variants. Initially delivered in gleaming polished metal, most were later camouflaged in a variety of schemes, including a deep green over grey, a mottled scheme reminiscent of some Italian schemes (and when parked beside a Swedish Regianne Re.2000, looking remarkably like fraternal twins), and some even sport two or three tone underside disruption schemes of black and white or black, white, and sky!
Meanwhile, troubles loomed for Seversky. His company was wrested from him in a hostile takeover by stockholders and he was forced out. Rebranded as Republic Aircraft, they would go on to produce the P-43 Lancer and soon the legendary, all but indestructible, P-47 Thunderbolt.
Yet, the story of the P-35 was still not done. The Swedes had ordered three batches of aircraft in lots of fifteen, forty-five, and sixty. Due to the German occupation of Norway, through which the aircraft were being shipped, the last order was not delivered. With the U.S. Army Air Corps desperate for modern aircraft and the P-38, P-39, and P-40 still going through their own developmental phases, the undelivered lot of sixty Swedish destined aircraft were taken over by the U.S. and redesignated as P-35A’s.
As more modern types began to trickle in, many P-35’s (if there could ever be said to have been many) were assigned to training units as advanced fighter trainers and instructional airframes. Others were sent to far flung backwater bases to bolster defenses, most notably in the Philippines where they would join even more outdated Boeing P-26’s, B-17C’s, A-27’s (a T-6 attack variant originally intended for Thailand), P-36’s and then new P-40’s, most notably at Clark Air Base. It was there that they would be blooded.
When
war came to the U.S. and the Philippines in December of 1941, the P-35 was there
to answer the call. It was, in most respects, hopelessly outclassed by the
Mitsubishi A6M2 Zero, though a number of kills of various Japanese types were
recorded. In truth, it could be said that it fared little worse than any other
U.S. type in servi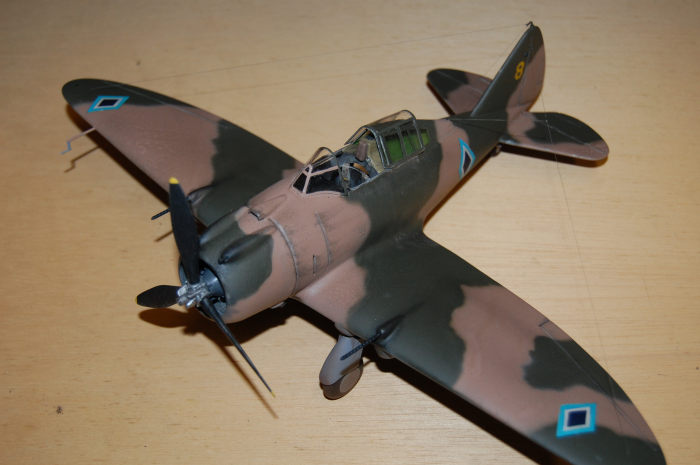 ce
during those dark days where hope was dim and resupply nil. The American and
Philippine Airmen did the best that they had with what they had and ultimately
could be said to have given a good account of themselves, fighting on to the
bitter end.
ce
during those dark days where hope was dim and resupply nil. The American and
Philippine Airmen did the best that they had with what they had and ultimately
could be said to have given a good account of themselves, fighting on to the
bitter end.
A number of P-35’s were transferred to the Philippines Army Air Corps in November of 1941. If the now U.S. Army Air Force was in a state of flux during this period as they found themselves with aircraft shown to be inferior to newer types being proven in combat in the skies of Europe and China, the Philippine Army Air Corps was in a state of near disarray. Already obsolete P-26’s were newest thing, some being rushed into service still in their U.S. yellow wings era paint with Philippine insignia hastily painted over the U.S. stars. Keystone B-9’s still served alongside Boeing P-12 biplanes and a trio of Martin B-10’s. The Seversky was a welcome addition to the stable, though arriving just as war was about to strike.
Ultimately several dozen aircraft were incorporated into Philippine service, though they were hampered by a lack of spares, adequate pilot training, and even a near lack of .50 ammunition. Some were fitted with field modifications, including bomb racks, one notably sinking a Japanese minesweeper near Luzon. Ultimately, they were worn down by attrition, the same as the U.S. aircraft.
P-35’s would serve in the U.S.A.A.F. until the end of the war, though after the fall of the Philippines they would be fighter trainers and instructional airframes. Ironically, a two seat export variant the Seversky AV81 would serve with Japanese forces in China, the only U.S. combat design to be operated by Japan during the war. Two or three aircraft (sources vary) that were retrofitted Seversky air racers also are said to have served for a time with the Ecuadorian Air Force. Additionally, a two seat variant originally intended for Sweden was produced but not delivered, also being folded into U.S.A.A.F. Service as the AT-12 Guardsman. A single example survives at Chino. A sole P-35 is beautifully restored and on exhibit at the United States Air Force Museum as well as a Swedish J-9 in the Swedish Air Force Museum.
| THE KIT |
This kit debuted from William Brothers in 1970. So far as I have been able to determine, it was their first injection molded aircraft kit. It is a mix of good and bad, mostly bad. Anyone familiar with Williams Brothers kits will know that despite being “regular production items” and their molds never having been retired, they definitely fit in the short run/garage kit category so far as the skill and technique required to finish one. The example I built was from the 1970’s, and even then, there was great deal if flash and some parts were molded with rather indefinite detail. I have not seen one of the newest boxings of the kit, so I cannot say how the molds have fared. However, having built their Martin B-10 four times in my life, the first as a child when it was released in the 1970’s, I can say that a kit purchased new in the early 2000’s seemed unchanged in mold quality from the 1970’s or 1980’s examples that I had built previously. If it is to be accepted as an example, I would suspect that the molds have fared well, despite their short run aspects.
Parts are mostly well molded, though, with a nicely, for its period, detailed engine. Panel lines are raised and the plastic, like that of all Williams Brothers kits, is on the soft side, so it is very easy to obliterate detail when filling and sanding, and there will seemingly be no end of it on this kit. The instruction sheet is a bit odd and somewhat vague and is more similar to that of a flying model kit than a static model in many respects. I highly recommend consulting any resource available on the P-35 when attempting this kit, though being a somewhat obscure type, those are limited.
 The
kit comes with most of the parts to build either a standard U.S. Army P-35 or
the S2 Air Racer, to include two completely different canopies and several
versions of carburetor air scoops. Decals are provided for the air racer as well
as the 17th. Pursuit Squadron.
The
kit comes with most of the parts to build either a standard U.S. Army P-35 or
the S2 Air Racer, to include two completely different canopies and several
versions of carburetor air scoops. Decals are provided for the air racer as well
as the 17th. Pursuit Squadron.
Interestingly, all Williams Brothers kits that I know of come with optional flexible rubber tires and injected wheels and tires. I have only chosen to use these once, on the B-10 that built decades ago (I was ten years old and real rubber tires were cool!). These reputedly have a reputation of cracking with age, or in some cases with other manufacturers, eating the styrene to which they are attached. I find it noteworthy that those on my B-10 still look the same after around forty years. While I do not advocate them as such, I cannot deride them either.
The box says “recommended for experienced modelers.” Take that statement to heart. This was the toughest of their kits that I have dealt with. I have only seen one of these completed with my own eyes on two other occasions. One was quite interestingly and unusually in Australian markings. I have never been able to find any reference to this aircraft. It wore Australian roundels with what looked almost like civil registry on the wings on a tan/brownish scheme over neutral grey undersurfaces with a yellow cowl ring. This seemed so very specific that I suspect that it was an actual aircraft, though I have failed to uncover a story behind it. (I suspect that it may have been flown from the Philippines to Australia during the frenetic days of early 1942. A wide variety of types not officially known to have been in Australia seem to have appeared there during this period, but that is something of a different story.)
Test fitting is the rule with this kit. Still, no matter how much one may test fit and tweak parts, be prepared with the filler and sandpaper. It is far from unbuildable, but it is a daunting task. I abandoned this build in general frustration more than once.
| CONSTRUCTION |
I started this build in 2014. I just finished it six years later. Part of this was due to caring for aging parents in their final days. The rest was due to the rather labor intensive build that made me condemn it on the proverbial “shelf of doom” for years at a time. I went through three iterations of what version of the P-35 that I wanted to build. Initially my plans were for a pre-war bird in U.S.A.A.C. colors. However, I quickly became disillusioned with this notion upon seeing the ill fit of the major parts and the sanding and filling that would be required coupled with the difficultly of preparing it for a suitable condition to take a polished natural metal finish.
I next planned to build a Swedish J-9 in some variation of camouflage. This remained the plan up through its last interment on the shelf of unfinished kits. When I decided to take it again, I became intrigued by the idea of a Philippine Air Corps aircraft, having recently become aware of them. That was ultimately them the final form that you see today.
I started this build with the engine. It was relatively straight forward, with only a minimum of cleanup required compared to some of the parts. The engine went together in the manner comparable to that of the Hasegawa 1/32 Yellow wings aircraft. There are separate cylinder jugs, which will require some cleanup and a two-piece cylinder block. This went together with little difficulty though.
The block and hub housing were painted in Testors square bottle flat grey while the pushrod tubes were finished in Testors Chrome. The cylinders were painted in Testors Aluminum and accented by dry brushing with Model Master Anodonic Grey and given a wash Tamiya Smoke thinned with alcohol.
Then I began with the cockpit an interior. All cockpit walls and interior walls and components were painted with Testors Aluminum and given the same Tamiya Smoke wash. I did not like the kit seat, as it did not look like the photos that I had seen in the Squadron Signal Mini In Action book or those I had seen online. I fished one out of the spares box, though I do not know where it orginally came from. Seat belts were made from Buff painted Tamiya tape and fitted with generic 1/32 U.S. photo etch buckles. The control column, pedals and machine guns are suitable and used straight from the box.
A lot of test fitting should be used when fitting the cockpit components and there will still be a lot of tweaking necessary. There are no positive attachment points throughout most of this model.
If there was a gunsight included in the parts, I never found it or a notation of it in the instructions. The gunsight that I used is a 1/32 Photo etch Bren Gun ring type.
The kit control main and secondary instrument panels were used, painted flat black and accented by dry brushing with silver with some details picked out in red. Gauges were each given a drop of Micro Krystal Clear to represent the glass. However, the kit features a generic blob of plastic for the offset instrument cluster which I replaced with something gleaned from the spares bin that was the right shape with and given the same treatment as the main panel
One of the n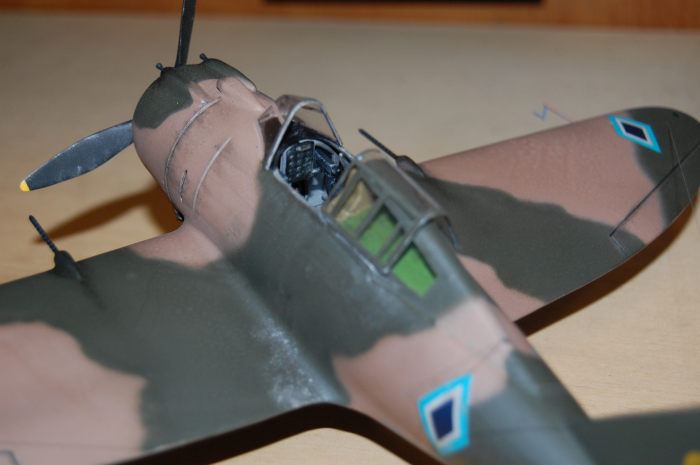 umerous
oddities of this aircraft is the secondary passenger seat in the fuselage. There
is no provision for this in the kit or the rather larger picture window in the
door to this compartment. The door is scribed into the fuselage, but there are
no instructions as to fitting it out properly or kit parts for this or the
passenger compartment. After a tedious, careful scoring with an X-acto knife, I
managed to remove the section where the window would be. The window itself was
made from, of all things, a cellphone screen protector.
umerous
oddities of this aircraft is the secondary passenger seat in the fuselage. There
is no provision for this in the kit or the rather larger picture window in the
door to this compartment. The door is scribed into the fuselage, but there are
no instructions as to fitting it out properly or kit parts for this or the
passenger compartment. After a tedious, careful scoring with an X-acto knife, I
managed to remove the section where the window would be. The window itself was
made from, of all things, a cellphone screen protector.
Supports for the seat were scratchbuilt and another seat was again taken from the spares bin, this time from a Revell Bf-109G kit slightly older than this one. A round oxygen bottle wa painted in Testors Cobalt blue and added to the side of this compartment along with a generic box for a first aid kit as well as another miscellaneous box mounted to the fuselage wall, as it simply looked too bare inside for my tastes.
Seatbelts were added, though for this seat they were lap type only with similar photo etched buckles painted in Dark Anodonic Grey. Again, a wash based on Tamiya Smoke was used for some weathering and accenting throughout.
Then I closed the fuselage, or tried to. While it went together okay, it was clear that there would be some filling and a lot of sanding. After the gaps had been filled and sealed with CA gap filling glue, all of the seams were sanded smooth.
The engine and main cowl assembly were fitted and went on without any problems. Then the cowl ring was added and it was notably oversize. I should have trimmed this down some in advance. However, by this time I was getting confident enough in the build that I failed to test fit and paid the price. There was a lot of careful sanding in order to pare this down to size. However, this part is very thin on the front, and by the time that I had the right shape, it was almost like paper and was damaged and repaired on four occasions before I finally got around to the painting.
By this time I was fairly happy with the results so far, though it had been time consuming. Then I turned my attention to the wings. These are composed of six main components, upper and lower halves of the left wing, right wing, and center section. The more I looked at it the less I liked it and the more I started to dread it. This was the point at which the build was abandoned for a while.
When I got back to it again I cleaned up the six main sections and assembled each one individually, which again entailed a lot of sanding. Test fits of the three components revealed that the fit was not good and alignment was going to problematic. What to do?
There were not a lot of options here, so ultimately I plunged into it headlong and hoped for the best. Each wing was attached to the center section using CA glue and aligned as much as possible before given a shot of Insta Set before it could move. This was where the worst gaps in the kit revealed themselves, more than one eight of an inch in places!
Once again, rather disgusted, I set it aside for several years during which I worked on some more mainstream models and was also preoccupied with caring for my father and mother during the last three years of their lives. The last thing that I needed was to deal with so frustrating a build when I needed the escape of modeling to relax me.
 Finally, in
the winter of 2019, I built series of 1/72 and 1/48 scale Brewster Buffalos,
contemporary to the P-35 and equally esoteric. Finally, my thoughts returned to
this long languishing kit, and it landed on my workbench once again.
Finally, in
the winter of 2019, I built series of 1/72 and 1/48 scale Brewster Buffalos,
contemporary to the P-35 and equally esoteric. Finally, my thoughts returned to
this long languishing kit, and it landed on my workbench once again.
It was time to address those horrific wing joints. While putty would be most logical choice for such large gaps, I was more concerned with the strength of the joints and cracks eventually emerging. Instead, they were gradually filled with gap filling CA glue over several sessions until I was a satisfied that they were filled. This was followed by quite a number of lengthy sessions sanding these fills, then refilling any small gaps and pinholes with thin CA glue and giving it some light sanding to finish this out.
Once again, test fits revealed that the wing to fuselage fit was less than perfect. However, I was determined to press on an finish this beast at last. The instructions note that a “Flap Backing Strip” is needed, which was made from sheet styrene.
The wing was secured to the fuselage with the same gap filling glue, followed by more filling, more sanding, and more difficulties. The flap fit was mediocre and required addition judicious filling and sanding, though with thinner glue.
Finally, around three weeks after resuming work, it now looked more or less like a P-35. I now fitted the aft landing gear farings which after the standard cleanup went on surprisingly well with little filling. However, I need to added the shell collection farings under the wings which were not included in the kit.
Once again, I delved the parts bin and ultimately settled on two wing tanks from a 1/48 Mania Ki.27 that were reshaped and fitted into place. Upon completion of the build, I decided that these were a little too shallow in depth towards the leading edge of the wing. In retrospect, I probably should have made a mold and vacuformed a new part from scratch. Still, they do look fairly close.
I also needed to make the machine gun farings for the cowl guns and the wings. The former were made from halves of 1/72 Vietnam era streamlined 1000 lb bombs. The wing gun farings were sourced from 750 lb bomb halves. All were carved and sanded enough so that only a minimal amount of filling and sanding were required once glued in place. However, it was during the fitting of the cowl farings that I damaged the paper thin cowl ring and had to repair it with more CA glue and careful sanding. All cowlings were drilled out with a pin vise in preparation for installation of the guns once the painting and decaling was complete.
One of the least troubling parts was fitting the horizontal stabilizer. These fit well and there was only minimal filling required. The same cannot be said for the cowl airscoop or the ventral scoop. Yet, at last, it was ready to paint.
| COLORS & MARKINGS |
As mentioned, I had gone through a number of ideas on how I wanted to paint the aircraft. By this time, I was intrigued by the idea of a Philippine Air Corps aircraft. Now I just had to find some pictures.
I scoured every book that I had with a reference to the P-35 with no luck. The same for searching for photos or color plates on the internet; I could find nothing. Yet there were several references to their use, some with a bit of operational detail. Yet, no pictures could be found.
I also tried extensive searches on Philippine aircraft of this period, P-35’s in the Philippines, and just general references to the Philippine Army Air Corps. Still, there was nothing.
I was not entirely surprised, as these were rather chaotic days and photographing aircraft cannot have been a high priority. I suspect there must be some photos somewhere, but they eluded any searches that I tried. Then again, it would not be the first aircraft to have never been photographed or any photos that were taken having long been lost somewhere.
Ultimately, I decided that they were very likely painted in the same manner as the Philippine P-26’s. The colors used in these also are a matter of some debate. Some sources indicate that they were Olive Drab and Tan over Neutral Grey. Others indicate that they were something close to British Dark Green and Dark Earth. Yet others indicate that they were Olive Drab and some color similar to the same Dark Green.
Illustrations and builds that I have seen of these P-26’s seem to lean more towards a slightly darker tan color, and not quite like any of the aforementioned colors. I tested several tans and finally settles on Model Master Italian Sand as a very close match. The Green seemed more green than Olive Drab and I settled on Model Master Green Drab instead.
The all the open holes in
the kit were filled with damp paper towels and the fuselage window was masked
with Tamiya tape. The undersides were then sprayed in Model Master Neutral Grey.
After drying overnight, the upper part of the kit was sprayed freehand with
Italian Sand. Once dry, the Green Drab was freehanded on using the pattern from
the Hasegawa P-2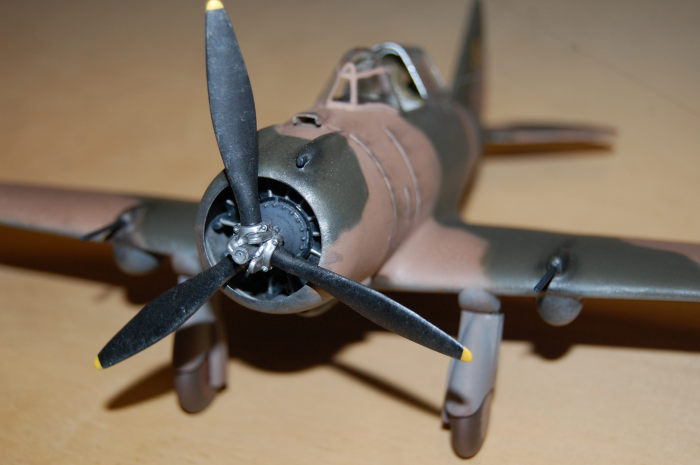 6
instructions as a general guide.
6
instructions as a general guide.
The forward landing gear farings were assembled and painted as well as the landing gear and wheels while I gave this a full day to dry and cure. The next day the gear and farings were installed in another somewhat surprising trouble free operation. At this point it was given a coat of Testors rattle can Gloss.
While waiting for this to dry, I turned my attention to the propeller. The blades were removed from a sea of flash, trimmed, sanded and painted. While dried I worked on the hub. This is a two piece affair with no alignment points. To my surprise, I managed to get it right on the second try and painted it in chrome silver.
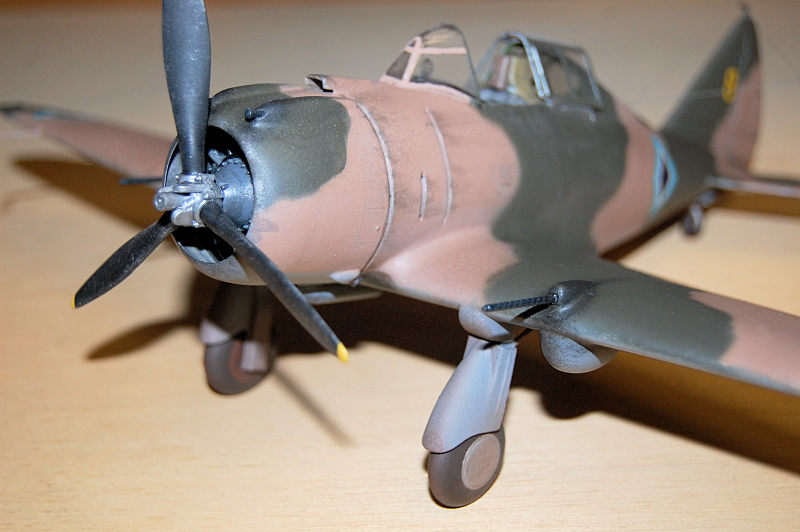
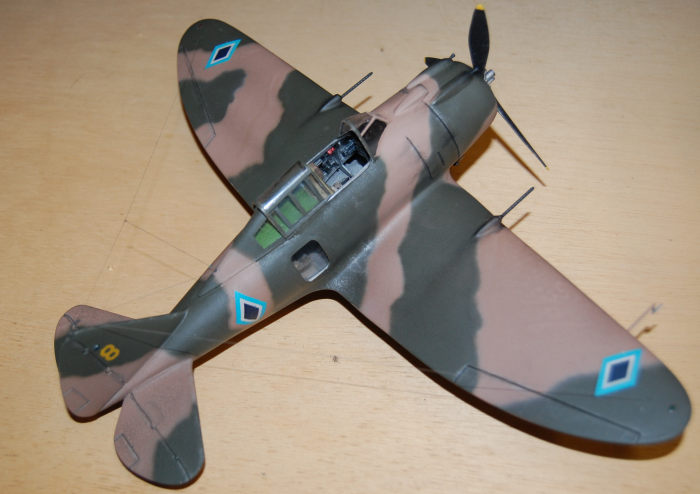
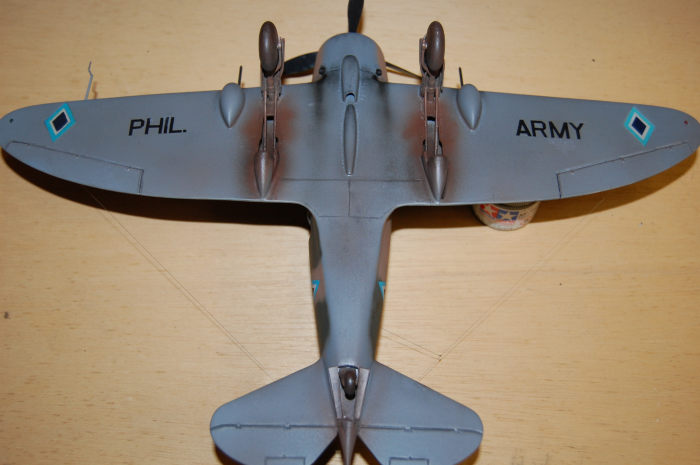
The following day, I began decal work. The Philippine diamond insignia came from a Hasegawa P-26 kit. These have no white in the center of the three colors stripes and notably translucent. This was address by using one as a template to cut some plain white decal paper to be used as backing for them. Once these white diamonds had been applied, the Hasegawa decals were settled onto them and sungged down with Solvaset.
Following the pattern of the P-26’s, a simple tail number, a yellow “8” was chosen from the decals spares file and added. The Phil. Air Corps was sourced from a spare sheet from a Hobbycraft P-26 took quite a lot of Solvaset to get it to settle without silvering, though it worked in the end.
After the decals had dried, the area aft of the cockpit that would be beneath the rear canopy was painted in Green Chromate and the area immediately behind the windscreen in flat black. At this point the ring gunsight was added and the headrest painted and fitted.
| FINAL BITS |
The entire aircraft was given a coat of Testors Dullcote from the rattle can. Once dry, more Tamiya Smoke was was applied to various areas to enhance surface detail. Various areas were dry brushed with Aluminum and Flat Black.
Brass Master Model 1/35 Browning M-2 .50 machine guns barrels were used for the wing guns and a pair of appropriate looking barrel stubs were sourced from the parts drawer for the cowl guns. These were all painted sprayed in Testors Gun Metal and glued in place.
More weathering was then by dry brushing thinned Flat Black for muzzle blast and some Dark Anodonic Grey used to accent a few points here and there.
Tamiya smoke was airbrushed for exhaust staining. It was also very lightly applied over the gun farings. Additionally, Tamiya N.A.T.O. Brown was thinned and carefully airbrushed in and around the tires, landing gear, and wheel wells to simulate accumulation of dirt from unpaved strips, which were, aside from Clark Field, mostly the rune of the day in the Philippines in 1941-42. While this dried, I turned my attention back to the propeller.
I had a feared that the bladed were going to be difficult at best to align and fit correctly into the hub. This is the only part of the kit that I can say fits really well. If the hub is assembled correctly, the blades fit at their proper alignment and angle perfectly. Satisfied with this, I gave the blades some dry brushing with Aluminum to show wear and was quite pleased with the overall results.
At this point I gave it another coat of Dullcote. The kit was now all but finished. Still there was the matter of fitting the canopy.
I had feared that this would be another ill-fitting part, but after a little trimming and sanding and acceptable fit was achieved. Parts were masked with Tamiya tape and painted. Once dry, the interior framing was brush painted with a fine brush.
The front windscreen was then glued in place with G-S Hypo Watch Crystal Cement. The aft section was glued with a small amount of CA glue. Once these had dried, white glue was used to fill the minor gaps, applied with a fine brush. After a little touchup painting with a fine brush, the sliding canopy was glued in place.
Now the final step was the position lights and radio aerial. Position lights were painted with Tamiya Clear Red and Green on the upper and lower wings. The tail maker lights were painted with Tamiya Clear Blue.
Some stretched sprue was fitted to the top of the vertical tail and painted at which point the radio aerials were made using fine black E-Z Line. This is very easily glued in place with a minuscule application of CA glue. It stays taught and does not break easily. I highly recommend it over anything else yet discovered for rigging wires, aerials, and so on. With this, it was finally done.
| CONCLUSIONS |
Virtually nothing about this kit could be said to be easy, or even particularly well designed by either modern standards or those of the era from which it hails. Still, it can be built up to a quite decent representation of a Seversky P-35 and most of its variants and close relatives, if one wants to go through some serious conversion work. In many cases, I would rather build a dog of a kit to get something that I wanted, generally the unusual, than one of the shake and bake variety kits of subjects done so many times that one really has to wonder why manufacturers keep releasing kits of some of these aircraft.
I did not track my total working time on this kit, but it was one of the higher hour jobs that I have done. I easily could have completed a dozen average 1/48 kits in the amount of time that it took to build this one. Still, would I do it again? Probably.
In all seriousness, I would not deter any modeler with some skill and experience with short run kits from taking this one on. Just know what you are getting into and expect things to take time, work, and outsourcing for some parts. Overall, it was no worse than some of the short run kits I have built in smaller scales, just bigger and owing to the necessity of more details being added, more tedious. I have another one of these kits waiting in the wings to be converted to a Seversky SEV-3AXR in Spanish Republican colors to satisfy my Spanish Civil War fetish and prove that there was actually something uglier in Spain than the Ju.87A, for which it will make a nice shelfmate.
| REFERENCES |
Squadron-Signal Mini In Action No.1, P-35, ISBN 0-89747321-3, 1994, Squadron Signal Publications
Scale Modeler Vol.11, No.4; April/1976, Challenge Publications, Inc.
Scale Modeler Vol.9, No. 11; November/1974 Challenge Publications
Flying Colors by William Green & Gordon Swanborough, ISBN 0-7651-9212-8, 1997, Salamander Books
https://en.wikipedia.org/wiki/Seversky_P-35
5 May 2020
Copyright ModelingMadness.com
If you would like your product reviewed fairly and fairly
quickly, please
contact
the editor
or see other details in the
Note to
Contributors.
Back to the Main Page
Back to the Review Index Page
Back to the Previews Index Page