Matchbox 1/72 SBC-4 Helldiver
| KIT #: | PK-35 |
| PRICE: | $10 from the Swap Shop |
| DECALS: | Two options |
| REVIEWER: | Joel Hamm |
| NOTES: | OOP but easy to find. |
| HISTORY |
Ever since as a kid I had an
Aurora 1/48 (?) unpainted, unrigged SBC on my dresser, the Helldiver has been
one of my favorite aircraft. Its coloration and brawniness epitomize the “Yellow
Wing ‘Tweener” era. Unfortunately, its limited performance in all roles
 to which it was assigned also
exemplify the lackadaisical level of combat preparedness at which many US
weapons systems between the world wars were procured .
to which it was assigned also
exemplify the lackadaisical level of combat preparedness at which many US
weapons systems between the world wars were procured .
Printed and Web Site accounts differ on the details of the Helldiver’s service record, so the reader may select his own authority. Probably the most accurate, certainly the most exhaustive, is Squadron/Signal Publications’ “Helldiver In Action softcover, which is out of print but fairly findable.
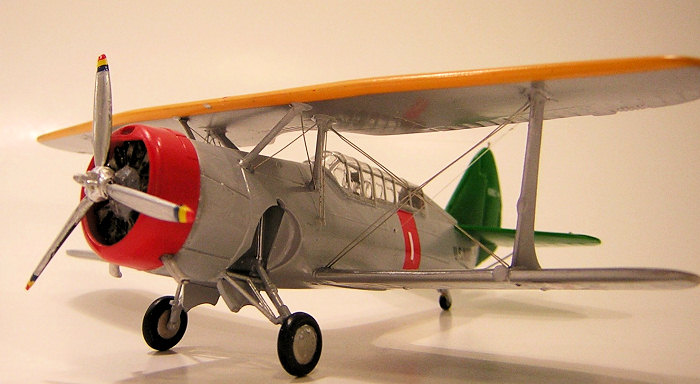
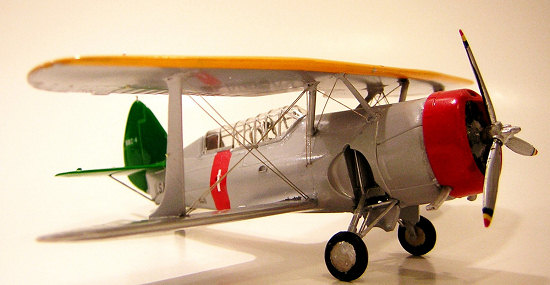
The Helldiver was produced in two major variants: the under- powered SBC-3 and the not-quite-so-under-powered SBC-4. Externally they are distinguishable by the latter’s larger, scooped cowl, straighter underbelly, and slightly taller fin.
| THE KIT |
1/72 Helldivers were kitted by Heller and Matchbox. Affection for this airframe compelled me to try each rendering, starting with what I wrongly assumed would be the easier “fall together” British version. MB’s traditional optically perfect and flawlessly fitting , if excessively framed, single piece canopy would allow for some cockpit scratch-detailing; except that this issue featured a sectioned, rough, cloudy, and ill fitting – though still heavily framed - semi-transparency. Capping the disappointment, the kit I had bought through the Swap Shop Forum was missing the windshield.
 Disaster would be avoided,
though, since the spares collection held a Clearvax canopy from a US Navy
collection; or if that did not fit, the Heller’s hood could be vac-copied.
Neither option was fault-free. The store-bought vacanopy was molded in sections,
intended to be posed open. Joining these and framing them in my preferred closed
position would be a tricky chore. Several attempts failed at casting a male
mold, separating, then rejoining the sections sans spacers. By the time I was
willing to try carving up the original Clearvax, it no longer was very clear or
in good enough shape to mess with.
Disaster would be avoided,
though, since the spares collection held a Clearvax canopy from a US Navy
collection; or if that did not fit, the Heller’s hood could be vac-copied.
Neither option was fault-free. The store-bought vacanopy was molded in sections,
intended to be posed open. Joining these and framing them in my preferred closed
position would be a tricky chore. Several attempts failed at casting a male
mold, separating, then rejoining the sections sans spacers. By the time I was
willing to try carving up the original Clearvax, it no longer was very clear or
in good enough shape to mess with.
The Heller kit canopy could not be used as-is for a re-vac mold because it was shorter in height than the Matchbox cockpit opening. Checking the “In Action” reference suggested that the French molders got the more accurate dimensions, though they gave the windshield section a too prominent “forehead”. (It should have a flatter, more “Neanderthal” slope.) Since I had already built up and painted the main airframe, raising the cockpit ramparts with strip stock and putty would be a one-step-forward-too-many-steps-back proposition.
I ended up embedding the Heller canopy into a vertically enlarged block of water based wood putty (Durham’s Rock Hard – my favorite); then forming a female mold around this using Alumite 2-part putty. Into this I poured casting epoxy, which, when hardened, was tweaked to appropriate shape. This male, in turn, was set on the vacu-former box and used to melt-suck an almost perfect canopy. The “almost” part meant re-filling it with Durham’s and meticulously sanding the base down to match the stepped cockpit edge. (q.v. my How-To article somewhere on the Techniques Forum).
 After achieving a truly exact
fit, framing with Pactra Trim Tape and coating with multiple Future layers
re-added a smidgen of height. Reciting the mantra: THE ENEMY OF GOOD IS
BETTER, I decided to quit while still ahead, forgo further sanding, fudge any
gaps with caulking (aqueous polyurethane) and pretend not to notice the slight
miss-match evident only where the aft edge meets the turtle back.
After achieving a truly exact
fit, framing with Pactra Trim Tape and coating with multiple Future layers
re-added a smidgen of height. Reciting the mantra: THE ENEMY OF GOOD IS
BETTER, I decided to quit while still ahead, forgo further sanding, fudge any
gaps with caulking (aqueous polyurethane) and pretend not to notice the slight
miss-match evident only where the aft edge meets the turtle back.
This multi-mold process seems like more work than the kit was worth; but Virginia’s first blanket of “wintry mix” was covering the yard, gardens and roads, and with The Frau off on business (she is yet to equal my blissful state of retirement) little alternative diversion suggested itself, save contemplation of the piles of dishes in the sink, heaps of laundry threatening the Whirlpool, and coating of dust and dog hair accreting everyplace else.
| CONSTRUCTION |
Well, I sorta skipped right over that, but as mentioned, Matchbox kits are cause for writer’s block on this subject. Details worth mentioning:
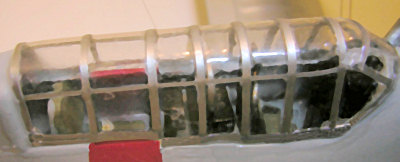 Cockpit furnishings were
deferred until the canopy was ready to go on. The kit’s simplistic seats and
stuff were replaced with whatever better could be scrounged, dolled up with PEB
belts, radio faces and doo-dads, then, except for the prominent Direction Finder
loop, obscured by the not-quite-optical-quality transparency.
Cockpit furnishings were
deferred until the canopy was ready to go on. The kit’s simplistic seats and
stuff were replaced with whatever better could be scrounged, dolled up with PEB
belts, radio faces and doo-dads, then, except for the prominent Direction Finder
loop, obscured by the not-quite-optical-quality transparency.
Rigging was done with .05mm soft bead stringing wire CA’d into holes drilled in wings and fuselage. .
Molded-in cabane struts meant to facilitate top wing attachment ended up doing just the opposite. Aligning all six struts with their holes is impossible. One approach is to leave the interplane struts off until the two wings are firmly mated by the cabanes, then snap them into place. The reverse procedure works better. Cut away the cabane struts entirely. Join the wings by the two interplane struts, then replace the cabanes with more accurately scaled lengths from the scrap heap.
The kit engine was a pretty sorry embossed button integral with the firewall. A more realistic “Engines’n’Things” resin replacement emerged from the spares bin.
| COLORS AND MARKINGS |
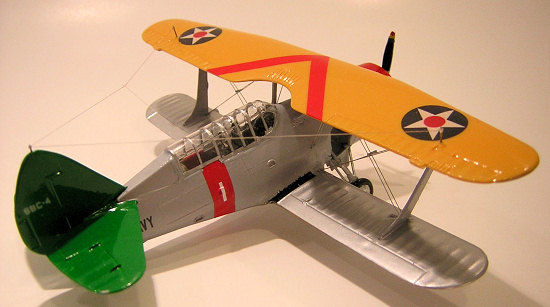
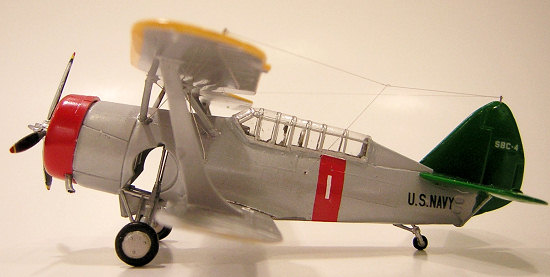
 The epitome of naval aviation’s
Golden Age had to be clothed in full Technicolor splendor, at least as far as
the spare decal trove would permit. The scheme was taken from the In Action
book’s back cover, which was supported by web photos of the apparently same
actual aircraft. Minor discrepancies popped up, such as the color and placement
of the tail codes. I went with the actual airplane, though it is likely a
reconstruction bearing inaccuracies.
The epitome of naval aviation’s
Golden Age had to be clothed in full Technicolor splendor, at least as far as
the spare decal trove would permit. The scheme was taken from the In Action
book’s back cover, which was supported by web photos of the apparently same
actual aircraft. Minor discrepancies popped up, such as the color and placement
of the tail codes. I went with the actual airplane, though it is likely a
reconstruction bearing inaccuracies.
Fuselage band and wing chevron were painted on (Model Master red enamel) then masked over. Aluminum lacquer on the metal surfaces was suitably faked with a mixture of silver and white enamel. Doped fabric surfaces were treated, as appropriate, to Floquil old silver, and Model Master chrome yellow. Tail was Testors square bottle green. Future sealed it all for the future.
| FINAL BITS |
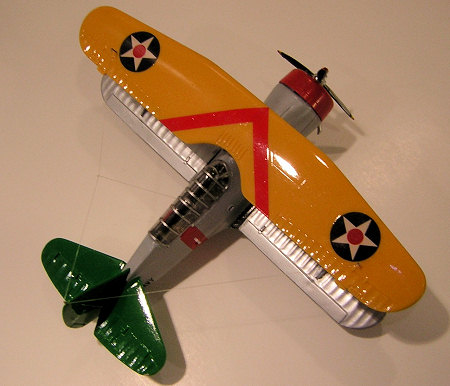 Antenna wire of “invisible
thread” strung between wire masts. Exhaust stacks made from curved and flattened
snippets of aluminum tube. That’s all, Folks.
Antenna wire of “invisible
thread” strung between wire masts. Exhaust stacks made from curved and flattened
snippets of aluminum tube. That’s all, Folks.
| CONCLUSIONS |
Discounting the wrangling to replace the missing windshield, not a bad replica for a Matchbox kit. Next project is the Heller version. SBY for a review.
January 2008
Copyright Modeling Madness.com. All rights reserved. No reproduction in any form without express permission from the editor.
If you would like your product reviewed fairly and quickly , please contact the editor or see other details in the Note to Contributors.