| KIT #: | 72043 |
| PRICE: | $24.95 MSRP when new |
| DECALS: | Four options |
| REVIEWER: | Joel Hamm |
| NOTES: | May be difficult to find. |
| HISTORY |
Another Ememer has posted a review of the Hawk III kitted by Merlin, (http://modelingmadness.com/reviews/preww2/fordhamhawk3.htm) so I won’t repeat the history that he has already covered. Besides which, GOOGLE can dump in your lap endless pages of history on any aircraft, some of which may actually make sense.
| THE KIT |
MPM has molded a trio of FW-190’s,
an ME-109, and a few 262’s, but generally they stick to subjects bypassed
by the major leaguers (not to say
that MPM is by any means a minor league player). Happily, they often venture
into the realm of US “Tweeners” (between the wars), the most literally and
figuratively colorful era in aviation. Quality consistency is not a trait for
 which
they are known, probably because they are a consortium of several mold makers
and injectors, and box kits from many sources.
which
they are known, probably because they are a consortium of several mold makers
and injectors, and box kits from many sources.
On a 1-10 scale of what they have produced, the Curtiss III rates about a 7. No particular trait deserves labeling as a shortcoming, but the overall impression is of a bit less than the Hasemiya crispness that some of their releases have exhibited. No flash, sink holes, or ejector marks mar any of the main constituents; but the small parts such as landing gear legs and struts require cleaning up. MPM should consider resorting to he practice of Merlin et al who included lengths of extruded struts and rod for builders to “roll their own”. Since each part on a sprue supposedly adds considerably to production costs, this would benefit company and builder. Packages of extruded struts of various sizes used to be marketed by Plastruct (“Plastruct extruded strut stock” – try saying that three times quickly without moistening your listeners), but haven’t been available for several years. Rods and strips are readily available under the brand name “Evergreen”.
The kit features no resin, a medium which would have helped the engine, prop and a few other fiddlies. A small PEB fret is provided, but I didn’t realize it until the kit was completed, the metal being hidden in a bag with an unused decal sheet. Mox nix. Seat belts were the only applicable pieces and the ones made of masking tape are Gudenov.
| CONSTRUCTION |
 The
parts breakdown of this bipe encourages painting as separate pieces the
fuselage, wing panels, tail pieces, and cowl; so the only parts that went
together were the fuselage halves connected to the lower wing. Anchor and
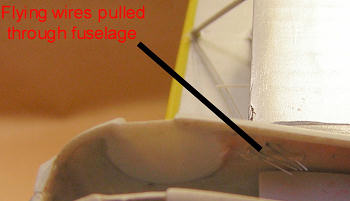
pull-trough holes for the rigging get drilled at this stage.
The belly panel is a separate piece that is best left
off to facilitate rigging. The flying wires can be drawn through holes drilled
in the wing roots, then tensioned and fastened from inside the fuselage.
Before painting, test fit the belly pan and tweak the
seams smooth to avoid later messing with the paint. job.
The
parts breakdown of this bipe encourages painting as separate pieces the
fuselage, wing panels, tail pieces, and cowl; so the only parts that went
together were the fuselage halves connected to the lower wing. Anchor and
pull-trough holes for the rigging get drilled at this stage.
The belly panel is a separate piece that is best left
off to facilitate rigging. The flying wires can be drawn through holes drilled
in the wing roots, then tensioned and fastened from inside the fuselage.
Before painting, test fit the belly pan and tweak the
seams smooth to avoid later messing with the paint. job.
One minor accuracy issue should be corrected at this point. The rearward location for fixing the cabane strut to the fuselage should be filled and re-drill 2 or so silly millimeters toward the nose. Otherwise, the strut provided is too short and the rake is at too sharp an angle. While you have the Dremel tool cranked up, chuck in a small ball burr and deepen the locations for struts and aileron rods.
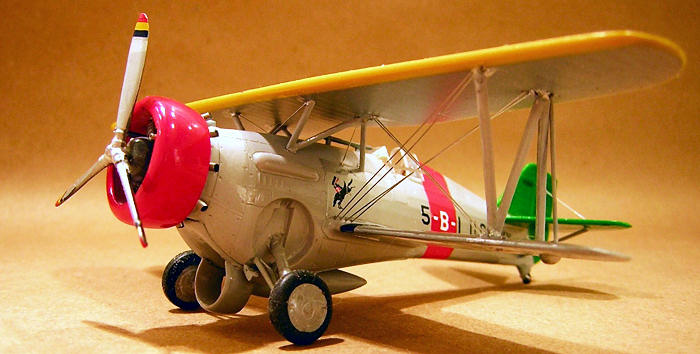
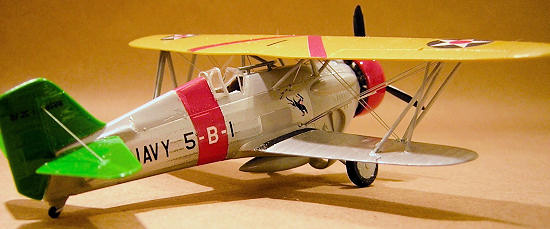
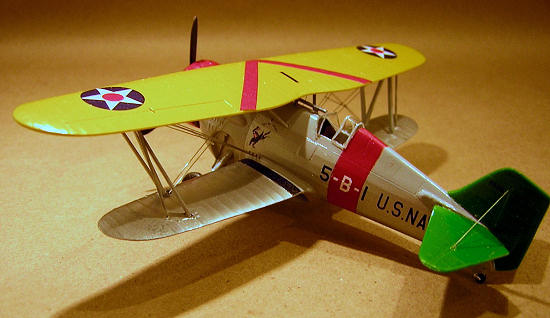
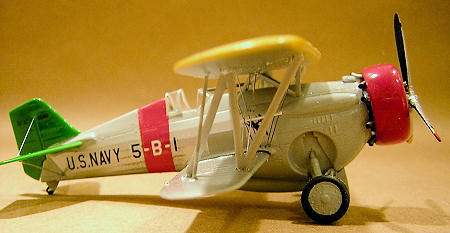
| COLORS & MARKINGS |
“Fabric” portions of the wing and fuselage were painted with Floquil Bright Silver, which is no brighter than their Old Silver. Everything else was Testors little square bottles or mixtures thereof. The fuselage band was painted on, since no decal is provided, and I preferred not to take my chances struggling with one from an old Microscale sheet.
The kit was originally boxed
with markings for one Chinese and one Royal Thai aircraft.
As an afterthought, a separate
sheet and diagram are tossed in for the subject USN yellow winger, and for
another foreigner – I forget,
something with pictures of
 elephants
on the wings. Not my cup of Lipton, but if anyone wants these oddball markings,
throw me an e-mail with your postal and I’ll unload all sorts of non-US decals
that have accumulated.
elephants
on the wings. Not my cup of Lipton, but if anyone wants these oddball markings,
throw me an e-mail with your postal and I’ll unload all sorts of non-US decals
that have accumulated.
In decaling the upper wing, I made my usual boo-boo of thinking they didn’t look quite perfect and doused them with Micro Sol. The left side of the wing snuggled down as if spray painted; the right crinkled and dried that way. Something to do with the alignment of Saturn’s moons. Subsequent slatherings with every setting fluid in the arsenal flattened them out, but not enough for an otherwise booger-free build. It took 6 strippings with Easy Lift-Off and 7 repaintings to get an acceptable finish. Replacement markings eventually emerged from the spares box.
Roundels on the lower wing were deferred until post-rigging, so the insignia could hide the holes though which went the landing wires. All surfaces were sealed with my standard misting of Future diluted 30% +/- with distilled water to which had been added a few drops of Winsor and Newton Acrylic Flow Improver; $7 for 4 oz at Michaels and other arts suppliers. The stuff allows a very thin layer to be applied without graininess, and seems to cure Future of its occasional fogging and orange peel tantrums. Folks who paint with acrylics might want to experiment and see if it improves their quality of life. Also helps decals slide around when added to their watering trough.
| FINAL CONSTRUCTION |
Rigging was done with 32 gauge stainless surgical
suture, which you might be able to procure through your doctor or vet if you are
not like me blessed with a brother in the business. The wire is stiff enough
that it does not have to be tensioned to straighten.
 Enter at
the pull-through hole, guide it without kinking into its anchor point, bend out
any curves with a probe, then seal the deal with CA at each end.
.005” bead stringing wire is an acceptable alternative
in 1/72 (probably also 1/48), but it is softer and needs to be held tight while
the glue sets up. Remember to add brace wires to the tailplanes.
Enter at
the pull-through hole, guide it without kinking into its anchor point, bend out
any curves with a probe, then seal the deal with CA at each end.
.005” bead stringing wire is an acceptable alternative
in 1/72 (probably also 1/48), but it is softer and needs to be held tight while
the glue sets up. Remember to add brace wires to the tailplanes.
With the interplane struts splayed outward (check the instruction diagram for the approximate angle) mating the upper and lower wings is a bear. The struts must be fixed to the lower wing and allowed to dry solid before adding the upper deck – unless you own one of those fancy-schmancy biplane building jigs being sold by Micro Mark for the price of a small mansion. Add the cabane struts after everything is set up. Aileron operating rods can be snapped in afterward. I made mine from Evergreen rod, rather than try and clean up the kit parts.
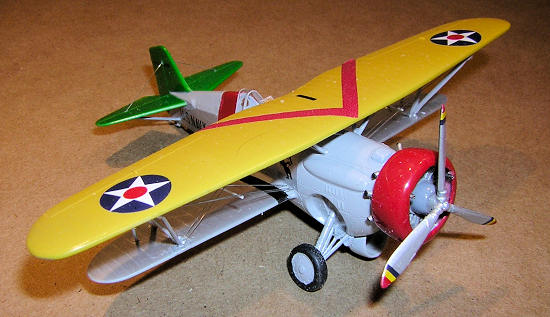
Some confusion exists regarding Der Ring des Nibelungen, or whatever is that circular thing hanging in front of the belly tank. The box art shows it perpendicular to the longitudinal axis; the marking diagrams depict it slung backward at varying angles. Available photos show it not at all. I picked perpendicular.
 The cowl
is a nasty split affair that tapers at both ends too much for the engine to
simply be popped in after the halves are mated. The cowl will have to be routed
out inside and/or the cylinder heads ground down, however the installation is
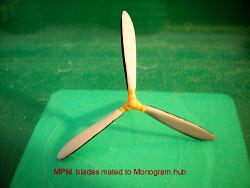
made. The “indistinctness” of the propeller hub so bothered me that I removed
the blades and wire-pinned them to the boss from a wrecked Monogram Hawk.
I’m told anti-depressant
medications can alleviate these sorts of compulsions, but they would interfere
with my FAA medical certificate, so I will simply have to exercise more self
control should they come upon me again in future builds.
The cowl
is a nasty split affair that tapers at both ends too much for the engine to
simply be popped in after the halves are mated. The cowl will have to be routed
out inside and/or the cylinder heads ground down, however the installation is
made. The “indistinctness” of the propeller hub so bothered me that I removed
the blades and wire-pinned them to the boss from a wrecked Monogram Hawk.
I’m told anti-depressant
medications can alleviate these sorts of compulsions, but they would interfere
with my FAA medical certificate, so I will simply have to exercise more self
control should they come upon me again in future builds.
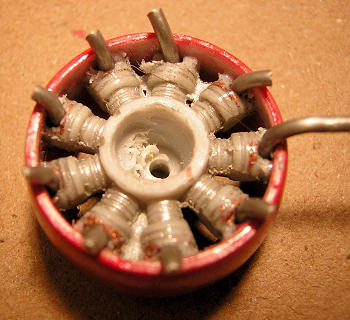 Affixing
the exhaust pipes causes some difficulty, particularly when one fails to consult
the instructions and attempts to apply them backwards, with the stubs leading
from the cylinders to the collector ring. Reversing them according to the
diagram doesn’t help much.
What does is realizing that a
collector ring would not coexist with stub exhausts, the purpose a said ring
being to collect the exhaust from individual cylinders and dump it out of a
common stack, so as not to blind, asphyxiate, or immolate the pilot riding
behind in the open (or in this case,
Affixing
the exhaust pipes causes some difficulty, particularly when one fails to consult
the instructions and attempts to apply them backwards, with the stubs leading
from the cylinders to the collector ring. Reversing them according to the
diagram doesn’t help much.
What does is realizing that a
collector ring would not coexist with stub exhausts, the purpose a said ring
being to collect the exhaust from individual cylinders and dump it out of a
common stack, so as not to blind, asphyxiate, or immolate the pilot riding
behind in the open (or in this case,
 inconceivably
half-open) cockpit. GOOGLE photos confirmed the non-existence of such a ring, so
I cut stub pipes from solder wire and stuck them to the engine.
Note that the top 2 pipes exit
sideways, presumably to divert flame and gas from the top wing, while the
remainder radiate out – well, radially.
inconceivably
half-open) cockpit. GOOGLE photos confirmed the non-existence of such a ring, so
I cut stub pipes from solder wire and stuck them to the engine.
Note that the top 2 pipes exit
sideways, presumably to divert flame and gas from the top wing, while the
remainder radiate out – well, radially.
If the vacu-formed
transparencies get boogered up they can easily be fashioned from flat acetate.
Guess how I found out.
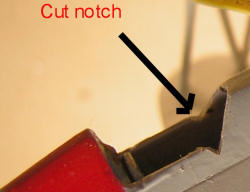
A small notch need to be nicked
into the cockpit opening to accommodate the windshield (see photo).
| CONCLUSIONS |
 A few
points shy of a “10” on the MPM scale, but a darn sight better than building a
Hawk III from the Merlin kit.
A few
points shy of a “10” on the MPM scale, but a darn sight better than building a
Hawk III from the Merlin kit.
September 2008
If you would like your product reviewed fairly and quickly, please contact me or see other details in the Note to Contributors.