MPM 1/72 Grumman FF-1
| KIT #: | 72075 |
| PRICE: | Approx $25.00 |
| DECALS: | Four options |
| REVIEWER: | Joel Hamm |
| NOTES: | Short run multi-media kit. Probably OOP |
| HISTORY |
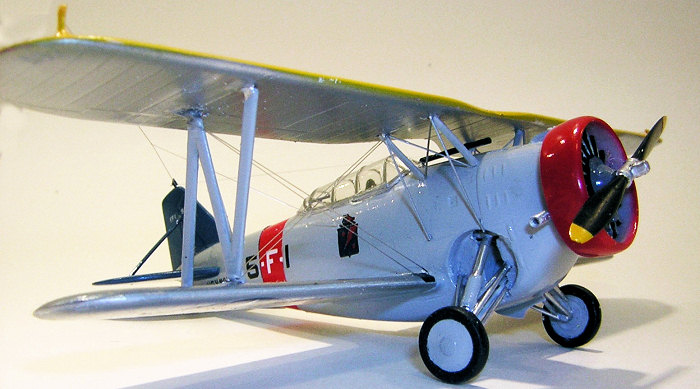
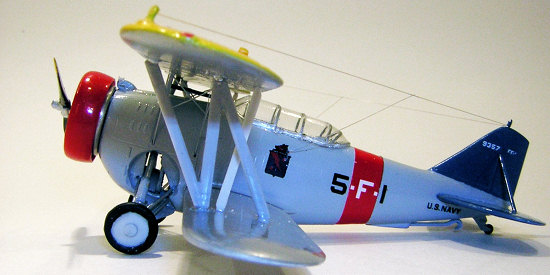
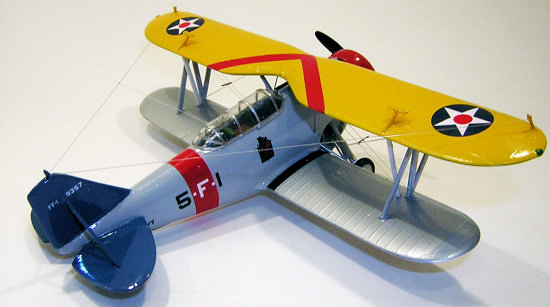
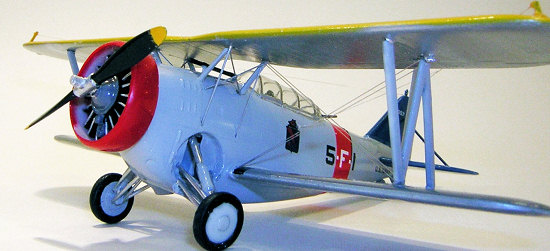
Yellow Wing Tweeners, those gaudy between-the-world-wars US aircraft, comprise the Golden Age of Aviation; if not for their performance, certainly for their garish liveries, and their mish-mash of (then) new and old technologies. Grumman’s FF-1, semi-affectionately known as “Fifi”, is an example we’d never expected to see in an injected kit. According to The Grumman Guidebook V1 (if Volumes 2 through whatever were ever issued, I’ve never found them) the FF-1 was the company’s first aircraft and the start of a long and successful relationship with the US Navy. It was also the world’s first retractable gear production fighter. Despite that innovation and notable others, its designers could not break out of the box formed by two wings and all the struts and wires that held them together.
FF-1’s equipped a
single squadron, VF-5B, aboard the U.S.S Lexington from 1933 – 1935. An improved
version, the G-23 Goblin, was exported to several countries, and according to
one source served under the designation SS-1 with Scouting Squadron 2 also
aboard the Lexington. Which brings up an interesting inaccuracy in this model.
One of the Goblins was 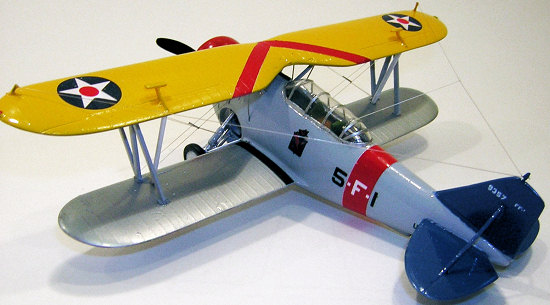 recovered
from somewhere in South America, restored (and flown) by Grumman, and now hangs
in the Naval Aviation Museum in Pensacola Florida. It was put in the markings of
the “Red Rippers” (VF-5B) commander, who of course flew the earlier version. For
a number of reasons, chiefly the availability of clear color photographs, that
is the airplane I chose to represent. So – my model is an accurate rendering of
an actual aircraft, though one not in service in that configuration. The actual
aircraft is actually inaccurate.
recovered
from somewhere in South America, restored (and flown) by Grumman, and now hangs
in the Naval Aviation Museum in Pensacola Florida. It was put in the markings of
the “Red Rippers” (VF-5B) commander, who of course flew the earlier version. For
a number of reasons, chiefly the availability of clear color photographs, that
is the airplane I chose to represent. So – my model is an accurate rendering of
an actual aircraft, though one not in service in that configuration. The actual
aircraft is actually inaccurate.
Agents of the Absolute Historical Veracity Gestapo may take up any issues with the restorers at Grumman and the curators at Pensacola. Those at the Smithsonian would never commit such a gaff. Their fascinating book (for $65 it darn well better be fascinating) Restoring Museum Aircraft fills several chapters detailing their quest for – no, their obsession with – archival exactitude. Their sine qua non is to never display an artifact as anything that it never was. If, for example, if a T-Bolt that had languished stateside were to be restored as an example of a European theater campaigner, it would be done up as a non-descript bird; never as the mount of Bob Johnson or Francis Gabreski.
The
authors discuss all the compromises and conundrums involved in deciding how to
restore and display a plane. One of those issues transfers to our hobby. The
modeling nitpickers love to pounce upon any model finished in pristine
glossiness when the actual subject never appeared that way in the depicted
configuration. For example, “Flak Bait”, the famous high-time
 Marauder, was a way-worn tatters
by the time it sported its well known and oft reproduced markings; though it
is often modeled as if it came that way fresh off the assembly line.
Marauder, was a way-worn tatters
by the time it sported its well known and oft reproduced markings; though it
is often modeled as if it came that way fresh off the assembly line.
Turns out the full scale nitpickers shriek the same complaint about NASM (The National Air and Space Museum) restoring its aircraft to “just opened the carton” condition. The curators answer that they frown upon artificial weathering as “Hollywooding”. Their purpose is preservational and educational; to demonstrate and archive the color and markings of the artifact. They believe those functions are better performed if the plane looks “right out of the paint shop” without the fake smearing , smudging, and chipping.
If the philosophy is good enough for the Smithsonian Institute, it’s good enough for those of us who like to build our bits of plastic all clean and shiny.
| THE KIT |
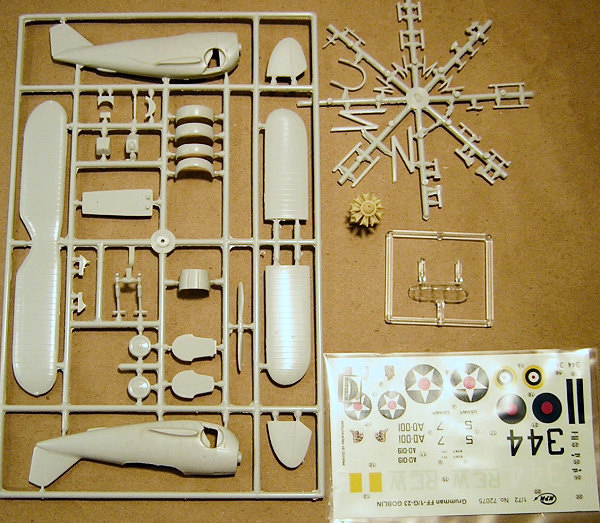 MPM’s
is actually the second kitting of Fifi in 1/72 – or any scale. The first was a
rough but buildable cottage industry version by Meikraft, in a galaxy long ago
and far away. (q.v. my review in the “Kits from Hell” series). MPM’s molding is
lightyears improved, but still reminiscent of short runners. Large parts are
trouble free, but small pieces require cleanup – and careful cutting from large
sprue gates. The box art trumpets that “Canopy is Injected”, but a well-sucked
vacanopy might have been a better choice. The clear casting isn’t. It needs
polishing and Future-ing. Mine had two prominent zits right on the pilot’s side
windows that required excising and re-clarifying. The fit to the fuselage wasn’t
that great either. More anon.
MPM’s
is actually the second kitting of Fifi in 1/72 – or any scale. The first was a
rough but buildable cottage industry version by Meikraft, in a galaxy long ago
and far away. (q.v. my review in the “Kits from Hell” series). MPM’s molding is
lightyears improved, but still reminiscent of short runners. Large parts are
trouble free, but small pieces require cleanup – and careful cutting from large
sprue gates. The box art trumpets that “Canopy is Injected”, but a well-sucked
vacanopy might have been a better choice. The clear casting isn’t. It needs
polishing and Future-ing. Mine had two prominent zits right on the pilot’s side
windows that required excising and re-clarifying. The fit to the fuselage wasn’t
that great either. More anon.
Instructions are a multi-page set of drawings that includes a detailed parts
map, necessary because pieces are not numbered on the sprues. Parts are provided
for either the FF-1 or G-23, though photos of the Pensacola plane show
additional differences, such as an exhaust collector ring with starboard side
discharge, rather than the twin downward pipes provided. Chief divergence
between the two variants is a wider chord cowling on the G-23. The exhaust pipes
are dissimilar; so are the cabane
 struts, the latter version
deleting the upper fairings, which on the kit are overdone to the point of
resembling turkey drumsticks. The carburetor intake scoop is different, though
the two plastic pieces are equally amorphous. For the G-23, MPM provides a
separate nose piece, which is supposed to be transplanted after the fuselage is
cut apart. Don’t do it. The only change is in the arrangement of louvers; and
photos show the G-23 had the same twin row of 3 provided for the FF-1.
struts, the latter version
deleting the upper fairings, which on the kit are overdone to the point of
resembling turkey drumsticks. The carburetor intake scoop is different, though
the two plastic pieces are equally amorphous. For the G-23, MPM provides a
separate nose piece, which is supposed to be transplanted after the fuselage is
cut apart. Don’t do it. The only change is in the arrangement of louvers; and
photos show the G-23 had the same twin row of 3 provided for the FF-1.
Some question exists over whether the later version’s cowl retained the twin gun barrel troughs. The two fuselage mounted .30’s were supposedly replaced by a single gun WWI style on the top wing. Since this did not sound like the type of “improvement” that would be made to a successive variant, and since the restored G-23 photos showed neither the upper cowl nor a wing-top gun, I chose not to fill in the troughs. Arrangement of the antenna wires varies on the two planes and a few additional discrepancies pop up. The point is to decide upon the model to be built and study the drawings and available references.
| CONSTRUCTION |
The cockpit interior is a twenty-part, seven step procedure that can be simplified through omission of throttle quadrant and such, as many parts will remain unviewable. For ease of painting and canopy fitting I deferred installation of seats, stick, etc; though I did then guild the lily a bit by giving the rear seater an Aeroclub cast metal Browning .30 caliber to fool with.
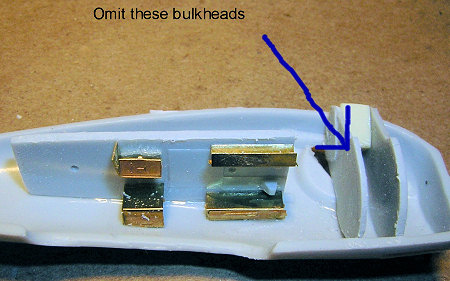 A complicated assemblage of
bulkheads and shapers is supposed to box in the gear wells. These too are
invisible and are best discarded since they keep the fuselage halves apart and
make installation of the gear struts impossible. Keeping the wheel wells open to
the fuselage also simplifies rigging, by allowing the wires to be tightened from
inside.
A complicated assemblage of
bulkheads and shapers is supposed to box in the gear wells. These too are
invisible and are best discarded since they keep the fuselage halves apart and
make installation of the gear struts impossible. Keeping the wheel wells open to
the fuselage also simplifies rigging, by allowing the wires to be tightened from
inside.
The lower wing panels are but joined to the wing roots, but the latter surfaces require a bit of machining to avoid unwanted sweep-back. Locator markings for the interplane struts are scribed on the wings, but they got these wrong. The kit has the “N” struts splayed too far outboard, which makes the wings too close together and gives Fifi an undeserved sleekness. Photos show the struts nearly vertical and about a foot of space between the windshield top and the bottom of the upper wing. The fix is simply to move the attach points on the upper wing inboard by about a millimeter each. To avoid losing the locators by sanding and painting, I marked them with pin pricks, then after painting roto-tooled shallow depressions with a ball burr. Before mating the wings, drill all rigging wire holes and attach the gunsight; ticklish jobs once Fifi becomes a biplane.
 Joining the wings can be
facilitated by a dose of Dewars sufficiently generous to keep frustration in
check, but below the level causing physical impairment. Expect no Monogram or
Matchbox “cabane struts are integral with the fuselage” help. As a matter of
fact, locator marks for the cabane struts are entirely missing from the fuselage
and wing. Fortunately, the head-on drawings are full size (full size for the
model, silly, not the real plane), so the proper angle can be gauged from these.
Joining the wings can be
facilitated by a dose of Dewars sufficiently generous to keep frustration in
check, but below the level causing physical impairment. Expect no Monogram or
Matchbox “cabane struts are integral with the fuselage” help. As a matter of
fact, locator marks for the cabane struts are entirely missing from the fuselage
and wing. Fortunately, the head-on drawings are full size (full size for the
model, silly, not the real plane), so the proper angle can be gauged from these.
For rigging I was going to try some .05mm bead stringing wire I had found at the arts & crafts store, but decided the model had suffered enough, or its builder had; so I stuck to my standard monofilament nylon somewhat-too-invisible thread. Cabane strut wires were made from stretched sprue. In real life flying and landing wires are fastened to brackets a few inches from the strut attach points; but in this scale no one will notice that I tied the stuff directly to the sticks.
The cleaned up canopy was framed with strips of Pactra Trim Tape, in silver-gray, a sutable compromise when you can’t determine which color the real thing was, and don’t want to paint the sticky stuff anyway. Even after careful trimming and fiddling with the cockpit opening, gaps remained that had to be filled with my adhesive and caulk of choice – aqueous polyurethane varnish.
 Many of the struts came from
the spares box, as the originals required too much cleaning. For Some reason,
MPM molds the struts with the gates in the middle of the span, rather than at
the ends. The cowl ring also needed smoothing and sanding, but I found a perfect
replacement from a wrecked Monogram or Matchbox bipe. The radial engine is the
only resin piece, and it’s beautifully detailed. The prop blades, however, are
very thick and look more like Hawaiian war clubs. A bit of scraping and sanding
brought them into better proportion.
Many of the struts came from
the spares box, as the originals required too much cleaning. For Some reason,
MPM molds the struts with the gates in the middle of the span, rather than at
the ends. The cowl ring also needed smoothing and sanding, but I found a perfect
replacement from a wrecked Monogram or Matchbox bipe. The radial engine is the
only resin piece, and it’s beautifully detailed. The prop blades, however, are
very thick and look more like Hawaiian war clubs. A bit of scraping and sanding
brought them into better proportion.
I’ve built several ’30’s era planes with wheels that tuck into the fuselage, and never had luck using the kit provided retraction struts; so I stick built them in-situ with .020 rod (thinner would have been better). It’s a semi-tedious job, but not really difficult as long as you hold it to one strut per session. The axle stubs on the main struts had to be snipped and re-ground at a better angle, otherwise they would splay the wheels outward instead of inward as appropriate.
I mentioned earlier that the Pensacola “FF-1”, which is actually a G-23, and the model for my model, has a circular exhaust collector ring with a right side ejector stub, rather than the inverted “U” pipe provided. I just happened to have in the spares bin a white metal ring of the proper size from an unbuilt Merlin or Pegasus sumthingorother, to which I added a snippet of aluminum tube.
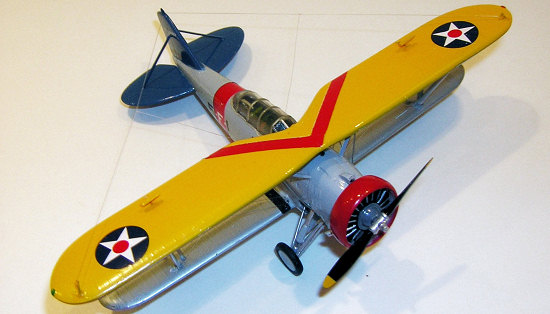
| COLORS & MARKINGS |
Paint and
decals were applied before the two wings were joined, but in the write-up I
didn’t want to break up the construction sequence. Fabric surfaces were Floquil
“Bright Silver”, which isn’t all that bright. Everything else is Testors MM or
little square bottles. Fuselage band and wing chevron had to be painted on, so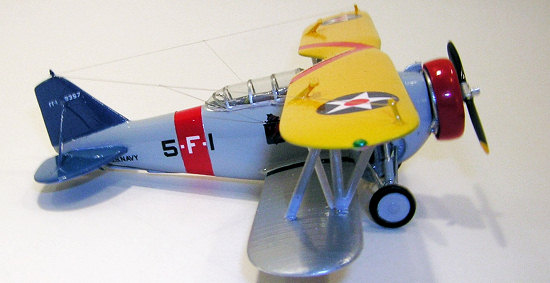 my sequence was: overall gloss white; red and blue where applicable, mask that,
more gloss white, overall yellow or gray as appropriate, remove the masking,
curse up a blue streak ‘cause the paint crept under the tape, do a lot of touch
up with a ten-ought brush and 3X magnifier.
my sequence was: overall gloss white; red and blue where applicable, mask that,
more gloss white, overall yellow or gray as appropriate, remove the masking,
curse up a blue streak ‘cause the paint crept under the tape, do a lot of touch
up with a ten-ought brush and 3X magnifier.
MPM’s decals (no printer is identified) are ultra-thin and conformable, with no clear film surround. They are also ultra-finicky about going where you want them to, and ultra-eager to crumple or disintegrate if not handled with the greatest respect. I boogered several, but recovered them from the ancient Meikraft kit. Those decals were equally high quality, surprising considering the age of that kit. I’ve since discovered a cure for recalcitrant decals. In an earlier review or two I mentioned using “Artist’s Acrylic Paint Flow Improver” as an additive to Future overcoat. A few drops of that surfactant added to the decal soak, and brushed on to the model’s surface, allows the marking to be slid into place without fear of tearing or folding. No, it doesn’t hamper adhesion one bit. As a matter of fact, it may even improve the snuggle-down coefficient. The FF-1 was unusual in having the larger set of Nat insignia on the wing undersurface, and the smaller ones above.
| CONCLUSIONS |
Looking at Fat Little Fifi, the Painted Lady, is it any wonder why I love these yellow wing ‘tweeneres
October 2007
If you would like your product reviewed fairly and fairly quickly, please contact the editor or see other details in the Note to Contributors.