Hasegawa 1/32 Boeing F4B-4
|
KIT #: |
JS-066 |
|
PRICE: |
$currently OOP, but you can find it.
|
|
DECALS: |
Three options |
|
REVIEWER: |
Tom Cleaver |
|
NOTES: |
|
While Boeing is today known for the design and manufacture of very large
commercial airplanes, the company got its start in the 1920s by beating out
Thomas Morse for the contract to produce the MB-3 fighter.
With what they learned from this - the first
mass-produced American fighter - Boeing designed the XPW-8, a better airplane,
which would serve as the basis for a series of fighters designed and built in
the mid-1920s for both the Army and the Navy, the first of which would be the
PW-9 for the Army.
As a result, Boeing became locked in a struggle with
Curtiss to become the military's premiere fighter company.
The Navy at this time was operating the U.S.S. "Langley,"
the service's first aircraft carrier, and was in the process of
 converting the "Lexington" and "Saratoga" from battle cruisers to
aircraft carriers as a result of the restrictions of the first Washington Naval
Treaty of 1922. The Navy was going to need fighters to protect those aircraft
carriers
converting the "Lexington" and "Saratoga" from battle cruisers to
aircraft carriers as a result of the restrictions of the first Washington Naval
Treaty of 1922. The Navy was going to need fighters to protect those aircraft
carriers
Boeing's first naval fighter was the FB-1, which was based
on the Army PW-9, powered by a Curtiss D-12 V-12 with radiator
beneath the nose.
Ten FB-1s were produced for the Marines; two FB-2s with
arrester hooks for carrier operations were followed by three FB-3s with a
Packard IA-1500 engine while the Navy decided whether to standardize on the
liquid-cooled inline engine the Army favored - which were built by Curtiss and
Packard - or the
new lightweight, reliable radial engines Wright and Pratt &
Whitney had created.
The single FB-4 was delivered with a
Wright, and a year later modified with a Pratt & Whitney R-1340
Wasp as the FB-6.
In the meantime, 27 FB-5s were delivered with
the Packard 2A-1500 liquid-cooled engine.
By 1926, the Navy had decided to standardize on radial
powerplants.
32 F2B-1s were ordered in March 1927; a larger wing
which allowed lower landing speeds distinguished the 74 F3B-1s
which reached the fleet in February 1928.
Boeing - which was facing strong competition from Curtiss' Hawk derivatives -
then came up with the Model 83, powered by the brand-new 500 h.p. Pratt &
Whitney R-1340B.
First flown June 25,
 1928, the Model 83 was ordered by the Navy as the
F4B-1 and the Army as the P-12; it was the last time the two services would
operate the same fighter equipment until the arrival of the North America
F-86/FJ-2/3/4 series 20 years later.
29 F4B-1s were followed by 46 F4B-2s in June 1930.
1928, the Model 83 was ordered by the Navy as the
F4B-1 and the Army as the P-12; it was the last time the two services would
operate the same fighter equipment until the arrival of the North America
F-86/FJ-2/3/4 series 20 years later.
29 F4B-1s were followed by 46 F4B-2s in June 1930.
In December 1930, Boeing offered the Model 218, which was
the Model 83 with an all-metal fuselage.
This became the Army P-12E and the Navy F4B-3.
75 F4B-3s were originally ordered on
April 23, 1931, and August 15, 1931, but 54 of these were
delivered as F4B-4s.
The F4B-4, which had a more powerful R-1340-16, a wider fin
and an enlarged headrest, first flew in July 1931.
38 F4B-4s -
in addition to the 54 in the revised F4B-3 contract - were ordered
August 15, 1932.
The F4B-4 had wing racks for two
116-lb. bombs, while a 55-gallon drop tank could double the internal
fuel supply.
The F4B-4 was supremely maneuverable and loved by all who
flew it for its tractability and performance.
The late Dick Best, better known to history as the man
who sank the carrier "Akagi" at the Battle of Midway, began his naval aviation
career as a commissioned section leader in VF-2 "The Flying Chiefs", just before
the unit transitioned from the F4B-4 to the F2F-1.
Several years
ago, Dick told me the F4B-4 was the most responsive airplane he ever flew.
"You could make it turn by sticking your arm out to one
side or the other, it was that responsive," he remembered in 1999.
Hasegawa released their 1/32 F4B-4 in the mid-1970s, as the first of four 1/32
"Golden Wings" models, the others being the P-12E, BF2C-1, and P-26A.
The kit was available over the years in re-releases, but
has been out of production for at least the past 15 years I am aware of.
The kit can be found at model swap meets and on eBay for
reasonable prices if one is willing to look for a bargain.
 The kit is quite simple.
In at least the original release, it came in two shades
of plastic: silver for the wings, tail surfaces, and interplane struts, and grey
for the fuselage, landing gear, engine and cowling.
Given the difficulty of molding sharp trailing edges
then, the last quarter inch of the wing surfaces on both upper and lower wings
are molded one-piece.
This is the one difficult area of assembly, to get rid
of the resulting seam without losing the quite nice fabric wing detail.
The kit is quite simple.
In at least the original release, it came in two shades
of plastic: silver for the wings, tail surfaces, and interplane struts, and grey
for the fuselage, landing gear, engine and cowling.
Given the difficulty of molding sharp trailing edges
then, the last quarter inch of the wing surfaces on both upper and lower wings
are molded one-piece.
This is the one difficult area of assembly, to get rid
of the resulting seam without losing the quite nice fabric wing detail.
The cockpit is not well-detailed, though the various items one needs to know
existed there are molded to the fuselage sides, and can provide the basis for
suitable scratch-built parts to detail this important area.
A "pilot figure" is provided to hide the lack of
original detail, but this blog is best put out of its misery by being consigned
to the wastebasket at the outset.
The engine is molded in one piece, unlike the later
engine provided with more detail and a separate inner cowling with the P-26A and
BF2C-1 kits.
The decals are good for the period of their production and provide markings for
three different aircraft, though detail in the various squadron markings is
primitive.
Fortunately, Yellow Wings Decals has just released sheet 32-007,
which provides markings for four different F4B-4s and is of excellent quality
and accuracy.
The good news here is everything fits quite nicely after one makes sure to clean
up any flash, and test fits the wing parts to get as tight a fit on the lower
wing surface as possible.
I
started by assembling the wings.
I scraped out the interior of the lower wing joint to
thin it down and insure that when I glued the upper and lower halves together
there would be as tight a fit as possible.
I filled the seam with Tenax and held it tight to get as
much "fill" as possible.
When this was dried and set, I carefully scraped off the
excess.
I needed to apply a little Mr. Surfacer (from my dwindling stash) to
these joints, which were then carefully sanded down with wet 'r' dry fine grit
wrapped around a paintbrush handle.
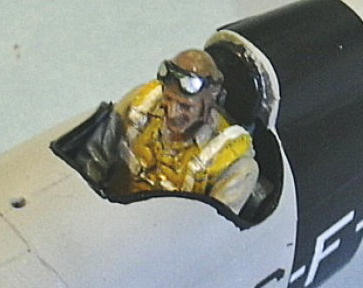 I
thought about scratchbuilding a cockpit interior, but at the same time I read
Les Dorr's review of the Master Details 1/32 1930s US Naval Aviator, and it
struck me I had saved some very nice pilot figures from the 21st
Century Toys F4U Corsairs I bought.
I checked one out, and it could easily be a 1930s Naval
Aviator if painted right, and it was such quality in its detail that I decided
for the first time in 40-plus years to put a pilot figure in one of my models.
I
thought about scratchbuilding a cockpit interior, but at the same time I read
Les Dorr's review of the Master Details 1/32 1930s US Naval Aviator, and it
struck me I had saved some very nice pilot figures from the 21st
Century Toys F4U Corsairs I bought.
I checked one out, and it could easily be a 1930s Naval
Aviator if painted right, and it was such quality in its detail that I decided
for the first time in 40-plus years to put a pilot figure in one of my models.
After painting the cockpit silver, then implying the other details by painting
their molded-on bits black, I put the pilot figure in the seat.
In retrospect, I should have either cut out the bottom
of the seat or cut off the molded seatpack parachute, since the seat was just
thick enough that the pilot was revealed to be sitting just a little high when I
glued the fuselage together.
At that point it was too late to fix, so we can assume
this is a pilot as tall as Dick Best was, since I remember a photo I once saw of
him in an F4B-4 and he did indeed sit a bit tall for the cockpit.
The rest of the assembly went easy.
I glued the lower wing, tail surfaces, landing gear and
drop tank, leaving the engine and upper wing separate for painting.
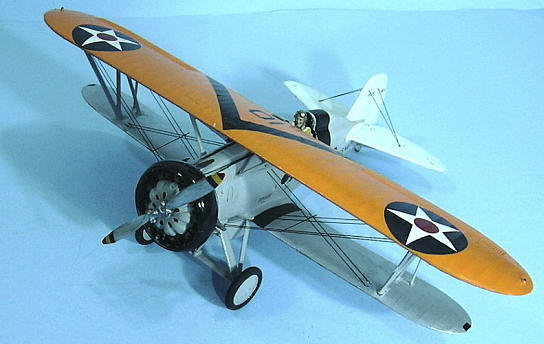
I also opened up the hand grips on the lower wingtips
and the upper wing center section.
The petite raised surface detail is a very accurate representation of the
surface detail of the real thing, as I have noted from studying the P-12E out at
Planes of Fame Air Museum.
Painting:
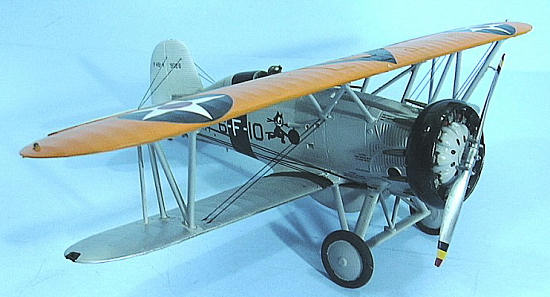 The wings were painted with Tamiya Flat Aluminum for the fabric areas.
The tail surfaces were painted with Tamiya Flat White.
The fuselage, landing gear, wing struts, and the
associated panels on the wings were painted Gunze-Sangyo Light Aircraft Grey.
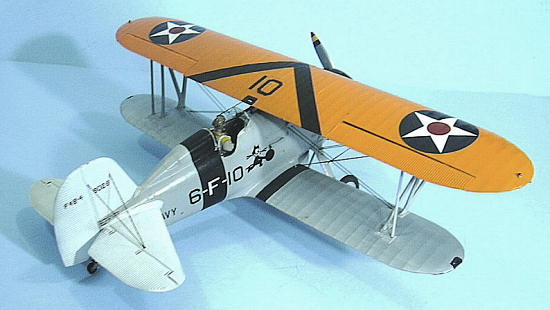
The upper surface of the upper wing was painted
Gunze-Sangyo Orange-Yellow.
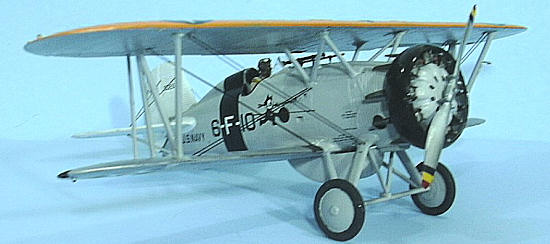
The cowling halves were painted Tamiya Semi-Gloss Black
on the outside and Flat Aluminum inside.
The Engine was painted Light Aircraft Grey, with the
cylinder heads painted with Tamiya "Titanium" and then drybrushed with Tamiya "Smoke" to pop out detail.
The exhaust was painted with Gunze-Sangyo "Burned Iron."
The prop was painted with SNJ Aluminum, and then
polished out with SNJ polishing powder.
I gave the model an overall coat of Xtracrylix Gloss
Varnish.
The wings were painted with Tamiya Flat Aluminum for the fabric areas.
The tail surfaces were painted with Tamiya Flat White.
The fuselage, landing gear, wing struts, and the
associated panels on the wings were painted Gunze-Sangyo Light Aircraft Grey.
The upper surface of the upper wing was painted
Gunze-Sangyo Orange-Yellow.
The cowling halves were painted Tamiya Semi-Gloss Black
on the outside and Flat Aluminum inside.
The Engine was painted Light Aircraft Grey, with the
cylinder heads painted with Tamiya "Titanium" and then drybrushed with Tamiya "Smoke" to pop out detail.
The exhaust was painted with Gunze-Sangyo "Burned Iron."
The prop was painted with SNJ Aluminum, and then
polished out with SNJ polishing powder.
I gave the model an overall coat of Xtracrylix Gloss
Varnish.
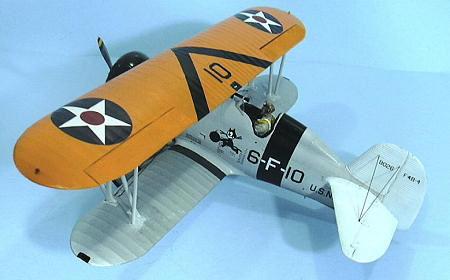
Decals:
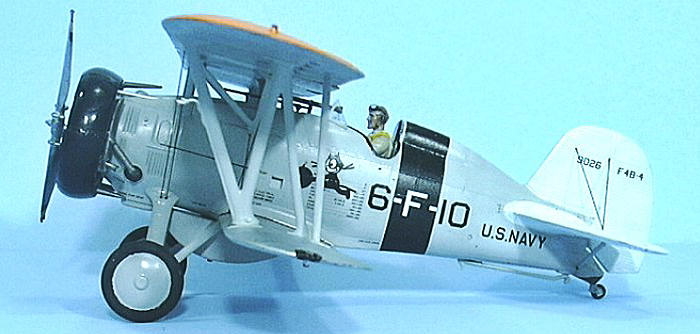
The Yellow Wings decals went on easily.
I did the well-known 6-F-10 of VF-6 aboard the Saratoga
in 1932.
The model received an overall coat of Xtracrylix Satin Varnish once the
decals had set.
 Test fitting the cowling halves revealed I needed to sand down the cylinder
heads slightly to insure good fit.
Once I did this, the cowling went on easily.
I then attached the exhaust parts, and then glued the
whole assembly in position on the fuselage.
Test fitting the cowling halves revealed I needed to sand down the cylinder
heads slightly to insure good fit.
Once I did this, the cowling went on easily.
I then attached the exhaust parts, and then glued the
whole assembly in position on the fuselage.
The upper wing didn't want to fit exactly, but when I used rubber bands over the
areas where the interplane struts were.
I gave liberal applications of Tenax to the strut
attachments to upper and lower wings and let this set up overnight before
removing the rubber bands.
The simple interplane bracing was done with .010 wire, painted black for visual
effect.
This really is the nicest F4B-4 available in any scale.
It has more detail than the Monogram 1/72 kit, and is
far easier to build than the now long out-of-production Classic Airframes kit.
The pilot figure did wonders for the overall look.
The kit makes up into an excellent replica of this
classic "Golden Age" fighter and is highly recommended.
The kit is well worth getting hold of, and the new
Yellow Wings decals guarantee that an out-of-the-box effort will look superb.
Looking at the finished model, I am glad I followed Les
Dorr's suggestion about putting a pilot in the cockpit.
Kit
courtesy of my wallet.
Tom Cleaver
October 2008
If you would like your product reviewed fairly and fairly quickly, please
contact
the editor or see other details in the
Note to
Contributors.
Back to the Main Page
Back to the Review
Index Page