Classic Airframes 1/48 Brewster F2A-1 Buffalo
| KIT #: | ? |
| PRICE: | $54.98 MSRP |
| DECALS: | Three options |
| REVIEWER: | Tom Cleaver |
| NOTES: | Short run with etched metal and resin parts |
| HISTORY |
By the late 1930s, everyone in U.S. Naval Aviation was aware that the fighting biplane was obsolete, though there were those who believed it would be impossible to marry the high performance of a monoplane with the requirements of carrier operations. In late 1937, the Bureau of Aeronautics put forward a set of requirements for an F3F replacement that - like those which resulted in the SB2U-1 - did not necessarily call for a monoplane.
 In fact, Grumman was asked to submit a biplane design, the XF4F-1. Grumman
did so, grudgingly, but soon managed to convince the powers-that-be that
with a little detail refinement to the F3F-2 and a higher-powered R-985,
the requested performance for the XF4F-1 could be bettered. This resulted
in Grumman delivering the last Navy biplane fighter, the F3F-3, and allowed
the company to design and submit a monoplane, the XF4F-2.
In fact, Grumman was asked to submit a biplane design, the XF4F-1. Grumman
did so, grudgingly, but soon managed to convince the powers-that-be that
with a little detail refinement to the F3F-2 and a higher-powered R-985,
the requested performance for the XF4F-1 could be bettered. This resulted
in Grumman delivering the last Navy biplane fighter, the F3F-3, and allowed
the company to design and submit a monoplane, the XF4F-2.
How the U.S. Navy managed as a result of the competition to not only allow Brewster - a company that had begun by making buggies a hundred years earlier and had never yet produced a successful aircraft design - to enter a design, but chose that over the submission of the premier Naval aircraft manufacturer is one of those anomalies of aviation history that makes things interesting. Nevertheless, the XF4F-2 was beaten by the XF2A-1, and Brewster Aircraft Company received the contract to take the Navy into the next generation of combat aircraft.
 A
more unlikely source would be hard to imagine. The company had no
understanding of how to mass-produce an airplane. The two-story factory
did not have elevators, and the completed fuselages, which were
hand-assembled on the second floor, were lowered by a hay baler type of
winch to the lower floor. Once there and completed, there was no airport
to test the airplanes, which had to be towed several miles to the Buffalo
airport.
A
more unlikely source would be hard to imagine. The company had no
understanding of how to mass-produce an airplane. The two-story factory
did not have elevators, and the completed fuselages, which were
hand-assembled on the second floor, were lowered by a hay baler type of
winch to the lower floor. Once there and completed, there was no airport
to test the airplanes, which had to be towed several miles to the Buffalo
airport.
Needless to say, Brewster was behind schedule by the time they delivered the first production F2A-1 in the late summer of 1939 and never did catch up throughout the entire production run of the F2A series.
VF-3, the squadron chosen to be the first to equip with the new fighter, had only received six of them when the entire rest of the 54-aircraft production run for the F2A-1 was diverted to Finland with the outbreak of the Winter War in November 1939. The squadron flew on with six F2A-1s and 12 F3F-1s until the summer of 1940, when they were able to re-equip with the F2A-2. Some of the F2A-1s were returned to the factory to be modified to F2A-2 standards, but at least one survived as an F2A-1 until the summer of 1942, when it crashed at NAS Miami where it was being used as an advanced trainer.
Fortunately, Grumman did not take defeat lying down, and went back to the drafting table, where the less-than-stellar XF4F-2 became the F4F-3 Wildcat, the airplane that held the line during the desperate opening battles of the Pacific War during 1942.
| THE KIT |
Tamiya has produced an F2A-2 Buffalo since 1974. Originally priced at an amazing $9.00 (in a day when the standard was around $2.50 maximum for a 1/48 injection-molded kit), it could also be made as a Model 339 Buffalo I as flown by the RAF and the Dutch Air Force. This is still a good kit, which shows how far in advance of its time it was, and is still available. In the early 1990s, Aeromaster produced resin conversion sets for this kit that allowed one to turn it into an F2A-1 or an F2A-3. Modelers were happy to hear that Classic Airframes was going to do an F2A series earlier this year, given that the conversion sets were no longer available and had not been that good to begin with.
 On opening the box of the Classic Airframes kit, it is easy to answer the
question “Who’s your daddy?” It is basically an updated Tamiya kit, with
all-engraved panel lines, a suitable modification to the forward fuselage
and a different cowling, as well as an injection-molded engine mount and
resin wheel well detail, two areas that had been lacking in the Tamiya kit.
Additionally, the cockpit offers more detail, with resin parts and
photo-etch instrument panels and seat belts. (Your editor has the Tamiya
kit and I have to say that I don't think this is in any way copied from the
Tamiya molds.)
On opening the box of the Classic Airframes kit, it is easy to answer the
question “Who’s your daddy?” It is basically an updated Tamiya kit, with
all-engraved panel lines, a suitable modification to the forward fuselage
and a different cowling, as well as an injection-molded engine mount and
resin wheel well detail, two areas that had been lacking in the Tamiya kit.
Additionally, the cockpit offers more detail, with resin parts and
photo-etch instrument panels and seat belts. (Your editor has the Tamiya
kit and I have to say that I don't think this is in any way copied from the
Tamiya molds.)
Personally, I wish that Classic Airframes would go back to their vacuform canopies, since these were generally more accurate than the injection-molded canopies they have used in their kits since 2001. This canopy is only a little less thick than the Tamiya canopy, and it is just barely possible to pose it open. Fortunately, the Squadron (Falcon) vacuform canopy for the Tamiya kit will fit this kit, thus solving all the problems of posing the canopy open.
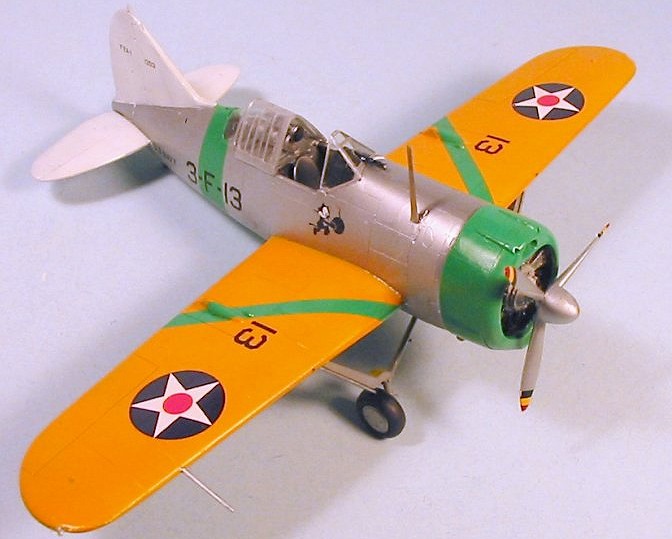
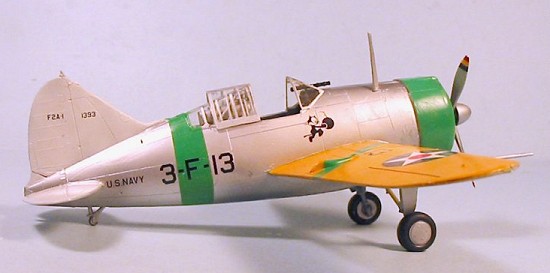
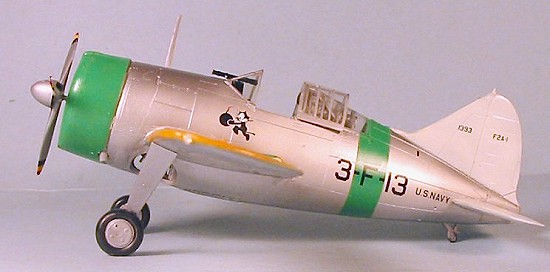
Decals are provided for two aircraft operated by VF-3, one in the pre-war “Golden Wings” markings and one in the overall light grey scheme. A third option is for one flown at NAS Miami as a trainer.
Fortunately, Yellow Wings Decals has a sheet for the F2A-1/2 that will allow a modeler to build every F2A-1 and F2A-2 built, and I opted to use these to do the fifth section leader’s airplane of VF-3.
| CONSTRUCTION |
There is really no easy way to assemble this kit, as Scott Van Aken conclusively demonstrated in his review of the Finnish Model 239 kit. The instructions would have you assemble the wings - which involves using the resin wing ribs that really don’t want to fit - and then attach the firewall, the engine mount and the gas tank to this sub-assembly, then assemble the cockpit to the two fuselage halves, then fit the fuselage around the engine mount and close things up. All in all, very fiddly.
 I
chose to build the fuselage and wing as sub assemblies with the firewall
and engine mount attached inside the fuselage. This was only a little
bit less fiddly than the suggested sequence, and has been detailed by Scott
in his review. I don’t see any way of getting this model together easily.
It will require some of those modeling skills. Modelers who have built the F2A-3 have noted that the engine
mounts are the same as for this kit, which makes for problems inasmuch as
the forward fuselage of the F2A-3 is 12 scale inches longer than for the
F2A-1, so that the engine mount doesn’t fit to the engine.
I
chose to build the fuselage and wing as sub assemblies with the firewall
and engine mount attached inside the fuselage. This was only a little
bit less fiddly than the suggested sequence, and has been detailed by Scott
in his review. I don’t see any way of getting this model together easily.
It will require some of those modeling skills. Modelers who have built the F2A-3 have noted that the engine
mounts are the same as for this kit, which makes for problems inasmuch as
the forward fuselage of the F2A-3 is 12 scale inches longer than for the
F2A-1, so that the engine mount doesn’t fit to the engine.
Personally, for all this work, what is visible inside the wheel well once things are all together isn’t, in my opinion, really worth the hassle. With this model sitting next to my Tamiya F2A-2 and my Tamiya kit modified to an F2A-3 - neither of which have the “interior detail” - the additional detail of the F2A-1 is not that apparent unless you’re a member of the Penlight Brigade.
Once all the Mr. Surfacer had been sanded smooth and the model polished, it was time to paint it.
| COLORS & MARKINGS |
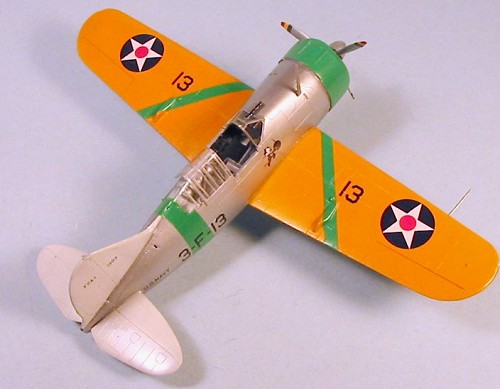
I
first painted the tail surfaces, the upper wing, the area of the fuselage
band and the cowling with Gunze-Sangyo “U.S. Navy Gloss White” - the color
actually used on gull grey and white schemes - which is sort of a
“slightly-off-white” color and looks better than the too-bright Gloss
White. When this was dry, I painted the upper wings with Gunze-Sangyo
“Orange-Yellow,” which is a good match for the U.S. Navy
 version of “chrome
yellow” used pre-war. When that was dry, I masked off the wings and tail,
and painted the fuselage band, wing chevrons and cowling with a
Gunze-Sangyo “Bright Green” that is very close to U.S. Navy “Willow Green,”
a color that is both bright and has a distinct yellow cast to it.
version of “chrome
yellow” used pre-war. When that was dry, I masked off the wings and tail,
and painted the fuselage band, wing chevrons and cowling with a
Gunze-Sangyo “Bright Green” that is very close to U.S. Navy “Willow Green,”
a color that is both bright and has a distinct yellow cast to it.
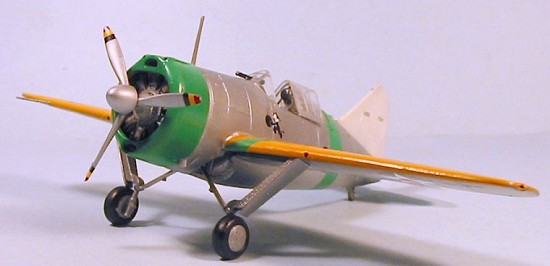
With all these colors masked off, I painted the fuselage, lower wings and landing gear with SNJ Aluminum, which does a good job of imitating the aluminum lacquer these areas were painted with (since it is an aluminum lacquer!).
With the aluminum paint dry, I unmasked the model, gave it an overall coat of Testors Model-Master “Sealer”, and proceeded with the decals.
The Yellow Wings decals are printed by MicroScale and go down without problem. The sheet comes with a list of all US Navy F2A-1 and F2A-2 airplanes, matching Bureau Number with the squadron markings, which guarantees accuracy. I used national insignia from the Yellow Wings national insignia sheet for the 32-inch cockades. Felix the Cat came from the kit decals.
| FINAL CONSTRUCTION |
Final assembly involved unmasking the canopy and pressing down the sliding section as tight as possible over the rear canopy, fixing it in place with cyanoacrylate glue and accelerator. These airplanes were maintained in immaculate condition, so I did no weathering.
| CONCLUSIONS |
For those who model U.S. Navy fighters, the F2A-1 is a historically-significant airplane, and the Classic Airframes kit turns into an accurate model with requisite effort. Modelers with several limited-run kits under their belt who are willing to take their time during assembly can have an interesting addition to their “Golden Wings” collection.
September 2005
Copyright ModelingMadness.com. All rights reserved. No reproduction in part or in whole without express permission.
If you would like your product reviewed fairly and fairly quickly, please contact the editor or see other details in the Note to Contributors.
Back to the Review Index Page 2022