Broplan 1/72 PWS-10
| KIT #: | MS01 |
| PRICE: | approx £10 |
| DECALS: | Two options |
| REVIEWER: | Chris Peachment |
| NOTES: | Vacuform kit with decals |
| HISTORY |
The PWS-10 was designed by Aleksander Grzędzielski and Augustyn
Zdaniewski (which I can spell for you, but cannot pronounce), and
constructed by the Podlaska Wytwórnia Samolotów - Podlasie Aircraft
Factory. It has its place in history as the very first all-Polish fighter
to enter serial production.
It replaced the French SPAD 61s in their Air Force and design began in
in 1927. It first flew in March 1930, at the same time as the PZL P1, a more
modern fighter, was developed. That was a more capable machine, but the War
Ministry decided that it needed further work, and so 80 PWS-10s was ordered as a
temporary measure.
They were built 1931-2. A biplane version, the PWS-15, was tried,
but while it was more manoeuvrable, it had a lower top speed and so nothing came
of it.
 Mixed
construction of canvas and plywood was employed. The fuselage had a metal
frame, covered with duralamin at the front and canvas at the rear. The engine
was a water cooled W-12 layout by Lorraine-Dietrich, built under licence by
Skoda.
Mixed
construction of canvas and plywood was employed. The fuselage had a metal
frame, covered with duralamin at the front and canvas at the rear. The engine
was a water cooled W-12 layout by Lorraine-Dietrich, built under licence by
Skoda.
Twenty PWS-10s were sold the Spanish Nationalist forces in the Civil
War, though they were not used as fighters, only for pilot training. On one of
the websites below you can find them in their mottled camouflage, and that might
make a nice option, especially as Spanish Civil War markings are easy to paint
on, if you do not have any decals.
During the German invasion 1939 they were too obsolete for combat, but were used for reconnaissance flights in the first days. And in the usual spirit of Polish insane courage, I expect a few grenades were thrown at the advancing Wehrmacht.
| THE KIT |
I found this kit by chance at an IPMS meeting
where it was lurking under the table of one of the clubs. “Yours for a
fiver,” said the sharp salesman sitting behind the table, noticing the furrows
in my brow and acquisitive gleam around
 the
eyes. At that price I could hardly refuse, most especially because I had
never heard of the aircraft before.
the
eyes. At that price I could hardly refuse, most especially because I had
never heard of the aircraft before.
I had never made anything by Broplan before either, but this is
surprisingly good for a vacform kit. The details on all the parts are fairly
well moulded, without too much irregularity, and the plastic is of a good
thickness to allow sanding. The only problems I encountered were around the
three cylinder banks on the nose, which had been stretched thin by the moulding
process, and didn't allow very much sanding before vanishing into thin air.
Each marking on the decal sheet has to be cut around as the whole sheet is varnished. But with square markings that is not difficult. I find a pair of sharp scissors better than a scalpel, as even a new blade on a scalpel tends to lift the edge which you are cutting and damage the marking.
| CONSTRUCTION |
 One
good tip, if this is your first vacform, is to cut strips off the dead sheets of
plastic and make you own locating tabs. Simply glue a strip at intervals along
the edge of one fuselage half, with an overhang, and then the other half will
marry up very well. And don't worry about poor alignments or glue marks. It all
comes off in the sanding. As it happened, very little problem was encountered
with the wings or tail, since they were a good fit. The trick is to sand the
training edges to within an inch of their life, and then you will have nice
clean lines.
One
good tip, if this is your first vacform, is to cut strips off the dead sheets of
plastic and make you own locating tabs. Simply glue a strip at intervals along
the edge of one fuselage half, with an overhang, and then the other half will
marry up very well. And don't worry about poor alignments or glue marks. It all
comes off in the sanding. As it happened, very little problem was encountered
with the wings or tail, since they were a good fit. The trick is to sand the
training edges to within an inch of their life, and then you will have nice
clean lines.
As with all vacforms, the struts and the prop are only one sided, and so
they can be used as templates for strut lengths.
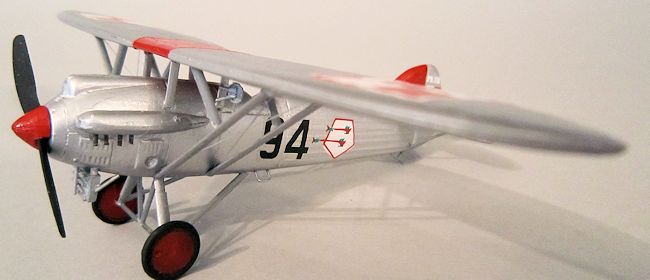
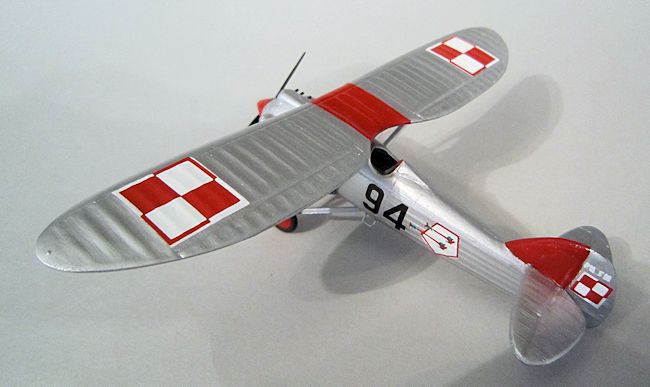
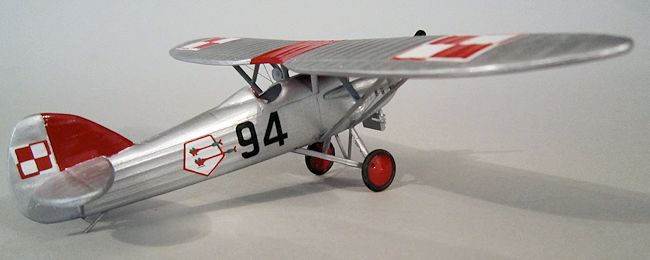
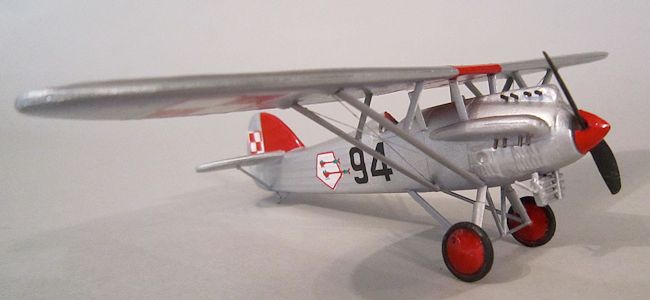
| COLORS & MARKINGS |
 Once
wing and fuselage were complete, they were painted separately. The instructions
suggest a scheme of Khaki Drab, but I have one too may Polish aircraft in this
dull colour and so I chose to do a silver one, with bright red markings. Paint
came from a Humbrol rattle can, Silver number 11. I tried a darker silver for
the canvas parts, but the difference can't be seen in the pictures, and only by
humans if they have cat's eyes, and are hunting at dusk. The red bits are easily
masked off and done with Tamiya Red X-7, which is one of the very few Tamiya
paints which can be brushed, although you have to move quickly, or the usual
clumping occurs.
Once
wing and fuselage were complete, they were painted separately. The instructions
suggest a scheme of Khaki Drab, but I have one too may Polish aircraft in this
dull colour and so I chose to do a silver one, with bright red markings. Paint
came from a Humbrol rattle can, Silver number 11. I tried a darker silver for
the canvas parts, but the difference can't be seen in the pictures, and only by
humans if they have cat's eyes, and are hunting at dusk. The red bits are easily
masked off and done with Tamiya Red X-7, which is one of the very few Tamiya
paints which can be brushed, although you have to move quickly, or the usual
clumping occurs.
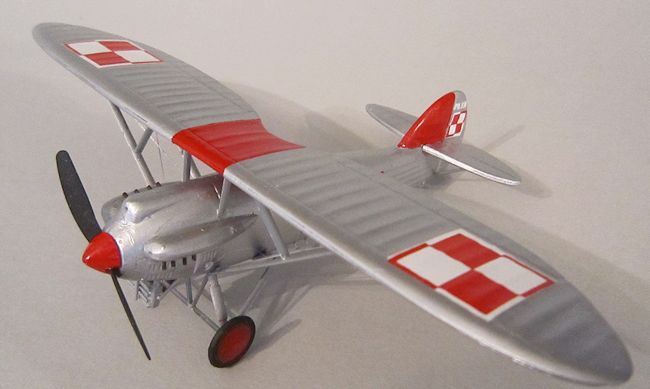
| FINAL CONSTRUCTION |
After that, cut some cabane struts, and let the parasol wing rest on
them until set. Then come the mainplane struts, measured from the vacform ones.
At this point a pair of X-plan rigging wires each side should be added. Then the
support struts, using pictures from below to see where they go.
The undercarriage struts have to be cut from lengths of strut material,
and once in place, I addressed the nose mounted radiator, which is hopelessly
blobby in the vacform part. I used that as a template and added extra thickness
of plastic card, sanded it all to the correct shape, and then detailed the front
with plastic rods for the vents. Narrow rod was used for the mountings.
 Each
cylinder banks had four very short exhausts and these were cut from rod,
painted dark rust with black exhaust holes, and cemented in place. How easy it
is to write that last phrase. For “cemented in place”, read “reduced a grown man
to sobs of frustration and rage as he put three pairs of reading glasses in his
nose and pushed around tiny lengths of glue-encrusted plastic, with a dental
pick, until they all lined up, and then showed that several were of the wrong
length”.
Each
cylinder banks had four very short exhausts and these were cut from rod,
painted dark rust with black exhaust holes, and cemented in place. How easy it
is to write that last phrase. For “cemented in place”, read “reduced a grown man
to sobs of frustration and rage as he put three pairs of reading glasses in his
nose and pushed around tiny lengths of glue-encrusted plastic, with a dental
pick, until they all lined up, and then showed that several were of the wrong
length”.
I sometimes wonder if all modellers are not masochists. We are certainly
afflicted with something, and medical science might not yet have a name for it.
Plasto-psychotic perhaps? Polystyrosis? Whatever the name, there is no known
cure. The condition can only be alleviated by more plastic, arranged in piles in
the loft.
I noticed in some of the photos that there seems
to be a rear-view mirror mounted on the port rear cabane, and so one was rustled
up from scrap plastic and rod.
Same regarding a tail skid
and two struts
for the tailplane.
Finally, I used the spinner from the kit, with gaps for the blades
carefully cut away, and two prop blades from the Big Bag of Propellers in my
spares box. And the same applies to the wheels. Use the vacform ones to
find a pair of the same diameter in your Big Bag of Wheels.
| CONCLUSIONS |
 A very
purposeful looking fighter and one which points the way toward the more famous
PZL 11. I have always been fond of parasol winged fighters, most especially all
those French ones of the interwar years. No vacform I ever make is going to win
prizes, because I don't have the time or desire for super-detailing. But if you
want to add to your knowledge of rare and interesting aircraft this is the only
game in town. Although I believe there is a 1/48 one made by a Polish
company called X Resin. There are even some card models available to be
downloaded from various websites, but they won't interest anyone afflicted with
Polystyrosis.
A very
purposeful looking fighter and one which points the way toward the more famous
PZL 11. I have always been fond of parasol winged fighters, most especially all
those French ones of the interwar years. No vacform I ever make is going to win
prizes, because I don't have the time or desire for super-detailing. But if you
want to add to your knowledge of rare and interesting aircraft this is the only
game in town. Although I believe there is a 1/48 one made by a Polish
company called X Resin. There are even some card models available to be
downloaded from various websites, but they won't interest anyone afflicted with
Polystyrosis.
| REFERENCES |
http://www.aviastar.org/air/poland/pws-10.php
http://www.airart3d.ovh.org/html/pws10.htm
http://www.mysliwcy.pl/forum/watki.php?id=490&ustaw=sz&s=391
May 2014
Copyright ModelingMadness.com. All rights reserved. No reproduction in part or in whole without express permission from the editor.
If you would like your product reviewed fairly and fairly quickly, please contact the editor or see other details in the Note to Contributors.