| KIT #: | ? |
| PRICE: | $9.95 |
| DECALS: | One option |
| REVIEWER: | Robert Myers |
| NOTES: |
| HISTORY |
 In the mid 1930s the Czechoslovakian
Air Force was full of obsolete aircraft. The Czech aircraft industry didn't
have the experience to develop a new bomber with a metal airframe and skin.
So Czech Government turned to the Marcel Bloch Aircraft Company of France
to provide the design for a new bomber to be license built in
Czechoslovakia by Aero and Avia. By 1937 production had begun with a few
minor differences in the weapons and internal avionics. The planes would
soon be obsolete, but the Czechs were getting experience in the design and
manufacture of the new generation of metal aircraft.
In the mid 1930s the Czechoslovakian
Air Force was full of obsolete aircraft. The Czech aircraft industry didn't
have the experience to develop a new bomber with a metal airframe and skin.
So Czech Government turned to the Marcel Bloch Aircraft Company of France
to provide the design for a new bomber to be license built in
Czechoslovakia by Aero and Avia. By 1937 production had begun with a few
minor differences in the weapons and internal avionics. The planes would
soon be obsolete, but the Czechs were getting experience in the design and
manufacture of the new generation of metal aircraft.
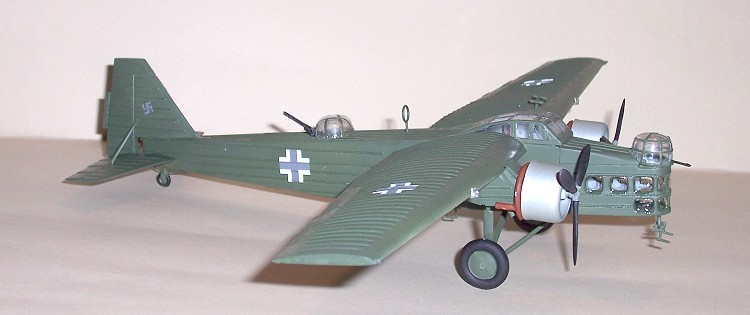
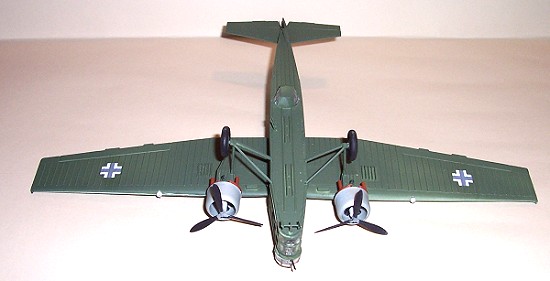
After the Germans invaded Czechoslovakia production continued for a short time. The new aircraft received German markings and were pressed into liaison and other non-combat duties. Older existing MB.200s were also pressed into Luftwaffe service, with a few going to Romania and Bulgaria. This particular model aircraft represents a French design, built by the Czechs and flown by the Germans.
| THE KIT |
 This Model was made by KOPRO/KP, but it has come out in several different
Czech manufacturers names over the years. It comes in a large box. I
thought the plane would be huge. It’s not, the sprues are molded so that
the majority of the parts are on just two very large sprues. The plastic is
slightly soft and molded in a light grey with very little flash. There are
a bunch of clear side windows. They are thick and vary in size from to
small to too big. The canopy is a one piece clear mold that is well formed
with delicate engraving to help with the masking.
This Model was made by KOPRO/KP, but it has come out in several different
Czech manufacturers names over the years. It comes in a large box. I
thought the plane would be huge. It’s not, the sprues are molded so that
the majority of the parts are on just two very large sprues. The plastic is
slightly soft and molded in a light grey with very little flash. There are
a bunch of clear side windows. They are thick and vary in size from to
small to too big. The canopy is a one piece clear mold that is well formed
with delicate engraving to help with the masking.
My instructions were on one big fold out sheet. They have top and bottom views with little dotted lines showing where each part goes. They are adequate, but not very helpful for the less experienced modeler. My version of the kit was from the early 1980s. I have been told the newer versions have a much improved set of instructions.
| CONSTRUCTION |
I started construction with the cockpit as usual, but it is a little different. There are two sides to the cockpit. Each glues directly to each fuselage half so that when the sides are joined there is a walkway between the seats. Works great! As expected for 1/72 scale the cockpit detail is minimal. I left the interior in the molded grey, as the instructions show a grey interior. After painting the control wheels flat black and putting in some gloss black dots for instruments I sprayed the entire inside of the fuselage with dull coat. Oops, so much for the glossy glass over the instruments. No biggy a dot of Testors Clear Parts Cement fixed that.
 Next I tried to fit the clear windows
into the fuselage. None of them fit well. So I threw them into the parts
box and got out the Testors Clear Cement. I put a generous dab on the
tapered end of a paint brush handle, inserted it into the window opening,
gave it a complete turn to coat the window frame and pulled the brush out
verrrrrry slowly. WOW...easy thin a and very clear windows.
Next I tried to fit the clear windows
into the fuselage. None of them fit well. So I threw them into the parts
box and got out the Testors Clear Cement. I put a generous dab on the
tapered end of a paint brush handle, inserted it into the window opening,
gave it a complete turn to coat the window frame and pulled the brush out
verrrrrry slowly. WOW...easy thin a and very clear windows.
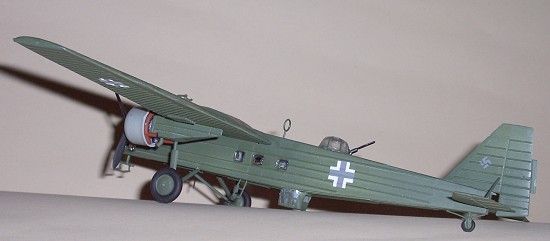
The fuselage is a square boxy affair with four distinct sides. I assembled them according to the instructions with no problems. The bottom front and rear of the fuselage needed a little putty to fill the gaps. A quick sanding on the flat surface was easy and didn't even wipe out any detail. The wings were next. They are just a top and bottom half. I glued them together with lots of liquid glue so that some seeped out on the joining surfaces. When they dried I gave the mating surfaces a light sanding. No putty was needed. The wings glue to the fuselage with a butt joint, but there is a spar that passes thru the fuselage and into each wing. It really helps align and support the wings. The tail slipped in to place with no problems.
The landing gear is robust and handles the weight well, but it takes a little tweaking to get everything to sit level. I recommend using regular plastic glue and letting the plane sit overnight to dry. Even my slow super glue gel sets up a little to fast. The MB.200 was now assembled except for the engines, cowlings, turrets, canopy and wheels. I coated the canopy and turrets in clear masking and tacked them in place with the masking liquid. I left the windows made from Testors Clear alone, can't mask those. I will explain about them in the final assembly.
| COLORS & MARKINGS |
 The engines were brush painted in
aluminum and grey with a flat black wash. The propellers were paint a flat
black. It was now off for paint. I used Model Master #2106 French Khaki.
The instructions called for a French Khaki, so I hope this is right. Even
if it isn't, looks good to me!
The engines were brush painted in
aluminum and grey with a flat black wash. The propellers were paint a flat
black. It was now off for paint. I used Model Master #2106 French Khaki.
The instructions called for a French Khaki, so I hope this is right. Even
if it isn't, looks good to me!
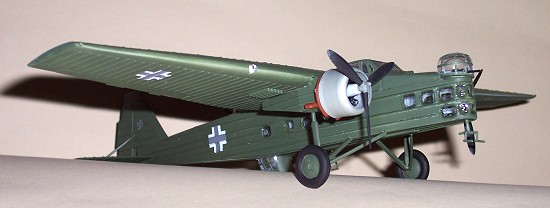
I tossed the kit supplied decals. They were old and yellowed. Instead I used a set of generic German markings made by EagleCals. I plan to do a full review of them, the short story is that they worked fine. They seemed to be a little stiff. After I used a little Micro Sol they snuggled down on the corrugated wings and sides with no problem at all. I like them, BUT I was not real happy with the grey color. I am used to seeing Luftwaffe crosses in a jet black! I e-mailed EagleCals and asked them about the grey.
They explained that they made the markings to be more accurate in the 1/72 scale by adding the white to make a grey. Also they explained that German aircraft weathered (just like ours) and faded. Those are the reasons for the grey rather than jet black. Ok. I still prefer the jet black and plan to replace these markings. I do commend EagleCal for being responsive and having a good explanation. I will leave it up to you to decide for yourself.
| FINAL CONSTRUCTION |
 After the paint dried for a week, (have to work to support my modeling
habit) I coated the plane with Future to apply the decals. When everything
was dry, I started gluing on the engines and small parts. No surprises
here, except most of the parts glue directly onto the surface of the
aircraft. I drilled small locating hole for some parts and touched up the
paint. I found a photo on the internet that showed the engine cowlings to
be an aluminum or maybe grey. I decided to repaint them aluminum for some
extra color to catch the eye. I also noticed the real airplane had no wheel
spats, so I left them off.
After the paint dried for a week, (have to work to support my modeling
habit) I coated the plane with Future to apply the decals. When everything
was dry, I started gluing on the engines and small parts. No surprises
here, except most of the parts glue directly onto the surface of the
aircraft. I drilled small locating hole for some parts and touched up the
paint. I found a photo on the internet that showed the engine cowlings to
be an aluminum or maybe grey. I decided to repaint them aluminum for some
extra color to catch the eye. I also noticed the real airplane had no wheel
spats, so I left them off.
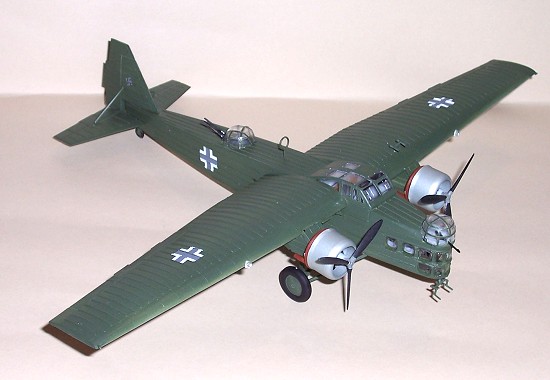
After all of the touch up was done, I gave the plane one more coat of Future to even out the paint sheen. I let that dry overnight and finished off with a dull coat. I popped off the turrets and canopy. The liquid masking peeled right off. I re-masked the canopy with tape and sprayed it with the flat khaki. The lines on the turrets have always defeated me! This time I unrolled a couple of 6 inch lengths of 1/16 pin stripping tape on a piece of glass. Used a metal ruler and cut the tape lengthwise so it is about 1/32nd of an inch. Next I painted the tape Khaki. After pulling the tape off of the glass I made the ribs on each turret. They are nice and straight!!!! The clear parts were glued back on. Remember the clear windows that are now painted. I just took an Exacto knife and cut each one out, shook out the pieces and made new ones. That took all of ten minutes and I have thin wonderful windows.
| CONCLUSIONS |
The MB.200 is a unique 1930s era airplane that can fill several niches in a collection. The fuselage has all the aerodynamics of a brick, but that makes for a simple build with no seam on the mating halves of the fuselage to sand. I would recommend this kit as an inexpensive kit for a junior builder. The more experienced builder should like it as well. There is a wealth of detail that can be added. You Luftwaffe collectors should check it out. I enjoyed the build.
January 2005
| REFERENCES |
kit instructions
luftwaffe-exerten.co.uk
Copyright ModelingMadness.com. All rights reserved. No reproduction in part or in whole without express permission from the editor.
If you would like your product reviewed fairly and fairly quickly, please contact the editor or see other details in the Note to Contributors.