SMER 1/48 Fiat CR.20
| KIT #: | |
| PRICE: | $10.00 for a bag of kits + |
| DECALS: | None |
| REVIEWER: | Christopher Campbell |
| NOTES: | An exercise in creativity and tenacity |
| HISTORY |
FIAT got into the aviation game before World War I, as an engine supplier. Already a supplier of engines for automobiles and trucks, and an early powerhouse in Grand Prix auto racing, it was only a matter of time before they began building aero and marine engines. They supplied aero engines throughout the Great War and began producing complete aircraft shortly thereafter.
One of their first designs was the CR.1, the direct ancestor of the aircraft that is the subject of this review. This was a wood and fabric design for Regia Aeronautica featuring a V-8 engine and pair of Vickers .303 machine guns. It was a successful, if unremarkable. design that began to serve with the Italian Air Force starting in 1924.
Two years later, an improved, all metal construction sesquiplane powered by an V-12 engine producing 410 horsepower. Armament consisted of the same twin Vickers guns mounted in the cowl, but also included a provision for a second pair mounted low on the sides of the forward fuselage. This four-gun suite was somewhat novel for its time, twin guns being the general order of the day.
 Top speed was around 170 miles per hour and the
service ceiling approached 25,000 feet. Again, aside from its optional armament,
this was not exceptional, being comparable to most similar designs of its day.
Still, it was a practical, serviceable design and as such was well liked both in
its home country and as an export fighter.
Top speed was around 170 miles per hour and the
service ceiling approached 25,000 feet. Again, aside from its optional armament,
this was not exceptional, being comparable to most similar designs of its day.
Still, it was a practical, serviceable design and as such was well liked both in
its home country and as an export fighter.
Italian fighter doctrine of the day, as with most air arms, emphasized maneuverability. In that respect the Cr.20 was quite good, if not exceptional. It as was noted to be highly aerobatic, a trait that it passed down to its successors, the CR.30, Cr.32, and what many regard as the ultimate biplane fighter, the CR.42.
More than seven hundred were produced, including a version with a 450 horsepower Isotta Franchini engine. A twin float equipped variant was developed as well, with forty six being produced, as well as a number of two-seat trainers. The Cr.20bis version featured an improved landing gear, more capable of handling rough airstrips and unimproved fields.
In Italian service it saw actions in their anti-rebel campaigns in the Italian colonial possession of Libya. It would also see use in colonial Abyssinia (more correctly known as Ethiopia) up until the early days of World War II, serving in a ground attack role. In export service, it would serve in Austria, Lithuania, Hungary, Poland, Spain, and Paraguay, there seeing action in the Chaco War.
FIAT would continue to develop the basic sesquiplane, V-12 powered design into the renown CR.32, which saw action around the globe in the 1930’s and in the early stages of the Second World War. Sadly, so far as I have been able to determine, none survive in museums today.
The Chaco War
The conflict erupted over growing tensions over a disputed border region between Bolivia and Paraguay, resulting in full armed conflict in 1932. Armed border clashes had occurred since 1928. However, the real conflict ignited when both sides sought to control the region high desert region known as the Gran Chaco, then thought to rich in oil reserves.
The conflict raged for two bloody years, with one-hundred-thousand military personnel being killed in action and approximately seventy-thousand civilians. There are some striking similarities to the coming conflict in Spain, with Italy and Argentine supporting Paraguay with equipment and advisors. Officially, Bolivia was supported by Czechoslovakia. Bolivia also utilized a great deal of U.S. and German equipment, including some surprisingly new aircraft. Whether or not there were U.S. or German advisors in the field remains a bit vague, so draw your own conclusions. (I personally suspect that there were, given the strong presence and interests of both countries in the affairs of many South American nations during the pre-Great War and Interwar era.) The same may likely be said of a significant amount of French and British equipment in Paraguayan hands.
This conflict saw the only, battles to date between tanks by two New World belligerents. Primitive by modern standards as they may have been, nonetheless, it was armor fighting armor. There were even conflicts on the waterways (three rivers flow through the region) between patrol boats and a surprising number of seaplanes in use by two landlocked countries fighting a war in what was generally arid, high desert.
 It also saw the second combat use of the Junkers Ju.52
trimotor, four serving with Bolivia. (The Ju.52 had actually been blooded months
earlier in the Columbia-Peru conflict that occurred almost concurrently.) An
interesting side note was that in my reading I discovered that it was common in
the colder months to have to drain the oil from the crankcases of the aircraft
to avoid freezing and damaging the engines. Not the sort of thing one often
associates with either deserts or South America.
It also saw the second combat use of the Junkers Ju.52
trimotor, four serving with Bolivia. (The Ju.52 had actually been blooded months
earlier in the Columbia-Peru conflict that occurred almost concurrently.) An
interesting side note was that in my reading I discovered that it was common in
the colder months to have to drain the oil from the crankcases of the aircraft
to avoid freezing and damaging the engines. Not the sort of thing one often
associates with either deserts or South America.
Bolivia also fielded the single engine Junkers W.34 and most importantly, relating to this build, Curtiss Hawk II (F11C) biplane fighters, as well as Curtiss Ospreys. To counter these, and the generally superior Bolivian air arm, Paraguay obtained five FIAT CR.20’s.
To surmise in brief, while Bolivia had the larger better equipped military, the war fell in favor of Paraguay. Paraguay made the best of their limited means and mounted three successful offensives over the course of the war. Bolivia had one successful counteroffensive. However, the growing scope of the conflict and fear that it would spill across borders had led most neighboring states to embargo shipments of arms and supplies, to include food and medical supplies, through their borders, resulting, as always in war, the suffering of civilians as well.
Paraguay had gained significant territory on the ground when international pressure mounted to resolve the conflict. The warring powers finally relented, and truce was agreed to in 1935. Paraguay would gain two-thirds of the disputed region with Bolivia retaining the remainder. Ironically, while the region is mineral rich, little in the way of petroleum reserves has ever been found there.
One enduring legacy of the conflict is Bolivia’s infamous Yungas Road, sometimes known as the Death Road in Boliva, built through the mountains by forced labor using many Paraguayan prisoners of war. It was, in effect, their Burma Road of the conflict though in famously more treacherous. It was a single lane unpaved nightmare, with no guard rail or even shoulder in most areas and was the only “direct” route through the area for many years.
It still exists, but mainly became a route for cyclists on tour in the latter 20th. Century. That did not lessen the danger, though, it has claimed eighteen lives of cyclists over the years. A newer, purpose-built road has supplanted it nearby in that same mountainous region. Known as Route 3, is it paved and has numerous safety improvements, thankfully.
| THE KIT |
There was no actual kit, as such. This is Frankenstein’s Model. Fortunately, it never turned on its creator. I had not considered submitting an article on this build. However, I was chatting with frequent contributor Tom Cleaver via email and mentioned the build, then sent some photos. He complimented me on it and I thought that it might be nice to send it in and show off this rare bird a bit. It was my first attempt at something like this, but I think it came out reasonably well and makes for quite a unique piece in my collection.
 I will apologize in advance if my details on the
actual build are a bit fuzzy. I built this model around twenty years ago. Having
always been, as anyone who read my dual 1/32 Stuka kit review will know,
somewhat Spanish Civil War obsessed, in the early 2000’s I became interested in
a similar, somewhat less well-known conflict, the Chaco War. This now obscure
conflict was the largest war confined to the America’s since the American Civil
War.
I will apologize in advance if my details on the
actual build are a bit fuzzy. I built this model around twenty years ago. Having
always been, as anyone who read my dual 1/32 Stuka kit review will know,
somewhat Spanish Civil War obsessed, in the early 2000’s I became interested in
a similar, somewhat less well-known conflict, the Chaco War. This now obscure
conflict was the largest war confined to the America’s since the American Civil
War.
After reading Aircraft of the Chaco War, I decided that I wanted to build a Bolivian Hawk II and a Paraguayan FIAT CR.20 in 1/48. While the Lindberg it was around (and is pretty decent, given its age) for my Bolivian Hawk, there was and still is no 1/48 FIAT CR.20. At that point the only kits were three 1/72 limited run kits from the mid-garage kit era from Aeroclub, KPL, and Esoteric. If I was going to build a CR.20, I was going to do it the hard way.
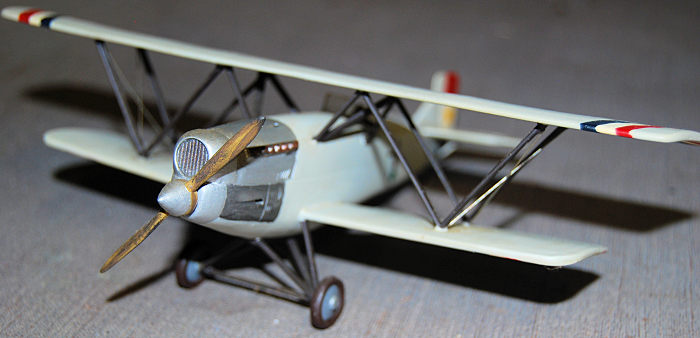
As luck would have it, I had recently gotten my hands on big bag of SMER kits from the old 1/48-1/50 scale Artiplast mold kits from a model show vendor for $10. In it there were three Cr.32’s, two Macchi Mc.200’s, two Re.2000’s, two Bristol Bulldogs, and an Ansaldo SVA-5. As I looked at the lines of the FIAT Cr.20, I started wondering, could I scratchbuild and kitbash one? Then, even before having started on the Cutiss, I did.
The main components used were from one of the CR.32’s. The landing gear was made out of components from by the SVA 5 and the CR.32 and there were miscellaneous items gleaned from the parts box, and a chunk of scrap balsa. It would be an interesting and enlightening experiment.
| CONSTRUCTION |
I started this build by addressing the shape of the wings. While also a sesqiplane form biplane, the wings have very little else in common with its descendent other than the ribbing. I found a set of three-view drawings of the CR.20 and scaled them out to approximately 1/48 scale with a copier (I think it is actually closer to 1/49) and made several copies, some of which would serve as templates.
I placed them over the wings and began tracing out the correct contours with a pencil. Once I was satisfied with these, I went back over them with a Sharpie marker, knowing that I would rub off pencil marks as I attempted to sand and shape them.
The outer wings were first cut to the correct angle
with a razor saw. The remaining reshaping was done with fine half-round
woodworking files. This worked much better than I had expected. I finished them
out by sanding the rough smooth with 320 and 400 grit sandpaper followed by 0000
steel wool.
The CR.32 rudder was all wrong, though. This was the first thing that I
addressed with the fuselage. I cut this away and then did the same with the
rather large, squarish rudder from the SVA-5. This was in turn shaped in the
same way until I decided that it looked right and would fit on the tail of the
Cr.20 when the transformation was more complete. On the other hand, the
tailplane of the CR.32 would remain almost unchanged, the two aircraft being
very similar in this respect.
 The wingstruts of the two aircraft are essentially
identical as are the interplane struts. This being my first attempt at such a
dramatic conversion, I decided to leave well enough alone. However, I was, as
yet, a long way from that point.
The wingstruts of the two aircraft are essentially
identical as are the interplane struts. This being my first attempt at such a
dramatic conversion, I decided to leave well enough alone. However, I was, as
yet, a long way from that point.
From the cockpit back to the tail, the CR.32 would remain essentially unchanged. I prepared the cockpit and did some general improvement on the rather lacking kit equipment, mostly gleaning a throttle, stick, and instrument panel from the spares box. The interior was painted Testors Flat Grey, with the instrument panel in Flat Black and given a dry brushing with silver to pop out the gauges. This was then set aside, however. From the cockpit forward there was surgery to be done.
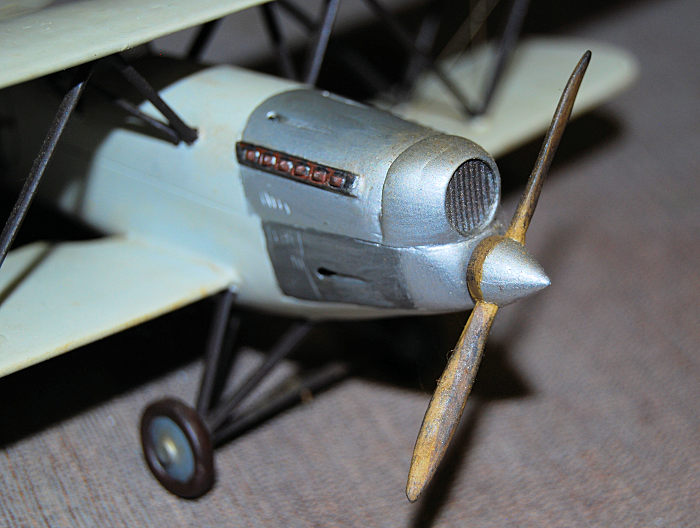
The forward fuselage had to be significantly reshaped by sanding and scribing. Virtually all detail forward of the cockpit was sanded smooth and I rescribed it with a sheet metal worker’s scribe borrowed from my father. Gun troughs were cut for the four machine guns. This was done by first drilling out the port with a pin-vise following cutting and tapering them out with a slightly thicker scribing tool. Once this was done, I sanded everything with 400 grit sandpaper and 0000 steel wool.
The forward cowl cap and radiator were completely reshaped by hand sanding with 320 followed by 400 grit paper until it looked right, then test fitted until it seemed to match the photos and drawings when test fitted to the fuselage halves. However, something had to be done about the belly.
The ventral fuselage of the Cr.20 was significantly deeper and more rounded than the Cr.32. I thought of several different options, but ultimately decided to try carving and shaping a piece of balsa to the correct contour. This took a couple of tries, as while I have done a lot of work with wood, very little of it has been on models. My first attempt was decidedly lopsided.
The second one looked more ore less right, though. I then proceeded to fit the cockpit and glue the fuselage halves together with thick CA glue. Once the basic sanding on the seams had been done, I glued my balsa belly prosthesis in place with the more of the thick CA glue.
Some puttying and sealing was done with Squadron Green putty thinned with nail polish remover in hopes of sealing both any gaps and the grain. This was very lightly sanding with 400 sandpaper. I went back over all of this, applying thin CA glue with a toothpick until I was satisfied that all of the balsa was thoroughly sealed. This was in turn sanded again, lightly and finish sanded with 1000 grit and 0000 steel wool. Finally, the cowl cap and radiator were glued in place. Now it really was staring to look like a Cr.20.
The lower wings were fitted with thick CA glue and any unwanted seam filled and sanded accordingly. The same followed with the tailplane and the rudder. Now I had to paint this Frankenstein’s abomination in plastic so that I could attempt the final assembly.
| COLORS & MARKINGS |
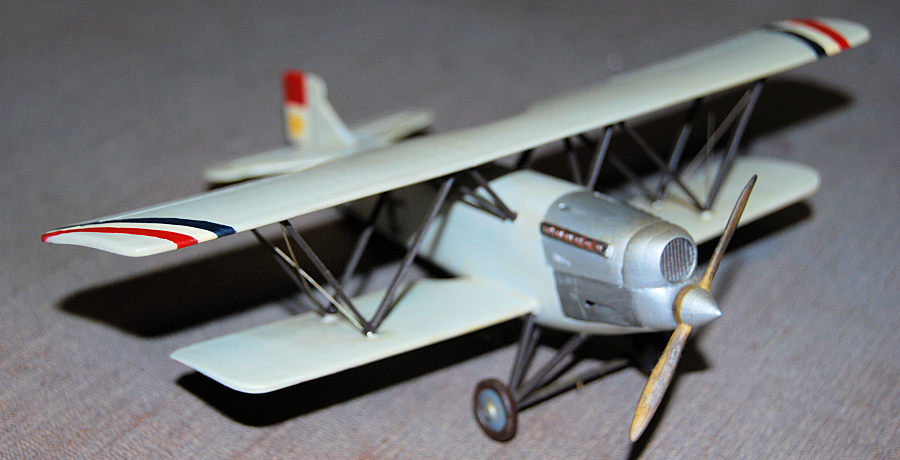
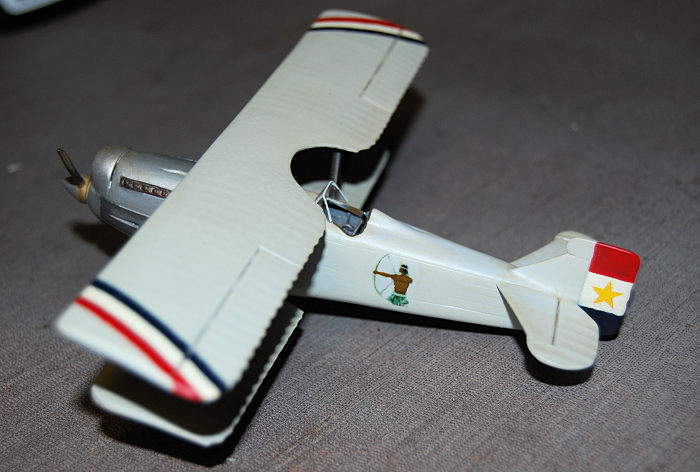
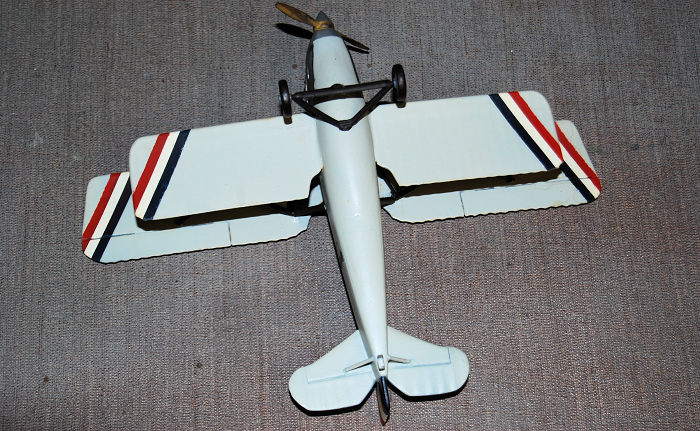
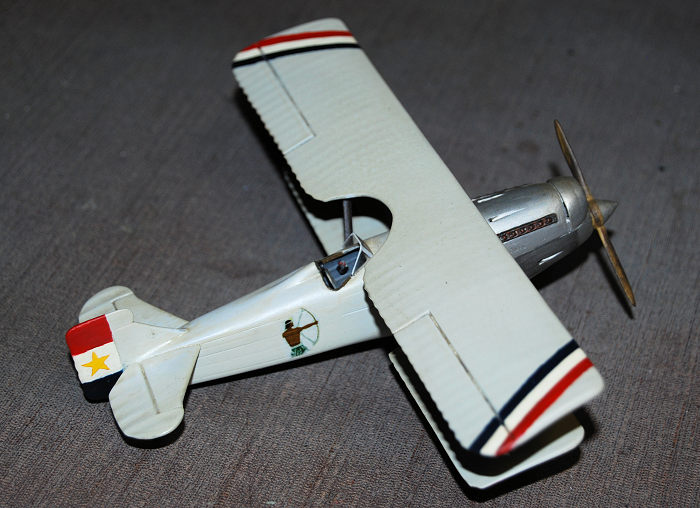
The overall color of these aircraft in Paraguayan service are noted as being pale grey or white. I painted mine (I think) in a mix of Model Master Ghost Grey and Flat White. However, before doing that, I first needed to paint the markings on.
 Some Paraguayan aircraft carried one of two different
varieties of roundel on the wings. The CR.20’s featured angled red-white-blue
wing bands. These were painted using Model Master Insignia Red, Flat White, and
Insignia Blue, respectively. The same was done with the rather large bands on
the tail. These were then masked off with ordinary masking tape (the old
fashioned yellow-white stuff, as I had not yest discovered Tamiya tape.). Then
the Grey-white was sprayed on, using my old single action Paasche airbrush.
While this was drying, I sprayed with and gear struts with. Floquil Dark Umber.
Some Paraguayan aircraft carried one of two different
varieties of roundel on the wings. The CR.20’s featured angled red-white-blue
wing bands. These were painted using Model Master Insignia Red, Flat White, and
Insignia Blue, respectively. The same was done with the rather large bands on
the tail. These were then masked off with ordinary masking tape (the old
fashioned yellow-white stuff, as I had not yest discovered Tamiya tape.). Then
the Grey-white was sprayed on, using my old single action Paasche airbrush.
While this was drying, I sprayed with and gear struts with. Floquil Dark Umber.
The propeller was reshaped slightly and then painted and dry-brushed in various tans, browns, and blacks to simulate wood grain. Once I was satisfied with this and it had dried, I painted the spinner in Testors Silver. The cowl was then also carefully brush painted in Testors Aluminum and Testors Silver.
| FINAL CONSTRUCTION |
Al of struts were first painted in Floquil Dark Umber, then overpainted, as were the gear struts in thinned gloss black. The illustrations of these seem to show some sort of black varnish on these rather than actual paint. I thought that this would be a closer match.
The stock interplane struts were fitted to the fuselage without incident and the upper wing was glued in place and aligned. The wing struts were then fitted and glued into place. This did not go as well as it had with my stock SMER CR.32 that I finished in Venezuelan livery, though I have never quite figured out why. In any case, one they were in place and secured with thick CA glue, I tackled the landing gear.
This had been cobbled out of the SVA gear and actually fit better than I had expected. The Cr.20 gear was a very different from that of its successor. Unfortunately, I do not recall the exact manner in which it was built at this point. The wheels were from an unknown source found in the parts bin, as neither kit had the right shape or size. The tail skid was made from scrap plastic and music wire, and painted silver.
With this done, I painted the CR.32 kit exhausts in Testors Rust, followed by dry brushing with Model Master Burnt Iron. These were very carefully glued in place with CA glue. Now all that I had to do was decal it!
I did not even have to look to know that there was no decal of the South American Native bowman. I had two choices: hand paint it or make my own. I opted for the latter. I found a color profile of the aircraft on the internet and did a cut and paste of the figure onto the appropriately, much-maligned Paint program (it was all I had to work with at the time).
 I scaled it out and printed a test shot on paper.
Satisfied, I mirrored it and printed it out on ink jet decal paper. This was
then sealed with Testors Decal Bonder Spray. While this was drying, I sprayed
the model in a light coat of Testors Gloss. Then I sourced and appropriately
sized yellow star for the tail from a long-forgotten decal sheet.
I scaled it out and printed a test shot on paper.
Satisfied, I mirrored it and printed it out on ink jet decal paper. This was
then sealed with Testors Decal Bonder Spray. While this was drying, I sprayed
the model in a light coat of Testors Gloss. Then I sourced and appropriately
sized yellow star for the tail from a long-forgotten decal sheet.
I was confident in the factory printed decal and it went on with no problems. This was first experience with “roll your own” decals, though. I was a little nervous about what might happen.
Much to my surprise, I trimmed the decals of the figure, wet them appropriately and found that they slid into place and worked perfectly. The film settled down so nicely that I did not even have to use setting fluid. However, it snugged down so well that I was glad that I got it right the first time. It was obvious that wherever these settled that they were there to stay.
Satisfied with my decals, I waited from them to cure, then sprayed it with Testors Flat. The windscreen framing was painted, and it was glued in place with Elmer’s Glue. Finally, X- cross rigging wires on the outer struts were cut from music wire and glued in place. Now I actually had a 1/48 FIAT CR.20, or at least a pretty reasonable representation of one.
| CONCLUSIONS |
This was my first attempt at this kind of a project, and I was very pleased with the results. Is it perfect? Nope. I am not going to even pretend that. Still, it looks nice on the shelf and you will probably be as likely to win the lottery as seen another one. I know of one other modeler who build his own in Italian markings around the same time as mine, though I do not know the story of the build.
It was quite a challenge. I think that I spent around thirty hours on it, but I am far from certain. Shortly after this build, I started on another monumental kitbash, destined to be a Curtiss Osprey in Bolivian markings. (Smer Bristol Bulldog and Lindberg Stearman as basic source materials) However, a little traumatized by this one, it still languishes in a Ziplock. Oddly enough, I still have not built the Bolivian Hawk either, having gone into a period of Polikarpov I-16, Spitfire, and Hurricane obsession. I should probably get back into those after I finish my present insane conversion of a Williams Bros. P-35 to a Spanish SEV-3. (Insane in that it is both a monumental task and it just might leave me that way by the time that I am done.)
I will say that any modeler with some experience under his belt and the nerve to push through challenging conversion could build one of these the same way that I did. Would I recommend it? That depends on how badly you want one. It somewhat obscure, though given the influence of this particular aircraft on subsequent FIAT designs and it reasonably widespread use, it is almost surprising that at least a short run kit of the CR.20 has not been offered. Unusual, highly obscure, esoteric subjects are frequently kited these days, at least in resin, so one may eventually appear.
While rather a daunting build at times, I will say that it was not the nail-biter I had expected it to be. The fuselage was actually the most difficult part, despite the significant reshaping of the wings. Oddball subjects like this are hard to find in any scale larger than 1/72, and sometimes not even that.
I will say that it you can handle short run kits or vacuforms, you can probably knuckle down and build one of these for yourself if you are so inclined. I would advise using SMER CR.32 as a starting point for two principal reasons. One, the kits are cheap and readily available. You are going to scratch build or discard a lot of it, so why spend a lot of money on things you are going to chop up and throw away. Plus, I was surprised that I did not end up having to throw it all out and start over. That can always happen with the best planned conversions.
Secondly, and most important, the plastic on these kits is fairly soft. This makes it easier to reshape, sand off detail, and rescribe as needed. These factors did make for what turned out to be a bit of an easier job than I had anticipated.
So, give it a shot if you are so inclined. Most importantly, have fun.
| REFERENCES |
https://www.militaryfactory.com/aircraft/detail.php?aircraft_id=1602
https://en.wikipedia.org/wiki/Fiat_CR.20
https://en.wikipedia.org/wiki/Chaco_War
Aircraft of the Chaco War 1928-1935, by Dan Hagedora & Antonio L. Sapienza, Schiffer Military publishing, 1996
The Complete Book Of Fighters by William Green & Gordon Swanborough, Quadrillion Publishing, 1994
Christopher Campbell
23 January 2023
Copyright ModelingMadness.com. All rights reserved. No reproduction in part or in whole without express permission.
If you would like your product reviewed fairly and fairly quickly, please contact the editor or see other details in the Note to Contributors.