Italeri 1/72 Ju-86D-1
| KIT #: | 114 |
| PRICE: | AUD $20.00 |
| DECALS: | Three options |
| REVIEWER: | Alwin Broeckelmann |
| NOTES: |
| HISTORY |
Comes direct from information on instruction sheet as I do not profess to be a historian just a humble builder of history.
This aircraft
first appeared in 1934 and was produced from drawing board to prototype in less
than 6 months. This twin-engined machine was planned for use in both civil
transport and also as a bomber, and the required variants used an unchanged base
structure. The result being that the aircraft although constructed with methods
and materials that were very advanced for the
 time, was a compromise between two
completely different requirements and was there-fore not entirely successful in
either version. The JU 86 was twin-engined with a profile not very aerodynamic;
it had a low wing configuration with a very thick cord, and was made of metal.
The wing covering was of thin metal sheet and was the first time Junkers had
used this technique. It had twin tail fins; retractable undercarriage and a
small fixed tail wheel, on the trailing edge of the wing were the typical
Junkers three-piece slats. The two on the inside were used as wing flaps and
the outside one as ailerons. Defensive armament was insufficient too and
consisted of three 7.9mm machine guns MG 17 placed respectively as follows, one
in the glass nose, one in the dorsal turret above the fuselage mid way between
the tail and trailing edge of the main wing and the third in a semi-retractable
ventral turret just behind the trailing edge of the main wing. The offensive
armament consisted of 800kg of bombs, which were hung vertically inside the
fuselage nose upper most. Perhaps the most interesting thing about this aircraft
was that it was fitted with diesel engines, these were two Junkers Jumo 205 of
600hp inline 2 stokes. These engines compared with normal aircraft engines did
have a less specific power but offered the advantage of using fuel (diesel oil)
which is much less flammable and also much cheaper plus last but not least
diesel have a much lower fuel consumption rate. The D-1 bomber version described
here used these engines; they were however prone to frequent mechanical failure
Junkers therefore decided to replace them with 4 normal radial engines. The D-1
took part in the Spanish Civil War flying with the Condor Legion, at the
outbreak of WW2 the aircraft, which was by now completely obsolete was relegated
to training schools. How-ever at the end 1942 it was taken back into the
Luftwaffe’s service as a transport when Germany needed to use all aircraft at
their disposal in a desperate attempt to supply troops that were cut off and
besieged in Stalingrad.
time, was a compromise between two
completely different requirements and was there-fore not entirely successful in
either version. The JU 86 was twin-engined with a profile not very aerodynamic;
it had a low wing configuration with a very thick cord, and was made of metal.
The wing covering was of thin metal sheet and was the first time Junkers had
used this technique. It had twin tail fins; retractable undercarriage and a
small fixed tail wheel, on the trailing edge of the wing were the typical
Junkers three-piece slats. The two on the inside were used as wing flaps and
the outside one as ailerons. Defensive armament was insufficient too and
consisted of three 7.9mm machine guns MG 17 placed respectively as follows, one
in the glass nose, one in the dorsal turret above the fuselage mid way between
the tail and trailing edge of the main wing and the third in a semi-retractable
ventral turret just behind the trailing edge of the main wing. The offensive
armament consisted of 800kg of bombs, which were hung vertically inside the
fuselage nose upper most. Perhaps the most interesting thing about this aircraft
was that it was fitted with diesel engines, these were two Junkers Jumo 205 of
600hp inline 2 stokes. These engines compared with normal aircraft engines did
have a less specific power but offered the advantage of using fuel (diesel oil)
which is much less flammable and also much cheaper plus last but not least
diesel have a much lower fuel consumption rate. The D-1 bomber version described
here used these engines; they were however prone to frequent mechanical failure
Junkers therefore decided to replace them with 4 normal radial engines. The D-1
took part in the Spanish Civil War flying with the Condor Legion, at the
outbreak of WW2 the aircraft, which was by now completely obsolete was relegated
to training schools. How-ever at the end 1942 it was taken back into the
Luftwaffe’s service as a transport when Germany needed to use all aircraft at
their disposal in a desperate attempt to supply troops that were cut off and
besieged in Stalingrad.
Tech data:
Engines: 2 x Jumo
205 2 cycle diesels at 600hp 6 double cylinders
Span: 22.50m
Length: 17.86m
Empty weight: 5800kg
Max weight: 8000kg
Max speed: 325km at 3000m
Range 1150km with 800kg bomb load
Max ceiling: 5800m
Crew: 4
Armament: 3 x 7.9mm MG17 machine guns
Bomb load: 800kg
| THE KIT |
The kit comes on 3
sprues 2 moulded in mid grey and on with clear parts which are a little thick
but very clear including a stand of good strength. So you can build her wheels
up with the ventral gun turret lowered if you like. Also a set of decals for 3
different aircraft 2 Luftwaffe strangely for Italaerei these include swastikas
and 1 Condor Legion aircraft, and even a basic instrument panel,
 all of which
appear at this stage to be usable. 1 sheet of instructions folded into 3 pages
classic early Italaerei front page gives the description of the aircraft in 3
languages, 2nd page shows sprues and part no’s, page 3 and 4 is a
blown up view in 4 sections showing where to put all the parts in very clear
diagrams, but you will needed to study them and test fit to ensure they are
correctly placed. Plus 1 colour code diagram for crew figures in 4 languages and
a 4th description of the D-1 in another language, the back 2 pages
are a painting guide in 4 languages and decal placement diagram of the D-1 for
all 3 versions. There is minimal flash even on the smallest parts and the
plastic is firm to work with, which is nice after the soft Airfix kits I have
been working on recently, soft as warm butter it was. Panel lines look nice and
are not overly raised not sure how accurate this is as I have been unable to
find any decent photo’s of this aircraft, only a couple on the net and one in my
own collection of reference books. As to the interior it is minimalist to the
extreme but with the small glass area this will not be seen and as there is no
option for open cockpits like in a fighter it hardly rates a mention, however
this is a review and one needs to tell all.
all of which
appear at this stage to be usable. 1 sheet of instructions folded into 3 pages
classic early Italaerei front page gives the description of the aircraft in 3
languages, 2nd page shows sprues and part no’s, page 3 and 4 is a
blown up view in 4 sections showing where to put all the parts in very clear
diagrams, but you will needed to study them and test fit to ensure they are
correctly placed. Plus 1 colour code diagram for crew figures in 4 languages and
a 4th description of the D-1 in another language, the back 2 pages
are a painting guide in 4 languages and decal placement diagram of the D-1 for
all 3 versions. There is minimal flash even on the smallest parts and the
plastic is firm to work with, which is nice after the soft Airfix kits I have
been working on recently, soft as warm butter it was. Panel lines look nice and
are not overly raised not sure how accurate this is as I have been unable to
find any decent photo’s of this aircraft, only a couple on the net and one in my
own collection of reference books. As to the interior it is minimalist to the
extreme but with the small glass area this will not be seen and as there is no
option for open cockpits like in a fighter it hardly rates a mention, however
this is a review and one needs to tell all.
| CONSTRUCTION |
I started by
removing the fuselage halves from the sprue for test fitting, this went well and
they aligned perfectly with no gaps. Then stating from the floor centrepiece
fitting the cockpit rear bulkhead, pilot’s seat, instrument panel with decal
fitted and covered with tamiya clear X-22, forward gunners seat and the floor
end plate. At this stage looking under the floor plate I discovered that the
bombs tail fins were moulded into it so gave then a lick of paint, as all the
parts so far mentioned had been pre-painted of course. This was then dry fitted
to the right fuselage half, all looking
 good till we discover that the
alignment marks are barely visible not to worry put the other half in place to
see the fit, then glue the floor in place.
good till we discover that the
alignment marks are barely visible not to worry put the other half in place to
see the fit, then glue the floor in place.
Next step is to
assemble the rear gunners position and retractable turret, the tricky part here
was not to be tempted to put the turret into place until the glue was truly set.
As I discovered, the arms allowing the turret to slide in and out open and the
turret falls out, so have patience. The alignment marks for the 3 bulkheads that
make up the gunners section are very prominent so no trouble here, though there
are no locating pins to align the floor piece and gun ring mount plate so again
test fit glue and allow to dry completely. Be very careful removing the gun ring
from the sprue it is extremely delicate, you need to have the top gunner in
place if you are using him before you can mount the machine gun into the ring.
The gun has very 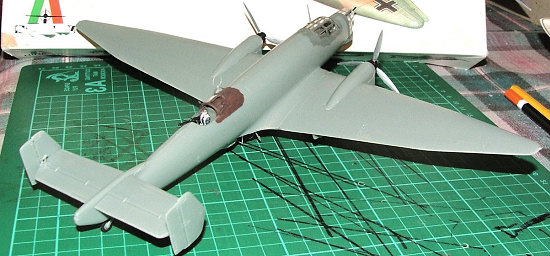 small indentations that the gun ring pins fit into but it’s a
gentle task don’t rush, and then a small dab of gun ensures it remains in place.
As I was building wheels down and being bombed up I did no put the lower gunner
or machine gun into the turret as it is in the up position.
small indentations that the gun ring pins fit into but it’s a
gentle task don’t rush, and then a small dab of gun ensures it remains in place.
As I was building wheels down and being bombed up I did no put the lower gunner
or machine gun into the turret as it is in the up position.
We then place the
pilot into position on his seat and give him the control yoke to hold onto,
retractable turret into its bracket. Now glue the fuselage halves together
holding in place with your own style of clamping. Once this dries the front
gunners clear floor piece is glued into the nose and the gunner onto his seat.
Now we place the machine gun into its mount in the nose glass cage, glue the
cockpit canopy as well as the top gunners glass slide. Once the gun mount has
dried I glued the forward glass cage to the nose, although I actually advise you
to wait until the last minute to put this on, as the machine gun becomes quite
an annoyance sticking out just waiting for a clumsy moment to snap it off.
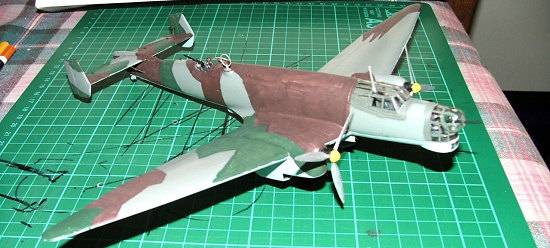
Now the landing gear is assembled, here I found that the outer half of the wheel without the hole in it needed to the centre scrapped out slightly to allow the wheel to turn freely once the holding ring had been glued to the stub axle end. Then the wing centre section is test fitted looks good so apply the glue and hold it in place with your chosen method I used clothes pegs from my wife’s washing line. The instructions show that the wheels are mounted at this point I didn’t but moved onto the wing assembly. The landing light needs to be glued into place before you assemble the wing sections; these went together with no trouble aligning perfectly. While these are drying place the tail plane and rudder section into position and allow to dry, the struts are left and right so make sure you use the correct one for each side. Again this section went together with no trouble. The wings are now mated to the fuselage after test fitting glued into place, there was a very small gap in a couple of spots but this was remedy with the old super glue.
Next I mounted the landing gear this was a fiddly job and takes a good deal of patience, but looks really good once you get it right. The bomb bay doors are fitted next, I have them open for loading. The crew access hatch and ladder are placed into the under belly just in front of the lower turret, again I have this open and ladder down. The radio antenna mast is fitted to the top of the cockpit canopy and the loop aerial is fitted to the top of the fuselage jus forward and to the right of the gunner position, and what appears to be an antenna is fitted to the belly to the right of the access hatch. All done unless you now need to fit the nose cage.
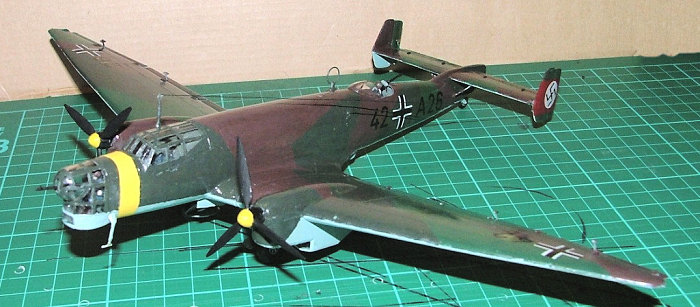
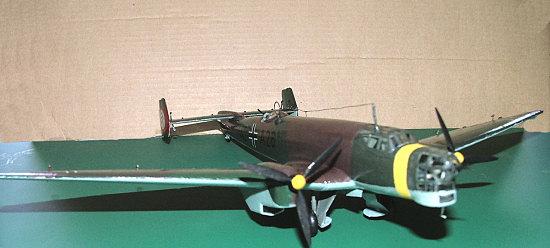
| COLORS & MARKINGS |
Painting:
I chose to go
with one of the Luftwaffe versions so nothing fancy a relatively simple tri
colour scheme. The underside is Humbrol RLM light blue 65, the upper surfaces
are Tamiya XF-61 dark green, XF-10 flat brown and XF-58 olive green, XF-1 fl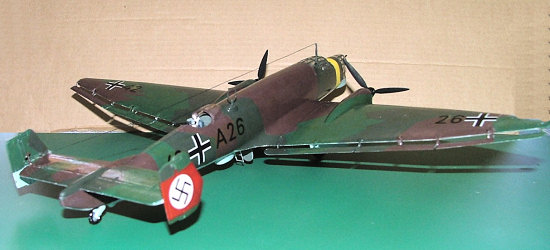 at
black for the wheels and metal areas in XF 16 flat aluminium. XF-3 flat yellow
was used for the band around the nose and prop spinners. XF-22 RLM grey for the
interior walls.
at
black for the wheels and metal areas in XF 16 flat aluminium. XF-3 flat yellow
was used for the band around the nose and prop spinners. XF-22 RLM grey for the
interior walls.
Decals:
The deals that came with the kit are very slightly yellowed but I chose to use them anyway. As they are very old I gave them a coat of tamiya X-22 clear, this helps hold them together should they be too fragile or brittle. I have used this technique successfully with a number of after market decals that tend to ribbon or divide into strips once wet. They went onto the prepared surface well; as I was using matt paint I put a light coat of X-22 where the decals were to go. The minor yellowing is only slightly visible on the light blue under the wing tips.
| CONCLUSIONS |
Over all a very nice build, no major issues were found. I really enjoyed building this kit and would recommend it to any-one who has built a couple of twin engine aircraft as this is a bit trickier than a single engine kit but my over all impression is that this is a great kit. One for the traditionalist who just loves history with-out the need to make it look super fancy.
October 2007
If you would like your product reviewed fairly and fairly quickly, please contact the editor or see other details in the Note to Contributors.