AZ Models 1/72 Avro 626 Prefect
| KIT #: | AZ 7229 |
| PRICE: | £15 or approx $30 |
| DECALS: | Four options |
| REVIEWER: | Chris Peachment |
| NOTES: |
This is
a typical AZ short run product, with no locating tabs. Plastic is soft
and easily workable. No flash, but seams need removing. |
| HISTORY |
The Model 626 was developed from Avro's 621 Tutor for export, intended
for aircrew training and
also other roles. The 626 was also a two-seater, but differed from the
Tutor in having an additional cockpit behind the rear seat. This cockpit
could be fitted with a machine gun and also carried equipment for
 navigation, wireless and gunnery training. Aside from that it was
identical to the Tutor with a fabric-covered, metal airframe and
single-bay wings. Most of the 626s, like the Tutors, had a 240hp
Armstrong Siddeley Lynx engines. Some 621s were fitted with floats and
skis. The prototype was first flown in 1930.
navigation, wireless and gunnery training. Aside from that it was
identical to the Tutor with a fabric-covered, metal airframe and
single-bay wings. Most of the 626s, like the Tutors, had a 240hp
Armstrong Siddeley Lynx engines. Some 621s were fitted with floats and
skis. The prototype was first flown in 1930.
One early demonstration aircraft was sent to South America in 1931.
After a record-setting flight over the Andes the aircraft was
commandeered by the Argentine military to quell a local uprising. I
don't know how it did this, since it is hard to imagine it carrying much
by way of bombs. Perhaps it just flew over the rebels, who fled back
into the pampas, gibbering about the great metal bird in sky. It must
have done the job well though, because an order followed for 14 of the
aircraft.
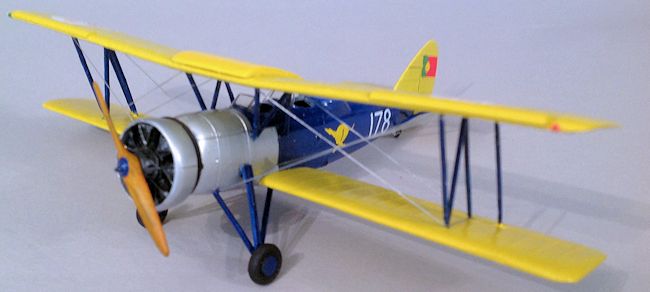
The biggest foreign users were Chile, Greece and Portugal. Sales ended in 1939, but many Prefects were in service until 1945. Only two civil machines were on the UK register pre-war. After the war, two ex-RAF Prefects were repainted for civilian use. And there is still one flying in New Zealand.
| THE KIT |
| CONSTRUCTION |
 There are a number of other boxings of this kit, including an attractive
pre-war British version with red sunbursts on the wings. I wanted this
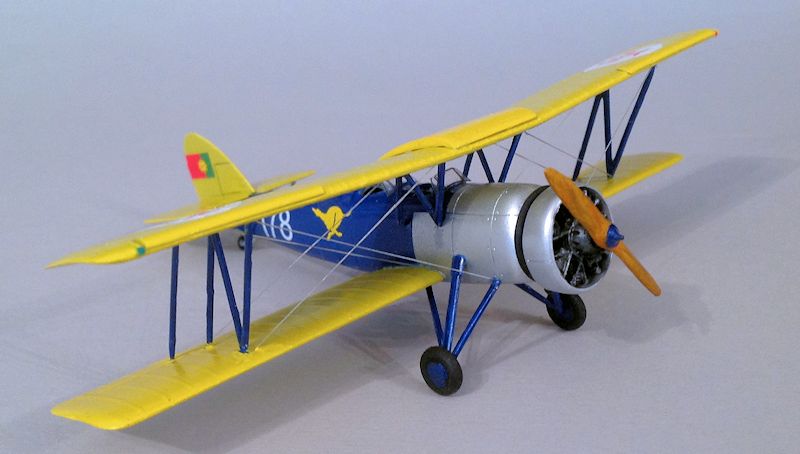
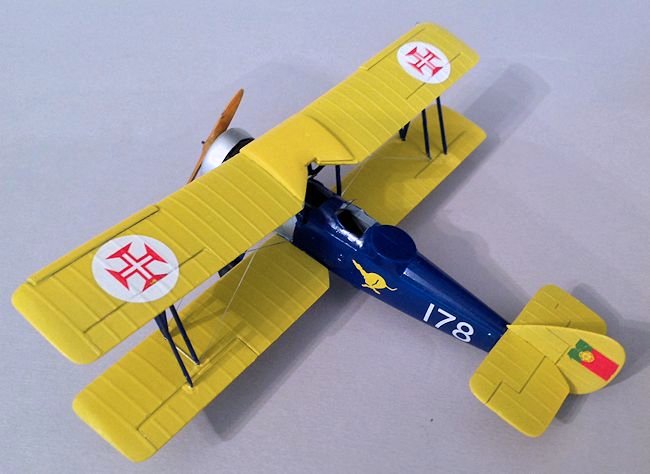
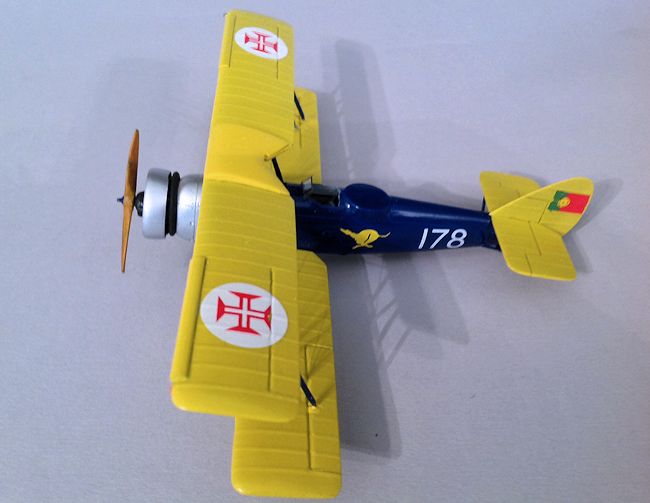
version because I have always been fond of the Portuguese roundels which are
the Cross of the Portuguese Order of Christ, sometimes known as the Christ's
Knights Cross. Portuguese vessels originally led by Prince Henry the
Navigator, sailed the world
with this very cross on their sails.
I also like the greyhound motif on the fuselage.
There are a number of other boxings of this kit, including an attractive
pre-war British version with red sunbursts on the wings. I wanted this
version because I have always been fond of the Portuguese roundels which are
the Cross of the Portuguese Order of Christ, sometimes known as the Christ's
Knights Cross. Portuguese vessels originally led by Prince Henry the
Navigator, sailed the world
with this very cross on their sails.
I also like the greyhound motif on the fuselage.
The build was straightforward, beginning as ever with the cockpit, which is a neutral grey. There is an etched set of seatbelts. Fit of the parts is fine, and I am coming to prefer having no location tabs as this makes alignment easier. You will need to sand the rear cockpit cover to make sure it is flat. But no filler was needed.
| COLORS & MARKINGS |
As usual, once the fuselage was done, I painted it and the wings separately.
The wings are Humbrol trainer yellow, and the blue comes from Tamiya Blue
X-4. If you are brushing this it will need to be thinned, otherwise the
dread clumping will occur.
Wing and fuselage markings were added now. And for some reason the fin flashes proved recalcitrant and need plenty of Microset and then varnish. The other markings went on perfectly.
| FINAL CONSTRUCTION |
 The
lower wings can be fitted now, although a word of warning is called for
here. The butt joints are at an angle, and the wings need very careful
alignment with the fuselage. Get it wrong at this point and everything later
from the tail to the undercarriage will be out of kilter, and you will end
up with an aircraft that looks like it has been badly repaired after a
horrible prang.
The
lower wings can be fitted now, although a word of warning is called for
here. The butt joints are at an angle, and the wings need very careful
alignment with the fuselage. Get it wrong at this point and everything later
from the tail to the undercarriage will be out of kilter, and you will end
up with an aircraft that looks like it has been badly repaired after a
horrible prang.
Since there are no locations holes or dimples for the cabanes, I mounted the
upper wing first on the outer struts (already painted), then offered up the
cabanes. It is wise to drill out the location holes under the upper wing
too.
Rigging is best done now, and is limited and perfectly straightforward. I
used my usual elastic thread, coloured silver with a gel pen, and fixed with
drops of superglue gel applied with a toothpick.
The undercarriage presented no problems, although again there are no
location holes. Check carefully with the instructions and box art, and you
won't go awry. Tail struts need to be made from plastic rod.
The nicely detailed engine is a resin item. Make sure that when you file off
th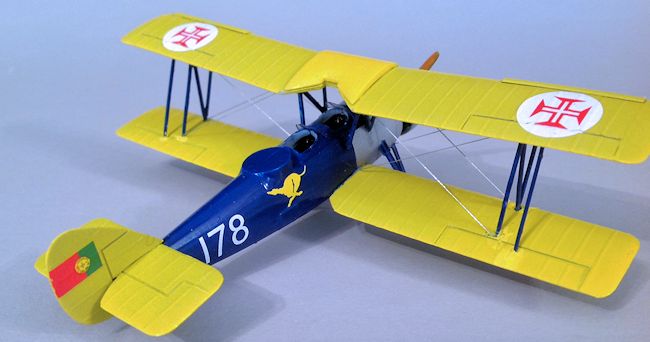 e rear moulding plug that you leave enough space for the exhaust ring,
which sits close behind the cowling. Flat black for the engine with some dry
brushing of gunmetal, and dark rust for the exhaust.
e rear moulding plug that you leave enough space for the exhaust ring,
which sits close behind the cowling. Flat black for the engine with some dry
brushing of gunmetal, and dark rust for the exhaust.
Three very nice windscreens are provided with printed outlines, and folding
lines. Since the rear cockpit was covered I used only two of them. They were
fixed with Humbrol Clearfix, though any white PVA wood glue will do.
Finally the prop got a coat of Mid Stone, some Dark Earth streaking, a coat
of clear orange, a blue nose cone, and was mounted with superglue at ten to
four.
| CONCLUSIONS |
 AZ always come up with the goods for rare aircraft which have been neglected for
too long by the kit makers, and this one is no exception. It is a very neat
little trainer, which didn't perhaps endear itself to flyers as much as the
Tiger Moth. But I am surprised there aren't more flying in the world still. It
sits very nicely next to the new Airfix Tiger Moth, and the two complement each
other perfectly. I suspect that, at dead of night, they mutter compliments to
each other about their respective bright colours and moan about the heavy
landings of the pupils who flew them.
AZ always come up with the goods for rare aircraft which have been neglected for
too long by the kit makers, and this one is no exception. It is a very neat
little trainer, which didn't perhaps endear itself to flyers as much as the
Tiger Moth. But I am surprised there aren't more flying in the world still. It
sits very nicely next to the new Airfix Tiger Moth, and the two complement each
other perfectly. I suspect that, at dead of night, they mutter compliments to
each other about their respective bright colours and moan about the heavy
landings of the pupils who flew them.
| REFERENCES |
http://www.aviastar.org/air/england/avro_prefect.php
http://www.flugzeuginfo.net/acdata_php/acdata_avro_626_en.php
http://www.airliners.net/photo/1366993/
http://www.edcoatescollection.com/ac6/Avro%20626%20Prefect%20REAF.html
September 2014
If you would like your product reviewed fairly and fairly quickly, please contact the editor or see other details in the Note to Contributors.