| KIT #: | 408 |
| PRICE: | $40 or so in 2005 |
| DECALS: | Four options |
| REVIEWER: | Spiros Pendedekas |
| NOTES: |
| HISTORY |
Developed privately as the Gloster SS.37, the Gladiator was RAF's last biplane fighter. Already rendered obsolete by newer monoplane designs even as it was being introduced, it nevertheless saw action in almost all theaters during the Second World War and with a large number of air forces, some of them on the Axis side. The RAF used it in France, Norway, Greece, Malta, the Middle East, and the brief Anglo-Iraqi War (during which the Royal Iraqi Air Force was similarly equipped). Other countries deploying the Gladiator included China, Finland, Sweden, Norway, Belgium and Greece.
Though often pitted against more formidable foes during the early days of the Second World War, the Gladiator acquitted itself reasonably well in combat. South African pilot Marmaduke "Pat" Pattle was the top Gladiator ace with 15 victories with the type. In total, 747 Gladiators were built.
 Gladiators of RAF
33 and 80 Squadrons assigned to the Near East saw active service during the
Arab Revolt in Mandatory Palestine in the late 30’s. They were mainly
deployed performing the so called “Air-Pin '' operations, where they would
appear over a village before ground troops were seen approaching it,
shooting at every fleeing person. Of course, apart from partisans, many
civilians lost their lives during those operations.
Gladiators of RAF
33 and 80 Squadrons assigned to the Near East saw active service during the
Arab Revolt in Mandatory Palestine in the late 30’s. They were mainly
deployed performing the so called “Air-Pin '' operations, where they would
appear over a village before ground troops were seen approaching it,
shooting at every fleeing person. Of course, apart from partisans, many
civilians lost their lives during those operations.
By May 1939, with the Arab strength in the countryside compromised and a sort of “peace” being settled, the machines returned to their normal stations in Egypt, awaiting the imminent war with the Axis, a war that did not seem too far away.
Bill “Cherry” Vale, DFC & Bar, AFC, born on 3 June 1914, was a RAF fighter pilot and flying ace of the Second World War. He was credited with 30 enemy aircraft shot down, shared in the destruction of three others, and claimed six damaged and another two shared damaged. His 20 kills achieved while flying the Hurricane and his 10 with the Gladiator, made him the second highest scoring Hurricane and biplane pilot in the RAF, in both cases after Marmaduke "Pat" Pattle . He retired from the RAF in 1959 and was sadly killed in a road accident on 29 November 1981.He had the reputation of a staunch pilot, displaying great courage and determination, even at the most adverse of odds.
| THE KIT |
Roden came in 2002 with a new tool Gladiator Mk.I, supplementing it soon after with the MkII and Sea Gladiator . Those kits, while limited run in nature, were “modern” kits compared to the good but elderly Pyro/Lindberg offerings and were praised by the modeling world back then. My specific copy was the initial release Mk.I, coming in a good quality top opening box with an amazing box art of a Gladiator flying unseen over a formation of Italian Bredas. The box art was created by the beloved and much missed Valeriy Grygorenko.
For a look of what is in the box, you may read our Editor’s preview of the kit.
| CONSTRUCTION |
 I started by attaching the rudder pedals onto the cockpit floor, which was
subsequently trapped between the fuselage halves (the sidewalls were
beforehand painted cockpit color). It was only then that the instrument
panel was attached in position: some trimming of its top part and some
twerking around were necessary, but in the end it locked in position. The
kit provides a kind of “box” to be attached aft of the headrest, but still
the area looked empty, so suitable pieces of sheet styrene filed to shape
were added, with the area then looking passable under a closed canopy. Basic
cockpit color was Hu78 Cockpit Green, with black instrument panel, grip,
throttle box, gunsight base and some sidewall details. The seat received
seat belts from masking tape. The instrument decals disintegrated upon
trying to affix them, so the instrument panel was dry-brushed with silver,
with a couple of red “knobs” done with a fine brush. looking acceptable.
I started by attaching the rudder pedals onto the cockpit floor, which was
subsequently trapped between the fuselage halves (the sidewalls were
beforehand painted cockpit color). It was only then that the instrument
panel was attached in position: some trimming of its top part and some
twerking around were necessary, but in the end it locked in position. The
kit provides a kind of “box” to be attached aft of the headrest, but still
the area looked empty, so suitable pieces of sheet styrene filed to shape
were added, with the area then looking passable under a closed canopy. Basic
cockpit color was Hu78 Cockpit Green, with black instrument panel, grip,
throttle box, gunsight base and some sidewall details. The seat received
seat belts from masking tape. The instrument decals disintegrated upon
trying to affix them, so the instrument panel was dry-brushed with silver,
with a couple of red “knobs” done with a fine brush. looking acceptable.
The 3-piece cowling was next assembled, followed by engine construction.
Following Tom Cleaver’s advice in his Mk.I
build review, the 18 separate mini exhausts were
attached only after
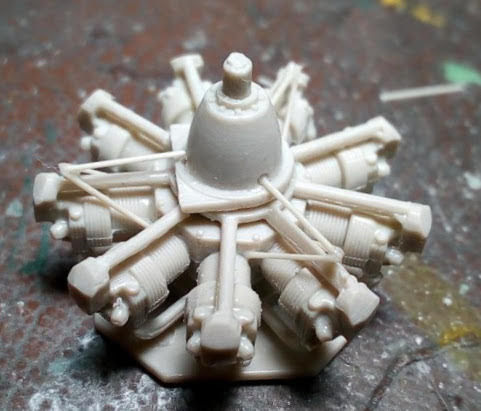 the engine fitted into the cowling. The Bristol Mercury
features three prominent triangular frames symmetrically placed, seemingly
connecting the crankcase with the cowling: they were not represented by the
kit and they were fabricated from pieces of stretched sprue. The engine was
painted black, then heavily dry brushed with silver. The exhausts, together
with the cowling lip area were painted burned metal, whereas the cowling
innards were painted steel.
the engine fitted into the cowling. The Bristol Mercury
features three prominent triangular frames symmetrically placed, seemingly
connecting the crankcase with the cowling: they were not represented by the
kit and they were fabricated from pieces of stretched sprue. The engine was
painted black, then heavily dry brushed with silver. The exhausts, together
with the cowling lip area were painted burned metal, whereas the cowling
innards were painted steel.
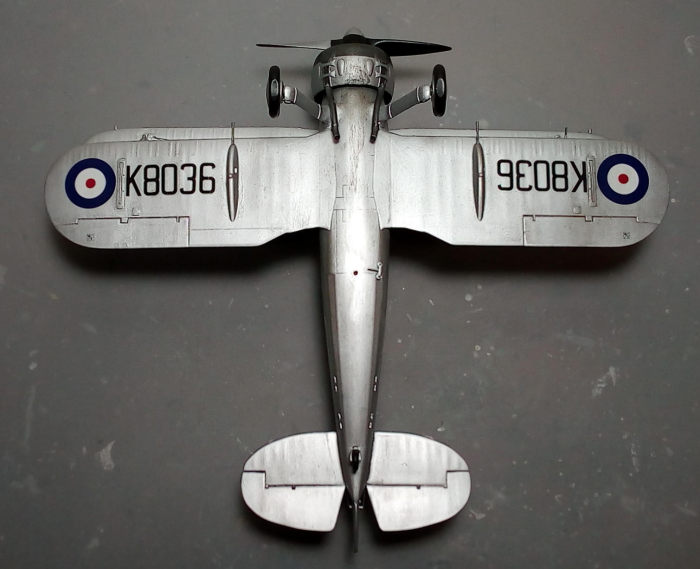
Returning to the basic model, I attached the lower wings, horizontal
stabilizers, rudder, cockpit entry hatches (in “closed” position), the
elevators (slightly drooped for more “dynamic” looks) and the underwing gun
pods. The main legs were next attached, followed by the drum brake housings
(at a slight negative camber, as is their natural posture). By consulting
net pics, brake lines were added from pieces of stretched sprue. The basic
model was then filled (not too much really, as fit was more or less good)
and sanded smooth.
In order to facilitate the quite extensive rigging, I pre-drilled holes at
all corresponding areas, with the very good rigging diagram provided by the
instructions helping a lot. Upon finishing the pre-drill session, I attached
all interplane struts, then quickly attached the top wing which, after some
adjustments to the strut angles, rested nicely in position. The main wings
were then rigged, using thin stretched sprue and a lot of patience! The two
inter-bracing rods that connect the front and rear main rigging wires were
also represented. After deeming the rigging passable, I carefully took the
Gladiator to the paint shop!
| COLORS & MARKINGS |
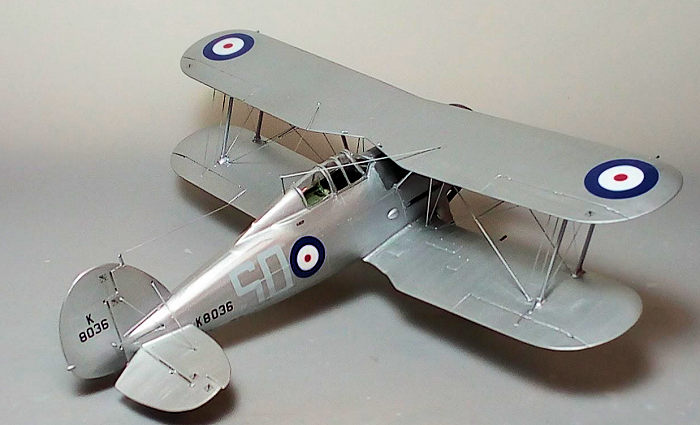
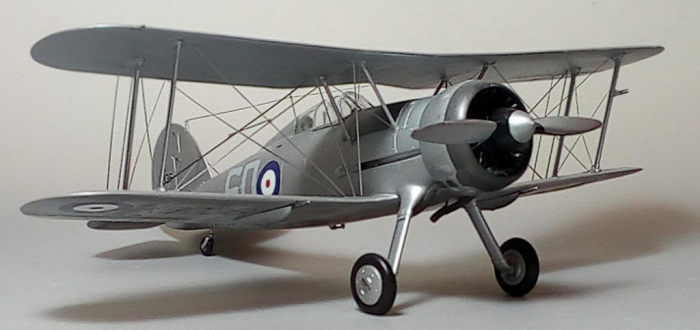
 The whole model was coated with Hu11 Silver, including the wheel covers and
cowling (the latter had its front collector ring masked beforehand). Apart
from paying some attention in order not to miss any hidden spot, painting of
the Gladiator was a breeze!
The whole model was coated with Hu11 Silver, including the wheel covers and
cowling (the latter had its front collector ring masked beforehand). Apart
from paying some attention in order not to miss any hidden spot, painting of
the Gladiator was a breeze!
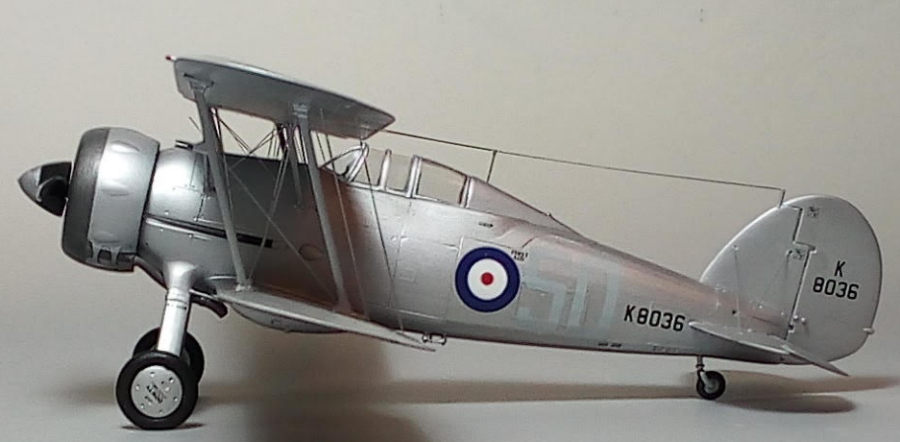
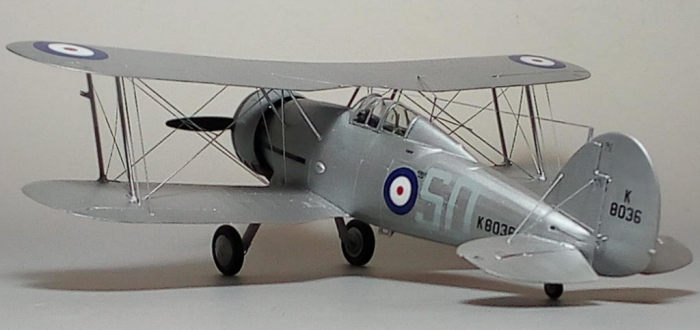
Moving onto decals, I used the kit supplied ones, in order to represent Bill
Vale’s K8036 machine, as it stood in Ramleh, Palestine during 1939. Roden
decals looked perfectly registered and thin, however upon being submerged
into water some shattering took place. Thankfully, shattering was not too
intense, so I managed to more or less affix them into place. A coat of
Future sealed them.
| CONSTRUCTION CONTINUES |
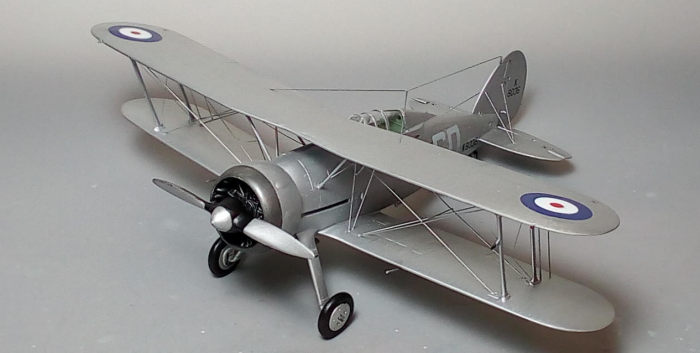
The main wheels were tad filed to look “weighted”. After having their tires
painted black, they were attached, followed by the already silver-painted
covers. The rear wheel strut was also attached, with the small tail wheel
trapped in between. The engine was then carefully installed, followed by the
exhausts, which were painted burned metal (their openings had beforehand
been drilled out). Both engine and exhaust installation are not too precise,
with some extra care being necessary there.
I then went to finalize the cockpit by adding the seat, stick (“pushed” tad
forward to match the “drooped” elevators), the compass just in front of the
stick and the distinctive “four-pod” gun sight at the front. The compass's
top face was highlighted with a fine silver pen and a piece of acetate was
affixed onto the gunsight, in order to represent its glass. The two fuselage
guns were painted gunmetal and carefully secured in position inside the
cockpit, with their barrels protruding outside. Finally, moving to the rear,
I applied the tail rigging, followed by the mini antenna mast in the correct
fin position for my version.
 Regarding the wooden prop, after reading some very interesting net
discussions, I came to the conclusion that the (very expensive and difficult
to construct) ) wooden Gladiator props were covered with a protective
“glove” which was then doped in order to be tightened and sealed. Whereas
the glove was typically pre-colored in gray, in a number of cases the prop
was doped in anti glare black, whereas the front blade faces were doped with
silver from the ⅔ of the blade length outwards. This is what I went for,
after filling and sanding the prominent sink marks at the blades rear faces
towards their bases. After painting the spinner also silver, the prop was
affixed in position.
Regarding the wooden prop, after reading some very interesting net
discussions, I came to the conclusion that the (very expensive and difficult
to construct) ) wooden Gladiator props were covered with a protective
“glove” which was then doped in order to be tightened and sealed. Whereas
the glove was typically pre-colored in gray, in a number of cases the prop
was doped in anti glare black, whereas the front blade faces were doped with
silver from the ⅔ of the blade length outwards. This is what I went for,
after filling and sanding the prominent sink marks at the blades rear faces
towards their bases. After painting the spinner also silver, the prop was
affixed in position.
Not too much weathering was performed, mainly consisting of dirtying the
undersides and tires and applying some oil staining aft of the cowling
bottom, all done with dark brown and black dry pastels. A satin coat gave
the bird its final finish.
The transparencies had their well defined frames hand painted and attached
in position, with the windscreen needing some trimming, in order to fit.
White glue took care of the mini gaps. The wing tip lights were sanded off
and replaced with tiny pieces of clear styrene, accordingly painted with
silver body red and green clear paints at their tips. The ventral light was
also represented with a blob of clear red. The correct aerial for my version
was replicated by a piece of stretched sprue that ran from the fin mast
towards the cockpit, then split towards both sides of the top wing, before
calling the pe-war Gladiator done!
| CONCLUSIONS |
This is a very good kit of an important and beautiful plane. It is
thoroughly researched, well molded, with good details and nice fabric
representation - a key area for the Gladiator. Instructions are nice and
clear, whereas the decals, though superb when new, were barely usable after
20 years, something to be expected.
 Though limited-run, meaning parts needing some extra cleaning, fit was
almost “mainstream” and the construction straightforward. Out of the box a
very respectable model can occur. If you wish to go aftermarket in order to
boost the kit’s looks and correct its (not many, truth be told) shortfalls,
you will not be disappointed, as a lot of good looking stuff seems to exist.
Though limited-run, meaning parts needing some extra cleaning, fit was
almost “mainstream” and the construction straightforward. Out of the box a
very respectable model can occur. If you wish to go aftermarket in order to
boost the kit’s looks and correct its (not many, truth be told) shortfalls,
you will not be disappointed, as a lot of good looking stuff seems to exist.
Due to its short run nature and the amount of rigging required, the kit is
not suitable for beginners, but an average modeler will not have too
challenging times when tackling it. It can still be found today at more or
less all its versions and at very sensible prices. If you have one or come
across one, do not hesitate to tackle it: a gorgeous model will surely
emerge!
This build is dedicated to the beloved and much missed Valeriy Grygorenko.
Happy modeling!
20 September
2022
Copyright ModelingMadness.com. All rights reserved. No
reproduction in part or in whole without express permission.
If you would like your product reviewed fairly and fairly quickly, please
contact the editor or see other details in the
Note to
Contributors.