Frog 1/72 Westland Wallace/Wapiti
| KIT #: | F-167 |
| PRICE: | $a few dollars from a vendor |
| DECALS: | Two options |
| REVIEWER: | Peter Burstow |
| NOTES: | Two builds with one a conversion. |
| HISTORY |
First flown in 1927, the Westland Wapiti, was a large two-bay biplane. Specified as a replacement for the Airco DH.9A for general purpose use, the prototype used the wings and tail of the earlier aircraft, with a new metal fuselage.
 Remaining in production until 1932,
565 were built, equipping 20 RAF squadrons. It was also used by Australia,
Canada, China, India and South Africa, remaining in service into the 1940s.
Mostly powered with various versions of the Bristol Jupiter engine, the Mk.III
for the SAAF was powered with Armstrong Siddeley Jaguar or Panther. The Wapiti
Mk.V had the fuselage extended by 0.6 meters (2 feet).
Remaining in production until 1932,
565 were built, equipping 20 RAF squadrons. It was also used by Australia,
Canada, China, India and South Africa, remaining in service into the 1940s.
Mostly powered with various versions of the Bristol Jupiter engine, the Mk.III
for the SAAF was powered with Armstrong Siddeley Jaguar or Panther. The Wapiti
Mk.V had the fuselage extended by 0.6 meters (2 feet).
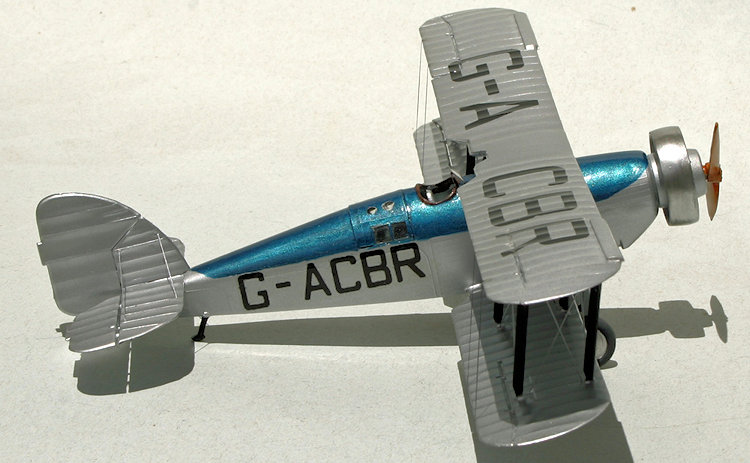
In 1931, Westland modified the prototype Wapiti Mk.V, replacing the Jupiter with the new Pegasus engine, and modifying the undercarriage, calling the aircraft P.V.6 Wallace and registered G-ACBR, this aircraft was known as the Huston-Wallace after Lucy, Lady Huston who was the patron.
Together with the earlier P.V.3 prototype G-ACAZ, an enclosed rear cabin was fitted, with oxygen and heating. On the 3rd April 1933, both aircraft flew over Mt Everest.
The production Wallace replaced the Wapiti in squadron service, and remained in use till 1943.
| THE KIT |
First released in 1964, the Frog
Westland Wallace was part of the 'Trail Blazer' series of mainly famous, record
setting aircraft. Frog produced around 130,000 of this kit between 1964 and
1971. Along with most
 of the Frog models, the tools were sold to the USSR in the
mid 1970s and released under the Novo brand. The kit was also re-boxed by
Air-lines and Hasegawa.
of the Frog models, the tools were sold to the USSR in the
mid 1970s and released under the Novo brand. The kit was also re-boxed by
Air-lines and Hasegawa.
My kits were both moulded in the USSR, probably by the Krugozor factory in Moscow. One was in a very poor box, the other was bagged, there was one decal sheet, water damaged and out of register.
Comprising 40 odd parts, the kits suffer from flash, sink marks and ejector pin marks. The clear parts were particularly badly moulded, being thick, distorted and not very clear. However the detailing of the parts was good, indicating the tool had not been too badly damaged. As is normal with Frog kits there is little internal detail, just a pair of seats moulded to a small section of floor, and aircrew. Little of the interior is visible anyway.
Both kits had instructions copied from the original Frog, with the text changed to Russian. The kit without the decals had an additional sheet with profiles.
| CONSTRUCTION |
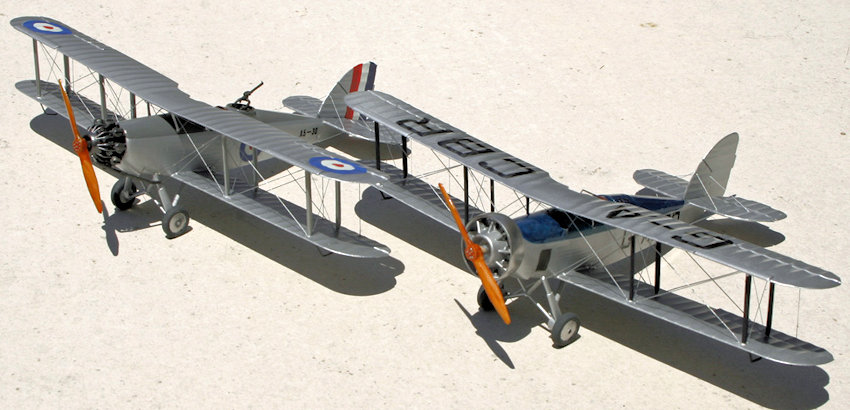
I built both models in parallel, switching from one to the other as needed. The Wallace was built OOB, the Wapiti had a few modifications.
 Starting first with the cockpit I
added the seats, putting the Wapiti rear seat in facing backwards. I painted the
cockpit internals light grey and the seats brown. The fuselage was then closed
up and I fitted the engine and cowling to the Wallace.
Starting first with the cockpit I
added the seats, putting the Wapiti rear seat in facing backwards. I painted the
cockpit internals light grey and the seats brown. The fuselage was then closed
up and I fitted the engine and cowling to the Wallace.
After drilling around 30 rigging holes in each kit, breaking five 0.3mm drill bits in the process, the lower wing and tail assemblies were then added to both kits. A little filling was needed around the wing roots.
The better of the two rear canopies was dipped in Future and masked, then fitted to the Wallace, the worse one, and it was a toss up as to which one was worse, had the framing sanded off and was then fitted to the Wapiti. A little filling and sanding was needed around the two canopies.
I made up a gun ring from a slice of a bomb in the spares box, which was then fitted to the Wapiti. A bit of filling around the ring then I drilled through the ring and canopy, opening up the gun position.
 Probably should have painted at
this stage, but I pressed on adding the upper wing, the cabane struts were a
little long, so I started with the outer bay struts, and worked my way in
towards the centre section. This was a good time to leave the kits alone for a
few days to let everything harden up. I then added the u/c legs and tail skid.
Probably should have painted at
this stage, but I pressed on adding the upper wing, the cabane struts were a
little long, so I started with the outer bay struts, and worked my way in
towards the centre section. This was a good time to leave the kits alone for a
few days to let everything harden up. I then added the u/c legs and tail skid.
I rigged the kits with 2kg fishing line for the flying and landing wires, and invisible mending thread for the cabane, tail and inter-strut bracing wires. My usual method of rigging is to thread the line through a hole in the lower wing then attach it to the top end of the strut where it is fitted to the upper wing. The line is then tensioned and glued on the underside of the lower wing. I then add a drop of thin superglue to the hole on the upper surface of the lower wing before trimming and sanding the tail of the line. This way hides most of the superglue blobs needed to fix the lines. Starting with the cabane, I worked my way outwards and had the two kits rigged after a few sessions over several days.
| COLORS & MARKINGS |
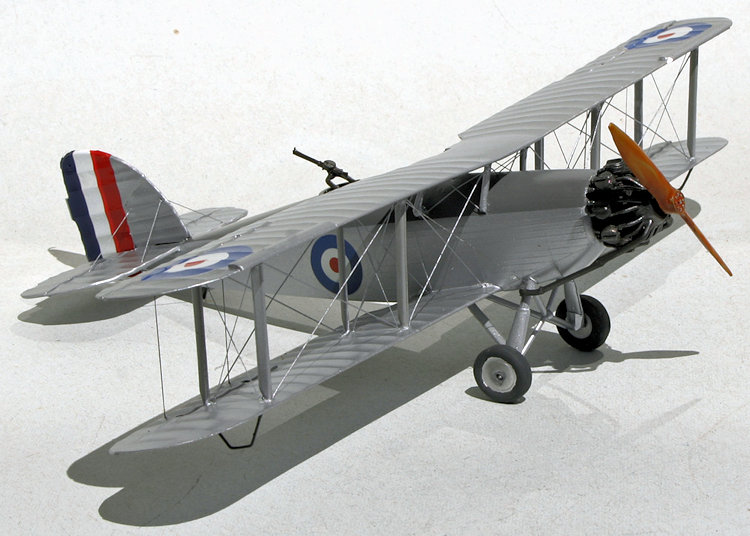 Both aircraft were overall silver,
the Wapiti was sprayed with Tamiya rattle can 'bare metal silver' AS-12, the
Wallace 'mica silver' TS-76. I then hand painted the top deck with grey for the
Wapiti and Tamiya X-13 'metallic blue' for the Wallace. This was a bit tricky,
poking a small brush through the cabane struts and rigging, note to myself to do
this sort of stuff before adding the upper wing. The struts on the Wallace were
hand painted black, on the Wapiti grey. I then painted some details, the oil
cooler and cockpit edging.
Both aircraft were overall silver,
the Wapiti was sprayed with Tamiya rattle can 'bare metal silver' AS-12, the
Wallace 'mica silver' TS-76. I then hand painted the top deck with grey for the
Wapiti and Tamiya X-13 'metallic blue' for the Wallace. This was a bit tricky,
poking a small brush through the cabane struts and rigging, note to myself to do
this sort of stuff before adding the upper wing. The struts on the Wallace were
hand painted black, on the Wapiti grey. I then painted some details, the oil
cooler and cockpit edging.
I have not had much success resurrecting old USSR decals in the past, but I tried, first giving the sheet a coat of liquid decal film. This didn't work at all, just making the ink run. It went into the bin. I made the civil registration and the serials from dry decals applied to clear decal sheet. The roundels came from the spares box, and the fin flash was made from Xtradecal strips. After decaling I gave both kits an overall coat of floor polish.
The propellers were painted with Tamiya XF-78 'wooden deck tan' covered with X-26 'clear orange'.
| FINAL CONSTRUCTION |
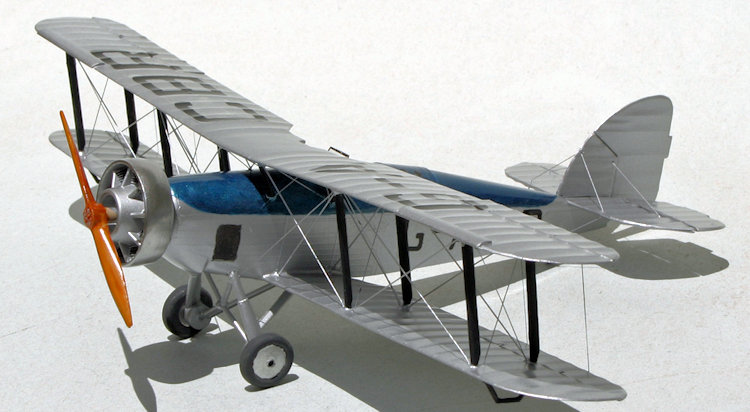 On the Wallace, just added the
propeller, windscreen and the wheels, removed the masking from the rear
canopy, then it was done.
On the Wallace, just added the
propeller, windscreen and the wheels, removed the masking from the rear
canopy, then it was done.
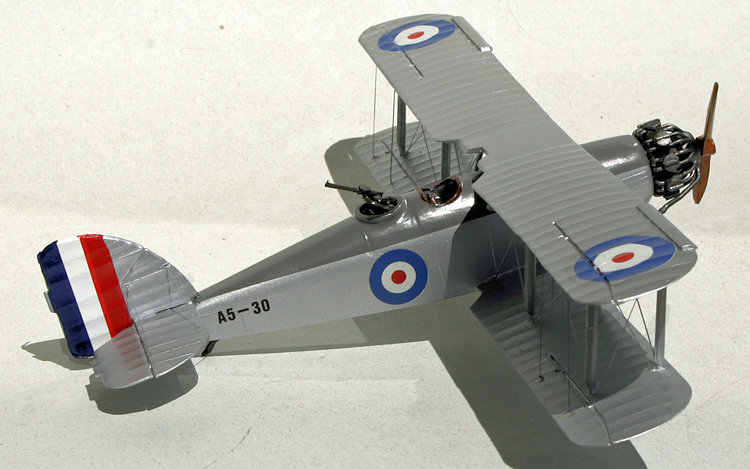
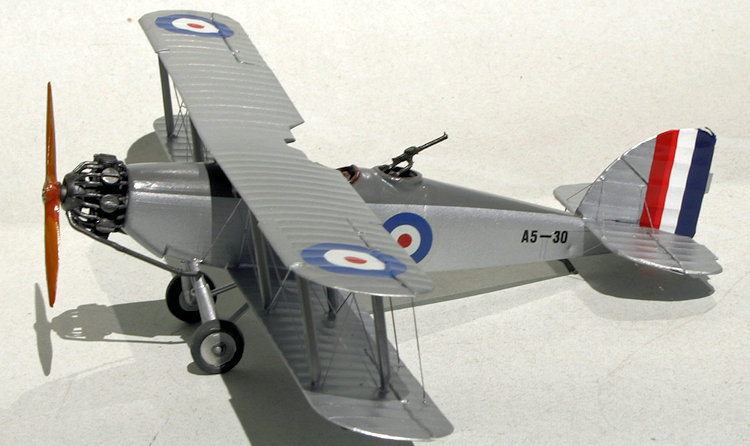
The Wapiti needed an engine, and being fully exposed, it needed to look right. I dug through the spares box, and tried a number of different engines, eventually I found a resin Jupiter in a short run kit. Being frugal, I made a resin copy of it using a silicone mould. I then added the intake and exhaust manifolds from a Special Hobby Spanish Vildebeest, where they are not used.
I made up the exhaust pipes from sprue, heated with very hot water and bent to shape. I found a gun mount and Lewis gun in the spares box. The engine assembly and gun were painted with Mr. Metal colour Iron, polished and then added to the kit, as was the propeller, wheels and windscreen.
| CONCLUSIONS |
I sometimes build the same kit in parallel, the problem being to make the models obviously different. In this case, the minor modification necessary to backdate the Wallace into a Wapiti changed the appearance a lot. To be totally accurate, the Wapiti, modelled as an RAAF Mk IIa, should have been shortened by about 7mm, but not having plans, I decided not to attempt that.
Otherwise, the construction was easy and straightforward for a two bay biplane. Despite the age of the kits, very little filling and sanding was required. The Wallace took a month, the Wapiti about five weeks. I enjoyed the build, which filled two holes in my collection, one more Frog Trail-Blazer, and one more important RAAF type.
Recommended for all if you can get it. Maybe a bit difficult for a first biplane due to it's two bay structure.
| REFERENCES |
https://en.wikipedia.org/wiki/Westland_Wapiti
https://en.wikipedia.org/wiki/Westland_Wallace
http://www.adf-serials.com.au/1a5.htm
February 2016 Copyright
ModelingMadness.com. All rights reserved. No reproduction in any form without express permission from the editor. If you would like your product reviewed fairly and fairly quickly, please
contact
the editor
or see other details in the
Note to
Contributors.
Back to the Review
Index Page 2026