
SMER 1/72 Potez 540
| KIT #: | 0846 |
| PRICE: | Yard sale special |
| DECALS: | One option |
| REVIEWER: | Dave Cummings |
| NOTES: | Reboxed Heller kit |
| HISTORY |
 The
Potez 540 was designed to a 1932 French Air Force requirement for a multi-role
reconnaissance / bomber, It was typical of the box-kites that uninspired French
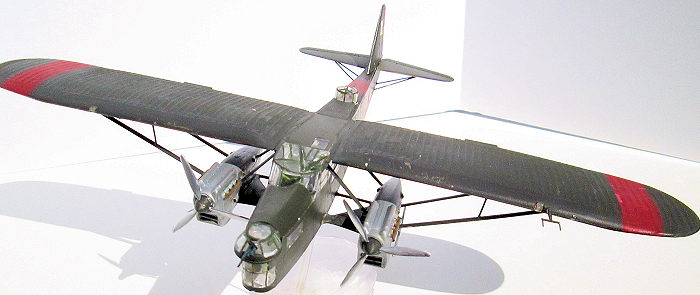
designers were producing at the time. It was defended by three, single gun,
manually operated turrets in the nose, dorsal, and ventral positions. Power was
provided by Hispano Suiza V-12s. Delivery to the Armee de l’Air began in late
1934. This made it available for sale to the Spanish Republican Air Force who
was scrounging for warplanes at the time for use in an ongoing civil war. The
French were shocked by its combat debut in Spain against German and Italian
fighters. The 540 was promptly nicknamed by its crews the “Flying Coffin.”
Shortly thereafter the French pulled the gun turrets off their stock of 540s and
converted them to transports.
The
Potez 540 was designed to a 1932 French Air Force requirement for a multi-role
reconnaissance / bomber, It was typical of the box-kites that uninspired French
designers were producing at the time. It was defended by three, single gun,
manually operated turrets in the nose, dorsal, and ventral positions. Power was
provided by Hispano Suiza V-12s. Delivery to the Armee de l’Air began in late
1934. This made it available for sale to the Spanish Republican Air Force who
was scrounging for warplanes at the time for use in an ongoing civil war. The
French were shocked by its combat debut in Spain against German and Italian
fighters. The 540 was promptly nicknamed by its crews the “Flying Coffin.”
Shortly thereafter the French pulled the gun turrets off their stock of 540s and
converted them to transports.
| THE KIT |
I have not been active in the hobby the last couple years due to life circumstances. So now the time is right to get it going again. Looked in the kit stash for something suitable to knock the rust off and settled on this one. My sister picked it up at a yard sale many years ago and gave it to me. The Potez 540 not being real high on my wants list, it languished there. Decided it would be good for seeing where my skill level stood after so long. If I screwed it up, no big loss.
 The SMER
kit is a re-pop of a 70s era Heller kit. This one dates back to the 80s I think.
The decals were no longer usable. There are no English translations in the
instructions so better brush up on your Czech real quick. Or just rely on the
drawings as I did. A little vague in places but if you can put 2 and 2 together
you can figure it out. Thetsre are 130 parts on six sprues sealed in two bags.
The kit shows its age with raised panel lines and rivets but since the only
metal covered parts are the engine pods not such a big deal. The fabric over
frame effect isn’t bad considering. The kit is surprisingly well molded, nothing
warped, and little flash. Clear parts are good with sharp framing. Fit is quite
good overall except for the engines which will need some filler. Instead of the
traditional split fuselage halves this one is in 4 pieces, top, sides, and
bottom. Since it makes into a simple square box and the fit is good this is not
a problem and eliminates that pesky seam. There is little in the way of interior
detail. The cockpit comprises a floor that only fills one side of the fuselage,
fore and aft seats each with control column and pedals, and an instrument panel.
Machine guns are rudimentary at best.
The SMER
kit is a re-pop of a 70s era Heller kit. This one dates back to the 80s I think.
The decals were no longer usable. There are no English translations in the
instructions so better brush up on your Czech real quick. Or just rely on the
drawings as I did. A little vague in places but if you can put 2 and 2 together
you can figure it out. Thetsre are 130 parts on six sprues sealed in two bags.
The kit shows its age with raised panel lines and rivets but since the only
metal covered parts are the engine pods not such a big deal. The fabric over
frame effect isn’t bad considering. The kit is surprisingly well molded, nothing
warped, and little flash. Clear parts are good with sharp framing. Fit is quite
good overall except for the engines which will need some filler. Instead of the
traditional split fuselage halves this one is in 4 pieces, top, sides, and
bottom. Since it makes into a simple square box and the fit is good this is not
a problem and eliminates that pesky seam. There is little in the way of interior
detail. The cockpit comprises a floor that only fills one side of the fuselage,
fore and aft seats each with control column and pedals, and an instrument panel.
Machine guns are rudimentary at best.
| CONSTRUCTION |
 The kit is
pretty simple overall with the gun turret assemblies giving the most
complications. Everything fits well but you have to identify which parts go to
which turret which is not easy as some are quite similar. The part numbers are
not shown on the drawings, they are identified in the text, which is in Czech.
You can figure it out by test fitting. I did not attempt a show entry here. I
painted the interior a light gray, but that’s just me. I didn’t have room on my
Spanish Civil War shelf for a big old bomber even in 72nd scale. So decided to
stick this one on a stand in flight above the shelf. Except for the turrets,
construction was straight forward with no big surprises. Again fit is pretty
good. I used filler at the engine pod seams and the wing join. Landing gear is
not optional but I had no problem assembling it in the up position. I put
together all the major sub-assemblies then painted before final assembly much as
we do biplanes. This one builds much like a biplane kit with all the struts and
all.
The kit is
pretty simple overall with the gun turret assemblies giving the most
complications. Everything fits well but you have to identify which parts go to
which turret which is not easy as some are quite similar. The part numbers are
not shown on the drawings, they are identified in the text, which is in Czech.
You can figure it out by test fitting. I did not attempt a show entry here. I
painted the interior a light gray, but that’s just me. I didn’t have room on my
Spanish Civil War shelf for a big old bomber even in 72nd scale. So decided to
stick this one on a stand in flight above the shelf. Except for the turrets,
construction was straight forward with no big surprises. Again fit is pretty
good. I used filler at the engine pod seams and the wing join. Landing gear is
not optional but I had no problem assembling it in the up position. I put
together all the major sub-assemblies then painted before final assembly much as
we do biplanes. This one builds much like a biplane kit with all the struts and
all.
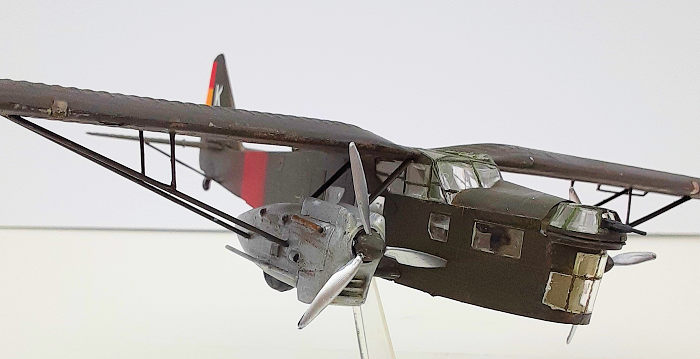
I fished a display stand out of the spares box. As it turns out the balance point for the stand was at the ventral turret. The opening was modified to fit the stand. I glued a gun barrel to the stand for effect.
| COLORS & MARKINGS |
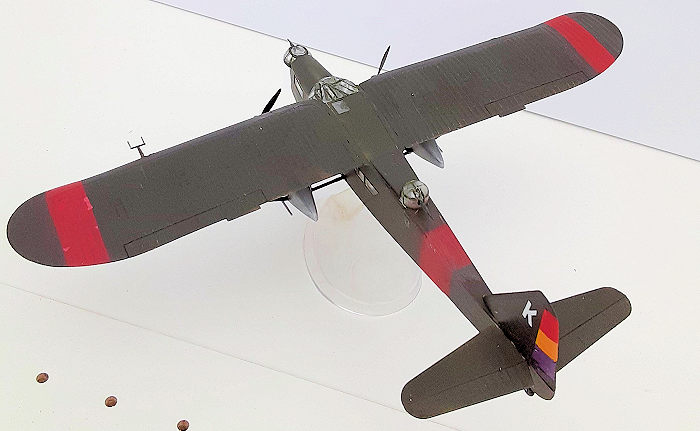
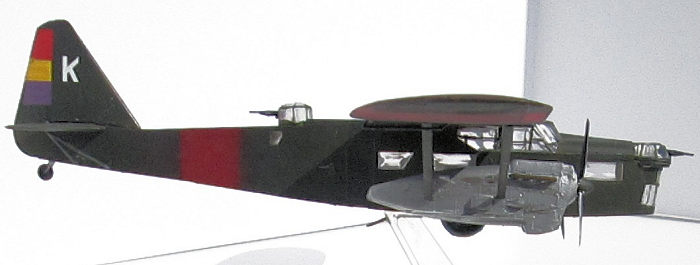
 Since the
decals were shot I decided a Spanish Civil War scheme would be
simplest and is the only conflict where the type saw extensive service as a
bomber. I painted the red stripe areas first. These were masked and the airframe
assemblies painted. The correct color is the ubiquitous French Khaki. I sprayed
mine Tamiya XF-61 dark green as it is what was on hand. A second coat was
lightened with a bit of white to fade the upper areas somewhat. Again I didn’t
spend a lot of time on detailing. The engine pod assemblies were painted Testors
aluminum then received a dark wash. I didn’t feel like masking off all the
framimg on the clear parts so painted them by hand (don’t look too close).
Since the
decals were shot I decided a Spanish Civil War scheme would be
simplest and is the only conflict where the type saw extensive service as a
bomber. I painted the red stripe areas first. These were masked and the airframe
assemblies painted. The correct color is the ubiquitous French Khaki. I sprayed
mine Tamiya XF-61 dark green as it is what was on hand. A second coat was
lightened with a bit of white to fade the upper areas somewhat. Again I didn’t
spend a lot of time on detailing. The engine pod assemblies were painted Testors
aluminum then received a dark wash. I didn’t feel like masking off all the
framimg on the clear parts so painted them by hand (don’t look too close).
Decals came out of the big box of stuff. The rudder stripes were from a 1/48 fighter that I cut to fit. Photos of the type show markings were minimal. After painting the model was assembled. Only needed some filler at the wing join. This was sanded and re-painted.
| CONCLUSIONS |
Overall a fun build and a good choice for me to get back into the modeling swing of things. Novices may find it somewhat intimidating (unless they speak Czech). But a good kit for those wanting a change from the usual Mustangs and Messerschmidts. I can recommend the kit. More so since its likely the only kit of the type you are going to see.
| REFERENCES |
References – Google search. Potex 540 Spanish Civil War.
15 October 2021 Copyright ModelingMadness.com.
All rights reserved. No reproduction in part or in whole without express
permission. If you would like your product reviewed fairly and fairly quickly, please contact the editor or see other details in the
Note to
Contributors. Back to the Main Page
Back to the Review
Index Page
Back to the Previews Index Page