Heller 1/72 Amiot 143
| KIT #: | L 390 |
| PRICE: | £10.00 |
| DECALS: | one option |
| REVIEWER: | Peter Chiu |
| NOTES: | Montex masks MM72136 |
| HISTORY |
 The Amiot
143M was a late 1930s French medium bomber designed to meet 1928 specifications
for a bomber capable of day/night bombing, long-range reconnaissance and bomber
escort. The Amiot 143 had a high-wing and fixed undercarriage, with the wing
thick enough to allow crew access to the engines by a tunnel between the wing
spars. The pilot sat in an enclosed cockpit, level with the leading edge of the
wing and the navigator-bombardier, who was also provided with flying controls,
sat in the extensively glazed gondola beneath the pilot. Defensive armament
consisted of Lewis guns in nose and dorsal turrets plus guns in the gondola.
The Amiot
143M was a late 1930s French medium bomber designed to meet 1928 specifications
for a bomber capable of day/night bombing, long-range reconnaissance and bomber
escort. The Amiot 143 had a high-wing and fixed undercarriage, with the wing
thick enough to allow crew access to the engines by a tunnel between the wing
spars. The pilot sat in an enclosed cockpit, level with the leading edge of the
wing and the navigator-bombardier, who was also provided with flying controls,
sat in the extensively glazed gondola beneath the pilot. Defensive armament
consisted of Lewis guns in nose and dorsal turrets plus guns in the gondola.
Evolved from the Amiot 140, which flew in 1931 with Hispano-Suiza engines. The 143 was fitted with two 870hp Gnome-et-Rhone 14 K radial engines. The first production machine being flown in 1935. Deliveries of this design eventually began in April 1935, continuing until March 1937, with a total of 138 being built.
At the outbreak of war, in September 1939, some of the French Air Force Escadres de Bombardement were still flying the Amiot 143. With the obsolete bomber the crews of I/34. II/34. I/38, II/38 and II/63 Groups flew night bombing missions against German targets with some low level attacks in the Sedan area.
Already obsolete by the start of the war, the Amiot was used to carry out reconnaissance and leaflet raids over Germany. It saw limited action before the Armistice before being used as transports before being retired from service in 1944.
| THE KIT |
The original kit was released by Heller in 1966 and has been reboxed several times since then by Heller and Smer amongst others. Checking Scalemates it looks like my kit is an original release from 1966 making it the oldest kit I’ve built so far! The plastic was quite hard and brittle, flash was evident on many of the parts. There was only one decal option, the decals themselves were yellowed and out of register. I tried leaving them pinned to a window hoping the suns UV could clear them up but this was not to be. Instead, I purchased the Montex paint masks that included those for painting the roundels and tail markings. This was for aircraft #106 de la 1eme escadrille du GB I/38 based at Istres 1940.
| CONSTRUCTION |
 I
originally started the kit in 2016, I got so far as to prime the kit with Tamiya
grey primer and glue the main wing parts together. However, there was quite a
lot of flash along the seams of the fuselage and I wasn’t able to clean it off
with the tools I had at the time. I decided to put the kit on the shelf of doom
and move on to other kits.
I
originally started the kit in 2016, I got so far as to prime the kit with Tamiya
grey primer and glue the main wing parts together. However, there was quite a
lot of flash along the seams of the fuselage and I wasn’t able to clean it off
with the tools I had at the time. I decided to put the kit on the shelf of doom
and move on to other kits.
Fast forward to 2020 and the first pandemic lockdown, I find myself with plenty of spare time so I decide to restart the kit. I attached all the glazing in the gondolier section and masked it off. The cockpit glazing came in 2 parts leaving a seam in the middle. It looked like there was a frame along the middle so I masked it off so that a frame would conceal the middle seam. As the interior was devoid of detail, I scratch built an interior from plastic card and unused parts of other kits. This included a rudimentary cockpit and controls plus a pilot to fill up the space. I painted the interior RLM 82 light green matt.
Once that was all done the fuselage halves were closed and the wings attached. I filed down the seams of the fuselage as best I could with some new seam scraping tools I had recently purchased. These helped give a bit a better finish.
Wing fit was quite precise and only had small gaps that I filled with Vallejo plastic putty.
Engine nacelles and undercarriage were then assembled, connection points for the undercarriage to the nacelles was a bit vague but I managed to get them fixed together and attached to the engine nacelles. They were painted aluminium as were the propeller blades, I would not attach them to the wings until the painting was complete. The tyres were painted with Model Air tyre black and along with the undercarriage was masked off in preparation for painting.
| COLORS & MARKINGS |
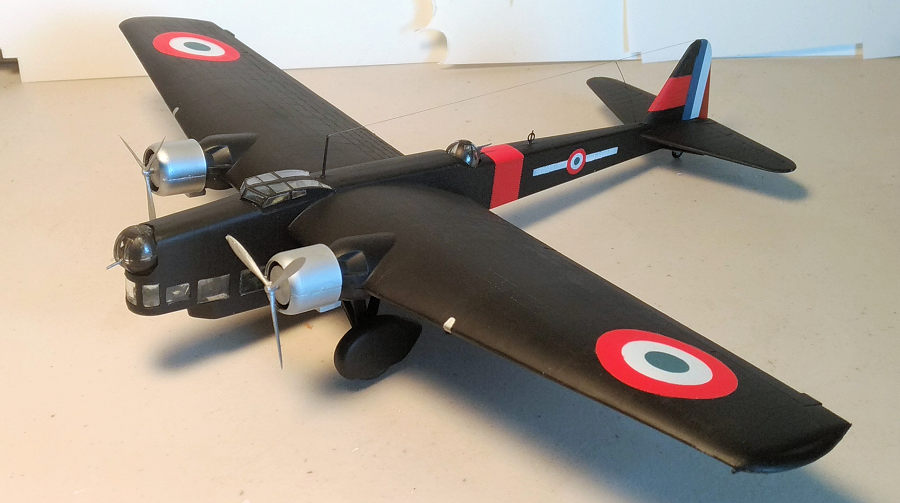
With masking complete for gondolier windows and cockpit, I then re-sprayed Vallejo grey primer to give the kit a base for the paints. The plane was painted all over black with the red bands on the fuselage and rudder. I sprayed Vallejo RLM23 Red and masked these of for the bands. Then I sprayed model air black matt over the rest of the kit. I gave it several light coats before starting with the Montex masks.
The masks was split in to 2 parts, those for the clear parts which I did not use as I had already masked them before buying the masks set. The second were to paint on the roundels and tail plane. I masked off the rudder then started with Matt white, then used the montex masks to block off and paint the red with RLM 23 and the blue using UK PRU Blue Matt.
 I repeated
this approach for the wing roundels, carefully measuring where to place the main
mask denoting the complete roundel, masking around it and spraying matt white.
Then applying the inner masks to complete the blue and red. The fuselage roundel
with white stripe was also done this way. On removing the masks a small amount
of paint had bled through the masks so this required some touch up to tidy this
up.
I repeated
this approach for the wing roundels, carefully measuring where to place the main
mask denoting the complete roundel, masking around it and spraying matt white.
Then applying the inner masks to complete the blue and red. The fuselage roundel
with white stripe was also done this way. On removing the masks a small amount
of paint had bled through the masks so this required some touch up to tidy this
up.
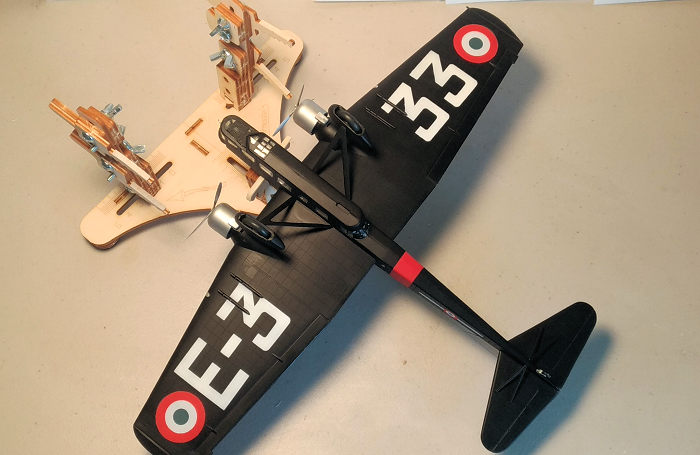
The underside had large lettering / numbering masks to apply. These were more difficult to get set as they had to be applied over the underwing bomb racks. I used a sharp blade to cut the masks so they fitted around the racks. Then I sprayed them matt white. After removing the mask there was some touch required as the white had bled through around the bomb racks. At this point I attached the engines to the wings to complete the build.
Once the painting was completed, I then sprayed Vallejo matt finish. Once the matt layer was dry, I removed the masking for canopy and fuselage windows. After removing the tape there were parts of the kit that needed touching up to complete the finish off the model. I then applied a mix of EZ line and stretched sprue for the radio antennae to the rudder to complete the build.
| CONCLUSIONS |
I was very happy with the finished build considering the age of the kit. The lack of interior was a minor hinderance. The Montex masks were great and I was pleased with the finish they gave to the plane. With hindsight I should have sanded off the rivets and re-scribed the kit as this would have made applying the masks a touch easier. I have a few more Heller kits in my stash and will look forward to building more in the future.
8 November 2021 Copyright ModelingMadness.com.
All rights reserved. No reproduction in part or in whole without express
permission. If you would like your product reviewed fairly and
fairly quickly, please
contact
the editor or see other details in the
Note to
Contributors.