MPM 1/72 A-17A
|
KIT # |
72521 |
|
PRICE: |
$ |
|
DECALS: |
Four options |
|
REVIEWER: |
Mark Fordham |
|
NOTES: |
Injected Canopy |
|
HISTORY |
 Northrop developed
the A-17 in the early 1930s to fill an Army Air Corps requirement for an
attack bomber. The aircraft would provide ground support for infantry,
attacking at tree-top level with its four forward firing .30 caliber
machine guns and fragmentation or chemical bombs carried internally.
Powered by the 750 hp Pratt & Whitney R-1535-11 radial engine, the A-17
could also carry up to four 100 lb. bombs on the underside of the wing
center section. In its day the A-17 had more firepower than its
contemporaries, the P-35, the P-36, and the early P-40. Delivery of 110
A-17s began in August 1935.
Northrop developed
the A-17 in the early 1930s to fill an Army Air Corps requirement for an
attack bomber. The aircraft would provide ground support for infantry,
attacking at tree-top level with its four forward firing .30 caliber
machine guns and fragmentation or chemical bombs carried internally.
Powered by the 750 hp Pratt & Whitney R-1535-11 radial engine, the A-17
could also carry up to four 100 lb. bombs on the underside of the wing
center section. In its day the A-17 had more firepower than its
contemporaries, the P-35, the P-36, and the early P-40. Delivery of 110
A-17s began in August 1935.
The A-17A succeeded the A-17, and the Army contracted for 129 A-17As in December 1935. It had an 825 hp R-1535-13 engine, retractable landing gear, and one flexible .30 caliber machine gun mounted in the rear cockpit. In June 1940, the Army Air Corps returned 93 aircraft for resale to Britain and France. Britain assigned the majority of its A-17s to South Africa for use in towing targets and as operational trainers. A few squadrons of A-17s continued in U.S. service into 1943 as trainers and in Panama where they performed anti-submarine patrols.
|
THE KIT |
 MPM’s Northrop A17A
is what we all have come to expect from this manufacturer these days,
almost Tamigawa quality mouldings with a smattering of finely cast resin
parts. Surprisingly enough there is very little in the way of resin in
this kit. The propeller hub being the only piece done in resin this time.
A superb decal sheet is included along with a thin injection moulded
canopy that would be on par with anything that Tamiya has provided.
MPM’s Northrop A17A
is what we all have come to expect from this manufacturer these days,
almost Tamigawa quality mouldings with a smattering of finely cast resin
parts. Surprisingly enough there is very little in the way of resin in
this kit. The propeller hub being the only piece done in resin this time.
A superb decal sheet is included along with a thin injection moulded
canopy that would be on par with anything that Tamiya has provided.
Instruction sheet is the now standard multi language affair with pictorial construction steps and color call outs for Humbrol paints. It’s interesting to note that a full 2/3rds of the instruction sheets are taken up with decal and painting guides.
|
CONSTRUCTION |
The cockpit if the MPM A17 is an all plastic affair this time, with no resin or photoetch in sight, the floor, seats and instrument panels supplied are more than adequate in this scale for detail but a little sidewall detail will not go amiss as the canopy is clear enough to see a fair amount of cockpit space.
 With the cockpit
assembled, painted and dry brushed it was time to close up the fuselage,
Now short run kits such as these don’t have the aligning holes and pins
like the Tamigawa kits, but with a bit of careful alignment a gap free
join can be achieved without the need for filler, a critical point if
your wanting to do one of the three Natural metal schemes supplied in the
decals.
With the cockpit
assembled, painted and dry brushed it was time to close up the fuselage,
Now short run kits such as these don’t have the aligning holes and pins
like the Tamigawa kits, but with a bit of careful alignment a gap free
join can be achieved without the need for filler, a critical point if
your wanting to do one of the three Natural metal schemes supplied in the
decals.
The main wings come in 5 pieces with a one piece upper wing and three lower pieces. The easiest way the assemble them without too many gaps is to glue the lower centre section to the fuselage, then glue the upper wing the to outer lower piece and finally glue these subassemblies together, by doing it this way any gaps will be underneath the wings were there are easier to fill and clean up.
Unfortunately the nose cowling is in two pieces split vertically and this requires a fair amount of sanding and finishing work to get it ready for an Alclad finish, a lot of work that could have been avoided if the cowl was one piece. A very nice radial engine is supplied and looks the part with a careful drybrush.
There are really no major problems in the construction of this kit if you test fit each part and take the odd snick off here and there, it can be assembled without any filler and very little sanding. The worse fitting part other than the cowling is the little insert that goes under the centre wing section by the nose, this insert doesn’t fit at all well but thankfully it gets covered by the air filter and doesn’t require too much cleaning up.
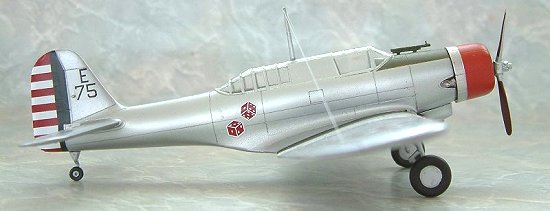
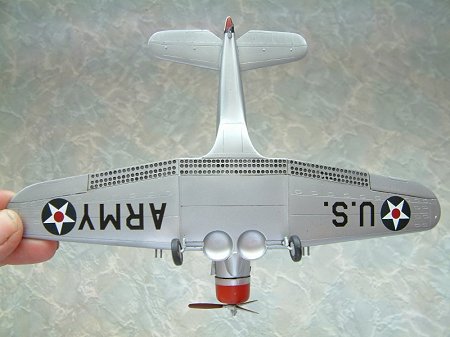
 One weak area with
this kit is the undercarriage, as you may be able to see in some of the
photographs the wheels are sitting at cockeyed angles, I assure you
that’s not me! The struts are beautifully thin and to scale, so much so
that the strut can’t hold the weight of the plane for very long before
bending the wheels out like a bandy legged Giraffe! Since taking the
photos and writing this review I have replaced the struts with
scratchbuilt ones that are a little thicker and can support the weight of
this rather heavy little plane.
One weak area with
this kit is the undercarriage, as you may be able to see in some of the
photographs the wheels are sitting at cockeyed angles, I assure you
that’s not me! The struts are beautifully thin and to scale, so much so
that the strut can’t hold the weight of the plane for very long before
bending the wheels out like a bandy legged Giraffe! Since taking the
photos and writing this review I have replaced the struts with
scratchbuilt ones that are a little thicker and can support the weight of
this rather heavy little plane.
The only down side with the MPM A17 is the propeller, the hub is finely cast resin with separate plastic blades, trying to butt join and align three blades to the hub is a mission in patience, Why MPM didn’t include a one piece propeller I don’t know, assembling the propeller this way will be extremely tricky for anyone new to the hobby.
The machine gun barrels were fashioned out of thin brass tubing along with the telescopic type gun sight and with the addition of the canopy the model was then ready for the paint shop.
|
COLORS AND MARKINGS |
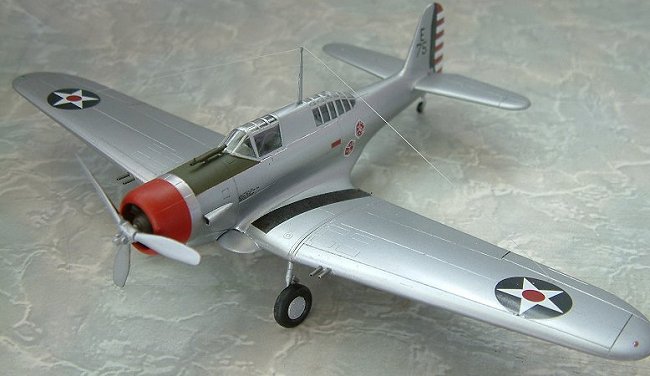
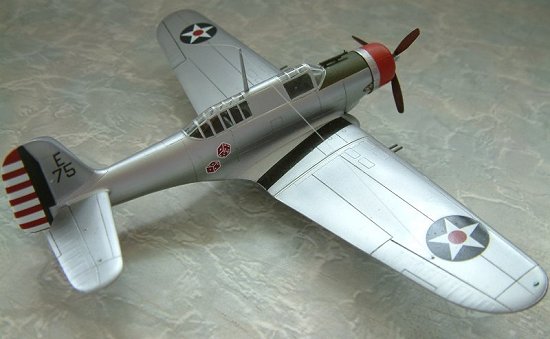
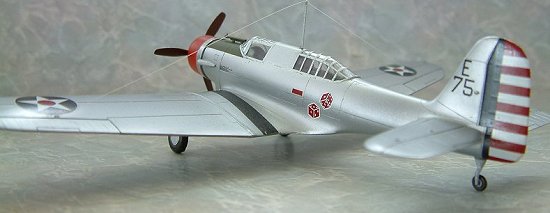
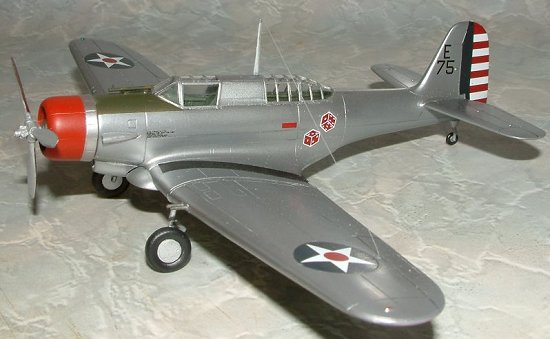
With my new found love of Alclad II and the fact that it is now available in New Zealand (hey I do believe that we are finally coming into the 20th century (yes I know it’s the 21st century :-} ) I decided on one of the Natural Metal schemes and after much thought I chose the A17A of the 90th Attack Squadron 3rd attack group November 1937. This particular aircraft is NMF all over with a Olive drab(ish) anti dazzle strip forward of the cockpit and a colourful red nose and dice on the fuselage.
 First order of the day
was to go over the model a number of times hunting down and dealing to
sanding marks, scratches, blobs of glue etc, no matter how many time I
think I’ve got them all the minute I hit it with the Alclad “sprong” out
jump the scratches at me. Pah! One thing I noticed with the MPM A17 that
didn’t happen with the F-51 testbed that I did was the lack of holding
power the Alclad had on the MPM plastic, even washed down and prepped
before painting it was easy to scratch and “chip” the Alclad and in fact
I pulled a few chips up with the masking of the anti glare strip,
admittedly I didn’t use an undercoat and sprayed the Alclad directly onto
the plastic.
First order of the day
was to go over the model a number of times hunting down and dealing to
sanding marks, scratches, blobs of glue etc, no matter how many time I
think I’ve got them all the minute I hit it with the Alclad “sprong” out
jump the scratches at me. Pah! One thing I noticed with the MPM A17 that
didn’t happen with the F-51 testbed that I did was the lack of holding
power the Alclad had on the MPM plastic, even washed down and prepped
before painting it was easy to scratch and “chip” the Alclad and in fact
I pulled a few chips up with the masking of the anti glare strip,
admittedly I didn’t use an undercoat and sprayed the Alclad directly onto
the plastic.
With the Alclad down and drying I masked up the cowling and shot the red, promptly pulling off the Alclad when I removed the masking tape off the fins! Oh dear, a quick mask over the red and a respray of the Alclad and all is well.
As a side note the instructions show the anti glare panel to end at the red cowling but the box top shows the cowl fins are left unpainted, I decided to do mine unpainted like the box art. I have seen photos of the A17 with both painted and unpainted fins but was unable to find one of E-75.
With
the painting out the way it was time to start decaling, having decided on
the options I first started on the tail stripes, MPM decals are very thin
and a little tricky to work with, it also took a little bit of teasing
and cajolin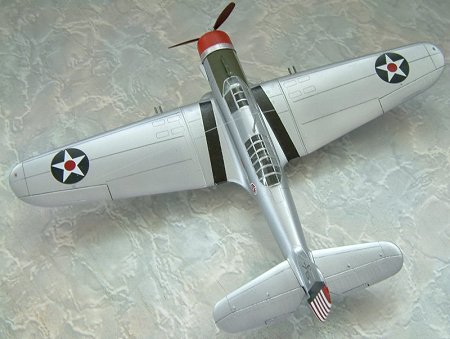 g to get
the stripes to curve around the bottom of the rudder, numerous
applications of my homemade decal softener allowed the decal to see my
point of view.
g to get
the stripes to curve around the bottom of the rudder, numerous
applications of my homemade decal softener allowed the decal to see my
point of view.
With the Alclad being gloss the rest of the decals went down without to many fusses apart from the dice on the fuselage, one of them went awol due to the fact that I had forgotten that I had done the dice and promptly picked the plane up by the fuselage and tore the decals off the instant I put it down, thankfully there was another set of dice on the sheet that I could replace them with. With all the MPM decals done all that was left was to add the wing walkway stripes and as these are not supplied in decal form I used some black strips cut from a Hasegawa sheet.
I didn’t add any weathering to the plane as I’m not confident enough yet with NMF aircraft not to screw it up so I limited the weathering to highlighting the airbrake holes with black ink and running a sharpie around the control surfaces. The final touch was the addition was the inclusion of the radio ariels which because of their location means that they get wiped off every time I pick the plane up.
|
CONCLUSIONS |
Almost Tamigawa in fit and build, excellent decals and an interesting subject to boot, what more could you ask for? With the inclusion of an injected canopy this kit is almost in the range of all modellers, only let down by the fiddly four piece propeller and weak undercarriage , If MPM saw fit to do a one piece propeller then the A17 could be done by even a novice modeller. My thanks to Scott for the review sample and the Alclad II which now is available for New Zealand modellers at Ace Hobbies in Auckland
|
REFERENCES |
“Google” A17A Attack bomber.
December 2003
If you would like your product reviewed fairly and quickly, please contact me or see other details in the Note to Contributors.