| HISTORY |
KP 1/72 Letov S.231
| KIT #: | 23 |
| PRICE: | Not very much |
| DECALS: | Two options |
| REVIEWER: | George Oh |
| NOTES: | I'd never heard of this aircraft. |
| HISTORY |
 The
Letov Š-31 was a fighter aircraft produced in Czechoslovakia in the early
1930s. A modified much-improved version appeared in March 1933 as the Letov
Š.231. The Š.231 was a large single-bay conventional biplane, with a metal
tubular frame with a fabric covering. It was powered by a Bristol/Walter
Mercury V-S2, 560hp radial engine in a metal cowling that was fronted by a
Townsend ring. Armament was 4 x 7.92mm Strakonice machineguns - two in the
nose and two in the wings, or under, and in pods, says Wiki. As an option, 6
x light bombs could be carried under the wings. After testing at the
Czechoslovak flight facility at Prague-Lethany, it entered production in
1935 and the 24 production models began equipping Czech fighter units in
June 1936. But they didn't remain in frontline fighter status with the
Czechoslovakian Air Force for long.
The
Letov Š-31 was a fighter aircraft produced in Czechoslovakia in the early
1930s. A modified much-improved version appeared in March 1933 as the Letov
Š.231. The Š.231 was a large single-bay conventional biplane, with a metal
tubular frame with a fabric covering. It was powered by a Bristol/Walter
Mercury V-S2, 560hp radial engine in a metal cowling that was fronted by a
Townsend ring. Armament was 4 x 7.92mm Strakonice machineguns - two in the
nose and two in the wings, or under, and in pods, says Wiki. As an option, 6
x light bombs could be carried under the wings. After testing at the
Czechoslovak flight facility at Prague-Lethany, it entered production in
1935 and the 24 production models began equipping Czech fighter units in
June 1936. But they didn't remain in frontline fighter status with the
Czechoslovakian Air Force for long.
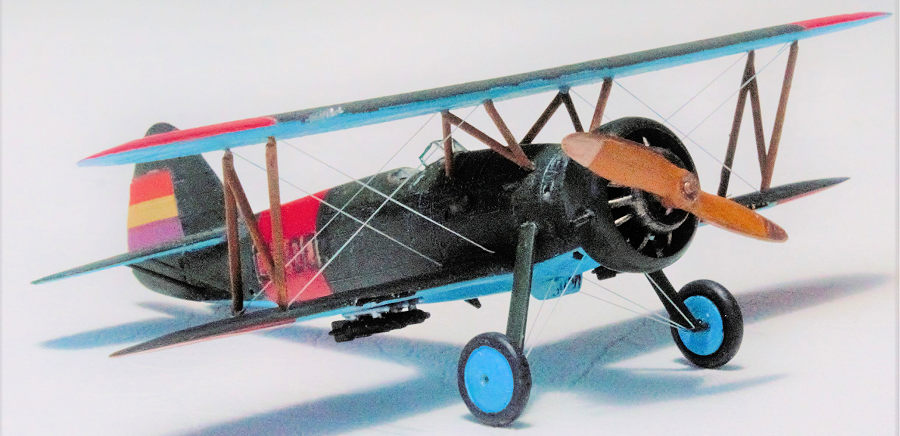
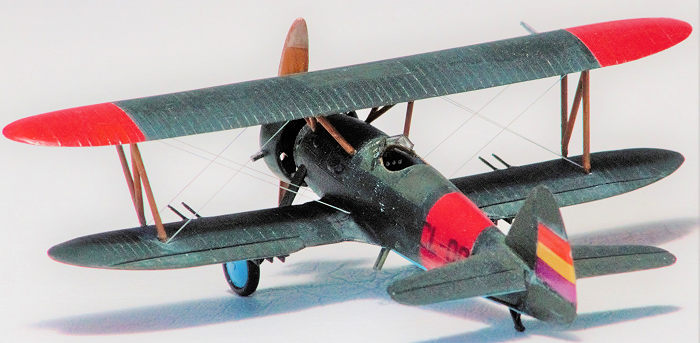
In 1937, 22 were sold to the Spanish Republican government. 6 were sent to Bilbao, but without assembly instructions (we modellers have been there & done that) or pilot's flight notes. 4 crashed during take-off attempts. 10 more went to Cartagene, but reports of their combat record in the Spanish Civil War (SCW) are vague. At least three machines survived the war and were used by victorious Nationalists.
| THE KIT |
 I can't
remember buying this kit, but it came in a flat flimsy end-opening box
containing one dirty-white sprue that framed 40 parts, and a clear sprue
with a single small flashy part. The plastic was very hard and showed flash
and some mould slip seams. Wings and tail-plane parts were all
single-pieces. Detailing was raised, but petit. What I personally didn't
like, was that the wing machinegun barrels (1 per wing) & pitot tube were
moulded as part of the wings.
I can't
remember buying this kit, but it came in a flat flimsy end-opening box
containing one dirty-white sprue that framed 40 parts, and a clear sprue
with a single small flashy part. The plastic was very hard and showed flash
and some mould slip seams. Wings and tail-plane parts were all
single-pieces. Detailing was raised, but petit. What I personally didn't
like, was that the wing machinegun barrels (1 per wing) & pitot tube were
moulded as part of the wings.
The decal sheet was small and obviously out of register (a replacement WAS available from the Avation Megastore). The instruction sheet was an A3 sheet of cheap newspaper with only three (well, 2.5) assembly steps and an alignment/rigging diagram. It contained more historical info than Google, and in 3 (or 4) languages. The painting guide was on the back of the box and revealed new information. It showed that the aircraft had wing walks that were light blue, and 4 guns - 2 in each lower wing. This is how an S.231 appeared in an exhibition in Paris in 1934.
I started building it in SCW Republican markings because the red markings attracted me, and because it required only 4 decals, only two of-which could be trimmed to remove the areas of poor registration.
| CONSTRUCTION |
 You've
already guessed that I started by assembling the (dunno why it had) two
sticks, rudder bar and seat onto the cockpit plate, and this (plus the IP)
was sealed inside the fuselage. There was a gap between the fin and the port
fuselage that needed heavy-duty filling. But because I wanted to preserve
the detail there, I elected to use white glue to do the job. The tailplanes,
legs and lower wings (using the upper wing to get them right) went on next.
Everywhere, the fit was good, but not perfect. The fuselage and the wing
seams needed filling, too, then smoothing was required around the moulded-on
detail. I wish I knew about Perfect Plastic Putty when I was building this
model. Then the painting started.
You've
already guessed that I started by assembling the (dunno why it had) two
sticks, rudder bar and seat onto the cockpit plate, and this (plus the IP)
was sealed inside the fuselage. There was a gap between the fin and the port
fuselage that needed heavy-duty filling. But because I wanted to preserve
the detail there, I elected to use white glue to do the job. The tailplanes,
legs and lower wings (using the upper wing to get them right) went on next.
Everywhere, the fit was good, but not perfect. The fuselage and the wing
seams needed filling, too, then smoothing was required around the moulded-on
detail. I wish I knew about Perfect Plastic Putty when I was building this
model. Then the painting started.
| COLORS & MARKINGS |
I brushed several parts with CM (Citadel Miniatures) abaddon black (engine, tires etc), mithryl silver and several browns (struts, seat etc). The wings and fuselage were sprayed with SMS Italian red. After a long drying time, the required areas were masked, then the model was sprayed with Tamiya IJN green. More masking, then the undersides were sprayed with lightened Tamiya X-14 Sky blue, as the raw paint was darker than the painting guide. It's still too dark. Rats!!!
 After
the masking was stripped-off, it showed what a lousy job I did on the
filling. Filling touch-up, then paint touch-up was required. The green was
repaired with CM catachan green (and a brush) which was a close match, but
it gave me some differentiation in the green, so I decided to live with it.
After
the masking was stripped-off, it showed what a lousy job I did on the
filling. Filling touch-up, then paint touch-up was required. The green was
repaired with CM catachan green (and a brush) which was a close match, but
it gave me some differentiation in the green, so I decided to live with it.
Rigging was done with elastic EZ-Line. Lengths were superglued into the strut location sockets on top of the lower wing. Then the painted struts were glued on top of them with liquid cement, and the top wing was used as a jig to hold them in position while they dried. Two days later, I dragged the EZ-Line over the tops of the adjacent struts and secured them there with touches of superglue. Gluing the top wing on top of the struts made it look like a biplane and put the build into the home stretch. For ease, I should have painted the wing-walks BEFORE doing all of this - Twit!!! Now, I can't get the wing walks in, so I have to accept that my model won't have them. The areas to be decaled were Futured as a foundation for the decals.
This SCW version required only 4 decals - 2 serial numbers and the fin flashes. The flashes needed trimming to remove the out-on-register elements. They were placed over areas of raw white plastic, then sealed-in with a coat of clear flat that caused a frosting over the model. Double Rats!!! Because of this, I shelved the model for a long while.
| CONSTRUCTION CONTINUES |
I wanted this off the Shelf of Doom and finished, so I scrubbed at the frosting with warm soapy water and a toothbrush - and it worked (Yay Me!!!), because the clear flat was an acrylic paint. I re-applied another clear flat coat from a brand-new bottle, and it worked.
The cowling ring had
two poorly-cast exhaust pipes projecting from it. They lined-up with two
elements of the exhaust collector ring - if the modeller puts the two
together correctly. I did, then I cut them off, drilled-out their positions,
and then replaced them with small-calibre plastic tube. C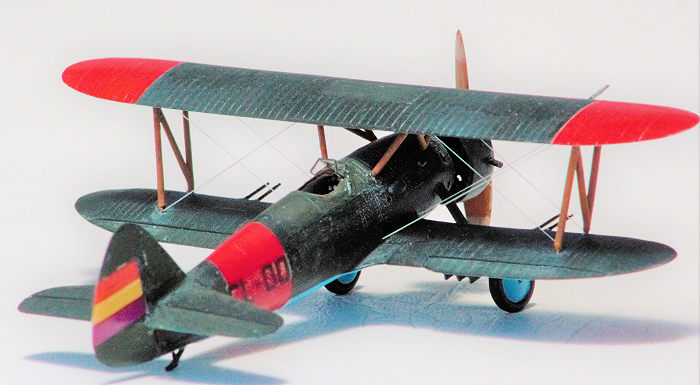 areful
gluing was needed to put the engine-and cowling on so that the exhaust pipes
were correctly placed, and still allow the propeller to spin (I like
spinning props).
areful
gluing was needed to put the engine-and cowling on so that the exhaust pipes
were correctly placed, and still allow the propeller to spin (I like
spinning props).
I wanted the 4 wing guns so that my model resembled the painting guide and that Parisian photo. The easiest way to do this was to lop-off the 2 moulded-on guns, and fit the wings with 4 Masters turned-brass barrels (from an FW.190 - but don't tell anyone). The difficulty was the drilling-out of the leading-edges of the wings because it always is, and the hardness of the plastic didn't help. The barrels are barely socketted in-place and I fear that they will soon succumb to clumsiness. I also attempted to replicate the 4 underwing shell ejection chutes in that hard plastic.
Rigging the undercarriage legs was required before attaching the wheels. I used one thin brass rod to give the legs a little more support, and a 'V' of EZ-Line. Attaching the six light bombs completed the model. On a whim, I Futured the red areas and the decals to (hopefully) give the model the appearance of newly-painted areas on an old aircraft to parallel their history. There were some tiny underwing horn-balances to be placed on the underside of the ailerons, but since they were only butt-joined on, I decided to fore-go them. The last requirement was to get some thin clear plastic sheet, and to scratch-fold a windscreen to replace the (tiny little) one that I lost (AFTER I had dipped and painted it. Triple Rats!!!)
| CONCLUSIONS |
This is my first SCW aircraft and while it looks too colourful to be a combat aircraft, it does look good on my shelf (according to me). I'd never heard of this aircraft before, and I don't know any other model of this minor aircraft. I found it a difficult build because of the filler required between the wings and the fuselage, the hardness of the plastic, and the mould seams. I wouldn't have thought that they would be a problem, but they were. I suppose persistence (or pigheadnesses) won the day. A better modeller (you?) could probably do a better job than I did.
19 July 2022
Copyright ModelingMadness.com. All rights reserved. No reproduction in part or in whole without express permission.
If you would like your product reviewed fairly and fairly quickly, please contact the editor or see other details in the Note to Contributors.