Airfix 1/48 Hawker Nimrod
|
KIT # |
` |
|
PRICE: |
@ $5.00 used |
|
DECALS: |
43 Sq RAF |
|
REVIEWER: |
|
|
NOTES: |
Two Airfix Furies needed for this conversion |
|
HISTORY |
Though the Hawker Nimrod is generally considered a navalized version of the Fury land-based interceptor, it is in fact a different airplane, with different origins.
Throughout the late
1920s and early 1930s, the standard fleet fighter was the Fairey Flycatcher, a
fighter that was nimble and fun to fly, but of decidedly pedestrian
performance, in comparison with later types serving the RAF. In 1926,
specification N.21/26 was issued for a replacement. Hawker was among the
companies that responded, and the Hawker "Hoopoe" was evaluated with
sufficient success to encourage Hawker to continue the design development,
though with an inline powerplant, rather than the Panther radial that powered
the "Hoopoe." Powered by the then-new Rolls-Royce Kestrel, the "Norn"
appeared in early 1930; obviously influenced by the F.20/27 design known at
t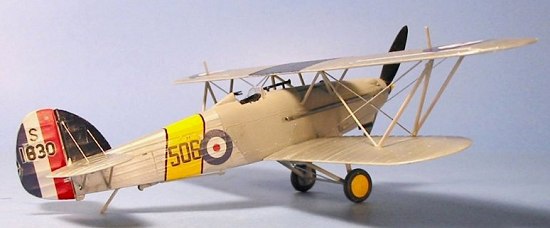 he time as the "Hornet," which would later be ordered as the "Fury,"
specification N.16/30 was written around the "Norn." Trials of this airplane
were successful, and it was ordered by the Air Ministry as the Nimrod with a
production run of 35 airplanes.
he time as the "Hornet," which would later be ordered as the "Fury,"
specification N.16/30 was written around the "Norn." Trials of this airplane
were successful, and it was ordered by the Air Ministry as the Nimrod with a
production run of 35 airplanes.
The first Nimrod was delivered on October 14, 1931. Both it and the second production example were sent to Japan for demonstration flights, returning in the Spring of 1932. In the meantime, the first production run had been completed. Landing tests with S-1577 - the first prototype - were carried out aboard HMS "Eagle" in April, 1932, with service clearance coming that June. The first unit to re-equip with the Nimrod was 408 Flight aboard HMS "Glorious," followed shortly by 402 Flight aboard HMS "Eagle." In both cases, the Nimrods were flown alongside the earlier Flycatchers until sufficient aircraft were delivered for complete re-equipment.
Following the reorganization of the Fleet Air Arm in 1933, Nimrods equipped 800 Squadron aboard HMS "Courageous," 801 Squadron aboard HMS "Furious," and 802 Squadron (402 Flight re-named) aboard HMS "Glorious." Each squadron operated two six-plane flights of Nimrods and one six-plane flight of Hawker Osprey aircraft, the naval development of the Hart bomber.
Nimrod Mk I K2823 was retained by Hawkers for further development, and was equipped with a swept wing similar to that used by the Hart light bomber. Specification N.11/33 was written around this development, to cover the order of 36 Nimrod Mk.II fighters to a similar configuration.
Replacement of the Nimrod by the Gloster Sea Gladiator began in 1938, with the last squadron to operate the Nimrod, 802, trading in its aircraft for the Sea Gladiator in May 1939.
|
THE KIT |
 There are two 1/48
kits of the Hawker Fury available. One, originally made by Inpact in the
mid-1960s and later released by Lifelike, Pyro, and finally Lindberg, is
commonly considered the best kit of this airplane available, though there are
some outline mistakes. The other Fury was originally released in the very
late 1970s by Airfix. Compared to the earlier Inpact kit, the Airfix kit is
quite crude, with the "hills and valleys" for the fabric-covered areas that
manufacturers have come to consider de rigeur for models of
fabric-covered airplanes, despite its manifest inaccuracy.
There are two 1/48
kits of the Hawker Fury available. One, originally made by Inpact in the
mid-1960s and later released by Lifelike, Pyro, and finally Lindberg, is
commonly considered the best kit of this airplane available, though there are
some outline mistakes. The other Fury was originally released in the very
late 1970s by Airfix. Compared to the earlier Inpact kit, the Airfix kit is
quite crude, with the "hills and valleys" for the fabric-covered areas that
manufacturers have come to consider de rigeur for models of
fabric-covered airplanes, despite its manifest inaccuracy.
The reason I chose to use the Airfix kit for this conversion is that the upper wing of this kit is made in one piece, as opposed to the three-piece upper wing of the Inpact kit. Since the wings of the Nimrod are some 4 feet greater in span than that of the Fury, cutting the wings of two kits and joining them together would be easier. While most Fury aficionados consider the Airfix kit far less accurate, it is "close enough" for this conversion, and generally more readily available at a lower price at dealer's tables than is the other kit, which is important when one considers it takes two Airfix Fury kits to make one Nimrod.
|
CONSTRUCTION |
The big difference between the two aircraft is the longer-span wings of the Nimrod. They actually work out to be approximately two rib-spaces greater in span to either side of the centerline, in both upper and lower wings. This makes the conversion quite easy.
 For the upper wing,
cut the wing at the rib immediately outboard of the locating holes for the cabane struts; this will be the new center section of the Nimrod wing. Take
the other wing, and cut out the outer wing panels along the rib line two
inboard of where the other wing was cut. Once these have been sanded smooth
and trued up, it is simple to glue the three parts together and set it aside
to set up.
For the upper wing,
cut the wing at the rib immediately outboard of the locating holes for the cabane struts; this will be the new center section of the Nimrod wing. Take
the other wing, and cut out the outer wing panels along the rib line two
inboard of where the other wing was cut. Once these have been sanded smooth
and trued up, it is simple to glue the three parts together and set it aside
to set up.
The lower wing of the Airfix kit is incorrect in that it is a one-piece part, attaching to the lower fuselage. However, take one wing and cut off the outer panels along the line of the third rib outboard from the fuselage line; this will provide guidance to get the dihedral of the lower wing right. Take the other wing, and cut off the outer wings at the first rib outboard of the fuselage line. As with the upper wing, true up the cuts and smooth them, then attach the outer wings to the center section. While the upper wing is in three parts with a definite division between the center section and outer wings, the lower wings are supposed to be one complete wing to either side. This will require you to fill the gap of that joint, and then sand it smooth, without losing the rib.
Construction continues:
The fuselage is
assembled per instructions. While the cockpit opening is small enough that
the causal viewer may not see anything inside, I took the time to create the
airframe with .030 Evergreen rod. Since the Nimrod was delivered in 1932,
when British cockpit colors changed, it should be British Interior Green
overall. You cannot see the area of fabric that would be red, so don't worry
about it.
I then attached the lower wing to the fuselage, and filled in the gaps fore and aft of the wing and smoothed that, then used my razor saw to "separate" the wings from the fuselage just enough to be noticeable. The radiator will cover the forward joint when it is glued in position.
The only parts that must be scratchbuilt is the fairing on which the oil cooler is mounted under the nose, and the headrest. I made both the fairing and the headrest from thick Evergreen sheet laminated together and then cut and sanded to shape. The oil cooler was assembled from sheets of .010 Evergreen sheet cut to shape.
The tailhook - which is attached after painting and decals - was made from a tailhook in the spares box and more of the .030 Evergreen rod for the "A" frame.
The exhausts were made with Evergreen rod glued into the exhaust holes in the cowling, with the exhaust pipe made from some spare sprue, drilled out at the end.
|
CAMOUFLAGE & MARKINGS |
 Painting:
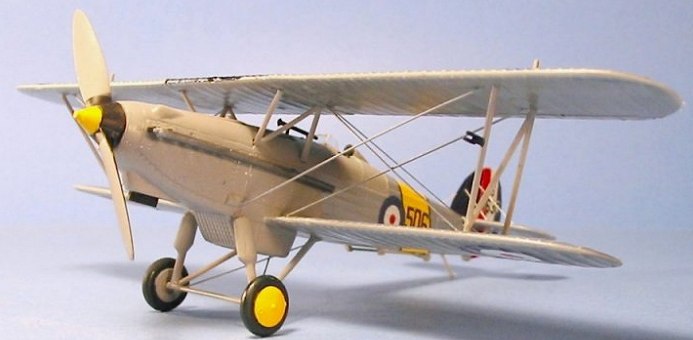
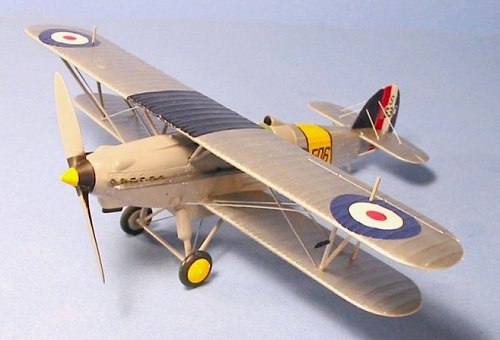
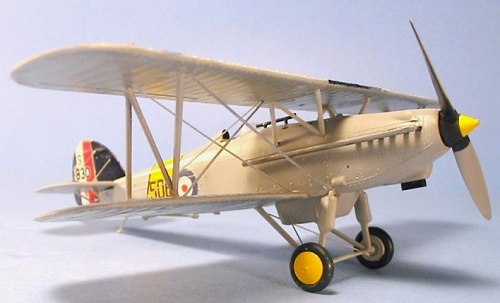
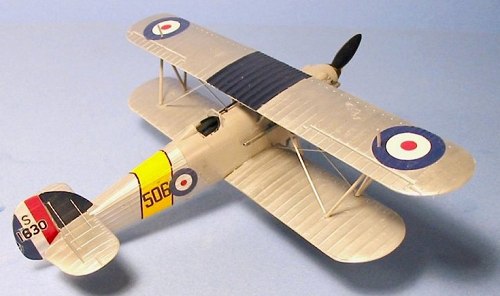
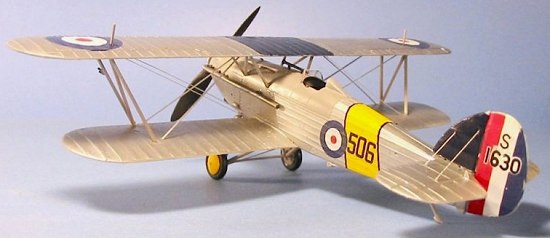
The FAA scheme is Cerrux Grey on all metal surfaces, and aluminum dope on the fabric surfaces. I painted the nose area, landing gear and struts with Tamiya "Sky Grey," and the fabric areas with SnJ Aluminum.
Decals:
I used the national insignia from the kit. The rudder decal (which is for K-1930) was modified and painted over, with other letters and numbers from the decal box, to make S-1630. The yellow band for HMS Courageous" was made with a sheet of solid-color "Yellow" decal cut to shape. The blue flight markings were done from a sheet of solid "Insignia Blue" decal.
|
FINAL CONSTRUCTION |
The wings were attached, along with the landing gear and prop. The model was rigged with .010x.030 Evergreen plastic strip to simulate the airfoil-section "raf wires." This plastic strip is the exact same size as the photo-etch rigging in the Tamiya Swordfish.
|
CONCLUSIONS |
 This is not a
difficult conversion, and it results in a good-looking model of an overlooked
type. Anyone who enjoys modeling aircraft of the Fleet Air Arm will find it
fills a hole in the collection and will look good sitting next to the
soon-to-arrive Sea Gladiator from Roden, and the old Inpact Flycatcher.
This is not a
difficult conversion, and it results in a good-looking model of an overlooked
type. Anyone who enjoys modeling aircraft of the Fleet Air Arm will find it
fills a hole in the collection and will look good sitting next to the
soon-to-arrive Sea Gladiator from Roden, and the old Inpact Flycatcher.
April 2003
Thanks to Pete Legge for supplying the second kit and the reference material.
If you would like your product reviewed fairly and fairly quickly, please contact the editor or other details in the Note to Contributors.
Back to the Reviews Index Page 2024