
Roden 1/48 Gladiator I
|
KIT # |
408 |
|
PRICE: |
$27.98 |
|
DECALS: |
Five Aircraft |
|
REVIEWER: |
|
|
NOTES: |
|
HISTORY |
Amazingly enough,
the Gloster Gladiator - the RAF's last fighting biplane - was the outcome of a
design competition that was expected to result in the procurement of the
service's first modern monoplane fighter. It was fortunate indeed that
 none of
the monoplane designs created in response to specification F.7/30 - which
called for a single-seat fighter capable of 250 m.p.h. and carrying four
rifle-caliber machine guns, capable of both day and night operation, with
particular stress on a wide field of view for the pilot and excellent landing
characteristics - was successful. Aviation development in the mid-30s was in
a revolutionary period, and the pace of development was such that these
designs would have been obsolete by the outbreak of war; the RAF would have
found itself in the same position as the French Air Force, which had adopted
monoplane fighters designed in the earlier period, and scrambled too late to
obtain more modern equipment.
none of
the monoplane designs created in response to specification F.7/30 - which
called for a single-seat fighter capable of 250 m.p.h. and carrying four
rifle-caliber machine guns, capable of both day and night operation, with
particular stress on a wide field of view for the pilot and excellent landing
characteristics - was successful. Aviation development in the mid-30s was in
a revolutionary period, and the pace of development was such that these
designs would have been obsolete by the outbreak of war; the RAF would have
found itself in the same position as the French Air Force, which had adopted
monoplane fighters designed in the earlier period, and scrambled too late to
obtain more modern equipment.
The Gloster S.S.37 was an evolutionary development of the Gloster S.S.19 - which was just being accepted into the RAF as the Gloster Gauntlet. In July 1935, the S.S.37 was ordered into production to specification F.14/35, with the name "Gladiator;" within a year the Hurricane and Spitfire prototypes would fly, while the Bf-109V1 had already flown in Germany.
In the spring of 1937 - the same year that the Messerschmitt Bf-109 would commence operational deliveries to the Luftwaffe - the Gladiator was taken on charge by 72 Squadron at Tangmere. Over the course of the next twelve months, the airplane would become the main type in Fighter Command, and the last fighter to appear in the colorful prewar livery of RAF squadrons.
|
THE KIT |
For a description of what's in the box, please visit the preview
The kit provides
decals for five airplanes, four of which are camouflaged fighters from the
Second World War. However, I wanted to do a pre-war example in colorful
markings; Max Decals has now released a decal sheet with some of these
 markings, but it was not available when I started this project. Fortunately,
there were enough decals to be found languishing in the decal dungeon to
create one of the first production Gladiator Is, as flown by 72 Squadron , the
first unit to equip with the type.
markings, but it was not available when I started this project. Fortunately,
there were enough decals to be found languishing in the decal dungeon to
create one of the first production Gladiator Is, as flown by 72 Squadron , the
first unit to equip with the type.
I have built numerous Inpact/Pyro/Lifelike/Lindberg Gloster Gladiators since first finding them in a hobby shop back in 1969. This new kit does not necessarily make the old kit superfluous - in fact I like the earlier kit's engine cowling better than what comes in this kit and eventually used one for this build. However, this kit by Roden is "more right" than the old kit. Among other things, the fuselage cross section is the proper "egg shape" as opposed to the oval shape of the other. Additionally, I think the "fabric effect" of the new kit is superior, There are other subtle curves around the cockpit, and the quite-subtle "gull effect" of the lower wing at the point of attachment to the fuselage where the new kit is vastly superior to the old. I also like the separate flying surfaces, which accurately portray the "Frieze" type ailerons it used.
|
CONSTRUCTION |
The kit is quite simple to build, and I only found difficulty in assembling the engine; while my ultimate solution was to use the older kit's engine and cowling, if you follow these steps in this order you should have no problems:
1. Assemble and clean up the cowling and paint the interior.
2. Paint, assemble and clean up the engine, without the exhaust stacks.
3. Once the engine is set up, sand down the "blocks" on the ends of the sleeve valves, until the engine will slide easily into the cowling.
4. Attach the exhaust stacks.
5. Attach the engine inside the cowling.
 The only other area
of difficulty is the instrument panel. It does not want to fit, and the only
way I eventually found to get it to do so was to remove the mounting ridges
inside the fuselage half and sand down the panel till it fits the internal
shape correctly. In the process, I managed to screw up the instrument decals,
so I ended up painting the instruments in the panel.
The only other area
of difficulty is the instrument panel. It does not want to fit, and the only
way I eventually found to get it to do so was to remove the mounting ridges
inside the fuselage half and sand down the panel till it fits the internal
shape correctly. In the process, I managed to screw up the instrument decals,
so I ended up painting the instruments in the panel.
Other than that, things fit well, though I suggest you open up the mounting holes in the fuselage and wings for the cabane and interplane struts to obtain better final fit of the struts.
Because this is something of a "limited run" kit, be sure to "test fit twice and glue once." I found I needed to re-shape the landing gear attachment area so it would fit to the fuselage properly; this was a matter of a few minutes with a sanding stick and some test-fitting till all was right.
When I had the fuselage, landing gear, lower wing and tail assembled, the model was ready for painting.
|
CAMOUFLAGE & MARKINGS |
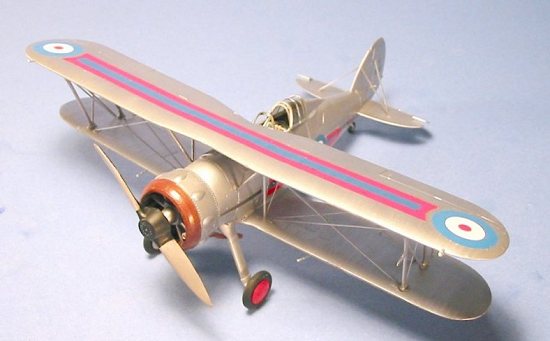
Painting:
Most RAF fighters of
the interwar period had a combination of aluminum dope on fabric surfaces,
with metal surfaces polished. This ended with the introduction of the
Gauntlet, on which the metal surfaces were painted
 with aluminum lacquer.
This was also the case with the Gladiator. I recreated this by painting the
fabric-covered areas with SnJ Aluminum, and the metal areas with Testors
ModelMaster Aluminum (non-buffing) Metalizer, finished with Testors Metalizer
sealer over these areas only.
with aluminum lacquer.
This was also the case with the Gladiator. I recreated this by painting the
fabric-covered areas with SnJ Aluminum, and the metal areas with Testors
ModelMaster Aluminum (non-buffing) Metalizer, finished with Testors Metalizer
sealer over these areas only.
Decals:
I used the kit decals, "cut and pasted" to do the serial number. The national insignia came from an old Micro-Scale World War I sheet, which had the correct lighter shade of blue and brighter shade of red of the pre-World War II insignia. The red-blue Squadron marking was done using solid-color Micro-Scale decal sheets, cut to the proper shapes and applied in layers.
When this was done, I washed off the decal solvent residue and gave another coat of Future.
|
FINAL CONSTRUCTION |
I attached the
wheels and tail wheel and the prop, then attached the cockpit canopy in the
open position. 
Rigging:
The Gladiator used "raf wires" which are an "airfoil shaped" wire developed in the last years of World War I. No one makes anything that really looks like them, but .010x.030 Evergreen strip - which is exactly the same size as the rigging wires in the Tamiya Fairey Swordfish - looks close enough, and this is what I used, after painting the strips with SnJ Aluminum which wouldn't rub off while being handled.
|
CONCLUSIONS |
While most modelers will want to do the Gladiator in the camouflage markings of its "immortal" service during the opening years of World War II, this scheme from the last years of peace looks good. With the Max Decals sheet, you can have several options.
Tom Cleaver November 2003
Copyright ModelingMadness.com. All rights reserved. No reproduction in part or in whole without express permission.
If you would like your product reviewed fairly and quickly, please contact me or see other details in the Note to Contributors.