Classic Airframes 1/48 F4B-4
|
KIT # |
4002 |
|
PRICE: |
$29.98 |
|
DECALS: |
See review |
|
REVIEW : |
|
|
NOTES: |
Multi-media kit |
|
HISTORY |
While Boeing is today known as the world's premiere designer, builder and manufacturer of very large commercial airplanes, the company got its start in the 1920s by beating out Thomas Morse for the contract to produce the MB-3 fighter. With what they had learned from this, the first mass-produced American fighter plane, Boeing designed the XPW-8, a better airplane, which would serve as the basis for a series of fighters designed and built in the mid-1920s for both the Army and the Navy, the first of which would be the PW-9 for the Army. Boeing became locked in a struggle with Curtiss to become the military's premiere fighter company.
The Navy at this time was operating the U.S.S. "Langley," the service's first aircraft carrier, and was in the process of converting the "Lexington" and "Saratoga" from the battle cruisers they began life as to aircraft carriers as a result of the restrictions of the first Washington Naval Treaty of 1922. The Navy was going to need fighters to protect those aircraft carriers.
Boeing's first naval fighter was the FB-1, which was based on the Army PW-9, with a Curtiss D-12 V-12 with radiator beneath the nose. Ten FB-1s were produced for the Marines; two FB-2s with arrestor hooks for carrier operations were followed by three FB-3s with a Packard IA-1500 engine. The Navy was trying to decide whether to standardize on the liquid-cooled inline engine the Army favored which were built by Curtiss and Packard, or the new lightweight and reliable radial engines Wright and Pratt & Whitney were creating. The single FB-4 was delivered with a Wright, and a year later modified with a Pratt & Whitney R-1340 Wasp as the FB-6. In the meantime, 27 FB-5s were delivered with the Packard 2A-1500 liquid-cooled engine.
By 1926, the Navy had decided to standardize on the radial powerplants. 32 F2B-1s were ordered in March 1927; a larger wing which allowed lower landing speeds distinguished the 74 F3B-1s which reached the fleet in February 1928.
Boeing, facing strong competition from Curtiss' Hawk derivatives, came up with the Model 83, powered by the brand-new 500 h.p. Pratt & Whitney R-1340B, which was first flown June 25, 1928. Ordered by the Navy as the F4B-1 and the Army as the P-12, it was the last time the two services would operate the same fighter equipment until the arrival of the North America F-86/FJ-2/3/4 series 20 years later. 29 F4B-1s were followed by 46 F4B-2s in June 1930.
In December 1930, Boeing offered the Model 218, which was the Model 89 with an all-metal fuselage. This became the Army P-12E and the Navy F4B-3. 75 F4B-3s were originally ordered on April 23, 1931, and August 15, 1931, but 54 of these were delivered as F4B-4s.
The F4B-4, which had a more powerful R-1340-16, a wider fin and an enlarged headrest, first flew in July 1931. 38 F4B-4s - in addition to the original 54 in the revised F4B-3 contract - were ordered August 15, 1932. The F4B-4 had wing racks for two 116-lb. bombs; a 55-gallon drop tank could double the internal fuel supply.
The F4B-4 was supremely maneuverable and loved by all who flew it for its tractability and performance. Dick Best, later known as the man who sank IJN "Akagi" at the Battle of Midway, began his naval aviation career as a commissioned section leader in VF-2 "The Flying Chiefs", just before the unit transitioned from the F4B-4 to the F2F-1. Today, Best recalls the F4B-4 as the most responsive airplane he ever flew. "You could make it turn by sticking your arm out to one side or the other, it was that light," he remembered in 1999.
|
THE KIT |
Classic Airframes is now well-known for producing kits of airplanes modelers have wanted to see over the years, that are unlikely to be produced by the major manufacturers. The company has produced more "Golden Age" models - airplanes from the 1930s - than any other. When their P-12E and F4B-4 appeared this past summer, I got one of each.
The model comes on two sprues of light grey plastic with a four part resin cockpit, and the tail surfaces and ailerons are recreated with the corrugated surface that is correct. The injection moldings are thick, but have nice petite scribed surface detail.
The kit provides decals for two airplanes, a VF-3B airplane aboard "Ranger" in 1934, and a VF-6 irplane aboard "Saratoga" in 1936. This is a period when Navy fighter squadrons changed unit numbers back and forth, and many have been confused by this. The confusion even extends to "Boeing P-12/F4B Fighters In Action," where the VF-3B airplanes are misidentified on two pages, and the VF-6 airplane on the cover is claimed as an airplane from U.S.S. "Langley," rather that "Saratoga" as it actually was. This mistake is also taken up by Classic Airframes, which produced that airplane as one of their markings alternatives.
|
CONSTRUCTION |
The F4B-4 is definitely no Accurate Miniatures F3F-1. This is a biplane model for an experienced biplane modeler, and is a challenge even there. The kit does not have locating pins for the landing gear or wing struts - which are also too long and need shortening if the upper wing is not to end up sitting too high above the fuselage.
Construction begins with sanding out the fuselage halves in the vicinity of the cockpit to allow the cockpit interior to be seen. What is provided is simple, but given that one looks at it through a small cockpit opening, what is there is effective. Remember when making seat belts that at this time Navy airplanes did not use shoulder harnesses, only lap belts. After the fuselage halves were glued together and the resulting seam sanded smooth, I attached the horizontal stabilizer and the lower wings. So far, so good, the easy part is over.
The landing gear is where things begin to get difficult. You need to have photographs of the real airplane, and will need to test-fit the landing gear as you cut it and sand it and shape it to fit. It's a good idea at this point to attach the drop tank. I covered over the forward part of the top of the tank with 15-mil sheet styrene, since the hole can be seen when the tank is properly attached otherwise. When I finally got the landing gear to look right, I attached it with cyanoacrylate.
The cabane and interplane struts are more difficult to get right. I found a 1/48 three-view drawing of the F4B-4 in Wings of Fame, No. 2, and made my modifications from that. I shortened the interplane struts 3/32" on either end, then sanded them to give the proper outward-splayed angle when attached to the wings.
I then glued the struts to the lower wing. When they were set up, I attached the upper wing by tacking it to the interplane struts with a drop of C-A, and then measured and cut the cabane struts to fit properly, and glued them to the fuselage in theproper positions. When they had set up, I detached the upper wing. This is also a method of doing the wings that I recommend if you attempt the Classic Airframes SBC-3 or SBC-4.
The engine is all resin, with separate cylinders and crankcase. Cut the separate cylinders off right at their base, and attach them to the crankcase. I use .020 Evergreen rod to finish the magnetos and glued them in position. I then glued the two halves of the cowling together. When it was dry and the join seam smoothed away, I test fitted the engine inside the cowling and sanded off a bit of the cylinder heads to allow the engine to slip inside smoothly.
The kit provides the original individual exhaust stacks, which can be used of you are making the VF-3B airplane. However, if you are making the VF-6 airplane (as I did) you need to examine the photographs of these airplanes in the Squadron book, and see how the exhausts were changed. These can be scratchbuilt with Evergreen rod, which is what I did. As an alternative, if you have an "extra" Hobbycraft P-26 - or are going to make it as an early version with the individual exhaust stacks - you can use the late version exhausts from this kit with the F4B-4 kit, as both the F4B/P-12 and the P-26 used the same engine.
|
PAINT & DECALS |
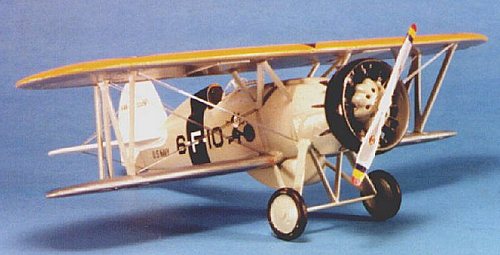
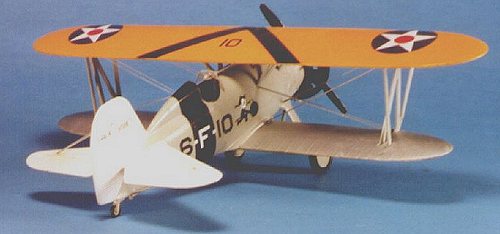
At the time the F4B-4 was in front line service, the Navy painted the metal parts of an airframe Light Aircraft Grey, while fabric areas were painted with aluminum dope and the upper wing surface was painted what the Navy called "Chrome Yellow," an unfortunate choice of words that has led many, many modelers over the years to paint this area the wrong color.
I started by painting the tail surfaces white, since this was an airplane from the Saratoga. While that was drying, I painted the upper surface of the wing with Gunze Sanyo H-24 "Orange Yellow." This is the right color for the upper wing. An alternative is Floquil Japanese Navy ID Yellow, which is also an "Orange Yellow." Do not paint this Trainer Yellow, Chrome Yellow or any other yellow-yellow shade - you will be WRONG!!
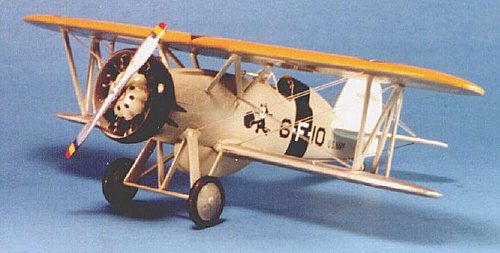
I set the wing aside, and painted the lower wing with SnJ aluminum. Once that was dry, I masked off the lower wing, vertical fin and horizontal stabilizer, then painted the fuselage, landing gear and interplane struts with Gunze-Sanyo H-332 "Light Aircraft Grey." While this is a modern color for British aircraft, it is close enough as to make no never-mind to pre-war U.S. Navy light aircraft grey. I finished off by painting the cowling with Tamiya semi-gloss black, for the fifth section leader's aircraft.
I painted the propeller with Future, and when it was dry to the touch but not fully set up, I rubbed in SnJ polishing powder and polished out the prop to a high gloss.
When all this was fully dry, I gave everything a coat of Future. When it was dry, we were ready for the decals.
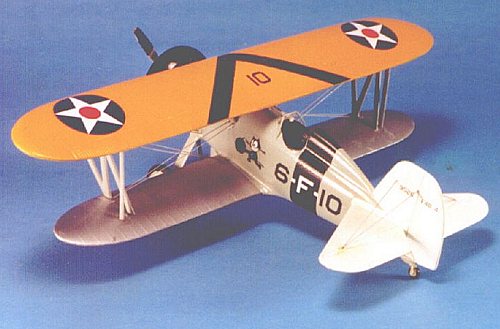
Classic Airframes now uses Micro-Scale decals, which makes everything easy. The decals went on with no trouble. I did replace the Felix the Cat insignia with another one from a sheet in the decal dungeon, because it doesn't have the face in white as it should; if I had not had the extra Felix, all would have
been fine. Alternatively - if you do not do the VF-3 airplane when you make the Accurate Miniatures F3F-1 - you can use that Felix insignia, which is completely right. I particularly liked the fact that the prop tip stripes came as a decal, which was much easier than painting them.
|
FINAL ASSEMBLY |
Final assembly included attaching the vacuformed windscreen and telescopic gunsight, and attaching the upper wing. Having pre-fitted the wing, it went on easily. I then glued the engine inside the cowling with cyanoacrylate and glued it into position on the front of the fuselage.
The great bugbear of biplane models: the rigging. You can't get away from it, though, because this is where the model "comes alive." Fortunately, the F4B-4 has a very simple rigging system. I used Evergreen .010 x .020 strip, painted silver, to create the flat-section "raf wires" used on the airplane. These attached easily with white glue and all was done.
|
CONCLUSIONS |
As you can see from the accompanying photos, this is a good-looking model when completed. Surprisingly, F4B-4 and the F3F-1 are about the same size. They look great sitting next to each other on the model shelf.
Thanks to Classic Airframes for providing the review kit.