Frog 1/72 Tupolev SB-2
| KIT #: | F-176 |
| PRICE: | Can be found cheap~! |
| DECALS: | . |
| REVIEWER: | Brian Baker |
| NOTES: | . |
| HISTORY |
The SB “High Speed Bomber” was developed by A. N. Tupelov’s design bureau, known as TsAGI, during the middle thirties. It was, for its time, an extremely modern three place twin engined bomber, and included the state of the art features such as all metal construction, retractable landing gear, and enclosed cockpits. The engines were two Kilmov M-100 liquid cooled engines rated at 750 hp., which were copied of the French Hispano Suiza 12 Ybrs engines but with lower power.
The SB was slow to get into production, mainly since the Soviets lacked adequate production facilities, and modern, all metal stressed skin construction required the training of workers before manufacturing could begin. However, production models began to appear in 1936, and production of various models continued until 1941, when it was replaced on the production line by the Petylyakov Pe-2.
 The SB was armed
with a total of four 7.62 mm. ShKAS machine guns, with a twin mounting in
the nose fired by the navigator/bombardier, and one each in dorsal and
ventral positions fired by a single rear gunner. Internal bomb load
consisted of six 220 pound bombs or two 551 pound bombs. Wingspan was
66’8”, and length was 40’4”.
The SB was armed
with a total of four 7.62 mm. ShKAS machine guns, with a twin mounting in
the nose fired by the navigator/bombardier, and one each in dorsal and
ventral positions fired by a single rear gunner. Internal bomb load
consisted of six 220 pound bombs or two 551 pound bombs. Wingspan was
66’8”, and length was 40’4”.
Empty weight was 9123 pounds, gross weight was 12,637 pounds. The aircraft had a maximum speed of 263 mph at 13,123 feet, and a range of just over 900 miles.
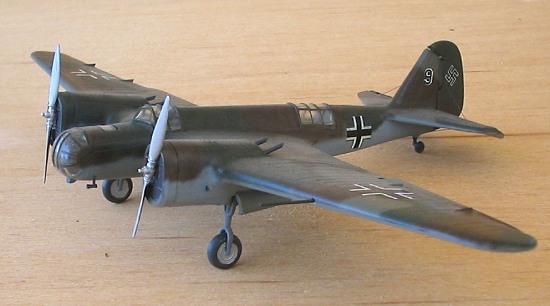
The first production models, SB-2-M100’s, were delivered to Soviet bomber units early in 1936, with aircraft being sent to Spain by the end of the year, 31 arriving by freighter.
These aircraft were used against the Spanish Nationalists who were supported by the Germans and Italians. At first, Russian crews operated the aircraft, although later Spanish pilots and aircrews were used. Even though it was an extremely fast aircraft, some combat losses occurred from the beginning, as some German and Italian fighters were just fast enough to intercept it. One interesting action involving SB’s was their attack on the German battleship Deutschland. The crew believing it was a Spanish nationalist cruiser. The Germans retaliated by shelling a Spanish port occupied by the Loyalists.
In 1937, Soviet crews were recalled, and the remaining SB’s were operated until the collapse in 1939. Nineteen SB’s survived the war, and these were used by the Nationalists until 1943, when they were replaced by German JU-88A’s. The last Spanish SB’s were scrapped in 1948.
Other nations
received SB’s before World War II. Soviet volunteers flew numerous
missions against the Japanese in the defense of China during 1937 and 1938,
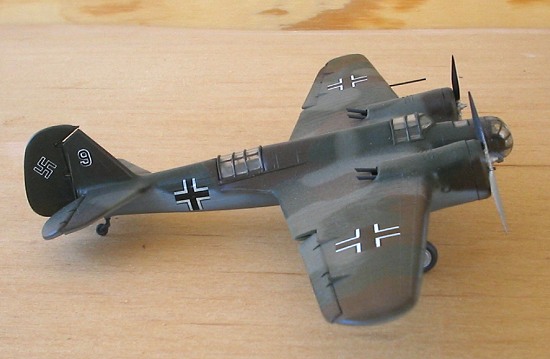
and Czechoslovakia bought 61 SB’s and license-produced 161. The Czech
aircraft were designated B-71, and most of these were taken over by the
Luftwaffe when Germany invaded Czechoslovakia in 1939.
 Some of these aircraft
were used by the Luftwaffe, while others found their way into the Slovakian
and Bulgarian air forces.
Some of these aircraft
were used by the Luftwaffe, while others found their way into the Slovakian
and Bulgarian air forces.
The major user of the SB was, however, the Soviet Air Force, who had completely reequipped with the type by the time of the German invasion in 1941. Large numbers were on hand, even though the design was by now over five years old, and more advanced aircraft were becoming available. After Soviet officers toured the German industrial plants, Stalin decided that Soviet production must increase rapidly, and this meant the production of existing, albeit obsolescent designs. Thus, Soviet airfields were packed with SB’s and I-16’s, both types clearly inferior to German types in service.
In 1939, a new version of the SB appeared, distinguished by a more streamlined cowling and three bladed propellers. These were produced in large numbers, as was a specialized dive bomber variant, designated Archangelskiy Ar-2. These were swallowed up in the initial German attacks, and although the type soldiered on throughout most of the war, first line units began to receive Pe-2’s, ending the service career of the SB.
Today, only one complete SB survives in a Moscow aviation museum, although others may remain unrestored or undiscovered in various parts of Russia and Finland.
| THE KIT |
This is a VERY OLD kit, and the instructions in my example were yellowed and deteriorated with age, much like an ancient newspaper. I have had this kit for years, and probably bought it in the early seventies. On the back is a set of generic instructions on how to build a plastic model in six languages. The front has detailed exploded views, showing how all of the parts go together, along with the options available, which include two different propeller types, and either wheel or ski landing gear.
 Painting
instructions are given in color on the boxtop, although given the date that
the model was researched, I would tend to doubt whether any of the color
schemes given are totally accurate.
Painting
instructions are given in color on the boxtop, although given the date that
the model was researched, I would tend to doubt whether any of the color
schemes given are totally accurate.
THE KIT
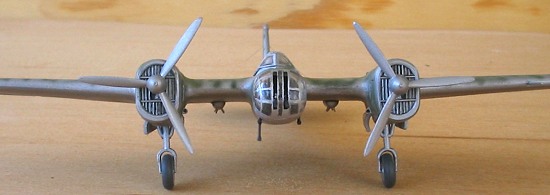
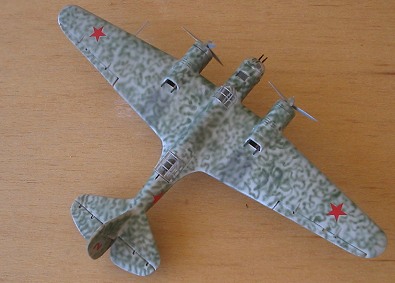
Cast in soft light grey styrene, the kit contains 96 parts, including four clear plastic pieces. As could be expected from such an old kit, there is a lot of flash and a number of sink marks that will require filling. In addition, raised panel lines are included, and these need to be removed. The moldings are crude by modern standards, but remember that Frog dared to be different during those times, coming out with injection molded kits that other manufacturers would not even consider. Nevertheless, the basic outline appears to be pretty accurate, and with a lot of work, an acceptable model can be made from this kit. The outline shows well when compared with the 1/72 scale drawings in the Maslov book on the SB. One problem is the two bladed propellers, which rotate in the wrong direction. The three bladed props are correct, but the two bladed props rotate American style, or clockwise as viewed from the pilot’s seat, whereas they should be British style, or counterclockwise. This is OK if you are building the three bladed version, as the two bladers can be used for other models.
The kit contains a number of toy-like features that were common during this period: moveable control surfaces and guns. There is not much that can be done with these except to carefully finish the parts and glue them in fixed positions.
KIT VARIATIONS AND OPTIONS
 The Frog kit, as
it comes from the box, can be built as two basic variants, the SB-2-M100
with two bladed fixed pitch props, and the SB-2-M100A, with 3 bladed
VISH-2 variable pitch propellers. The more streamlined B-103 type cowlings
are not included, and this would be a major modification. The only rear
turret provided is the flat hatch enclosure and gun ring, so the MV-3
dorsal turret would have to be scratch built. The M-100 and M-100A
versions were both operated with non-retractable skis, which are included
in the kit. Be sure to check sources when using the skis, as some aircraft
had the landing gear doors closed with the struts protruding through the
doors. The gear doors, by the way, are poor, and should probably be
replaced.
The Frog kit, as
it comes from the box, can be built as two basic variants, the SB-2-M100
with two bladed fixed pitch props, and the SB-2-M100A, with 3 bladed
VISH-2 variable pitch propellers. The more streamlined B-103 type cowlings
are not included, and this would be a major modification. The only rear
turret provided is the flat hatch enclosure and gun ring, so the MV-3
dorsal turret would have to be scratch built. The M-100 and M-100A
versions were both operated with non-retractable skis, which are included
in the kit. Be sure to check sources when using the skis, as some aircraft
had the landing gear doors closed with the struts protruding through the
doors. The gear doors, by the way, are poor, and should probably be
replaced.
A number of variants could be produced using this kit, including some of the civilian types used in the arctic in the late thirties. These lacked armament, and turrets were usually faired over. Maslov’s book has a wealth of information on these aircraft, and I intend to build several of these later on.
| CONSTRUCTION |
From the box, this kit is relatively easy to assemble, but a bit of scratchbuilding is required to make a good model. The cockpit includes a generic seat (which probably needs replacement), an instrument panel, a floor, and a rear bulkhead. The rear gun position is also very basic, with the same seat (only facing to the rear), a floor, a gun mounting ring, and a very non-descript machine gun. There is no provision for the ventral gun, which couldn’t be seen anyway. The front turret is represented by a clear plastic nose cone, a gun mounting ring, and two similar machine guns.
For detailing, the new Squadron-Signal SB book has one good photo of the instrument panel, and another useful picture of the rear turret, but unless you get the Laslov book, you’re on your own as far as superdetailing is concerned. You might find something on the internet, however.
 So as far as the
interior is concerned, a lot of work is required to bring it up to
standard. The rear gunner’s position needs to be scratchbuilt, along with
the gun ring, which is not included in the kit. The cockpit needs detail,
but through the thick canopy, not much is visible
So as far as the
interior is concerned, a lot of work is required to bring it up to
standard. The rear gunner’s position needs to be scratchbuilt, along with
the gun ring, which is not included in the kit. The cockpit needs detail,
but through the thick canopy, not much is visible
Once the interior is suitably detailed, the fuselage halves can be assembled. This requires quite a bit of filler, and there are some sink marks to be filled in.
The wings are another problem. They are essentially accurate in outline, but they suffer from excessive surface detail and need to be sanded down. There is absolutely no wheel well detail at all, and since you can’t see it in a display case, I didn’t add any. A purist would, however. The main gear struts probably have to be positioned in place before the wing halves are joined,. They line up pretty well, but you need to be aware of this problem during assembly, as it would be difficult to correct once the wings are joined.
The ailerons can be attached after the wing is assembled, but mine were a little low on the wing, failing to line up properly.
Once the fuselage and wing are assembled, it is time to attach the wings to the fuselage.
Do this before attaching the tail unit, as it is easier to align this way. Once glued, you have the task of sanding and filling so that the surface of the airplane is smooth. Remember that this airplane was one of the first flush-riveted types, so the surface would be abnormally smooth, even though this didn’t always work out due to production difficulties. Then attach the tailplane, making sure that the stabilizers line up correctly.
 You will have to do
a certain amount of sanding and filling there too, as the fit is not what
it could be. Then attach the rudder and elevators. You’ll have to trim
off the attachment fittings unless you attach the elevators before joining
the stabilizer sections.
You will have to do
a certain amount of sanding and filling there too, as the fit is not what
it could be. Then attach the rudder and elevators. You’ll have to trim
off the attachment fittings unless you attach the elevators before joining
the stabilizer sections.
The engine nacelles are molded integral with the wings, so they are no problem. There is a flat plate that fits into the side of each nacelle, and this doesn’t fit perfectly, and will have to be filled and sanded. I would do this before attaching the wings to the fuselage. The fronts of the cowlings, with the radiators, are just glued onto the front of the nacelles, but the props have to be attached first unless you want to be able to pull them out. The props, either variety, need a lot of trimming, as they suffer from excessive flash. Remember that the two bladed props are incorrect—they rotate the wrong direction. If you install the main gear before wing sections are joined, be sure to trim everything down, as the parts are pretty rough as they come from the box.
The canopies should be assembled at this time. The little top window above the navigator’s compartment is a little tricky. The front gun mounting is on a half ring and is supposed to traverse up and down. Mine actually does, although fitting it in is rather tricky. I just masked off the whole thing and painted on the framing line freehand. That was a lot less trouble, and certainly quicker than trying to mask off those little lines.
The cockpit canopy and rear gunner’s hatch can be glued on and masked off. They fit fairly well, and shouldn’t be a problem. However, they really should be replaced with vacuformed units.
| COLORS & MARKINGS |
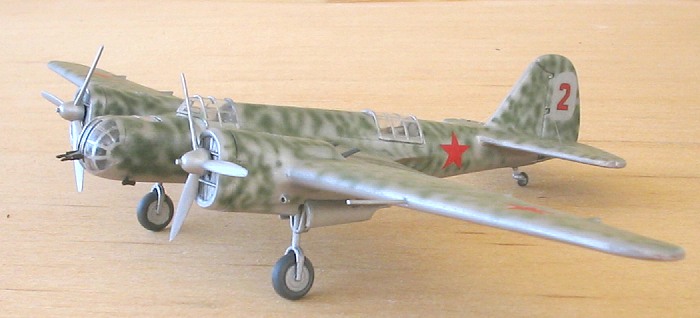
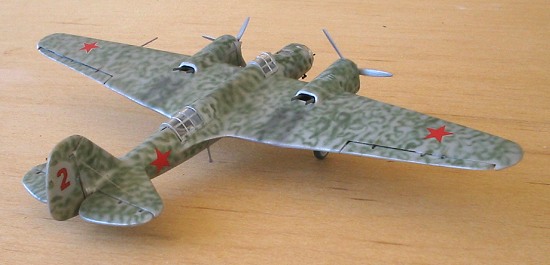
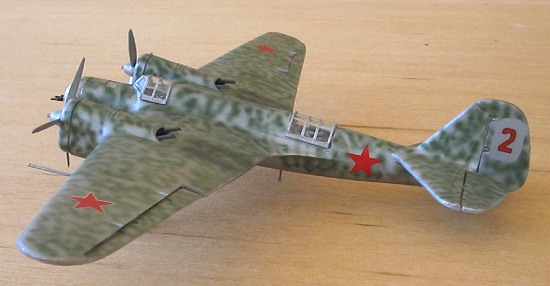
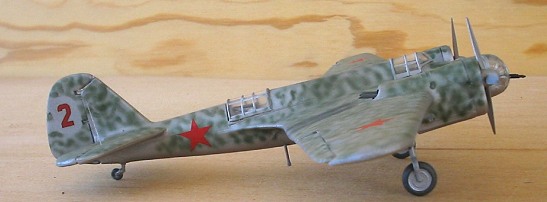
Once the model is assembled and filled in, it is time to paint it. This is the proper time to scribe any panel lines if you intend to do it. I selected a silver scheme with dark green camouflage overspray, a scheme I found in the Maslov book. It depicts an SB-2-100 of the 3rd Aviation Squadron of the 100th Aviation Brigade, based in Mongolia in 1940 after operations against the Japanese. The decals are very simple, four stars on the wings and two on the fuselage, with a red number two on the rudder. They are from my decal spares box, so I don’t know what model they originally came in, but they were kit decals, not aftermarket sheets.
| CONCLUSIONS |
 This is a very old
kit, and therefore not up to modern production standards. However, it is
currently the only model of this specific type of bomber. There is as
Eastern European SB model by MPM that has just come out, but I haven’t seen
one although I’ve seen pictures of the box art and the kit in the bag, and
it is the M-103 powered version, which had the streamlined cowlings. It is
infinitely better that the old Frog kit, but that is to be expected in a
kit that is at least thirty years newer, and it does represent a different
model. In addition, Pavla, I believe, produced a kit of the Archangelskiy
AR-2, the dive bomber variant, and it is a good kit, albeit, again, a
different model of the design.
This is a very old
kit, and therefore not up to modern production standards. However, it is
currently the only model of this specific type of bomber. There is as
Eastern European SB model by MPM that has just come out, but I haven’t seen
one although I’ve seen pictures of the box art and the kit in the bag, and
it is the M-103 powered version, which had the streamlined cowlings. It is
infinitely better that the old Frog kit, but that is to be expected in a
kit that is at least thirty years newer, and it does represent a different
model. In addition, Pavla, I believe, produced a kit of the Archangelskiy
AR-2, the dive bomber variant, and it is a good kit, albeit, again, a
different model of the design.
So until something better comes along, this is the only kit in town. If you have the time and the skill, it is certainly worth building, as there are numerous variants and color schemes that can be used. Don’t be a coward. Who said that modeling was supposed to be easy?
May 2005
Copyright ModelingMadness.com
If you would like your product reviewed fairly and fairly quickly, please contact the editor or see other details in the Note to Contributors.