| KIT #: | 03202 |
| PRICE: | $130.00 |
| DECALS: | Three options |
| REVIEWER: | Donald Zhou |
| NOTES: | Advantages: Big huge scale alternative to the ancient Tamiya Kit. Fit nice all the way around. PLENTY of weapons. Disadvantages: Intakes a mess. Instructions sometime wrong. “Split” left side results in unnecessary seams. |
| HISTORY |
The F-14 history can be traced to the now defunct F-111, specifically the F-111B. As any plane buffs know, the F-111, or VFX as it was known was McNamara’s effort to consolidate the Air Force’s requirements for a new fighter and attack aircraft and the Navy’s need for what is actually an interceptor for Fleet Air Defense or FAD. The plane would carry a huge powerful radar and would be able to launch missiles from extremely long range well away from the CVBG or Carrier Battle Group. McNamara, trying to get services to use common equipment as much as possible to save development costs, already forced the Air Force to select the Navy’s F-4 Phantom II as their new fighter. This turned out to be a wise decision as the “Rhino”, “the upside down fighter, “The world’s greatest distributor of MIG parts” was an instant classic and would go on to provide many years of service, especially during the hard years of the Vietnam War.
 However,
for the fleet air defense role, the secretary with an ego the size of Mount
Rushmore forced the Navy, based on equations chewed out by his “wiz bang kids”,
to participate in the VFX. Even though it carries the “F” designation, the F-111
was anything but since it’s a low-level strike aircraft. The Navy did not like
it since they felt it compromised with its fighter needs since the F-111 didn’t
have any fighter performance at all. On top of all that, the plane itself was so
overweight, it quickly proved it would be a hazard on the flight deck. The gee
wiz kids Mac hired to chew through cold hard numbers and equations forgot one
thing, experience and reality, which have a nasty habit of throwing monkey
wrenches into cold hard equations.
However,
for the fleet air defense role, the secretary with an ego the size of Mount
Rushmore forced the Navy, based on equations chewed out by his “wiz bang kids”,
to participate in the VFX. Even though it carries the “F” designation, the F-111
was anything but since it’s a low-level strike aircraft. The Navy did not like
it since they felt it compromised with its fighter needs since the F-111 didn’t
have any fighter performance at all. On top of all that, the plane itself was so
overweight, it quickly proved it would be a hazard on the flight deck. The gee
wiz kids Mac hired to chew through cold hard numbers and equations forgot one
thing, experience and reality, which have a nasty habit of throwing monkey
wrenches into cold hard equations.
With the F-111B running into serious trouble, General Dynamics, the producer of the F-111 teamed up with Grumman, a company who live on producing state of the art fighters for the Navy beginning with the F4F Wildcats, which held the line until the Zero Killer, another Grumman product, the F6F Hellcat came on line during World War II. However, the F-111B was flawed from the beginning, and not even the famous “Iron Works” could save it just because Navy aircrafts will always be heavier than their Air Force counterparts due to the fact, 1. They have to deal with constant salt corrosion, which demand a tougher stronger air frame. 2. Their landing gears especially have to be thicker and chunkier, what with all these “controlled crashes” and everything for a landing. And finally, 3. Most navy fighters features folding wings of some sort to save deck space, which are precious as it is. All of these factors add up to weight gains and with the “B” already pretty beefy, the additional changes meant a “fighter” that can’t maneuver worth a damn and with poor carrier approach to boot! McNamara, with his Mount Everest size ego still calling, demanded everyone to save the F-111B, this led to then Vice Admiral Thomas Connolly to say one of the more famous episode in Naval aviation history, “Mr. Secretary, no amount of thrust in all of Christdom will turn that thing into a fighter!” Mac was hoping Tom’s testimony will save his pet project. When it did not happen, his ego, which was bigger than Everest, demanded retribution. Vice Admiral Connolly will never get his Admiral rank. He sacrificed his naval career to kill the F-111B!
The fact of
the matter is, Grumman smelled trouble long before the “short nosed-vark” was in
trouble and was already starting on their own naval design long before the end
came. The design, Model 303 ended in the F-14. Though far lighter than the
F-111B, the F-14 is STILL the heaviest fighter to operate on a carrier, due to
no small amount to the AWG-9 radar system and its associated equipment, the
ability to carry 16,000lbs of fuel and of course, the massive AIM-54 Phoenix
missiles, six of which can be carried by the fighter (although this never ever
happened in service during a cruise since six phoenixes will be so heavy, the
Tomcat can take off, followed by an immediate in-flight refuel. However, if none
is expended, then the plane needs to dump two of the AIM-54’s into the ocean
since it would be too heavy to land, yes, even without a single drop of fuel and
at THEN 1 million dollars a pop, that’s pretty expensive! The
 regular
“heaviest” load would be four AIM-54, two AIM-7 Sparrows and two AIM-9
Sidewinders).
regular
“heaviest” load would be four AIM-54, two AIM-7 Sparrows and two AIM-9
Sidewinders).
The design features a swing wing, a large nose to house the AWG-9 radar system, a tandem crew, a pilot, and a RIO, or Radar Intercept Officer to operate the powerful radar and extensive weapon systems. One hard lesson learned in Vietnam caused the aircraft (and the Air Force’s F-15) to carry an internal gun from the outset, this would be old reliable M61 Vulcan 20mm. Top speed would be Mach 2.2+ and the F-14 would be powered by the same TF-30 engines that powered the F-111B. The wings can be swept from 20 degrees for takeoffs, slow speed, or landing to 68 degrees for high speed supersonic dashes. An onboard computer controlled the sweep at what speeds, leaving the pilot to deal with fighting. The wings can also be “overswept” to beyond 70 degrees for onboard storage.
In order to avoid interference from McNamara, whose ego, bigger than the entire solar system was still demanding justice, the Navy skipped the prototype stage and went straight to full scale development. The first flight was conducted on December 21st 1970, just 22 months when the first contract was awarded to Grumman, with Initial Operational Capability achieved in 1973. The first flight was not successful due to a hydraulic failure, which caused the first F-14 built to crash only 2 miles short of the runway. In fact, F-14 testing was all sorts of up and down, including a crash that killed two crewmembers. However, the Navy pressed on and all the problems and bugs, mainly due to the fact “skipping the prototype” stage, was eventually solved (Imagine the brouhaha that would cause in today’s “intertube” environment. See the F-35). The first operational cruise conducted by the F-14 was in 1975, during Operation Frequent Wind, the final pull out of the Americans from a falling Saigon by VF-1 Wolfpack and VF-2 Bounty Hunters. No MIGs were encountered. This made the F-14 the first of the American so called “Teen” series of fighters to enter service, replacing the aging F-4 Phantom II.
As the 70’s
turned into the 80’s, the F-14 became the premiere fleet air defense fighter
capable of not only intercepting supersonic nuclear missile armed Russian
bombers with the massive AIM-54 Phoenix, but also close in against fighters
using the AIM-7 Sparrow and AIM-9 Sidewinder or in a pinch, the gun. The first
blood drawn by the new fighter was the shooting down of two Libyan SU-22
“Fitters” over the Gulf of Sidra in 1981 by VF-41 Black Aces (the first
swing-wing vs swing wing fighter battle ever fought) and in 1989, two more
Libyan MIG-23 Floggers will also go down. However, there were some serious
 problems,
the biggest plaguing the entire F-14 community from beginning to end was the
engines. Simply put, the Pratt & Whitney TF-30 was never designed for a fighter.
It was temperamental, had a short fuse and seemingly, quit for no particular
reason just because it seems wanted to! In fact, it was so bad that new
secretary of the Navy John Lehman said the TF-30 and F-14 was probably the worst
engine to fighter combo he had ever seen! In fact, many F-14 pilots will tell
you that half of the battle was just “babysitting” the engines to prevent a
flame out that seemingly to come from nowhere. Fully 28% of F-14 losses was due
to engine failures, one of the more famous casualty was Lieut. Laura Haltgreen,
the first female navy pilot.
problems,
the biggest plaguing the entire F-14 community from beginning to end was the
engines. Simply put, the Pratt & Whitney TF-30 was never designed for a fighter.
It was temperamental, had a short fuse and seemingly, quit for no particular
reason just because it seems wanted to! In fact, it was so bad that new
secretary of the Navy John Lehman said the TF-30 and F-14 was probably the worst
engine to fighter combo he had ever seen! In fact, many F-14 pilots will tell
you that half of the battle was just “babysitting” the engines to prevent a
flame out that seemingly to come from nowhere. Fully 28% of F-14 losses was due
to engine failures, one of the more famous casualty was Lieut. Laura Haltgreen,
the first female navy pilot.
In fact, the TF-30 was always considered to be a “temporary” engine. The primary engine would have been the P&W F-401, which would have been a development of the famous F-100. But like so many things, it went kaput and the TF-30 became permanent, causing headaches all over. The only good and ironic thing about this was the F-14 engine bays was designed to be far larger than it should to handle its “new” engine. The space were so large, the F-14 was the only teen series fighter capable of handling the monstrous F-119 engines that power the F-22 with some minor modifications (Don’t even think about trying that trick, modification or no with the F-15, the F-16 and especially the F/A-18!) An F-14 with supercruise capability, now there is something for the imagination!
By late 80’s it was obvious the TF-30 was about to have had it! Plans were underway an upgrade. The end result of this was the GE F-101 DFE, or Derivative Fighter Engine. The F-101 is the engine that power the B-1B bomber and the fighter equivalent eventually became known as the GE F-110. The engine was such a vast improvement, some F-14 pilots actually shed tears of joy upon the news. Not only does it offer more thrust and fuel savings, the most important thing of all, F-110 is a fighter engine through and through and could handle even the meanest sudden input changes and hard maneuver from the pilot without a flinch! Finally F-14 pilots were able to fight 100%, not fight 50%, the other 50% nursing the engines. The new fighters, equipped also with Link 16 and host of other improvements were known as the F-14+, which eventually became the F-14B. There once was a plan to upgrade all F-14 with the new engine, but alas, like the F-401, that plan also fell through not only due to politics, but also the end of the F-14’s biggest enemy. When the old USSR suddenly went “POOF”, so went the F-14’s greatest foe.
 By the
1990’s, with the retirement of the A-6 “Iron Tadpole” looming, plans were set
into motion to add the long awaited bombing capability to the F-14. Previously,
the F-14’s role as the carrier’s main line of air defense was too important to
risk. But now, with the retirement of the Intruder and the dissolution of the
Soviet Navy, that plan was set into motion. In fact, it was dropping the ground
attack ability that caused the Marine Corp to not buy the jet. Originally, the
plane can only drop iron “dumb” bombs. It can drop smart bombs, but someone else
had to “lase” the target. With the upgrade to include the LANTIRN pod, which can
be carried on the right wing station, the Tomcat truly became a “mudmover” and
thus, gained a new nickname, the “Bombcat”.
By the
1990’s, with the retirement of the A-6 “Iron Tadpole” looming, plans were set
into motion to add the long awaited bombing capability to the F-14. Previously,
the F-14’s role as the carrier’s main line of air defense was too important to
risk. But now, with the retirement of the Intruder and the dissolution of the
Soviet Navy, that plan was set into motion. In fact, it was dropping the ground
attack ability that caused the Marine Corp to not buy the jet. Originally, the
plane can only drop iron “dumb” bombs. It can drop smart bombs, but someone else
had to “lase” the target. With the upgrade to include the LANTIRN pod, which can
be carried on the right wing station, the Tomcat truly became a “mudmover” and
thus, gained a new nickname, the “Bombcat”.
By mid-1990’s, with the F-14 fleet aging badly and the replacement, then known as the JAST, which would eventually evolve into the JSF, then F-35 still a long way off, Grumman offered the Navy several F-14 improvements, up and including plans such as the Super Tomcat 21. However, once again, politics came to play and a man named “tricky Dicky I’ll shoot ya face Cheney” would finally do what Mac could not, killed the Tomcat by turning to Boeing (who had acquired McDonell Douglas) and the F/A-18E/F Super Hornet. In fact, Cheney was so adamant that he pulled out all fundings for the F-14’s LEP (Life Extension Program) and the badly needed MSIP or Mid-life System Improvement Program, which would have kept the F-14 in service into 2026 to fund his pet project. This is also why the F-14 was so maintenance intensive down the stretch. By 2006, the F-14 also became the first of the teen series to be fully retired. Thus ended the career of a fighter that had gained a lot of fans along the way.
| THE KIT |
Ahhh, the “tommycat!” Yes, I’m an F-14 fan ever since that little movie, what is it called? Stars Tommy o’ Cruzsa (Tom Cruise), featuring fast planes, located in San Diego (then), a very hot woman (that latter turned out to be a lesbian), and a very famous, very buff beach volleyball scene. What is it called again? Ohh yeah, Top Gun (actually, it should be one word, Topgun, not two, Top Gun is a total Hollywood invention). The Tomcat also influenced a lot of sci-fi. The most famous one is Macross in Japan, or Robotech here. The famous swing wing fighter in that anime, as the producer famously admitted, was heavily influenced by the Tomcat along with one of the Tomcat’s squadron, the famous VF-84 (now VFA-103) Jolly Rogers, which became the “skull and crossbones” squadron in Robotech. So, when the time and chance came to get a big “Kittiekat”. I jumped.
Now, before this, there was actually two other 1/32
scale “Big cats” out there. The first is the ancient Revell one. That one was
plagued by accuracy issues and as can be expected by a kit made in the 70’s,
filled with fit issues. The second one was Tamiya. Although more accurate and
fit much better, comes with raised details (a PITA for anyone that hates
rescribing, like me) and some details, like the AIM-54
 Phoenix
missiles, are soft or non-existent. Does the Trumpeter version top them all?
Well, yes and no. Especially no if you listen to all the
“WAHHHHHHHHHHHHHHHHHHHHHHHHHH’s” from “that place that shall not be named”,
after some cursory glances, many immediately put down the kit as unbuildable.
Does this kit have a few problems? Yes. Is it unbuildable? Far from it! Me?
Well, let’s just say with some “modeling skills required” and the tips here, you
can build a big cat that will beat the pants off of the other two kits!
Phoenix
missiles, are soft or non-existent. Does the Trumpeter version top them all?
Well, yes and no. Especially no if you listen to all the
“WAHHHHHHHHHHHHHHHHHHHHHHHHHH’s” from “that place that shall not be named”,
after some cursory glances, many immediately put down the kit as unbuildable.
Does this kit have a few problems? Yes. Is it unbuildable? Far from it! Me?
Well, let’s just say with some “modeling skills required” and the tips here, you
can build a big cat that will beat the pants off of the other two kits!
The fact of the matter is, this is the second Tomcat kit I bought from Trumpeter and I’m planning to also get the F-14A (Told cha I’m a “Kittiekat” fan!). The first is the F-14D Super Cat (which actually came out first) that ol’ SWMBO bought for me as a birthday present when it first came out in 2010. This version of the kit, the “B”, came out in early 2011, which I “jumped” for myself and then built first due to the fact that stupid skull and crossbones marking for the VF-103 was simply “too distracting”. Despite some issues, some of which are major, it turned out actually pretty good. So, anyways, let’s get this dance started!
Well, that’s a large box! And it even has a handle on top! Upon opening it, you’ll be greeted by the top of the wing box, which is held in its own black container on the left. A small narrow box holds the canopy, windscreen, photo-etch, and other small bits is in the middle. The packaging is separated in two by the small box. The biggest difference from the other two kits, the F-14D and F-14A, other than the necessary detail differences on the real planes are the weapons. Since this is the “Bombcat” version, a whole host of bombs and ordinance, some which the Tomcats wasn’t supposed to carry are in the kit. The kit offers a detailed canopy, closed or open engine nozzles, speed brakes and of course, the swing wings can be moved except not together. After ogling at the kit for bit, time to build!
| CONSTRUCTION |
The
construction begin with appropriately enough, the cockpit. Everything is
accounted for except the rudder pedals. But then again, they are not missed.
Once the instrument coaming goes on, they are buried so deep, they can be hardly
seen. Decals are provided for both the pilot’s and RIO’s instrument panels. A
good wash brought out all the details. Now, there are a whole host of detailed
resin and/or photo-etch improvement sets out there but what’s in here is more
than good enough for people that do not suffer AMS. In fact, this cockpit is so
accurate that some admitted they wasted their money on aftermarket improvement
cockpits! I did not add in the photo-etch seat belts as I’m STILL looking at two
 crews to
crew this bird (anyone want to help me on this one?).
crews to
crew this bird (anyone want to help me on this one?).
Engines are build up next. I just build the canister since they won’t be seen after assembly.
Various bits, including the nose gear, radar and main gears came next. All gears have metal inserts for strength as this bird will be quite heavy when completed. I ditched the radar since I’m not planning to show it but did add the back plate to the nose so I can fill the radome with some lead balls for weight. Now with the nose gear, after building, is trapped into the gear walls with a plug on each side. This means the nose gear will stick out for the rest of the build…Thinking there must be a better solution, I travel the net and sure enough, hit upon the answer. The tip here is since the metal insert goes all the way and hit a hole on top of the well roof, after taping the gear well and attach it to the base of the cockpit, I carefully inserted the nose gear, with the two plastic halves, again taped up, into the three slots, mark the cutoff point and then cut off the top of the plastic gear that contains the two side slots off. Then once again, using the metal as a guide, carefully guided the two cut off slots and joint them against the side walls. This was a bit of hassle but it saved me some huge painting headaches down the stretch. With the nose gear slots trapped inside the well, I can safely move and remove the rest of the gear without any problems. Also, the kit do contain two different nose gears. One the standard raised gear, the other one being the “down” nose gear. The Tomcat, as it approach a “cat” launch, would lower its nose gear down to increase its AoA and also allow successful attachment of the catapult shuttle to the nose gear’s shuttle lock. However, since there are no crews provided, it makes this feature somewhat redundant.
Next few steps shows one of the major complains from that place that shall not be named. After building, I have to agree. Here, all the details for the left side of the fuselage are built including the M61A1 Vulcan, the ammo drum, crew boarding steps and radome, which can be build open or close. The M61, once again, if you build it, color it, and put it in its hold, once the cover goes on, it will never be seen unless you leave the cover open…So I made it, paint it and put it into my F-105 kit instead! The main gear wells are also made at this step.
The next step really showed off the complaints. Despite good fit and best effort from Trumpeter, the kit is really made to show all those left side details off since once the covers goes on, no matter how hard, seams will show. I spent a better part of four days filling the seams with Tamiya putty, sand, blast the seams with Mr. Surfacer 1000, repeat. As can be imagined, I lost a lot of details along the way. Saved some of them but lost some of them also. I fully agree with one of the complainer’s opinion that Trumpeter should’ve added another left side, one in which all the covers are already closed!
Then comes the majors of all major complaints about this kit, the intakes and jet intake ramps. But take this tip that I found out and you will save yourself a lot of frustration and time.
Namely, if
you assemble the intake ramps and intakes the way the instruction called for,
then good luck! This is because 1. The instruction for the parts are all
reversed. So, whatever is on the left, toss it on the right. Left? Yep, goes on
the right. 2. The ramp parts, never ever goes onto the three measly small and
thin support rods. Just toss the rods. 3. Even if somehow you get the ramp parts
onto the top of the bottom fuselage, once you tried to insert the jet intake
mouths, it will immediately crush them! After two days of frustration, with me
about to give up and checkup Zacto Man (google him) and get his intake parts, I
decided to wing it. Taking the two ramp parts, checking out how it goes on the
top of the intake mouth, I eyeballed it and carefully glued the ramps on top of
the intake following the contours….And
 guess
what? Two days of sheer frustration was quickly solved just like that! After
adding trunking holder, VIOLA! Outside of the jet intake complete! So yes, leave
about 25mm of space at the front of the intakes, then just cement the ramps on
top of the intakes following the contours and you should be all set!
guess
what? Two days of sheer frustration was quickly solved just like that! After
adding trunking holder, VIOLA! Outside of the jet intake complete! So yes, leave
about 25mm of space at the front of the intakes, then just cement the ramps on
top of the intakes following the contours and you should be all set!
Then the engine nozzles are attached to the engines. You have a selection of either open or closed nozzle plates. I chose the open version since the closed version nozzles lacked details. The intake trunking parts, once again, whatever was called in the instruction, for the right, toss it to the left, save yourself the mismatched trouble that will occur otherwise.
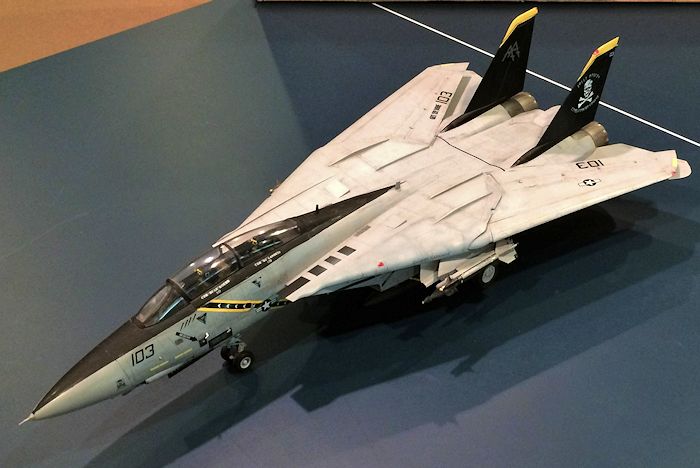
Now comes the time to attach the top of the main fuselage to the bottom. Make sure you drill out all the holes for the phoenix missile pallets first. You might be thinking it would be a good idea to reinforce the main gear wells with styrene strips. Guess what? I tried and it was a very bad idea. The top and bottom have such tight tolerances that if you try this, it will jut the top of the fuselage out. So just put cement on top of the main gear well and the top will do the rest. Do not add the vertical stabilizers until later if you are doing the Jolly Rogers or the Red Rippers birds since both feature black vertical stabilizers. Be careful with parts O1 and O2. These are black vinyl parts to simulate the black rubber bladders on the real thing
Wing assemblies are next. All movable parts such as slats, flaps etc can be build open or closed, raised or extended. Once again, if it does not fit, toss it on the other side!
Attaching the forward fuselage to the main is the next major assembly. Now, a big heavy clamp is needed to make sure the top of the forward fuselage does not jut up. I was one short of a large said clamp back then so yep, there was that large bump. After calming down for a month. I simply slobber the bump with millieputt, putty etc and sanded it down with a good grinder. You can still see just a bit of a bump under certain light condition but I got it knocked down pretty smooth and pretty good otherwise. Again, go out to Lowe’s or Home Depot and get yourself a nice set of clamps. You won’t even need to deal with this frustration if you just clamp it and leave it for 24 hours!
Canopy and windscreen are next. Leave off canopy side rail details if you want it to close.
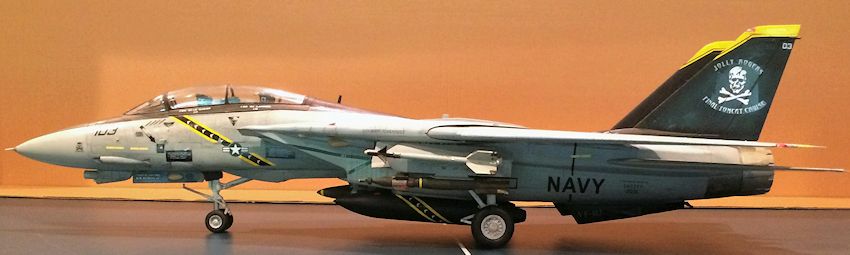
We now finally made it to the weapons. But first, are all the pylons. Belly Phoenix pallets have to be attached whether you are building a normal “Tom” or the “Bomb” cat. Two types of sidewinder pylons are provided. Use the BOL rails, the one with what look like a small radome in front. The weapon selection is massive in this kit. Six Phoenixes (again, operation Tomcats never ever carried that many except from land bases), two AIM-7 Sparrows, two intake tanks (leave them off if you are doing, once again, the Jolly Rogers or Red Rippers versions since they are all black), two types of JDAMs, GBU-31 and GBU-32, 2 GBU-27, a bunch of GBU-12, and GBU-38’s, two AIM-9L Sidewinders, some LGTR, and a bunch of ADM-141 and round things out, the reason for Bombcat’s being, the AN/AAQ-25 LANTIRN pod and it’s adaptor. Triple ejector rackets are also provided but like I’ve said, I doubt the Bombcat was cleared to drop all of them and I do know the Bombcat never carried TER’s. But still, you get so much, you can arm the next or even the next several projects with what comes in the kit.
The plane is pretty built up at this point. So time to hit the paint shop!
| COLORS & MARKINGS |
Three
markings are offered. Since by the time the F-14B entered service, all naval
fighters, including the Tomcat carried low-vis paint scheme of Dark Ghost Grey
on top and Light Ghost Grey on the bottom, t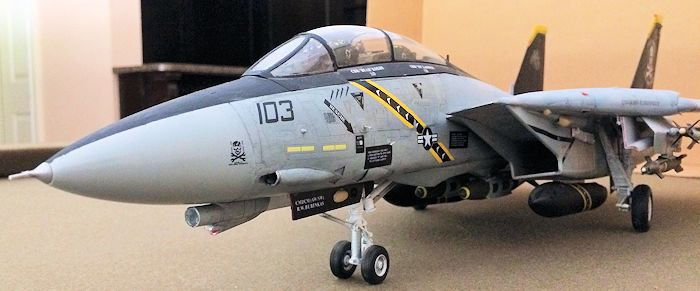 hat
is the main paint scheme for all three markings. The first two are high-vis
markings for VF-103 Jolly Rogers “Final Tomcat Cruise” and VF-11 Red Rippers.
Both have one thing in common in which their vertical stabilizers and ventral
fins are painted black with black canopy and black triangular nose glare shield.
The VF-103 also has black nose gear doors. The black glare shield goes all the
way beyond the canopy to the small of the back, forming another triangle and
also black external fuel bags. The third is all low vis marking for again, the
VF-103. Guess which markings I had to torture myself with? You guess it, the
high vis VF-103 “Jolly Roger Final Tomcat Cruise.”
hat
is the main paint scheme for all three markings. The first two are high-vis
markings for VF-103 Jolly Rogers “Final Tomcat Cruise” and VF-11 Red Rippers.
Both have one thing in common in which their vertical stabilizers and ventral
fins are painted black with black canopy and black triangular nose glare shield.
The VF-103 also has black nose gear doors. The black glare shield goes all the
way beyond the canopy to the small of the back, forming another triangle and
also black external fuel bags. The third is all low vis marking for again, the
VF-103. Guess which markings I had to torture myself with? You guess it, the
high vis VF-103 “Jolly Roger Final Tomcat Cruise.”
Painting started on the bottom, with the Light Ghost Grey. After plugging any white exposed areas with tissues, I washed the thing with Tamiya Flat Black. Originally, I wanted to do a clean bird but the problem is, Tomcats and any other naval birds get quite dirty during a cruise and the Tomcat at the end of its career was an extremely dirty bird. Eventually, I made a compromise. The bird will be dirty, not so dirty that it will distract from the famous Jolly Rogers markings. Also, since China does not carry Testors paints, I used Mr. Hobby. This actually became my favorite paint. It’s quite docile, goes on extremely smooth and is extremely tolerant. The only problem is I can’t speak Japanese. Luckily, the bottle says, “For U.S. Navy fighters, top” and “For U.S. Navy Fighters bottom”. And the colors look the part and sure enough, they are such close approximation to Light and Dark Ghost Grey that they worked perfectly!
After the wash is dry, I blasted the first coat on, then another wash of Tamiya Flat Black, this time waiting until it was about quarter dry before going through it with a slightly coarse cloth, especially following the airflow that plane will go through. This makes for a nice black streaks down the airframe. I especially blackend up the wing area where it will swing into the wing glove frame. After it was slightly dry, I swung the wings several times for the effect of oil and soot that gathers in the area. Afterwards, a second coat went on followed by the weathering effects where needed. After the third coat is on, the bottom coat is done. The same technique was used for the top side. The effect of this is a quite dirty Tomcat, but not so dirty that it distract the overall marking.
After that was done. I blasted the nose gear doors, the vertical stabilizers, ventral fins and the nose, canopy, and the small of the back with Mr. Hobby Semi-Gloss Black and painted the inside of the engine nozzles flat white.
Next are all
the weapons. Basically, all the bombs are Olive Green. I do know the center of
the smart bomb’s body are light ghost grey with a gooey substance that look
almost like anti-slip texture (this stuff is slobbered onto all Navy bombs to
raise their “cook off” temperature). But by this time I was too tired and too
impatient so just blasted the whole entire thing with olive green and called it
a day. The Phoenixes, all six are dark ghost grey body with white nose dome.
Same with Sparrow and Sidewinder e xcept
the fins, which are gunmetal for the Sparrow and flat black for the Sidewinders’
forward fin and nose. Took me a bit of time to get all of them colored except
the GBU-38 and the MALD’s….They are still uncolored and undecaled at this time…A
person can only take so much here! Ok, marking time.
xcept
the fins, which are gunmetal for the Sparrow and flat black for the Sidewinders’
forward fin and nose. Took me a bit of time to get all of them colored except
the GBU-38 and the MALD’s….They are still uncolored and undecaled at this time…A
person can only take so much here! Ok, marking time.
Once, again, as I’ve said before, Trumpyboss decals are extremely thin. The correct technique is simply let it soak in the water so much so, that it’s almost off the backing paper before taking it out, nudge it in place, dry the water before slobbing on Mr. Mark Softer and leave it at that. Mr. Mark Softer will do the most work by melting the decals right on the model. This is important cause the yellow top vertical stabilizer bands are included in the kit. There is no way I’ll try and mask and spray this. However, there are two strengthening plates on the stabilizer, one on each side. Without Mr. Marks, good luck trying to get them snuggle down on the plates. With Mr. Marks, slobber it on, wait about 10 minutes, slobber some more, wait for 20 and they snuggle down so fast they look absolutely natural! How did I learn that? Through this kit! I lost the “AA” markings on the inside of the vertical stabilizers and the “VF-103” decals that goes on the ventral fins. Luckily, I just grabbed the low-vis markings and no one can tell the difference! Otherwise, the decals snuggle down nice and gently.
Now, once again, to the weapons. The decal sheet for them is comprehensive to say the least! 10 are just for a single Phoenix missile and there are again, six of them! After spending a week getting my eyes crossed from all the weapons, I stopped after completing some of the GBU-12…..One of these days I will finish them….One at a time, one at a time…..
| FINAL CONSTRUCTION |
After all the markings are on. Time for the final painting, weathering, and fiddly bits.
First to go are the front vertical stabilizer tips. Leave it to Trumpeter for a headache inducing moment. The front tips of the stabilizer supports are molded right on the fuselage. Now, if you are doing the low-vis VF-103 marking, that might not matter. But for the other two, you have to mask it and spray it black. Not that big of a deal, but still an annoying time waster. Why can’t Trumpeter just mold them right on with the vertical stabilizers escape me.
Next, I
painted the exhaust holders gunmetal. The engine exhaust petals are painted a
combination of silver base, then washes of Tamiya Metallic Silver, gunmetal, and
flat black. Turning the plane upside down, I started attaching the gears. They
are almost a snap fit and at one time, I thought not cementing them at all. But
almost is almost. They are tight but not snap on so I eventually did cement
them. The
 gear
doors are another story. Some just have too small of attachment points and
require some elbow grease to get them to stay on but on they stayed so that was
that. Then came the external tanks and the ventral fins. After that, the plane
can finally stay on its own wheels, the vertical stabilizers went on. At least
Trumpeter made sure the fit between the tips and the rest was dead on without
any seams. Finally, the pitot tube, various instrument probes that go on the
side of the fuselage and the antennas are attached. The plane is done! Now, the
weapons!
gear
doors are another story. Some just have too small of attachment points and
require some elbow grease to get them to stay on but on they stayed so that was
that. Then came the external tanks and the ventral fins. After that, the plane
can finally stay on its own wheels, the vertical stabilizers went on. At least
Trumpeter made sure the fit between the tips and the rest was dead on without
any seams. Finally, the pitot tube, various instrument probes that go on the
side of the fuselage and the antennas are attached. The plane is done! Now, the
weapons!
So, what weapons do you want to fit? There are quite a lot here. Unfortunately, the kit only have two bomb adaptors for the phoenix pallets (Only the fuselage phoenix pallets are used to carry bombs). Fortunately, I can steal the two bomb adaptors from my F-14D kit if I so choose. One thing for sure, the right shoulder pylon is only used to attach the LATIRN pod since without it, the Bombcat is nothing but a dumb bomb hauler. The problem is the left. Usually, this station was used to carry a Phoenix for long range defense. But after that missile was retired in 2004, it was used to carry a Sparrow. For me though, I’m saving all the Sparrows for an extremely rare four Sparrow, 2 Phoenix and 2 Sidewinder loadout for the F-14D…In the end, I decided to whiff it by using the second LANTIRN adaptor and have it carry a GBU-12. Finally, I decided to only use two bomb adaptors and have the bird carry two GBU-31. Done and done!
| CONCLUSIONS |
Man oh man does this thing look fast! There is one reason why I love the Tommycat and this is it and not that stupid movie! This thing look as if it is moving at Mach 2 even standing still!
But alas, after only six months, I have to move back to States and had to leave my KittieKat and everything else back in China. Warp two years later, I finally got it back. Unfortunately, the long Pacific Ocean crossing trek broke it. One of the main gear fell off along with the door, the nose gear detached, both vertical stabilizers broke off, the pitot tube and all the small stuff are all missing. The worst though, was the crack on the windscreen and canopy! Sigh, **Cries**.
After calming down, the problems, as bad as it was, was all manageable except the cracks on the clear parts. I cemented the vertical stabilizers and the rest back on. With a stretched sprue and some spares, I recreated all the small stuff and antennas and….
VIOLA! It’s back! And yes, it still look like a freaking triangular shaped arrowhead going Mach 2! It’s already garnered more than a few glances from friends already. One of these days, I will take it to work where it will sure start a few conversation, not just because it is BBIIIG, looks fast, but also the color scheme is certainly an eye catching cool one! Now, onto the F-14D and eventually, the F-14A…..God I’ll need a new house just to house all three of them!
September 2015
If you would like your product reviewed fairly and quickly, please contact the editor or see other details in the Note to Contributors.