Hobby Boss 1/72 SH-60F Ocean Hawk
| KIT #: | 87232 |
| PRICE: | RMB68 at Xinshi in Beijing (US $9.95) |
| DECALS: | Two options |
| REVIEWER: | Richard F |
| NOTES: |
| HISTORY |
Some time in the 1960s the world's advanced navies
discovered the importance of having compact but capable helicopters on their
frigates and destroyers. These aircraft would fly around hunting and attacking
submarines, other surface ships, and generally making themselves useful.
Over time the mission grew as naval forces took on a wider range of duties and
as technology improved. The US Navy found that its Seasprite helicopters weren't
really up to the job in the late 1970s and so, like the US Army, it chose the
new model from Sikorsky to serve at the aft end of its smaller surface ships.
 The SH-60B,
or Seahawk, was 83% the same as its land based brother the UH-60 Blackhawk. It
could perform a wide range of maritime missions and ended up serving with
several other navies as well.
The SH-60B,
or Seahawk, was 83% the same as its land based brother the UH-60 Blackhawk. It
could perform a wide range of maritime missions and ended up serving with
several other navies as well.
In the 1980s, the US Navy wanted to replace the old Sea Kings as the
carrier-based ASW helicopter. The SH-60F Ocean Hawk came into service in 1989.
It lacks the SH-60B's radar and MAD, and uses dipping sonar, sonobuoys and
torpedoes to attack enemy submarines.
Helicopter Anti-submarine Squadron 8 (HS-8) is known as the "Eightballers".
After flying Sea Kings since 1962, it flew these Ocean Hawks between 1993 and
2007, alongside the HH-60H "Rescue Hawk". These days it flies the MH-60S, which
seems to be a combination of the most useful features of the "B" Seahawk and "F"
Ocean Hawk.
After it switched helicopters it became known as HSC-8 (Helicopter Sea Combat
Squadron 8).
| THE KIT |
This was my first HobbyBoss kit but it won't be my last.
It is not quite up there with the latest from Hasegawa or Trumpeter, but it is a
well-moulded, well-thought out kit that requires minimum work to achieve a good
result. It is part of a series of Seahawk-based kits from HobbyBoss, which also
includes the SH-60B Seahawk, HH-60H RescueHawk (two kits covering early and late
versions) and the HH-60J Jayhawk.
Detail is finely engraved panel and rivets, and the only real problem with the
parts is that some clean up is required, mostly of smaller components. Cockpit
detail is reasonable, with two pilot seats of four parts each, plus rear cabin
seating. The rear cabin seats have seatbelts moulded on. The instrument panel
is nicely done but th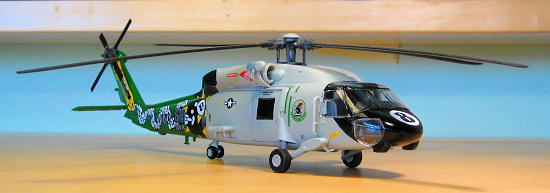 e
side control sticks are absent. Rear cabin detail is limited to the seats, but
there is a proper floor, ceiling and rear wall.
e
side control sticks are absent. Rear cabin detail is limited to the seats, but
there is a proper floor, ceiling and rear wall.
The kit includes the large fuel tank and also an AGM-119 Penguin anti-ship
missile which can be carried by various versions of this helicopter. The sprues
also include the towed MAD drone and various other parts that belong to
different variants (two torpedoes, a Gatling gun mounting, and a IR missile
countermeasure device).
Decals, covered in more detail below, are nicely printed and go on very well.
Finally, the clear parts are crisp, clear, and the main windscreen has small
wipers moulded on.
Accuracy? I haven't measured it nor compared it closely to pictures. I am sure
that the rotor head would require scratchbuilding to be really accurate, but
this is true of almost every helicopter kit. In general outline it faithfully
reflects the Seahawk's smooth, slightly-70s styling.
| CONSTRUCTION |
As usual this begins with the cockpit and the main cabin.
Construction here is straightforward once you've painted the interior walls and
all the seats. The two cockpit seats are built up of four parts each, including
side armour panels facing outwards.
Before joining the fuselage sides remember to drill out a few holes as
pointed out by the instructions. These are to insert various parts later on.
Also, blank off the holes where the undercarriage joins to the hull. It's quite
a big hole and I didn't notice until too late that it goes straight into the
main cabin. Any passengers in this
 helicopter
will not only be cold, they might actually fall out.
helicopter
will not only be cold, they might actually fall out.
Once that's done, the chopper goes together easily. A neat design feature of
this kit is big attachment brackets on the inside of the fuselage for the floor,
so alignment is simple.
Now you join on various fuselage parts like the engine intakes and the exhaust
fairing. Both require some putty and sanding as the join is not ideal. It's not
bad, either - nothing like Airfix or Matchbox - but neither is it as smooth as
the latest kit from Japan.
By this stage, construction is nearly finished. After adding the main wheel legs
and tailplane I went on to paint my helicopter - see below.
After the painting and decaling was done, I attached the wheels, grab handles,
winch and last of all the rotors.
| COLORS & MARKINGS |
All the other HobbyBoss Seahawk variants are pretty
drab except for the bright Coast Guard Jayhawk. I went for this one mainly based
on its decal options.
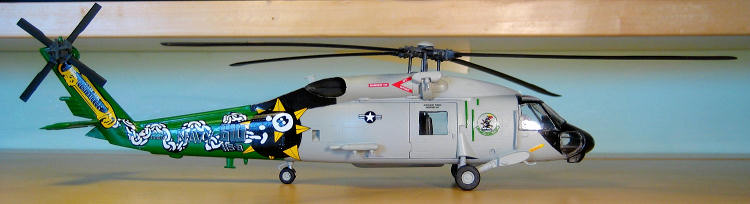
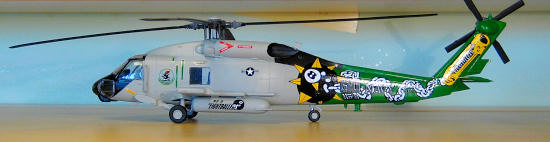
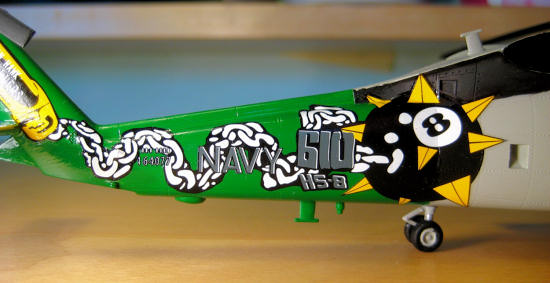
The version I built was the bright green tailed "Eightballer" from HS-8. I used
the beautiful Mr Color 66 "bright green" for this, though the painting chart
calls for Mr Color 6 "green". To my eyes they are identical. For the nose I used
Tamiya semi-gloss black and the boring grey on the rest of the helicopter is Mr
Color 11 "light gull grey". The instructions call for Mr Color 308 which is
probably just a touch darker and bluer than what I used. For the interior I used
a darker grey from Tamiya: XF-66 light grey.
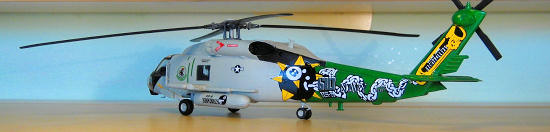
 The other
version is the "Charger" from HS-14. This one is overall grey except for a deep
gloss blue tail and part of the tail-boom. A bald eagle's head comes out of the
US flag and there is a similar design on the forward fuselage sides, but
smaller. It's also an attractive scheme but not as colourful as the HS-8
Eightballer.
The other
version is the "Charger" from HS-14. This one is overall grey except for a deep
gloss blue tail and part of the tail-boom. A bald eagle's head comes out of the
US flag and there is a similar design on the forward fuselage sides, but
smaller. It's also an attractive scheme but not as colourful as the HS-8
Eightballer.
The decals were very easy to apply. They are smooth and easy to attach. About
the only downside is they seem to adhere very quickly and it's hard to move them
around on the surface, even with liberal amounts of water. The hardest decal to
apply, of course, is the cool Eightballers logo that runs from the tail all the
way up to the centre of the airframe. I left this one for last so that I was
familiar with how the decals would handle before I tackled it.
Carefully positioning the paper so that the decal could slide off in roughly the
correct position, I then gently used wet fingers to position the whole decal. I
focused mostly on getting the big black "eightball" itself in the right spot,
then lined up the chain and finally made sure that the yellow handle fit
properly on the tail. With a slightly damp tissue I then carefully smoothed out
the whole thing, making it fit into the small valley formed by the fuselage
where the green tail joins the grey cabin. This worked quite well and with care
and patience I got a good result. Because the green tail boom is so glossy, the
decal finished up very smooth.
The nose of my chopper was painted Tamiya semi-gloss black - perfect for the
little "8" decal. Sadly I messed this up a little, noticing after smoothing it
down that it was in fact slightly in the wrong spot. In the course of
encouraging it to move a millimetre to the left, I ended up ripping it, which
required a tiny blob of gloss white touch-up paint. Still, it's difficult to see
the mistake unless you look very closely.
| CONCLUSIONS |
The Seahawk/Oceanhawk is a sleek helicopter and this simple
kit from Hobby Boss generally does it great justice. It needs only a little work
to make a nice model, looks great in its bright scheme, and offers plenty of
latitude to more advanced modelers to really go to town. I'm not sure what this
costs in the US or Europe but it's an economical and fun kit which I recommend
to anyone of any modeling standard. All the other versions are basically the
same kit, so there is variety a-plenty for the true Seahawk fan.
I'll definitely be going back for more from Hobby Boss.
| REFERENCES |
wikipedia
November 2009
Thanks to If you would like your product reviewed fairly and quickly, please contact me or see other details in the Note to Contributors.