| KIT #: | 48016 |
| PRICE: | $94.95 SRP |
| DECALS: | Two options (serial number differences) |
| REVIEWER: | Donald Zhou |
| NOTES: |
Advantages: Detailed assembly, only kit
of this aircraft in 1/48, options of straight wings or folded. Disadvantages: Extremely tail heavy, plastic landing gears exceedingly weak, tires really a WTF, nasty fit problems. P.S. SAC metal landing gears used. Royal Resin weighted wheels used. Fightertown decals: VAW-115 Liberty Bell extra decal set used. |
| HISTORY |
The Grumman E-2C Hawkeye was developed in the 1950’s to replace the Grumman E-1 Tracer. The project’s ancestry can be traced to WW II. During 1944, when the first Japanese Kamikazes appeared, the Navy was left scrambling to find an answer to prevent the suicide planes from reaching its carriers. During the Battle of Okinawa, Japanese Operation “Kikusu” or “Floating chrysanthemums” left the Navy reeling Over 1400 planes were used in the operation that saw all sorts of Navy ships damaged and sunk but thankfully, no carriers were lost but the lessons were learned, especially since Japan were amassing somewhere around 5000 planes for the invasion of Japan itself. Thankfully, that bloodbath never came when the two atomic bombs were dropped.
But the urgent need for something that would at least give the Navy carriers some sort of warning were not lost even after the war was over. In fact, the Navy in 1942 foresaw this. Previously, the carriers relied on their own radars, later, putting some tin can destroyers on the outer edges of the battle group to serve as “radar pickets”. These proved to be juicy and vulnerable targets during Okinawa. The problem is radar has to obey the laws of physics. Despite what “flat earthers” will have you believe, the Earth is round. And a ground or sea based radar can only detect high flying airplanes out to then, 45 miles or so, worse if they are coming at low level. The Navy quickly tried to mount some sort of radar on an airplane to increase the radar’s detection range.
The first of these was an ad hoc quick fix solution of mounting a radar in the belly of a TBM Avenger. The Avenger’s bomb bay would be ripped out, and the radar shoehorned in. It can do no better than just say “Target out there”. But it did increase the carrier’s response time and it was quickly prepared for the eventual invasion.
After the war, a better radar was mounted on the
venerable Douglas A-1 Skyraider but both platforms used existing aircraft and as
attack platforms, very short on space. Obviously, a new and larger aircraft must
be needed for this role. Enter the Tracer. First entering service I 1958, the
E-1 Tracer was developed from the S-2 Tracker anti-submarine aircraft. The big
difference is that it carried a huge radar in a dome on its upper fuselage,
earning the nickname “Stoof with a roof”. Stoof was the nickname of the S2
Tracker since under its
 old designation, it was the S2F. This aircraft was not
retired until 1977. However, despite its long service life and the fact it
was the world’s first true “AEW” or Airborne Early Warning” platform, the E-1
did had some faults. The biggest one was its radar is non-rotatable, meaning it
can only scan in one direction at time and the whole aircraft needed to be
turned in order to scan 360 degrees. After it entered service, Grumman quickly
started work on its replacement
old designation, it was the S2F. This aircraft was not
retired until 1977. However, despite its long service life and the fact it
was the world’s first true “AEW” or Airborne Early Warning” platform, the E-1
did had some faults. The biggest one was its radar is non-rotatable, meaning it
can only scan in one direction at time and the whole aircraft needed to be
turned in order to scan 360 degrees. After it entered service, Grumman quickly
started work on its replacement
The first E-2 was flown in 1960 and entered service in 1964. Up to then, all carrier based AEW aircraft was derived from another platform. The E-2 was the first AEW platform whose aircraft was developed specifically for the role. It would eventually be developed also into the C-2 Greyhound cargo aircraft but the plane will always be synonymous with the E-2 platform. The E-2 is more than just an updated E-1. Its airframe was much bigger with a longer wingspan. It carried two turboprop engines, rather than two air cool radials. E-1 had a crew of four. Two air crews and two radar operators. E-2 has five, adding one more to monitor and track the radar. Most importantly, it carried a radar mounted onto a rotating radome or rotodome. Despite its size, it could’ve been even bigger but one nasty requirement precluded this and that was Navy original requirement that the aircraft should serve on the updated Essex class aircraft carriers developed in WW II. Despite Grumman engineer’s warning, the Navy persisted. One development of this was The E-2’s famous quadruple tail. This was because the Essex class hanger was shorter than a supercarrier such as Midway and eventually, the Forrestal. When completed, it was quickly found out that the E-2 was indeed too large to operate from the Essex. It’s not just take off and landing, but all naval aircraft has a “safety distance” around them that precluded any other equipment and crew from entering this space except those that are needed when operating on deck…For all the obvious reasons! E-2, being the largest aircraft on any carrier deck, has the largest safety distance. Just for example, with its wings unfurled, its safety distance width wise adds an additional 90 feet to the already long 80 feet wingspan! This is why it’s consider even too large on an Nimitz class supercarrier and that wing is not allowed to be unfolded unless during maintenance or when it’s in place, ready to be locked onto the shuttle, ready to be “catted” off the deck!
However, when it first entered service, the E-2A, now known as the Hawkeye, was not a reliable machine. Simply put, the concept, like any other at the time, was simply too ahead of its time. Its vacuum tube avionics, analogue computers, and other mechanical machines led to huge maintenance nightmares and breakdowns, especially in the hot humid arid conditions of South East Asia! Of particular concerns were the machines lack of cooling mechanisms for its avionics. Analogue and vacuum tubes generate a lot heat, made worse by the conditions off of Vietnam. The plane originally just did not have enough cooling power to cool down its temperamental electronics, leading to all sorts of groundings and stand downs to the point, that for sometimes, the entire project was cancelled by Congress. It was not 10 more years later, with the advent of digital electronics, that Grumman and the Navy was able to wrestle these problems down.
 By 1968, these problem was being stabilized and the
E-2B went a long way to resolve some of the problems, the least of which, it
added more cooling power to stabilize the E-2A infamous heat problems. However,
the Navy always saw the B as an interim solution as the plane’s problems
prevented from achieving its potential and why the E-1 soldiered on all the way
to 1977. In 1971, two E-2A’s were modified into the E-2C, the finally stable
version of the plane. The biggest difference is that the nose is longer than the
A and B and finally, maturing digital electronics finally resolved many of the
issues plaguing the program since the beginning. 28 E-2C were ordered and 48
were modified from the E-2B. These were known as the “Group 0” aircrafts and
were used heavily in the 1980’s to combat USSR battlegroups, usually working
with another Grumman product, the F-14 Tomcat. These included downing of two
Libyan SU-22 Fitters in 1981, Operation Prairie Fire and Eldorado Canyon and
then two more Libyan MIG-23’s would also be downed by the F-14’s, guided once
again, by the Hawkeyes. By late 1980’s, some 18 “Group 1” aircrafts were
produced, mainly replacing the radars and engines with more powerful and
reliable variants. These were followed quickly with the even more improved
“Group II” aircrafts in the 1990’s. By 1997, Group II+” aircrafts were produced,
eventually resulted in the Hawkeye 2000 that saw the aircraft most distinctive
feature, its eight bladed props and host of electronics and mechanical
improvements. The final version is the E-2D, which gained a new AESA radar that
Navy says can now detect stealth. These days, at least four Hawkeyes serve with
each individual aircraft carrier with the Navy, providing critical AEW and
control services. The aircraft also gained a distinctive nickname, Hummer due to
its propeller making a noise very much like that of a vacuum cleaner.
By 1968, these problem was being stabilized and the
E-2B went a long way to resolve some of the problems, the least of which, it
added more cooling power to stabilize the E-2A infamous heat problems. However,
the Navy always saw the B as an interim solution as the plane’s problems
prevented from achieving its potential and why the E-1 soldiered on all the way
to 1977. In 1971, two E-2A’s were modified into the E-2C, the finally stable
version of the plane. The biggest difference is that the nose is longer than the
A and B and finally, maturing digital electronics finally resolved many of the
issues plaguing the program since the beginning. 28 E-2C were ordered and 48
were modified from the E-2B. These were known as the “Group 0” aircrafts and
were used heavily in the 1980’s to combat USSR battlegroups, usually working
with another Grumman product, the F-14 Tomcat. These included downing of two
Libyan SU-22 Fitters in 1981, Operation Prairie Fire and Eldorado Canyon and
then two more Libyan MIG-23’s would also be downed by the F-14’s, guided once
again, by the Hawkeyes. By late 1980’s, some 18 “Group 1” aircrafts were
produced, mainly replacing the radars and engines with more powerful and
reliable variants. These were followed quickly with the even more improved
“Group II” aircrafts in the 1990’s. By 1997, Group II+” aircrafts were produced,
eventually resulted in the Hawkeye 2000 that saw the aircraft most distinctive
feature, its eight bladed props and host of electronics and mechanical
improvements. The final version is the E-2D, which gained a new AESA radar that
Navy says can now detect stealth. These days, at least four Hawkeyes serve with
each individual aircraft carrier with the Navy, providing critical AEW and
control services. The aircraft also gained a distinctive nickname, Hummer due to
its propeller making a noise very much like that of a vacuum cleaner.
The aircraft also saw many export services. The first country to take advantage of this was Israel. Four aircrafts were delivered and the Israelis promptly used them to the fullest in the 1982 Bekka Valley Turkey Shoot. The Hawkeyes gave the Israelis a huge advantage. Hanging well over the horizon off to the sea, constantly escorted, it could scan with impunity into all of Syrian airspace. As soon as an Syrian aircraft took-off. The Hawkeye immediately detected it, then quickly identified it, tracked it, and then vectored friendly aircrafts onto it! This gave the Israeli a distinctive advantage and is one of the key reason of the lopsided Israeli victory. The Israelis would eventually develop their own much bigger Phalcon AWACS and would ship three of the Hawkeyes to Mexico and saved the fourth one as a museum piece.
The next customer is Japan. After Russian MIG-25 pilot Viktor Belenko defected to the U.S. via Japan, bringing in once in a lifetime windfall for a very very very exceedingly very happy USAF. The Japanese though, was scared out of their wits cause the MIG-25 simply disappeared on their ground radar when it went into low altitude and didn’t really appeared again until it was over Hakodate airport. Japanese quickly realized they need an aerial platform to prevent a repeat.
At first, everyone thought Japan would order the E-3. However, when the Japanese realized that there simply wasn’t any 707 left to remake them into the Sentry due to USAF needs, they opted for the Hawkeye to quickly fill the void until a permanent solution was found. 13 Hawkeyes were purchased and was in service by 1987. Eventually, the Japanese would put the Sentry electronics and radar onto a Boeing 767 instead. By 2014, the Japanese decided they will order some E-2D Advanced Hawkeyes instead of the E-737 Wedgetail as a supplement to the E-767.
One of the most important customer is France. When France decided to build their own nuclear powered aircraft carrier, the De Gaulle, they needed two things to make the carrier work, 1. A steam catapult. 2. A carrier based AEW aircraft. The always high aloof French never give in to the U.S. on anything but in both cases, they caved simply because it takes A LOT of knowhow and some extreme experience to do both…Not to mention A LOT of cash, cash that the French just did not have so they simply bought both from the U.S.
The French eventually ordered three Hawkeyes from Grumman with two always serving on the De Gaulle. It guided French naval operations during the attacks on Libya.
| THE KIT |
 You can see the kit
here
by John Lester. Ok, that is the original four blade Hawkeye but the Hawkeye 2000
is basically that kit with the new eight bladed prop instead and a new under
fuselage section that contain the squarish, bulging maritime battlespace
management communications systems. Various antennas are given so you can outfit
any Hawkeye configurations so check your sources.
You can see the kit
here
by John Lester. Ok, that is the original four blade Hawkeye but the Hawkeye 2000
is basically that kit with the new eight bladed prop instead and a new under
fuselage section that contain the squarish, bulging maritime battlespace
management communications systems. Various antennas are given so you can outfit
any Hawkeye configurations so check your sources.
The only down side of the kit is the most obvious one…This thing is a tail sitter bar none if you can’t shove like 2 tons of nose weight into the nose…Worse if you are going after the wing folded option…Which I would wager most will do because 1. This things wingspan is LLOOONNNGGG. Just how long? I have a pic of the plane sans the rotodome sitting on my 1/32 F-14B and the wingspan is almost as long as the Tomcat’s wings unfolded! 2. Again, stated above, this thing, when on a carrier deck isn’t even allowed to unfold its wings unless it’s at the cat station, ready to get attached to the catapult shuttle. Since no crews are provided, you can only build it with wings folded. Just bring LOOOOOTTTS of weight!
The second downside is fit problems. Specifically the engine mount to wing joint…This is my second go around with this kit actually. I built the Italeri version so many moons ago in China back in the day, which is just this under the Italeri brand with both the E-2C and Hawkeye 2000 parts in the same box. So I know the fit problems so break out your red spot putty glazing! The reason why I had to go through it again is because well….That plane did not survive the long ocean journey here…..Tail missing a stabilizer….All gear doors gone……And landing gears….Sigh, the gears…….
The third one is really both the landing gears and
tires are best tossed! The plastic landing gears are really flimsy, the main
ones especially since they just have two measly holders to hold the entire
thing….Consider you need about 4 tons of weights in the nose just to hold the
thing down with the wings unfolded and probab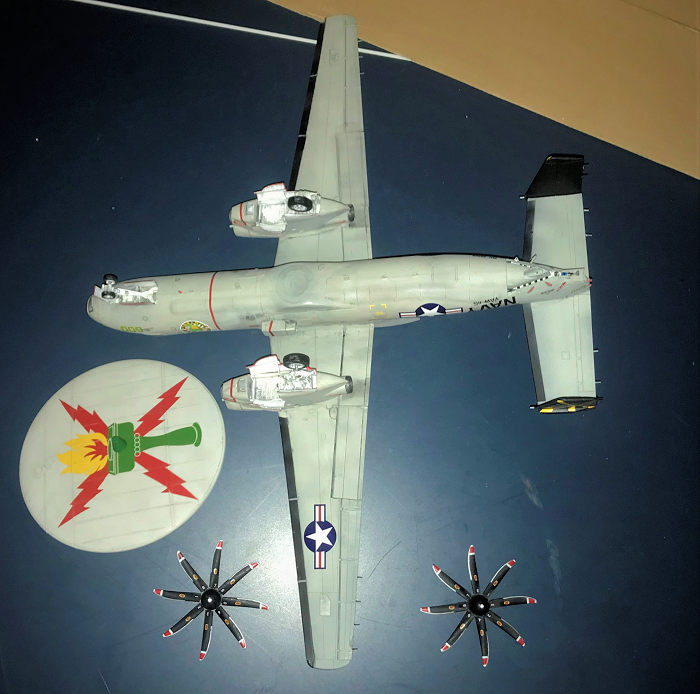 ly 6 tons with the wings folded,
these gears just couldn’t hold the weight! Hence another reason my Italeri one
is so trashed! My Italeri version gears never did…They always broke loose
eventually due to the weight. The tires on the other hand are just wrong. The
reason being they are too weighted. The E-2 is a naval aircraft and all naval
aircraft should have very little weighted wheels due to the fact their tires are
filled almost to full to counter the landing. If not, then the impact of a
“controlled crash” will cause the impact to go right through the wheels, up the
landing gears and right into the airframe! Now the Hawkeye, being a large
aircraft will have weight on them…But not as depicted in the kit, which shows
the tires being almost flat. Royal Resin cast some resin wheels that have the
correct weighted look to them. I just made a mistake of purchasing the “early”
version that’s all. No matter. No one gonna tell the differences anyways. I also
purchased a set of SAC metal landing gears with the correct main gear retracting
struts. IMO, if you are gonna get this kit, these two sets are a must!
ly 6 tons with the wings folded,
these gears just couldn’t hold the weight! Hence another reason my Italeri one
is so trashed! My Italeri version gears never did…They always broke loose
eventually due to the weight. The tires on the other hand are just wrong. The
reason being they are too weighted. The E-2 is a naval aircraft and all naval
aircraft should have very little weighted wheels due to the fact their tires are
filled almost to full to counter the landing. If not, then the impact of a
“controlled crash” will cause the impact to go right through the wheels, up the
landing gears and right into the airframe! Now the Hawkeye, being a large
aircraft will have weight on them…But not as depicted in the kit, which shows
the tires being almost flat. Royal Resin cast some resin wheels that have the
correct weighted look to them. I just made a mistake of purchasing the “early”
version that’s all. No matter. No one gonna tell the differences anyways. I also
purchased a set of SAC metal landing gears with the correct main gear retracting
struts. IMO, if you are gonna get this kit, these two sets are a must!
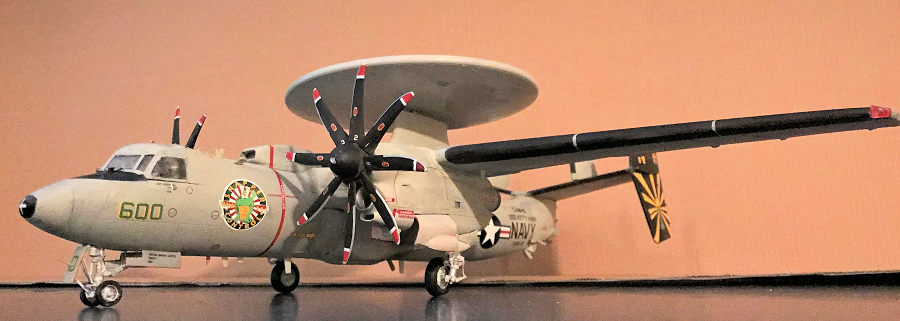
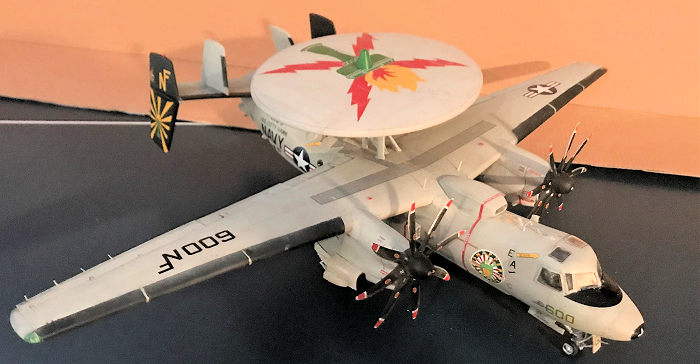
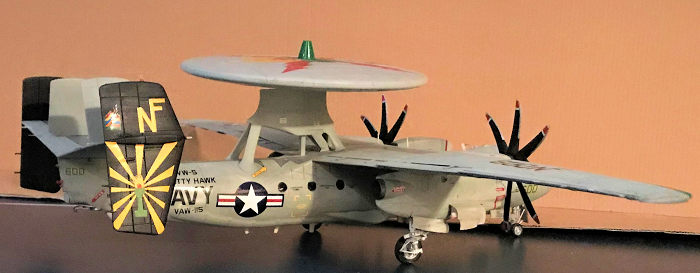
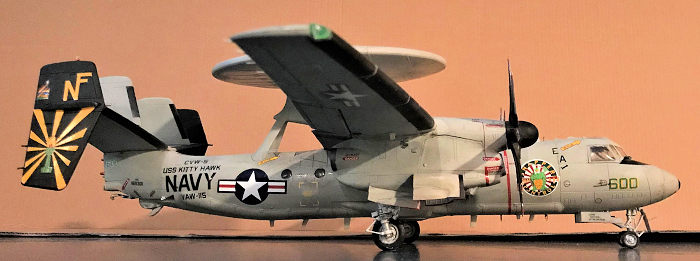
Finally, I did something about the kit’s decals. There is nothing wrong with them…Their just…BLAH with a capital B! It’s just one version and so “plain jane” that it just does not look nice…Especially since my Italeri one offers 5 versions, including a French one and my choice, a plane from the VAW-115 “Liberty Bells” circa 2006 or so when they had a black tail, and a very bold torch symbol on the rotodome. I want those markings back and Fightertown decals it seems, is the only company that makes them, a whole series of them including the one in the Italeri kit, a one with a Japanese rising sun symbol, a “plain jane” marking and the one that struck my eye. It’s similar to the Italeri offering but has a “ninja turtles” symbol on the fuselage, just after the cockpit. I had to get it off Evil-licious Bay but worth it.
The rest are covered in the Preview.
| CONSTRUCTION |
Construction begin with the cockpit. It’s very measly…Resin cockpit are now all over the place but trust me…Trash them! Once the fuselage comes together and the windscreens goes on, you can’t see a wit into it. Since I elected to once again, build this with wings unfurled (I ain’t inserting 8 tons of weight here), I sourced two F-14 tomcat crews from my trashed models from a long long long time ago and seated them in here instead. The fuselage is closed up right afterwards after you insert in the three radar operators windows (painted black from the inside since there is no interior details) and the crew entrance hatch. You might want to put on the entrance tunnel G32 on no matter what cause this becomes important later.
As stated above. Once you fitted the cockpit in, dry fit it. Notice there is a large space in the back, which will be covered by the windscreen canopy. The reason why Kinect did this is because you can drop weights down this hole later. If you inserted entrance tunnel part G32, you can then make a back cover piece and then cement it onto it. This create just enough of a space to insert just enough weight in the nose to prevent tail setting! Which is what I did. I first cut up a piece of plastic card, roughly measure it out, then cut it to shape and then superglued this piece, inside and out onto the G32 to create the cavity. Once the fuselage is joined, I started to drop led fishing sinker weights into the cavity until it is almost full…Which is just enough to get this thing on its nose!
The main central wing spar is assembled next. The slats here is always in the down positon when the wing is folded so keep that in mind. Afterward, insert this piece onto its fuselage housing.
The engine assembly is next. The jet intake has a seam that’s almost impossible to cure. I think seamless suckers do make one piece resin if that bothers you…I just made do. Again, toss the kit’s plastic gears. They are multipart assemblies and weak as hell with all the weight in the nose! I assembled the SAC metal gears instead but left them off until final assembly. Again, the engine to fuselage assembly is atrociously bad and I had to dremel them down and then putty them up. Puttying has to be applied throughout the kit so be patient.
 Same with the wheels. Nice of Kinectic to make the
tires separate from the wheel hubs….But again, their “almost no air” weighted
look is wrong for naval aircraft tires. For the side panels, the instructions
did not denote which is correct for the Hawkeye 2000. From research, I think
parts H17 and H14, the one with metal strengthening ribs are the correct ones.
Same with the wheels. Nice of Kinectic to make the
tires separate from the wheel hubs….But again, their “almost no air” weighted
look is wrong for naval aircraft tires. For the side panels, the instructions
did not denote which is correct for the Hawkeye 2000. From research, I think
parts H17 and H14, the one with metal strengthening ribs are the correct ones.
Attach the battle space management dome to the plane’s belly. Again, notice the seams. The original belly is also included so be careful here. The nose gears and all the doors are assembled now….I assembled the SAC gear instead and left the gear doors until later. The vertical and horizontal stabs are now made. They are all snap tight which suits me just fine since the two small inner ones has black deicing stripes and the large main outer ones are all black for the ones I’m making. I cemented them on later after painting and decaling.
Some detailing are next. For the nose, I sprayed the interior white, then added the landing lights and three multicolored landing sequencing lights before adding the clear nose dome, which has the relevant clear part taped off. The windscreen is added now. I did not add the upper removable clear hatch and the side windows…Make for less taping. Also, be sure to make sure you got enough weight in the cavity behind the cockpit! I didn’t do this step until the rotodome is assembled and I dry fitted it to its mount just to check the weight. I kept on adding lead fishing sinker weights until the nose dropped to the table with all the tail appendages at least in place, though not cemented. Only when I was sure did I put the windscreen in place.
 Wings assembly is next. The folded version require
more assembly and more thoughts since they are separate and fold joint is white.
Also, you need to assemble the small outer wing folding hatch if you want to
fold them. The Hawkeye has two small outer wing fold hatch that will open when
folding its wing so two “catchers” will catch a metal prong at the center of the
vertical stabilizers to stable the wings when folded. You can close this hatch
if you are unfolding the wings, which I did. All control surfaces are separate
and can be posed deployed or retracted.
Wings assembly is next. The folded version require
more assembly and more thoughts since they are separate and fold joint is white.
Also, you need to assemble the small outer wing folding hatch if you want to
fold them. The Hawkeye has two small outer wing fold hatch that will open when
folding its wing so two “catchers” will catch a metal prong at the center of the
vertical stabilizers to stable the wings when folded. You can close this hatch
if you are unfolding the wings, which I did. All control surfaces are separate
and can be posed deployed or retracted.
For wings straight, a strengthen piece K5 is added now. Despite this, a seam will show so you have to putty it. For unfolded, you have to carefully assemble the wing fold joint together while getting the small wing “catchers” onto the prong on the vertical stabilizer…. I would say use superglue to save youself the headache. And yeah, make this step despite all the different colors since you need to add 10 tons of weight in the nose. You want to check that important weight before you end up with a tail sitter!
The rotodome and its mount is assembled. The rotodome from the Italeri kit and the propeller’s did survive so I didn’t make them. Notice there is a long pin that goes into the lower half of the rotodome. This not only allows the rotodome to spin, but also allows you to remove it if you are taking the model to say, a show. I save the windshield wipers and all the pitot tubes and sensor blades later. Ohh, do not cement the mount to the airframe. This is because a series of walkway decals will go right under them and if you put the mount on now, trust me, you’ll be hurling cusses, curses, and expletives across the walls when it is time to put on the decals! Time to hit the paint shop!
| COLORS & MARKINGS |
Paint coloring overall is Light Gull Grey and Testors is just fine. Now, back in China, with my Italeri version, I used Mr. Hobby colors, which is just as good. Before that though, I sprayed the gear wheels and all the gears, the inside of the gear doors and the inside of the wheel hubs insignia white. I then painted the tires flat black. After those are dried, I tear off a few toilet paper, then stuff the windscreen openings and the gear wheels with them so the main painting can begin.
I sprayed the airframe with testors flat light gull grey. Afterward, I washed it lightly with jet black, with the wings following the air flow. Most naval aircraft are dirty, except it seems, this bird…Guess the crew chiefs kept these bird constantly clean due to the maintenance demand on them. Also, this is one of a kind celebration bird so naturally, it will be far cleaner than regular service bird. I then taped off all the deicer boots on the wings and the vertical stabilizers and sprayed these area flat black. After those are dried, decals can begin.
Just a warning do not, repeat DO NOT use MR. Marks
softener on the kit decals. Same with my Reliant model, the kit decals are
printed by Cartograf and although good, react rather violently with Mr. Marks.
It reacts much gentler with Tamiya mark softener so I used that after almost
trashing the wing and fuselage walkways. Str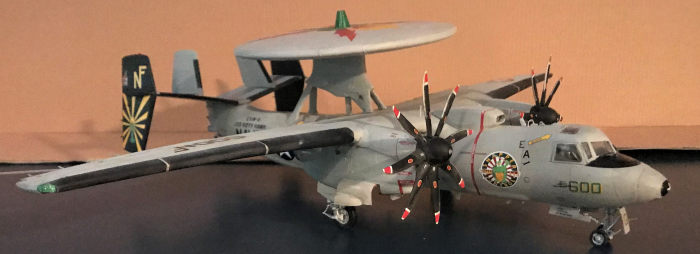 ange…My Italeri decals, also made by
Cartograf, did not react nearly as violently. The Fightertown decals are much
better with Mr. Marks but since they are also printed by Cartograf, do not let
the softener stay on the decals for too long or else it will “crinkle” them to
hell. I used mostly the kits decals and stencils. Fightertown does offer the
complete stencils but you need to track them down yourself! No numbers are
offered so what in the world….I never saw a decal sheet and instructions that
did not use numbers! It’s easy and make tracking down the decals simple! But
with Fightertown, they have very small drawing of the stencils in question, then
you have to track it down on the sheet! Trust me, after crossing my eyeballs
after only trying to find two of them…I gave up and just use the “ninja turtles”
markings on the sheet with kit stencils and stars and bars markings instead!
After that, once again, I used jet black as a wash to pop out the details,
especially along the walkways where the decals reacted violently with Mr, Marks
trying to hide the brouhaha.
ange…My Italeri decals, also made by
Cartograf, did not react nearly as violently. The Fightertown decals are much
better with Mr. Marks but since they are also printed by Cartograf, do not let
the softener stay on the decals for too long or else it will “crinkle” them to
hell. I used mostly the kits decals and stencils. Fightertown does offer the
complete stencils but you need to track them down yourself! No numbers are
offered so what in the world….I never saw a decal sheet and instructions that
did not use numbers! It’s easy and make tracking down the decals simple! But
with Fightertown, they have very small drawing of the stencils in question, then
you have to track it down on the sheet! Trust me, after crossing my eyeballs
after only trying to find two of them…I gave up and just use the “ninja turtles”
markings on the sheet with kit stencils and stars and bars markings instead!
After that, once again, I used jet black as a wash to pop out the details,
especially along the walkways where the decals reacted violently with Mr, Marks
trying to hide the brouhaha.
Final assembly begin with the gears and wheels. These are weathered and superglued to their respective spots with their gear doors. The SAC metal gears especially helps with the now very heavy 12 ton model! The resin wheels look much better than the kit one, which on my Italieri model, look like it’s about to collapse due to lack of air! After that, all the bottom antennas, which there are a lot of them. Then the windshield wipers are carefully added on. The pitot tubes are missing since I lost one of them. Finally, I took the rotodome and the propellers from my now damaged beyond repair Italeri kit and added to this kit….Model done!
| CONCLUSIONS |
This thing is big! Even at 1/48 scale, it got a wingspan to rival some 1/32 aircrafts! It’s also a rather strange looking bird indeed, what with that big huge rotodome on the rear fuselage. It’s also a rather colorful bird, that striking torch always draws eyeballs. Recommended provided you have the patience to fill the seams, gather about 16 tons of weight and get the SAC metal landing gears and the correct wheels.
18 March 2019
Copyright ModelingMadness.com If you would like your product reviewed fairly and fairly quickly, please
contact
the editor or see other details in the
Note to
Contributors.
Back to the Main Page
Back to the Review
Index Page
Back to the Previews Index Page