
Hobby Boss 1/48 F-18A Hornet
| KIT #: | 80321 |
| PRICE: | £34.99 |
| DECALS: | Three options |
| REVIEWER: | Ian Jackson |
| NOTES: |
Quickboost resin seat. Hasegawa Mk83’s. AIM-7 & AIM-9’s from spares box |
| HISTORY |
The McDonnell Douglas F/A-18 is a multi-role fighter designed for aircraft carrier duty and is the first tactical aircraft initially designed to carry out both air-to-air and air-to-ground missions. The U.S. Marines ordered it as an F-18 fighter and the Navy as an A-18 attack aircraft. It can switch roles easily and can also be adapted for photoreconnaissance and electronic countermeasure missions.
The resilient F/A-18 Hornet was the first aircraft to have carbon fibre wings and the first tactical jet fighter to use digital fly-by-wire flight controls. Variants included a two-seater, an improved fighter, a reconnaissance aircraft and a night-attack fighter.
Since the first Hornet entered service in 1980, McDonnell Douglas built over 1,200. Overseas, Hornets served with the Australian, Canadian, Spanish, Kuwaiti, Swiss, Finnish and Malaysian air forces. In November 1986, the 40th anniversary of the Navy's Blue Angels, the demonstration squadron replaced its A-4 Skyhawks with F/A-18 Hornets. They saw use as a show aircraft the following season.
 Hornets entered active duty in January 1983. In 1986, Hornets on the USS Coral
Sea flew their
first combat missions. During the 1991 Persian Gulf War, while
performing an air-to-ground mission, Hornets destroyed two Iraqi MiG-21s
in air-to-air combat. During 2001, Hornets provided around-the-clock
battlefield coverage in the Afghanistan theatre of operations.
Hornets entered active duty in January 1983. In 1986, Hornets on the USS Coral
Sea flew their
first combat missions. During the 1991 Persian Gulf War, while
performing an air-to-ground mission, Hornets destroyed two Iraqi MiG-21s
in air-to-air combat. During 2001, Hornets provided around-the-clock
battlefield coverage in the Afghanistan theatre of operations.
Though most F/A-18A Hornets have been withdrawn from service, those modified to F/A-18A+ and the remaining F/A-18C models are still viable weapons systems and continue to operate with fleet units.
You will probably recall that Scott reviewed this kit back in December 2014 and it would be fair to say that he didn’t enjoy a ‘good experience’ with it. I made a point of NOT reading his review or anybody else’s before embarking on my project simply because I wanted to come-at-it entirely without prejudice. So here’s my thoughts.
| THE KIT |
This is the fourth or
fifth Hobbyboss aircraft kit that I’ve built and like the others the medium
grey plastic is quite soft and to me reminiscent of old Heller kits. Detail
is all engraved and accurate. There
 are a few ‘anomolies’ however; on the
inside of each fin there’s a ‘ghost’ engraving of the low-light strips which
will need filling, atrocious ejector pin marks on the inside of all the gear
doors and the surprising omission… no clear parts for the nav & running
lights.
are a few ‘anomolies’ however; on the
inside of each fin there’s a ‘ghost’ engraving of the low-light strips which
will need filling, atrocious ejector pin marks on the inside of all the gear
doors and the surprising omission… no clear parts for the nav & running
lights.
The main landing gear requires a degree in engineering to assemble, but if you pay VERY close attention to the instructions and take your time, at the end of the process, you will have an immensely strong and incredibly accurate set of gears for your Hornet to sit upon – Kudos to Hobbyboss’s designers for the fantastic work they must have put-in. The nose gear is equally detailed but not as time-consuming to build.
There are two sets of nozzles, and a very complete load-out included, the only parts that I used were the drop-tanks, navigation pod and HER’s. The rest have been ‘stored’ for future projects.
| CONSTRUCTION |
 Unlike Scott after
studying the instructions, I decided to go-my-own-way and started the build
with the flaps & slats. I was determined to have everything ‘down’n dirty’
and quickly figured-out the way to achieve this was to cut all the actuators
for the flaps and ailerons at the hinge point, attach one side to the wing
and the other to the control surface after cutting a ‘V’ shape off each one
to allow them to droop.
Unlike Scott after
studying the instructions, I decided to go-my-own-way and started the build
with the flaps & slats. I was determined to have everything ‘down’n dirty’
and quickly figured-out the way to achieve this was to cut all the actuators
for the flaps and ailerons at the hinge point, attach one side to the wing
and the other to the control surface after cutting a ‘V’ shape off each one
to allow them to droop.
A quick study of the (many) reference books I’ve acquired over the years confirmed the positions I was after. A couple of sessions later and I was done and moved on to the cockpit.
 To
my eye the Hobbyboss ‘pit looks too ‘generic’ and if I was to build another
then I’d invest in an Eduard pre-painted ‘Zoom’ set. That said it paints up
nicely and the Quickboost seat really enhances the appearance once
painted-up – I highly recommend you buy one of these little gems if you are
thinking about a 1:48 Hornet. Unlike our editor, I loved the finesse of the
HUD frames which dropped in to position without any fuss, I dipped the HUD
lenses in Johnsons Klear and lightly brushed two coats of Humbrol clear
green enamel in-situ, not sure it’s 100% accurate but it looks fine to my
eye.
To
my eye the Hobbyboss ‘pit looks too ‘generic’ and if I was to build another
then I’d invest in an Eduard pre-painted ‘Zoom’ set. That said it paints up
nicely and the Quickboost seat really enhances the appearance once
painted-up – I highly recommend you buy one of these little gems if you are
thinking about a 1:48 Hornet. Unlike our editor, I loved the finesse of the
HUD frames which dropped in to position without any fuss, I dipped the HUD
lenses in Johnsons Klear and lightly brushed two coats of Humbrol clear
green enamel in-situ, not sure it’s 100% accurate but it looks fine to my
eye.
Next I brought the fuselage sections together with the separate nose (which also included the very neat gear bay). Some minor swearing and clamping was required but what could have been a nightmare turned-out fine. Like Scott, I found the underside of the LEREx’s needed a fair amount of attention from the ‘Green Stuff’.
| COLORS & MARKINGS |
With the fins attached, and the transparencies masked and temporarily glued in to place it was time for paint. I had flirted with idea of doing my first salt and hairspray job but eventually decided not to, relying on good ol’ fashioned pre & post shading and washes to get the paint effects I was after. First I pre-shaded the natural dark shadow areas (LEREx to fuselage joints top and bottom, base of the fins, flaps & slats hinge-points etc) with Tamiya acrylic NATO Black then once dry sprayed the radome and sidewinder rails Xtracolour ADC Grey, the following day I masked the radome and sprayed the whole airframe WEM enamels RAF Medium Sea Grey.
Next I started layering-on the pre-shading. First a generic dark grey around some panel lines and back in to some of the natural dark shadow areas that I’d done before followed by an ‘off white’ especially on the top panels which would be most exposed to the marine weather.
I didn’t wait for each layer to dry, just had two mixes ready to go, dark first then light, then touch-ups. To do this I dialled the pressure right down to 10-12psi and removed the diffuser tip from my Iwata BR to ‘focus’ the paint-jet.
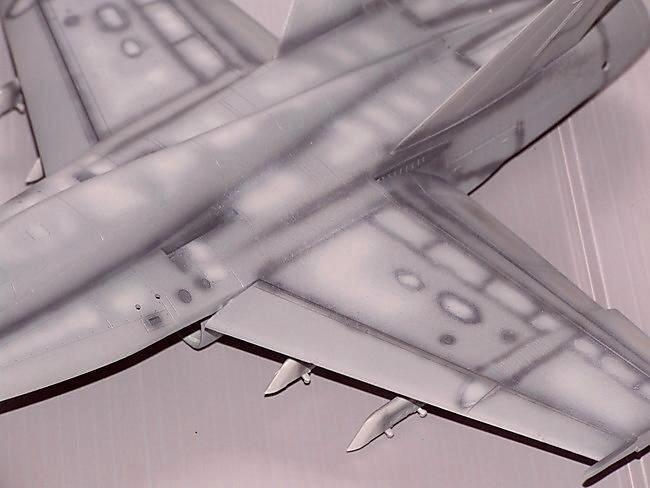 When I was happy I opened two ‘brand new’ tins
of twenty-year-old of Xtracolour Dark & Light Compass Grey, mixed it 60/40
with artists refined turps and sprayed three light coats leaving just
ten-to-fifteen minutes between each coat – very similar to the way I apply
‘wet coats’ to a car model – again leaving the paint only long-enough to mix
a little dark grey into the original, I applied a sparse random mottle over
the top sides and a very specific mottle on the myriad of access hatches
below the LERX’s, lightening
that mix with white I went
back again and added another random & specific mottle.
When I was happy I opened two ‘brand new’ tins
of twenty-year-old of Xtracolour Dark & Light Compass Grey, mixed it 60/40
with artists refined turps and sprayed three light coats leaving just
ten-to-fifteen minutes between each coat – very similar to the way I apply
‘wet coats’ to a car model – again leaving the paint only long-enough to mix
a little dark grey into the original, I applied a sparse random mottle over
the top sides and a very specific mottle on the myriad of access hatches
below the LERX’s, lightening
that mix with white I went
back again and added another random & specific mottle.
Finally I sparsely applied a mottle of RLM02 around some panels to simulate ‘fresh’ spot-painting. This whole session took around four hours, with drying aided greatly by a sunny day !!.
I left the Hornet alone for a couple of days (well, I did spray all the load-out, gear doors, landing gear etc), however when I went back to it, I was surprised and delighted by the result. I quickly realised that only a minimum of post shading would be needed, so to continue the ‘mosaic’ effect I was aiming for, I went back to the WEM Med. Sea Grey, mixed it 50/50 with glossy white and gently post-shaded the panels along the spine, above the engine bays, some of the access panel on top of the wings and along the LEREx’s. Again I walked-away for a couple of days.
When I returned I was still very happy with the ‘look’ so set-to with Phil Flory’s ‘Pro Modeller’ dark-dirt wash. After another sunshine-assisted 90min session it was finished. The following day I got the Windsor & Newton oil’s out and using the ‘oil dot’ method I applied all the underside stains – The first F/A-18’s I ever saw in the flesh were a pair of CAF machines that visited us at Coltishall in 1984, they weren’t more than two years old, then and they were filthy underneath. I’ve used this method a number of times and was quite confident I could replicate the effect.
Prior to decaling the whole model was given
two coats of Johnsons Klear/Future to seal everything in to place (I don’t
spray Klear, I use a pair of 10mm chisel edge and a No.6 round-head sable
brush). I then gently rubbed and polished the airframe with 4000, 6000 and
8000 micro-mesh cloths and plenty o f water to get a glass-smooth base for
the decals.
f water to get a glass-smooth base for
the decals.
I applied the aircraft specific decals from a CAM sheet and all the generic stencils, walk ways, low-light strips etc from an Aeromaster sheet.
Both sets settled perfectly with absolutely no silvering whatsoever – a tip, if you’re planning on doing the same scheme, I would strongly recommend you cut the black & white leading edge stripes about 4mm from the bottom and at the ‘turn’ on the top – apply the tricky bottom section first, then the top, then run a black ‘sharpie’ along the leading edge wrapping around a couple of millimetres before adding the middle section of the decal… it’s all in the planning, anticipate the problem and solve it before it happens !!.
I broke-out the Afterburner decals ‘missiles’ sheet for the AIM-9’s which really makes them ‘pop’, the Sparrow & Mk83’s are wearing thirty-year-old decals from my original ‘Hasegawa Weapons Sets’ bought City Models in Liverpool when they were brand-new - the £8.99 price sticker is still on the boxes !!
Final assembly was a joy but took a number of sessions, main gears first, next day check the sit and then glue nose gear. Following day all the doors, but check the nose gear first, on and on it went until the final session some four sittings later (Sidewinders & ladder) !!
| CONCLUSIONS |
I’ve
read Scott’s review since I completed my Hornet and have to say that whilst I
did experience some
of the same issues, I didn’t have the lack of ‘rapport’ that he appears to have
suffered (sorry, mate !!). I thoroughly enjoyed every minute of my build, well
OK, maybe not the tedious filling and s anding of those ejection marks on the
gear doors. For me it built very easily, fit was a solid eight-and-a-half out of
ten, detail is very good indeed and looking at the kit supplied seat, it is
totally acceptable, I’d already bought the Quickboost one so used it anyways.
anding of those ejection marks on the
gear doors. For me it built very easily, fit was a solid eight-and-a-half out of
ten, detail is very good indeed and looking at the kit supplied seat, it is
totally acceptable, I’d already bought the Quickboost one so used it anyways.
Very rarely for most modellers, I’d guess, the overall look of the finished model is precisely what I had in my imagination before I started. I can guarantee that 70% of that look is down to luck, the rest experience – I’m definitely nobodies’ expert. Have to say as a parting thought, if I found another Hobbyboss Hornet at a discounted price (like this one) I’d buy and build it without hesitation, at d*mn near £35.00 as currently listed I think that’s around £5.00 too much as it is quite a basic (but good) kit.
Regards from the land of the Long White Cloud.
6 December 2016
Copyright ModelingMadness.com.
If you would like your product reviewed fairly and fairly quickly, please contact the editor or see other details in the Note to Contributors.
Back to the Main Page Back to the Review Index Page Back to the Previews Index Page