Hasegawa 1/48 SH-3H Sea King
| KIT #: | Pt 1 |
| PRICE: | Around 35 Euros currently |
| DECALS: | Three options |
| REVIEWER: | Frank Spahr |
| NOTES: |
Eduard EDEX041 Precut masks (@5 €). Eduard EDFE511 Seaking Interior (@11,-€). Eduard 48078 PE for Seaking (issue from about 1996). |
| HISTORY |
Well, I originally had meant to chicken out of this by referring to the oodles of build reviews of Sea Kings on this site. That plan was thwarted by the absence of said oodles. I could only find one review by a guy braver than me, Peter Marshall, who had converted this kit to the British commando version HC-4.
Plan A having shatteringly failed, I hereby state that information on this classic and iconic helicopter is abundant, and Wikipedia is at least a good starting point.
 Suffice it to say that this
helicopter design has been around for decades. The protoype had its first flight
in 1959 and today loads of aircraft of various subtypes and various licenced
manufacturers are still in service, amongst them with the German navy. The type
was primarily built for ASW service and was the first helicopter that could
carry both the equipment to locate a submarine and the one to attack it. It was
designed with a boat hull to be able to land on water. During the service of the
type, various subtypes and derivatives were built. Some versions were heavily
armed and armoured and used for combat rescue, others were employed to transport
troops, others for SAR service and civilian versions were used to ferry
passengers to islands and offshore installations. The president of the United
States uses a heavily modified Sea King as personal transport.
Suffice it to say that this
helicopter design has been around for decades. The protoype had its first flight
in 1959 and today loads of aircraft of various subtypes and various licenced
manufacturers are still in service, amongst them with the German navy. The type
was primarily built for ASW service and was the first helicopter that could
carry both the equipment to locate a submarine and the one to attack it. It was
designed with a boat hull to be able to land on water. During the service of the
type, various subtypes and derivatives were built. Some versions were heavily
armed and armoured and used for combat rescue, others were employed to transport
troops, others for SAR service and civilian versions were used to ferry
passengers to islands and offshore installations. The president of the United
States uses a heavily modified Sea King as personal transport.
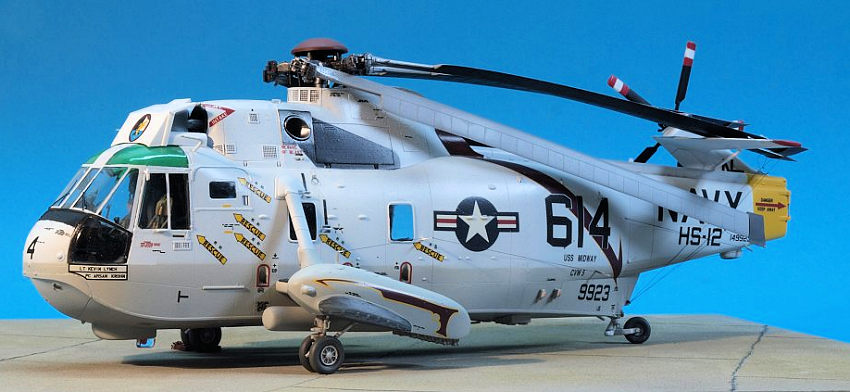
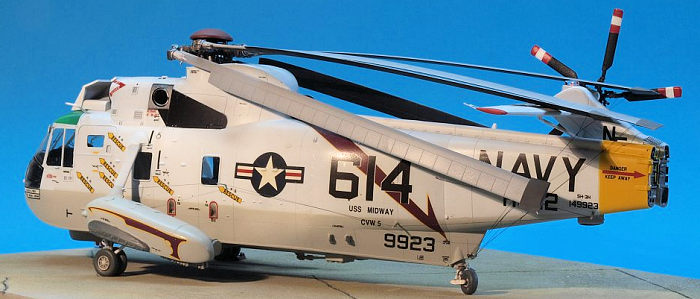
The single helicopter that got a very young and impressionable me hooked on the type was the one used to pick up Apollo astronauts after their space missions, in most cases using the hull number 66. In those days, USN helicopters were painted in the high visibility scheme of White over Light Gull Grey, with colourful national and unit insignias.
| THE KIT |
Hasegawa first issued their 1:48 Sea King kit in 1992. My kit is one of this first production run. It was reissued later both by Hasegawa and by Revell. Hasegawa later offered modified kits to also build the British versions, including the AEW.2 with its distinctive swivelling radome. There are numerous aftermarket bits for the kit, and it still is the only game in town for a Sea King in this scale. Those inclined to do so may add or exchange a sizable part of the kit.
 It is a well-designed and
well-produced kit, with a lot of detail from the outset, crisp and clear
transparent parts, a small PE fret with some of the numerous external grilles,
and a large decal sheet with markings for three aircraft. Two of those are in
the Hi-Viz scheme, I used one of them.
It is a well-designed and
well-produced kit, with a lot of detail from the outset, crisp and clear
transparent parts, a small PE fret with some of the numerous external grilles,
and a large decal sheet with markings for three aircraft. Two of those are in
the Hi-Viz scheme, I used one of them.
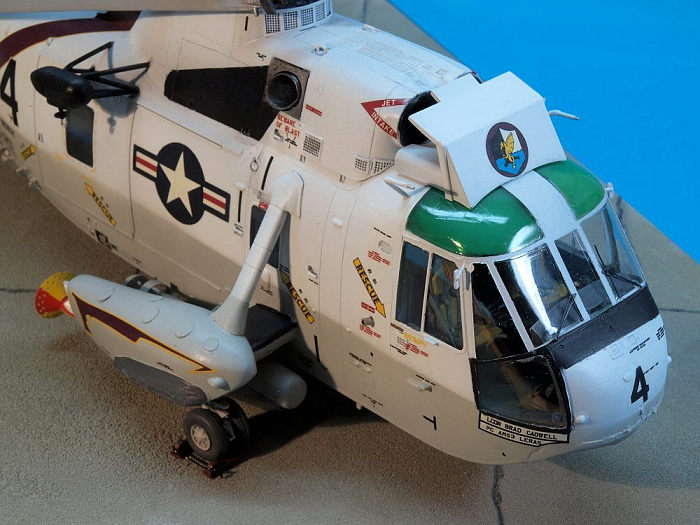
The cockpit interior is quite nicely reproduced, and will be pretty visible through the large windows. The rest of the interior is blank, and neither the crew access door nor the main loading door are designed to be opened.
I bought this kit at some point in the mid 1990ies, and added the then current Eduard PE set to it. This set, etched in steel, comprises two frets and addresses both the interior of the cockpit and the exterior of the aircraft. Many of the parts are exceedingly iffy and, to people of limited skills like me, unbuildable. One might open the crew access door and replace it completely from PE. Whilst using the provided PE looks doable to me, I shied away from cutting out the door from the kit part, as that would leave a long and very narrow strip of plastic adjacent to the large transparent canopy part. I saw disaster waiting to happen from that corner and decided to pass.
| CONSTRUCTION |
The next 20 years, the kit
gathered dust and slowly matured in my stash. Until I decided to finally build
something from the stash in the late summer of 2017 and pulled it out. Sifting
through scalemates I looked after updated aftermarket options, and found a very
nice-looking and affordable pre-painted
 and self-adhesive PE fret from Eduard
addressing the interior only. I had previously enjoyed working with Eduard´s
die-cut masks, and with all the large windows on this kit, I also bought those.
I got Vallejo´s transparent green for the tinted overhead windows and their ModelAir Light Gull Grey, and was ready to go.
and self-adhesive PE fret from Eduard
addressing the interior only. I had previously enjoyed working with Eduard´s
die-cut masks, and with all the large windows on this kit, I also bought those.
I got Vallejo´s transparent green for the tinted overhead windows and their ModelAir Light Gull Grey, and was ready to go.
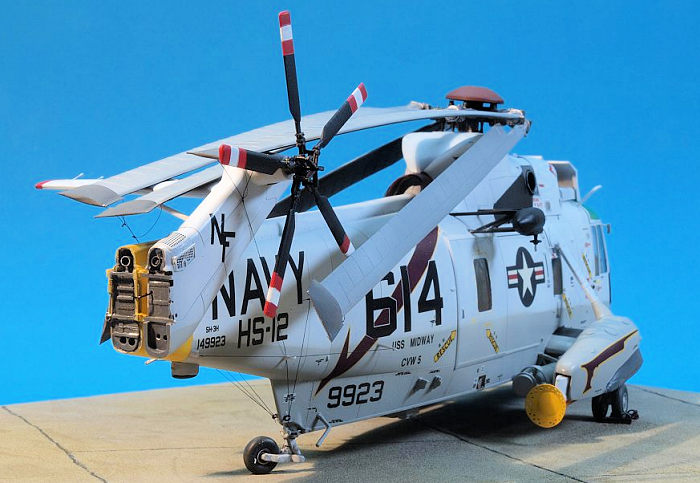
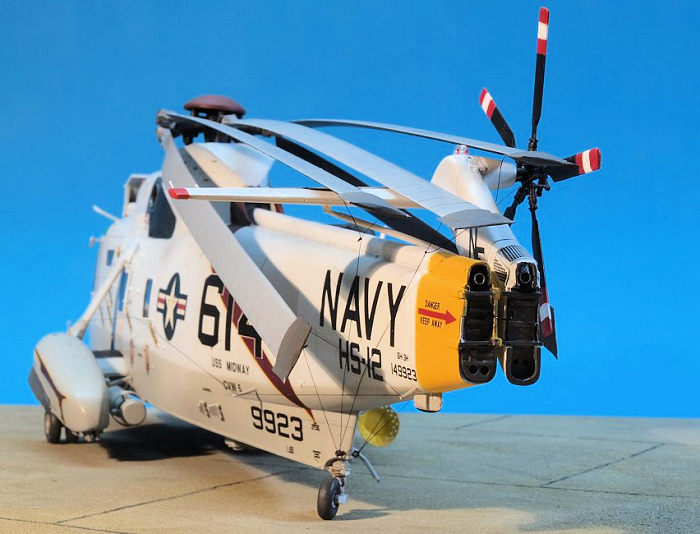
Space is exceedingly an issue for me, so I decided to display my model with folded main rotor and folded tail. In the end, it comfortably fitted into a Trumpeter display box, which was affordable and easily stored.
I am a late convert to Tamiya Extra Thin cement, started using it only a year ago or so, and in this build it again worked very nice and neat. I of course started with the cockpit and interior, but also tried to tackle as many subassemblies as I could to speed up the build and always have multiple parts to work on whilst waiting for others to cure. I tried to work out which PE parts to use and which rather to avoid, and ended up with using the most visible and effective parts, such as the aft part of the MAD array. I used nearly all of the PE grilles, but not all of them.
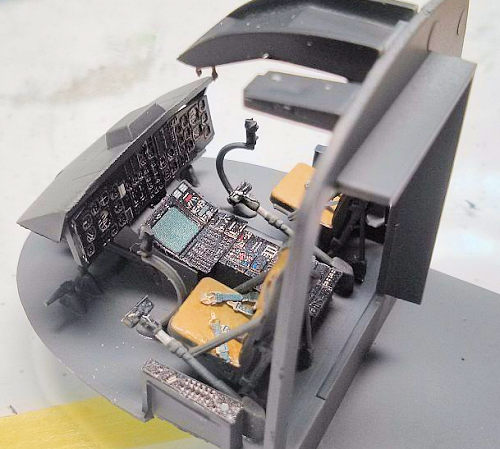 Having removed the raised
detail from the instrument panels, I painted the interior and placed the
self-adhesive PE on it. Well, it was a bit less adhesive in areas than I would
have liked, but a bit of CA glue helped. And this stuff really looks very, very
neat, even more so when you can actually see it on the completed model.
Having removed the raised
detail from the instrument panels, I painted the interior and placed the
self-adhesive PE on it. Well, it was a bit less adhesive in areas than I would
have liked, but a bit of CA glue helped. And this stuff really looks very, very
neat, even more so when you can actually see it on the completed model.
I needed to carefully check and re-check the instructions for the numerous holes to be drilled into the hull, most of which I later temporarily closed with Maskol for fear of paint fumes finding their way inside the hull and on the inside of the transparencies.
There are always some parts and procedures that scare me in a project. In this case, most of them revolved around the large clear canopy part. Two of the panes needed tinting, it all needed careful masking, and it needed to be attached to the hull both strongly enough and with the best possible fit. At the same time, I needed to avoid blinding the clear part by glue fumes, be it CA glue or conventional styrene glue. In short, this was a veritable bugbear.
Before I could tackle it, I needed to assemble the hull so far that I could check the canopy´s fit. So the hull was carefully glued together, after gluing the windows with Tamiya cement. I feared using PVA glue would result in me popping the windows out of their frames in the very final stages of construction, whilst removing the masks. With the Tamiya cement, that was unlikely, but of course I managed to get glue on some of the clear parts. That meant carefully cleaning them up with progressively fine sandpaper and polishing compound, and sealing them with Klear. I felt my spirits taking a noticeable drop. Yet again perfection, that elusive lady, blew me a raspberry and sauntered away.
Having assembled the hull
far enough, I checked the fit of the canopy, which was quite OK, in fact. So I
started tinting the two panes. I started by dipping the entire piece into Klear,
which worked a charm and made the transparency super-clear and glossy. So far,
so good. Don´t ask me how, but I managed to get things upside down and mask and
spray the wrong panes. My brains must have gone AWOL that day. To add insult to
injury, the transparent paint didn´t work out well. It wouldn´t cover well and
kept clogging my airbrush. I then had to remove all I had sprayed from the wrong
panels, clean them up, re-polish, re-dip, re-mask and start again. By then, my
heart wasn´t in it any more, and I kept t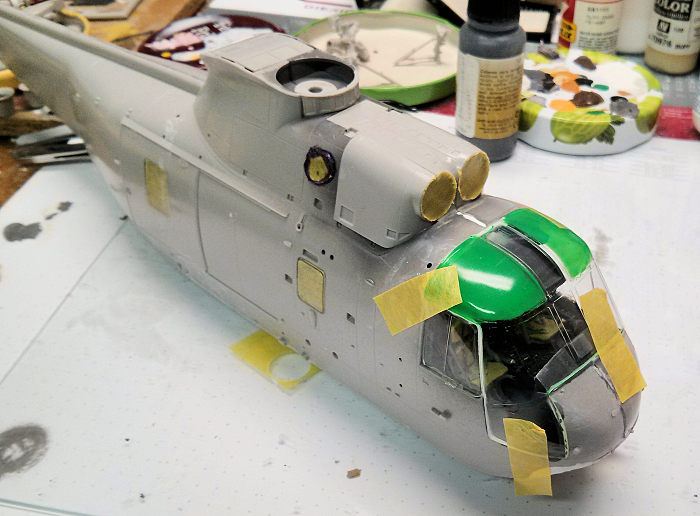 hrowing longing glances to the wastebin,
its maw gaping in easy dropping distance. But I persevered; I re-sprayed the
part, using a mix of Klear and the transparent paint, using multiple thin layers
until it covered well enough. By that time it was seriously green and not a
delicate tint at all, but it was either binning or plodding on at the time, so
the latter was what I did. I recoated the part with Klear and let it cure under
a cover to minimize the amount of dust it would attract.
hrowing longing glances to the wastebin,
its maw gaping in easy dropping distance. But I persevered; I re-sprayed the
part, using a mix of Klear and the transparent paint, using multiple thin layers
until it covered well enough. By that time it was seriously green and not a
delicate tint at all, but it was either binning or plodding on at the time, so
the latter was what I did. I recoated the part with Klear and let it cure under
a cover to minimize the amount of dust it would attract.
After completion, modeling friends remarked upon the tinting being too intense. They are right, but it was literally the best I could come up with at the time. My annoyance probably kept me from finding the best solution, which I only found afterwards. I tested it on the remaining panes, and it went like this: I first mixed the transparent green with Vallejo thinner and Vallejo flow improver, and sprayed the parts. That did cover evenly, and thinly. But it ended up flat. Luckily, dipping the part in Klear after this process rendered it glossily clear again. If I ever attempt something like this again, I will apply my tinting thinly from the inside, and only then dip the entire part in Klear.
On my subassembles, I made steady progress. I utilized round PE parts you get from French supplier L´Arsénal in their series of structural parts to simulate the various circular covers on the sponsons. Those were molded rather shallow and suffered from sanding the parts, so the PE made a difference. The undercarriage was left mostly OOB, with just some very iffy PE parts added. Having looked at a number of Sea King rotor head images, I decided to leave well alone and not try to replicate even a part of the hydraulic lines it is festooned with.
I had downloaded a number
of walkaround images of a comparable aircraft, and used those to detail the area
of the tail fold. As it was, there were two gaping holes if I displayed the tail
folded. So with the aid of my assorted styrene, brass and tubing stock I
fashioned some distant approximation to what the real thing looked like. I also
needed to make cutouts under the PE grills to achieve the necessary see-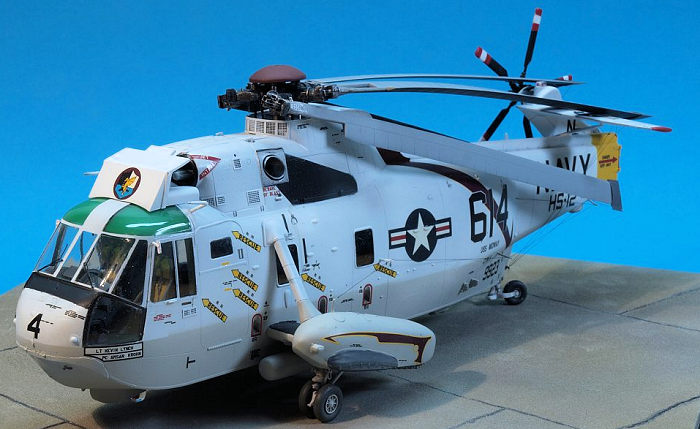 through
look. Annealing the PE parts eased conforming them to the curvature of the hull.
through
look. Annealing the PE parts eased conforming them to the curvature of the hull.
Another blunder happened with the exhausts. Contrary to the instructions, I decided to add the exhausts after assembling the hull. Well, that way they didn´t fit, so some minor surgery was needed. But the exhausts looked really nice painted with Alclad.
Having done all the necessary work on the hull, I tried to clean it with compressed air from my airbrush and then added the canopy, using PVA glue. That worked reasonably well, but not perfect, as there still were some steps. I decided to well leave alone, though. The Eduard masks worked very well and were easily applied. On the curved panes, they only address the edges, and you´re supposed to mask the centre of the pane with a liquid mask. I used Maskol. That worked well, but must have reacted with the Klear on the panes, as in those areas the panes came out flat after de-masking. I was able to compensate that with a fresh application of Klear, but would recommend using something else if masking over a canopy treated with Klear.
| COLORS & MARKINGS |
The entire transparencies masked, I was able to start priming the model. I had covered the numerous small holes in the fuselage with Maskol, as mentioned above. The various subassemblies were primed now, too. I normally use a primer in a can bought from our local automotive paint supplier. It cures fast and strong, and should have a great bond with the plastic. Which it didn´t in this case. I had tried to de-grease the plastic prior to priming by spraying lighter fluid and/or white spirit. I had even rubbed the blades with white spirit. Nonetheless, the primer flaked off in big swathes. If you would picture my motivation on a scale from 1 to 10, you´d probably find it at the very beginning of the scale by now.
Next came spraying the
black anti-glare panel in the front and the black areas around the exhausts.
Those were sprayed with Vallejo´s trusty black primer. These days, I thin all
Vallejo paints, even the ModelAir, with a bit of Vallejo´s thinner and add a few
drops of their Airbrush Flow Improver, which to me makes a difference. The black
areas were masked, and the aircraft then lightly pre-shaded and then sprayed
white, also using Vallejo´s primer. I find this stuff to cover best of all the
acrylic whites I´ve tried so far. Then came the demarcation line to the Light
Gull Grey underside. In the real thing, it is sprayed, and not masked. I am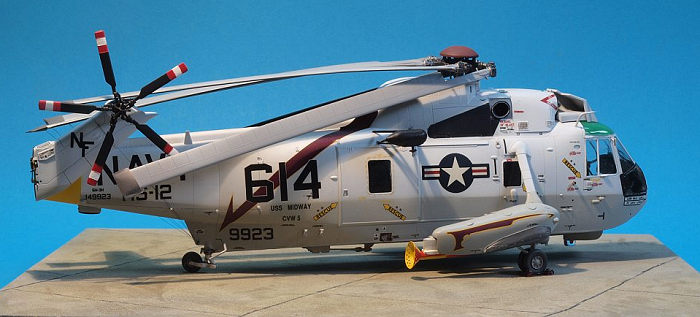 unable to spray that fine. So I fashioned a „flying mask“ from a post-it note.
Said note was drenched with CA glue to avoid it curling up when moistened by the
paint, and a .5 mm plastic rod was glued to the note about 1 cm from the edge.
That cured, I was able to lightly fix the mask to the hull with strips of kabuki
tape, and spray the LGG in sections. That worked surprisingly well and lifted my
spirits up a bit. Next came spraying the yellow tail band. That done, the
aircraft was sprayed with Klear prior to decaling.
unable to spray that fine. So I fashioned a „flying mask“ from a post-it note.
Said note was drenched with CA glue to avoid it curling up when moistened by the
paint, and a .5 mm plastic rod was glued to the note about 1 cm from the edge.
That cured, I was able to lightly fix the mask to the hull with strips of kabuki
tape, and spray the LGG in sections. That worked surprisingly well and lifted my
spirits up a bit. Next came spraying the yellow tail band. That done, the
aircraft was sprayed with Klear prior to decaling.
Parallel to work on the hull, the other subassemblies were painted at the time. I limited my effects as I assumed the aircraft had been well kept and frequently washed with clear water to prevent corrosion. A gentle dark wash accentuated some structures, using Humbrol thinners and dark oil paint.
With the Klear cured, I started on the decals, and on the trickiest and largest of them. My rationale was that if that one didn´t work out, I need not trouble with the other decals anyway. When I opened the kit box, I had been shocked by the severe yellowing of the decals. Placing them in a clear plastic binder taped to our living room window for a week in late summer worked wonders, though, and they looked virtually as good as new. They were still going strong, not being overly thin, but reasonably so, and sturdy enough to take some handling. The large hull number with the maroon stripe went down well and responded to MicroSol. Instead of ordering a proper maroon shade, I sifted through my paint collection, and found an acrylic Royal Navy hull red that seemed a close fit. This was used on the spine where the two maroon decal stripes meet each other, and on the rotor head cover.
Only when the first decals set on the hull did I realized I had yet again blundered, this time whilst masking the black panel around the exhaust. It needed re-masking and re-spraying, both with white and with Alclad, which tended to raise some hairs, but went unexpectedly well.
| FINAL CONSTRUCTION |
It followed a period of decaling and work on the subassemblies, until I was able to declare the aircraft decaled and could attach the sponsons. Whilst test-fitting them, their locating pins had playfully snapped off, and I needed some work to find their correct placement, using steel pins to strengthen the bond. Now they and their struts were attached, needing only a very limited amount of filling. PVA glue sufficed.
 The sponsons cured, the
undercarriage was added, and with the aircraft finally on its wheels, it
received a flat coat from the Winsor&Newton Galleria series. That cured, it was
time to very carefully start removing the masks from the windows. At this point,
a lot might happen: I might find out that some overspray had found its way
inside the hull. One or more panes might pop out. The tape might remove the
Klear from the panes. It might lift off paint around it, leaving ragged edges
and raw plastic. Luckily, none of this happened. Instead, I was greeted by
glossy panes, crisp demarcations and the opportunity of actually looking inside
the cockpit. Well, I did find a small speck of Maskol inside, and unwilling to
move. And I found that the Klear had reacted with the Maskol. Plus that the
demarcation between the antiglare panel and the white in front was a bit on the
ragged side. I was able to fix the gloss of the panes, and re-masked and
re-sprayed the area in front.
The sponsons cured, the
undercarriage was added, and with the aircraft finally on its wheels, it
received a flat coat from the Winsor&Newton Galleria series. That cured, it was
time to very carefully start removing the masks from the windows. At this point,
a lot might happen: I might find out that some overspray had found its way
inside the hull. One or more panes might pop out. The tape might remove the
Klear from the panes. It might lift off paint around it, leaving ragged edges
and raw plastic. Luckily, none of this happened. Instead, I was greeted by
glossy panes, crisp demarcations and the opportunity of actually looking inside
the cockpit. Well, I did find a small speck of Maskol inside, and unwilling to
move. And I found that the Klear had reacted with the Maskol. Plus that the
demarcation between the antiglare panel and the white in front was a bit on the
ragged side. I was able to fix the gloss of the panes, and re-masked and
re-sprayed the area in front.
Now it was time to add the numerous external items of increasing fiddliness, to attach the folded tail (I had provided steel pins for that), and then the external transparent parts I had left off so far.
All that went reasonably well, even rigging the external antennae with UNI 8/0 flyfishing thread. The rotor bladed were added to the rotor head in the folded position, and retaining cuffs made from paper, rigged with flyfishing thread. I built a wheel chock from styrene stock, and then placed the model on a simple base depicting some non-descript tarmac on some airbase.
| CONCLUSIONS |
I hadn´t built a 1:48 scale helicopter in more than ten years, and it´s really quite a task. I must be naturally allergic or incompatible with clear parts, so this was something between aversion therapy and self-harm, but I somehow sailed through and enjoy the model despite its imperfections and the numerous blunders I made.
| REFERENCES |
https://en.wikipedia.org/wiki/Sikorsky_SH-3_Sea_King
Frank Spahr
1 January 2018 Copyright ModelingMadness.Com If you would like your product reviewed fairly and fairly quickly, please
contact
the editor or see other details in the
Note to
Contributors.
Back to the Main Page
Back to the Review
Index Page
Back to the Previews Index Page