| KIT #: | 2620 |
| PRICE: | Around €30 in 2005 |
| DECALS: | Two options |
| REVIEWER: | Spiros Pendedekas |
| NOTES: |
| HISTORY |
The Sikorsky Seahawk is a twin turboshaft engine, multi-mission United States Navy helicopter. It emerged during the mid-70s as the selected platform that would carry the latest and bulkiest Mark III Light Airborne Multi-Purpose System (LAMPS) for maritime warfare, a suite that the already in service smaller Kaman Seasprite would not be able to carry.
The resulting Seahawk was essentially an extensively modified Blackhawk, in order to carry out its projected maritime tasks. Main changes were corrosion protection, more powerful T700 engines, single-stage oleo main landing gear, removal of the left side door, addition of two weapon pylons and modification of the tail landing gear (strengthened, utilizing twin wheels and shifted 13 ft forward in order to reduce the footprint for shipboard landing).
 Other
changes included larger fuel cells, an electric blade folding system, folding
horizontal stabilators and addition of a 25-tube pneumatic sonobuoy launcher on
the left side. An emergency flotation system was originally installed in the
main landing gear stub wing fairings, but was subsequently removed, as it was
found to be impractical and possibly impeding emergency egress. First flight
occurred at the end of 1979, but it was not before 1984 that the type entered
operational service.
Other
changes included larger fuel cells, an electric blade folding system, folding
horizontal stabilators and addition of a 25-tube pneumatic sonobuoy launcher on
the left side. An emergency flotation system was originally installed in the
main landing gear stub wing fairings, but was subsequently removed, as it was
found to be impractical and possibly impeding emergency egress. First flight
occurred at the end of 1979, but it was not before 1984 that the type entered
operational service.
Deployed primarily
aboard frigates, destroyers, and cruisers, the Seahawk’s primary missions are
surface and anti-submarine warfare. Its ψομπρεηενσιωε equipment includes, among
others, a towed Magnetic Anomaly Detector (MAD), air-launched sonobuoys, the
APS-124 search radar, the ALQ-142 ESM system and optional nose-mounted forward
looking infrared (FLIR) turret. Munitions carried include the Mk 46, Mk 50, or
Mark 54 Lightweight Torpedo, AGM-114 Hellfire missile, and a single
cabin-door-mounted M60D/M240 7.62 mm (0.30 in) or GAU-16 .50 in (12.7 mm)
machine gun.
Standard crew is one pilot, one ATO/copilot (Airborne Tactical Officer) and an
enlisted Aviation Warfare Systems Operator (Sensor Operator). Apart from the
United States, variants are in service with another 14 countries. With 938 units
built so far and effectively upgraded, this very successful helicopter is to
remain in service well into the 2030s.
Established on 25 September 1987 at NAS North Island, the “Saberhawks” of HSL-47
Helicopter Anti-Submarine Squadron Light FOUR SEVEN employed the Seahawk. From
then on they have been at the forefront of helicopter operations in the Pacific
Fleet, having established an outstanding reputation.
In 2009 HSL-47 transitioned to Helicopter Maritime Strike Squadron SEVEN SEVEN.
They were attached to CVW-2 and the Abraham Lincoln Strike Group and deployed
for the first time with the upgraded MH-60R. Since 2015 the squadron has
operated aboard USS Ronald Reagan Carrier Strike Group as a member of Carrier
Air Wing 5 (CVW-5) in support of Forward Deployed Naval Forces, Japan.
| THE KIT |
 When
Italeri came in 2001 with the very good new tool quarter scale MH-60G Pave Hawk
(which was reboxed by Revell with some extra parts as MH-60L Blackhawk the
following year), the arrival of the Seahawk kit in 2003 came as a pleasant and,
to a certain degree, expected addition to Italeri’s “Blackhawk” family. From
then on, these comprehensive kits have been reboxed another 10 times, not only
by Italeri and Revell, but also from Skunkmodels, Wolfpack and even Academy (who
had their own elderly mold Blackhawk), with the occasional addition of extra
parts, in order to account for a wide range of the Blackhawk and Seahawk
versions.
When
Italeri came in 2001 with the very good new tool quarter scale MH-60G Pave Hawk
(which was reboxed by Revell with some extra parts as MH-60L Blackhawk the
following year), the arrival of the Seahawk kit in 2003 came as a pleasant and,
to a certain degree, expected addition to Italeri’s “Blackhawk” family. From
then on, these comprehensive kits have been reboxed another 10 times, not only
by Italeri and Revell, but also from Skunkmodels, Wolfpack and even Academy (who
had their own elderly mold Blackhawk), with the occasional addition of extra
parts, in order to account for a wide range of the Blackhawk and Seahawk
versions.
My kit was the 2003 initial Seahawk release, bought at the normal price of €30
in 2005. Italeri has somehow developed a reputation when it comes to helicopters
and this kit’s looks in the box do not disappoint. For an in-depth survey of
this very nice kit’s contents, you may read Dr Frank Spahr’s thorough preview here.
This kit had been quietly residing in my Shelf of Doom, until a Seahawk Flight
Engineer, now (as of 2022) a Navy Commander and good friend, announced that he
was soon to retire, so what better gift than a model of his beloved helicopter
type? Off the kit went from my Shelf of Doom then and onto my workbench!
| CONSTRUCTION |
Following the
instructions, I started with the interior by adding its various elements onto
the cockpit floor. Those included the instrument panel, pilot/co-pilot seats,
sticks, collectives, rudder pedals, the two piece radar operator’s office, the
three piece dual and single seats and finally the 4-piece sonobuoy launcher. The
rear bulkhead was then attached, followed by the roof. Basic interior color was
gull gray, with sticks, collective grips, boots and instrument panel shade
painted black. Seat cushions were painted khaki and their molded-on seat belts
linen. The nice looking kit decals were used to represent the instrument panel,
as well as the central, top and radar operator’s console faces. Finally white
and red “knobs” were painted on the stick and collective grips.
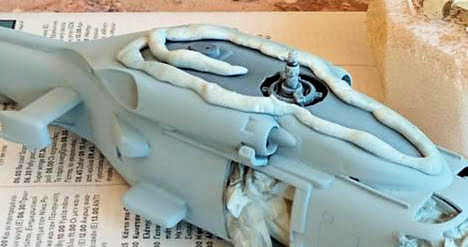
 The 4-piece
transmission was assembled and attached on top of the cabin roof. It was painted
gunmetal, then heavily dry brushed with silver. After opening a few holes
mentioned in the instructions and affixing the port window transparency from the
insides, I went on joining the two fuselage halves, with the completed cockpit
trapped in between. Fit was quite good.
The 4-piece
transmission was assembled and attached on top of the cabin roof. It was painted
gunmetal, then heavily dry brushed with silver. After opening a few holes
mentioned in the instructions and affixing the port window transparency from the
insides, I went on joining the two fuselage halves, with the completed cockpit
trapped in between. Fit was quite good.
The sensitive rear wheel strut, the underside beacon and a couple of tiny
antennas, which were molded together with the port fuselage half, were carefully
cut off, so I could handle and fill/sand the model without damaging them, with
the plan to attach them at later stages.
A side note, if you want a rotating tail rotor, you should secure it from the
insides before joining the fuselage halves. In my case, I prefered to sacrifice
the rotating future by leaving the delicate tail rotor off, since it would have
no chance surviving my less than delicate handling during the build.
The top front fuselage part (basically it is the top windows framing) was
attached, followed by the pilot's entrance door, which I elected to attach
“closed”. As fit was not totally positive there, I decided to attach both parts
at the same time and align them effectively as a whole before glue cured.
The top transmission cover was then attached, followed by the two piece engine
inlets and the rear cover that contains the upper parts of the exhausts (the
lower parts are molded with the fuselage halves, meaning horizontal seams that
have to be addressed). Fit was good but not perfect (especially at the engine
inlets), with all seams needing a degree of attention: this included treatment
with liquefied styrene and coarse sanding, followed by “normal” filler and fine
sanding.
 Taking a
break from main construction, I went on boosting my morale by doing some
subassemblies. Those included the 12-piece and 2-piece main and rear rotors
respectively, the 2-piece vertical stabilizer, the pair of 2-piece torpedo
pylons, the 4-piece towable MAD pylon, the 3-piece hoist mechanism and the
2-piece main wheels.
Taking a
break from main construction, I went on boosting my morale by doing some
subassemblies. Those included the 12-piece and 2-piece main and rear rotors
respectively, the 2-piece vertical stabilizer, the pair of 2-piece torpedo
pylons, the 4-piece towable MAD pylon, the 3-piece hoist mechanism and the
2-piece main wheels.
Having a basic frame complete and sanded smooth, I went on adding the gazillion
exterior “add-ons” (some more delicate than others) that modern helicopters
carry. Those included the underside radar dome and VU antenna, the MLG attaching
point fairings, the torpedo and towable MAD pylons, various ESM antennas, front
temperature sensors and so on.
The distinctive top cover sliding rails should not be attached as stated at the instructions: rather, their rear end should fit into the respective cover cutouts (the cover is supposed to slide onto them), something that required some judicious sanding. A number of delicate items, like the MLG struts themselves and various small antennas, were left off, to be attached at later stages. After a final filling and sanding sesion, I stuffed the interior with wet tissue and the Seahawk headed to the paint shop!
| COLORS & MARKINGS |
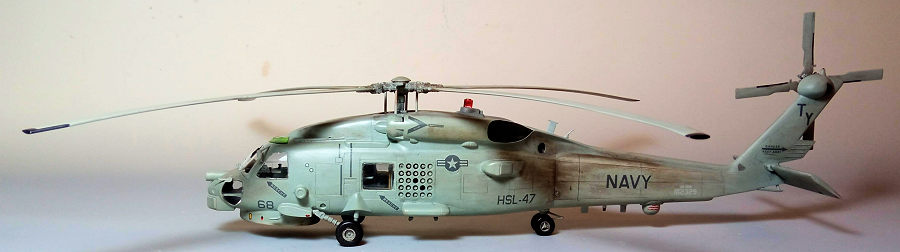
I first applied a coat of Hu196 light gray at the undersides and masked it off. I then applied Hu123 dark gray on the top flat area between the engines, then masked its borders with strings of tak (patafix), in order to obtain a neither hard nor too soft demarcation line. A generous spray of Hu127 ghost gray followed as the “sides'' color, the same shade being used for the main and rear rotors, landing gear parts and wheel rims.
 Some
serious overspray had taken place on top (where, lazily, I had only applied tak
strings at the borders and had not masked the complete area). Again, using tak
strings, I at this time affixed them slightly outside the dark gray top area and
carefully sprayed Hu126 (a lighter shade than the previously used Hu123) which
dried to a more “correct” gray shade. A coat of Future prepared the bird for
decaling.
Some
serious overspray had taken place on top (where, lazily, I had only applied tak
strings at the borders and had not masked the complete area). Again, using tak
strings, I at this time affixed them slightly outside the dark gray top area and
carefully sprayed Hu126 (a lighter shade than the previously used Hu123) which
dried to a more “correct” gray shade. A coat of Future prepared the bird for
decaling.
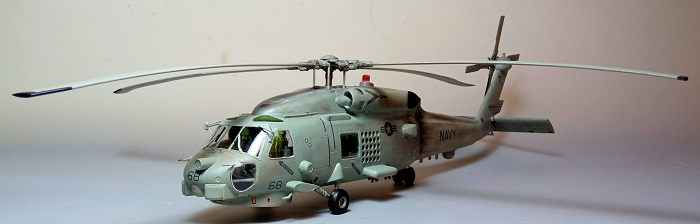
I used the kit decals, in order to represent an HSL-47 “Saberhawks” machine.
While the decals looked superbly printed, they refused to detach from their
backing paper despite being soaked in hot water for many minutes, as if there
was not sufficient (if any) decal glue between the decals and the backing paper.
What I did was, after soaking each decal in hot water for several minutes,
carefully lifting its edge with my hobby knife, then, using utmost care and with
fingers crossed, lifting the whole decal from the paper with my tweezers and
positioning it onto the model, where a drop of future had beforehand been
applied, to replace the missing decal glue.
Suffice to say the above process was hair raising, but, interestingly, all finally went well, with the base decal material proving strong enough to withstand the above torture. It has to be mentioned that this has been the only time I ever had an issue with the otherwise typically excellent Italeri decals, so I consider it an isolated case. A coat of Future sealed the decals.
| FINAL CONSTRUCTION |
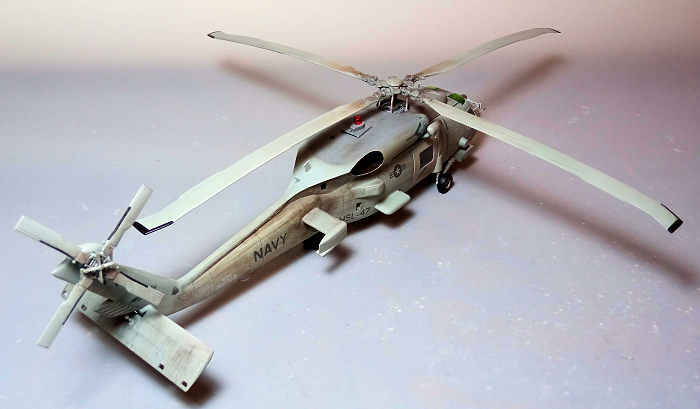
I attached the landing gear legs, followed by the wheels, which had
beforehand been filed to look “weighted”. Tires were black, whereas the oleos
were highlighted with a fine tip silver pen. The horizontal stabilizer, the
hoist, the tiny foot pegs as well as a number of antennas and other “small
stuff” were attached in position, all of them painted fuselage color, as pic
evidence indicated. The pylons' sway braces were also attached, painted
gunmetal. Finally, some “meshed” molded fuselage areas were highlighted with gun
metal, whereas the exhausts, together with the shallow innards of a couple of
air exits behind the engines were painted black. The main and rear blades black
areas were masked and painted at that time, as well.
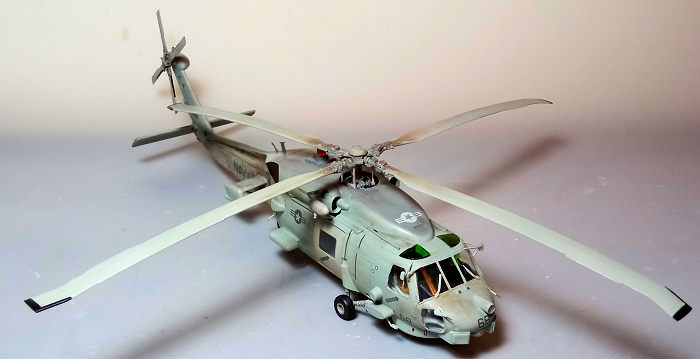
It was then time for some weathering: no matter how tempting might be to leave
the model clean, like it has just been delivered and, despite the personnel’s
serious efforts to keep the machines pristine, truth is that Seahawks look more
“right” with an amount of weathering on them, showing the effe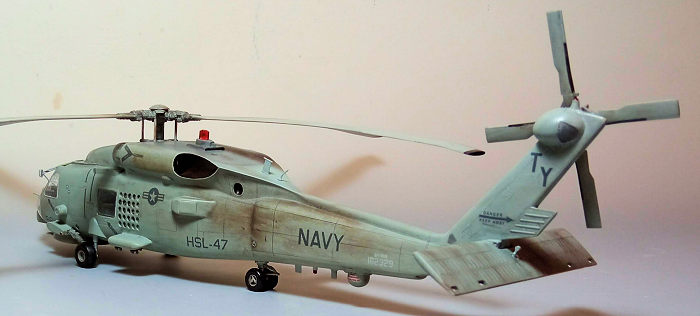 cts
of not only the harsh environment they operate, but also of the significant
exhaust staining that quickly shows onto the light ghost gray sides. I thus went
on and applied a black wash all over (hefty at grim-candidate areas), followed
by application of dark brown and black dry pastels to simulate general
“dirtying” and, especially, the exhaust staining that I tried to give a pattern
like it is observed in reality (towards the downwash airflow). An almost matt
coat gave the bird its final finish.
cts
of not only the harsh environment they operate, but also of the significant
exhaust staining that quickly shows onto the light ghost gray sides. I thus went
on and applied a black wash all over (hefty at grim-candidate areas), followed
by application of dark brown and black dry pastels to simulate general
“dirtying” and, especially, the exhaust staining that I tried to give a pattern
like it is observed in reality (towards the downwash airflow). An almost matt
coat gave the bird its final finish.
The tedious job of adding the transparencies was next: Fit was so-so, leaving
the occasional mini gaps and/or mismatch, those discrepancies taken care of
white glue carefully applied and “faired” with a wet cotton bud. The top windows
were tinted with Humbrol clear green.
The windscreen wipers, the front pitots and the ultra-delicate mirrors were
carefully attached. Wiper blades were black, pitot fronts were gunmetal, whereas
the mirror’s area was highlighted with my fine tip silver pen. The main rotor
was attached, followed by the rear one that was simply affixed in position, in
order to be positionable. The various lights (anti-collision beacons and port
tip) were painted with Humbrol clear red, whereas the starboard tip light with
clear green, before calling this very imposing and beautiful in its own
distinctive manner helicopter done!
| CONCLUSIONS |
Italeri has developed a justified reputation with helicopters and this
kit is no exception: it has a correct general shape, sufficient detailing all
around and generally good fit. Transparencies are clear but might possess some
challenges in attaching them, with, possibly, the best approach being to attach
them beforehand, blend them and mask them (something Yours Truly steadily
refrains from, due to laziness and “not changing the habits of a lifetime”
attitude…). Decals refused to detach from their backing paper (an isolated case
with Italeri decals), but they were otherwise very good.
It being a modern helicopter, means a gazillion of “add-ons” will be found all
around a Seahawk frame, some more delicate than others, deeming handling of the
model not an always easy process, especially at final stages (and you can be
sure that you will most probably snap-off a number of such bits a few times
before finishing!). Combined with the fact that construction does present a
degree of complexity, this is not a kit for the absolute beginner, but for at
least the average modeler with some experience.
Out of the box a very acceptable nodel can emerge. Should you wish to go
superdetailing, improving or even modifying, you will by no means be
disappointed, as a long list of beautiful aftermarket stuff is available.
Per the Italeri tradition, the kit is (and will most probably be) reboxed from
time to time with different schemes. As of 2022, it can be found at not too
unsensible prices. If you are not a beginner and have one, or come across one,
by all means grab it and build it! Some graphic language might commence each
time you (re)snap that tiny antenna off or when the downward view oval
transparency will not fit, but in the end an imposing Seahawk will emerge,
proudly deserving a distinguished place in your showcase.
Happy Modeling!
19 January 2023
Copyright ModelingMadness.com. All rights reserved. No reproduction in part or in whole without express permission.
If you would like your product reviewed fairly and fairly quickly, please contact the editor or see other details in the Note to Contributors.