Airfix 1/72 F-18 'Top Gun'
| KIT #: | A00504 |
| PRICE: | $25.00 |
| DECALS: | One option |
| REVIEWER: | Spiros Pendedekas |
| NOTES: | "Top Gun Maverick" editon |
| HISTORY |
 The United States Navy Strike Fighter Tactics Instructor program (SFTI
program), more popularly known as “Top Gun” is a training program that teaches
air combat maneuvering tactics and techniques to selected naval aviators and
naval flight officers who then return to their operating units as surrogate
instructors.
The United States Navy Strike Fighter Tactics Instructor program (SFTI
program), more popularly known as “Top Gun” is a training program that teaches
air combat maneuvering tactics and techniques to selected naval aviators and
naval flight officers who then return to their operating units as surrogate
instructors.
The program began as the United States Navy Fighter Weapons School,
established on 3 March 1969 at the former Naval Air Station Miramar in San
Diego, California. In 1996, the school was merged into the Naval Strike and Air
Warfare Center at Naval Air Station Fallon, Nevada. The school was made famous
by the 1986 film Top Gun and its 2022 sequel Top Gun: Maverick, starring Tom
Cruise.
In the 2022 Top Gun: Maverick sequel, Tom Cruise reprises his starring
role as the naval aviator Maverick. The ensemble cast also features Miles
Teller, Jennifer Connelly, Jon Hamm, Glen Powell, Monica Barbaro, Lewis Pullman,
Ed Harris and Val Kilmer (in his final film role). The story involves Maverick
confronting his past while training a group of younger Top Gun graduates,
including the son of his deceased best friend, for a dangerous mission.
The Boeing F/A-18E/F Super Hornet is the primary multirole fighter jet
depicted in the Top Gun sequel, replacing the Grumman F-14 Tomcat, which was the
primary fighter jet depicted in the original Top Gun movie.
| THE KIT |
 This is a 2020 reissue of the classic 1981 Airfix mold. The specific
copy was bought from my hometown’s sole remaining little hobby shop as a gift to
my 9yo son who performed well at school and for an in-depth look at its contents
you may read its preview found
in the ever growing MM archives.
This is a 2020 reissue of the classic 1981 Airfix mold. The specific
copy was bought from my hometown’s sole remaining little hobby shop as a gift to
my 9yo son who performed well at school and for an in-depth look at its contents
you may read its preview found
in the ever growing MM archives.
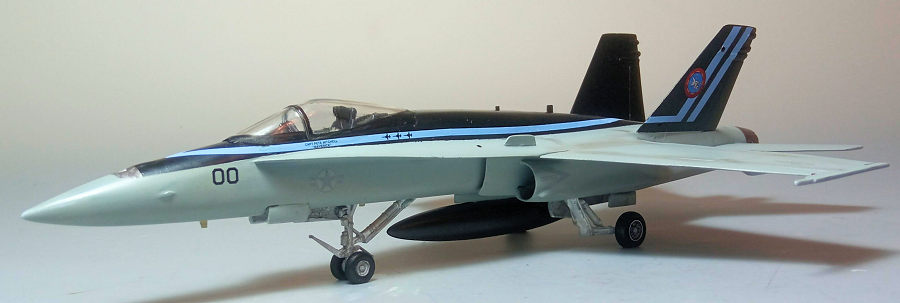
The kit is supposed to represent Maverick’s F-18, as it appeared in the
“Top Gun - Maverick” film. However, Maverick flew a Super Hornet in the movie
and not a first generation Hornet that the kit contains. Nevertheless, my son
wouldn't care too much whether Maverick flew an older Hornet or a Super Hornet
in the movie and he asked me to build this kit “as is”.
| CONSTRUCTION |
I started by attaching the instrument panel inside of the top fuselage
half and the main wheel upper wall inside of the bottom half, then joined the
fuselage halves. Not sure if any nose weight would be necessary, I nevertheless
trusted the strong nose gear and trapped around 20 grams of fishing weight to
the nose.
 Basic cockpit color was Tamiya XF-66 Light Gray, while the instrument
panel, the stick grip and top inner anti glare areas were painted black. The
instrument panel had its raised details dry brushed with silver and the two
glass screens were replicated by adding blobs of clear green paint to the
corresponding spots. The seat had black frame and head cushion, olive drab rear
and lower cushions and received seat belts from masking tape. True, the cockpit
is basic, but my die hard “closed canopy” attitude combined with the thick
transparencies reassured that nothing but a blur would be visible once the
canopy is attached.
Basic cockpit color was Tamiya XF-66 Light Gray, while the instrument
panel, the stick grip and top inner anti glare areas were painted black. The
instrument panel had its raised details dry brushed with silver and the two
glass screens were replicated by adding blobs of clear green paint to the
corresponding spots. The seat had black frame and head cushion, olive drab rear
and lower cushions and received seat belts from masking tape. True, the cockpit
is basic, but my die hard “closed canopy” attitude combined with the thick
transparencies reassured that nothing but a blur would be visible once the
canopy is attached.
Subassembly time was next, including the 2-piece wings, the 2-piece
leading edge extensions (LEX) and the 3-piece intakes, all of which were then
successively attached to the fuselage, followed by the fins, the airbrake (in
closed position), the centerline pylon and the LEX small fences. The centerline
drop tank was assembled at this time, as well. The stabilators were supposed to
be trapped between the fuselage halves, in order to be positionable, but I
elected to leave them off, in order to be able to sand the underlying horizontal
fuselage seams.
This concluded basic model assembly. Fit was average and, in areas,
challenging. I particularly had difficulty mating the LEXs to the wing roots,
with my less than perfect skills also contributing to the mismatch. Quite a few
rounds of filling and sanding took place and, upon deeming the result passable,
I took the bird to the paint shop!
| COLORS & MARKINGS |
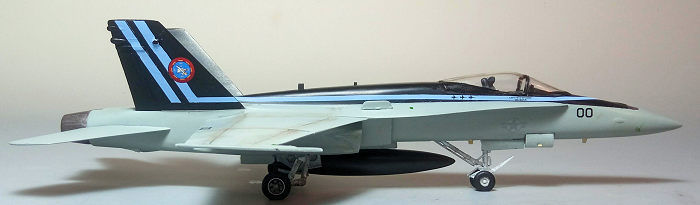
 I first gave the topsides (and the centerline drop tank) a coat of Hu85
Satin Black, then masked the required area off and gave the remainder, including
all doors, a coat of Hu127 US Ghost Gray. The front gun muzzle area was painted
Testors Burned Metal. Upon removing the masks and performing the (typically for
Yours Truly) necessary corrections and touch ups, I gave the complete model a
coat of Future to prepare it for decaling.
I first gave the topsides (and the centerline drop tank) a coat of Hu85
Satin Black, then masked the required area off and gave the remainder, including
all doors, a coat of Hu127 US Ghost Gray. The front gun muzzle area was painted
Testors Burned Metal. Upon removing the masks and performing the (typically for
Yours Truly) necessary corrections and touch ups, I gave the complete model a
coat of Future to prepare it for decaling.
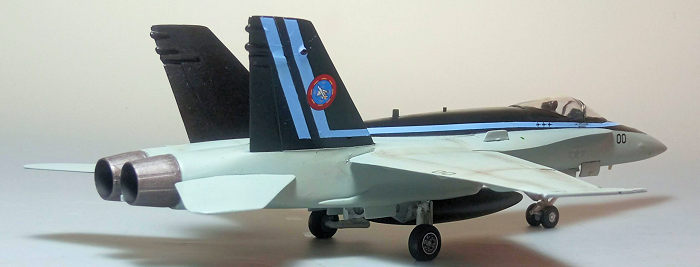
I used the kit decals in order to recreate Maverick’s scheme, which
behaved beautifully, easily detaching from their backing paper and nicely
adhering to every curve. This was especially helpful in tackling the scheme’s
distinctive light blue stripes. It is true that the “New Airfix” decals are
excellent, a vast departure from the ones typically (with some exceptions)
Airfix treated us two-three decades ago. A coat of Future sealed the decals.
| FINAL CONSTRUCTION |
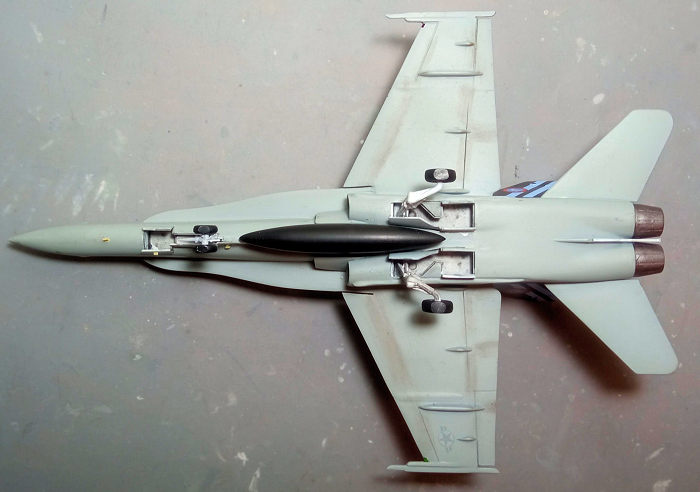
The good looking landing gear was assembled and attached in position,
followed by the wheels and doors, with the bird firmly standing on its feet and
everything fitting well. The wheels were filed to look weighted. All landing
gear parts, rims, wheel wells and door innards were painted white while tires
were painted black. Most door innards had nasty pin marks, but I was too lazy
to deal with them.
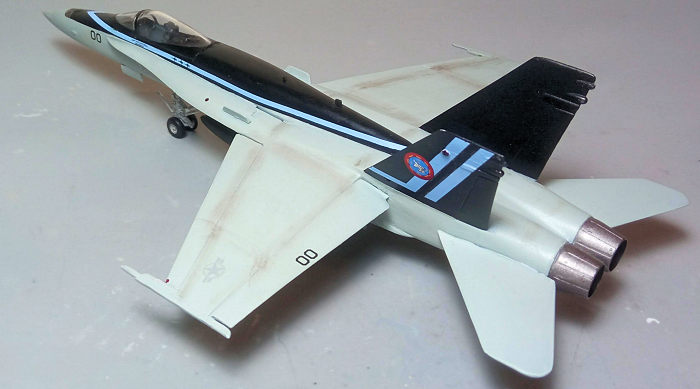
 The exhaust nozzles were painted Mr Hobby Burnt Iron and attached in
position, with their shallow ends (as well as those of the intakes) painted
black to add a sense of depth. The arresting hook was painted white and also
attached, together with the black centerline drop tank.
The exhaust nozzles were painted Mr Hobby Burnt Iron and attached in
position, with their shallow ends (as well as those of the intakes) painted
black to add a sense of depth. The arresting hook was painted white and also
attached, together with the black centerline drop tank.
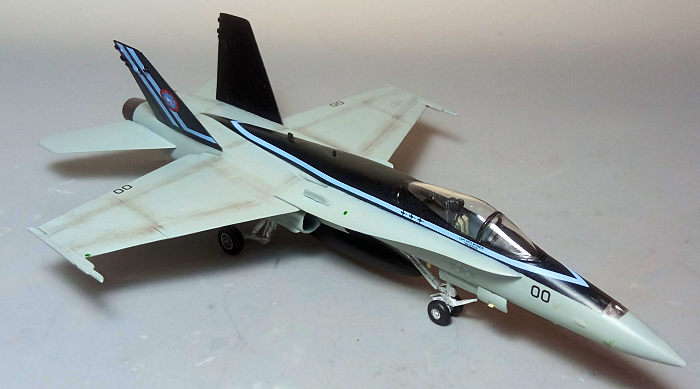
Time for some weathering, consisting of a black wash all over (heftier
in the landing gear area to give all parts a used, oily look) and selective
application of brown and dark dry pastels at areas where dirt or grime would
reside. A satin coat gave the bird its final hue.
The HUD transparency was lost somewhere in space-time and was replicated
by a suitably cut clear piece, painted clear green and attached in position,
followed by the 2-piece canopy which had its frames hand painted. The various
fillet antennas were replicated by suitably cut thin styrene pieces and
accordingly painted (some had been sanded off during construction and the rest
provided by the kit were too thick). Blobs of red and green clear paint
simulated the wingtip and anti collision lights, before calling the bird done!
| CONCLUSIONS |
This is an old mold, average fitting and relatively simplistic kit,
which requires some extra work, in order to produce a homogeneous result.
Additionally, the specific F-18 variant is not correct for the scheme depicted
at the sole kit decals option, which are of otherwise excellent quality.
So, this kit is a strange case. It is always good to see an old mold
like this reissued as a sort of walk down memory lane (a good number of us
like such reissues), however the sole decal option is wrong and, at least, an
alternative scheme would have catered for).
That said, there’s nothing wrong in building this kit, even out of the
box as an “alternative” Maverick’s bird, or using other decals to depict a
correct scheme.
Happy Modeling!
19 May 2025 Copyright ModelingMadness.com. All rights reserved. No
reproduction in part or in whole without express permission from the editor. If you would like your product reviewed fairly and
fairly quickly, please
contact
the editor or see other details in the
Note to
Contributors.