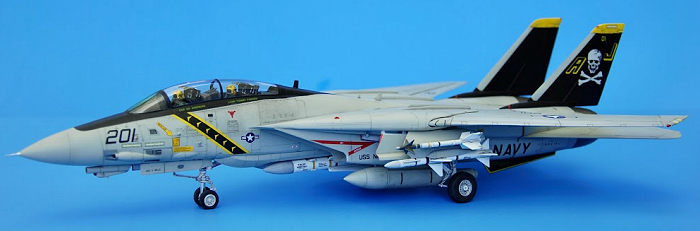
Hasegawa 1/48 F-14A Tomcat
| KIT #: | 07246 |
| PRICE: | $50.00 'used' |
| DECALS: | Four options |
| REVIEWER: | Martin McClendon |
| NOTES: | Furball stencils. A really great kit of the iconic Navy fighter that suffers from several fit issues. But highly enjoyable if you proceed with caution |
| HISTORY |
The history of the Grumman Tomcat is well known.
| THE KIT |
 The Hasegawa
1/48 Tomcat kit came out in 1988 according to Scalemates and was at that time
the best by far, totally superseding the earlier Revell and Monogram kits. Since
then, many companies have produced a 1/48 Tomcat. But in terms of overall shape
and capturing the “essence” of the plane, the Hasegawa kit is still very good.
It looks correct from all angles and the engraved panel lines are understated
and look “scale” from the average viewing distance--at least to my eyes. Besides
its accuracy, its biggest advantage these days is cost: you can get one for half
of what the Tamiya kit will cost you. The kit is not without its challenges, but
with a little effort it still holds its own with other kits.
The Hasegawa
1/48 Tomcat kit came out in 1988 according to Scalemates and was at that time
the best by far, totally superseding the earlier Revell and Monogram kits. Since
then, many companies have produced a 1/48 Tomcat. But in terms of overall shape
and capturing the “essence” of the plane, the Hasegawa kit is still very good.
It looks correct from all angles and the engraved panel lines are understated
and look “scale” from the average viewing distance--at least to my eyes. Besides
its accuracy, its biggest advantage these days is cost: you can get one for half
of what the Tamiya kit will cost you. The kit is not without its challenges, but
with a little effort it still holds its own with other kits.
A large sturdy box with beautiful artwork holds oodles of parts trees in Hasegawa’s familiar light grey—along with a PE fret, metal wheels, and vinyl tires! Many options are provided: TARPS pod, drop tanks, open/closed cockpit and speed brake, variable wing position, slats/flaps open or closed, boarding ladder and steps extended or retracted, multiple chin sensors, engine nozzles open/closed, intake ramps variable—but of course, no weapons. A giant decal sheet of beautiful and accurate decals for four schemes is also included.
| CONSTRUCTION |
Many previous modelers have noted this kit’s problems, mostly having to do with fit issues. I encourage anyone looking to build it to read the many earlier articles out there before they begin. And here I’d like to add a few more tips of my own.
It is well known that the
intake pieces are tricky. The intake trunking was pre-painted Tamiya flat white
before assembly. Then I carefully glued the halves together and did only minimal
sanding and touch-up of the seams. Placing the intake trunks int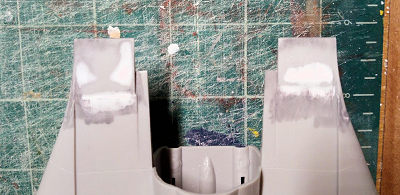 o
the intake housings, make sure to line up the front of the trunk with the
depression in the housing so you have minimal filling there; you will have to
build up the attachment point further back in the housing to lift the trunking
slightly to make it match up in front.
o
the intake housings, make sure to line up the front of the trunk with the
depression in the housing so you have minimal filling there; you will have to
build up the attachment point further back in the housing to lift the trunking
slightly to make it match up in front.
I worked to fine tune the
intake/engine housings so they would fit nicely against the inner fuselage
sides. I was trying to do as little filling and sanding as possible. But after
installing the interior diverter ramps (parts F7-F13, H6-7), I found that their
placement shifted the intakes back outward by a half millimeter or so, leaving
an ugly gap right where I hoped there would be none—and making the outboard tips
of the intakes a little too close to the outer
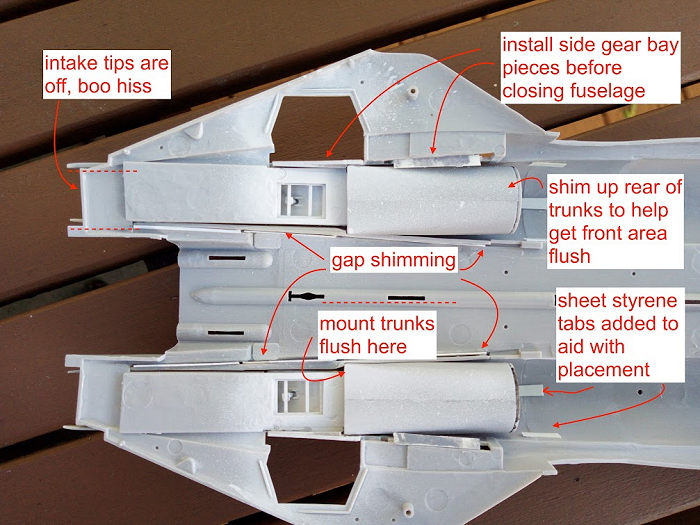 edge of
the upper fuselage. I advise you to test fit all these pieces and make sure your
ramps don’t interfere with the intake housings—if you can. Maybe even try
attaching the intake housings first, then sneaking the ramps in afterward.
Disappointed, I filled the gaps with styrene strips and putty.
edge of
the upper fuselage. I advise you to test fit all these pieces and make sure your
ramps don’t interfere with the intake housings—if you can. Maybe even try
attaching the intake housings first, then sneaking the ramps in afterward.
Disappointed, I filled the gaps with styrene strips and putty.
All gear well interior walls are provided as separate pieces, so I was able to spray them all Tamiya flat white and then use a pin wash of oil paint to accentuate the details before assembling and installing them. The weirdest part of all this is the side pieces of the main gear wells (C15-16), which are supposed to be slid in after the top of the fuselage is in place. I couldn’t see how that would work, so I put them in right after the intakes were attached, which allowed me to drop them in from the open top of the fuselage piece. As it was, their rear faces needed some trimming to fit up against the intakes. Oddly, they are also a millimeter or so short, and I had no clue whether to push them forward or rearward, or how that would affect landing gear placement later. I decided to push them back.
The multi-part main gear
wells are a well-known challenge. After several rounds of test-fitting I glued
them all in place on the fuselage bottom, then spent a while carefully sanding
down their upper edges and then test fitting the top and peeking through the
rear openings to see where they were still hitting the top and hampering the
fit. Finally it was time to join the top and bottom of the fuselage, which went
without too
 much
further trouble. I first glued the forward extensions over the intakes, and then
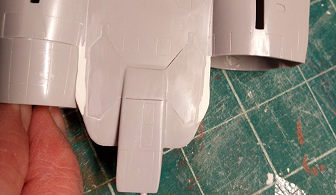
used liquid cement to glue up the rear seams. Next comes the “beaver tail.” It
is a top and bottom shell with a spreader piece to stabilize the construction.
The fit on the top was perfect: on the bottom, a nasty gap. If I pushed the
beaver tail down so that the gap disappeared, there would be sanding and filling
on the top around both sides where it hits the engines, as well as at the front.
I decided to make it match perfectly up top and confine the ugliness to the
underside. The arresting hook features a small separate linkage that is way too
tall to work with the hook retracted. Also pay attention to where you put the
hook housing, because there is no locator to guide you. If you put it too far
back, the hook will stick out the back—it is supposed to be roughly even with
the rear of the beaver tail. The housing should go right up to the edge of the
missile storage groove.
much
further trouble. I first glued the forward extensions over the intakes, and then
used liquid cement to glue up the rear seams. Next comes the “beaver tail.” It
is a top and bottom shell with a spreader piece to stabilize the construction.
The fit on the top was perfect: on the bottom, a nasty gap. If I pushed the
beaver tail down so that the gap disappeared, there would be sanding and filling
on the top around both sides where it hits the engines, as well as at the front.
I decided to make it match perfectly up top and confine the ugliness to the
underside. The arresting hook features a small separate linkage that is way too
tall to work with the hook retracted. Also pay attention to where you put the
hook housing, because there is no locator to guide you. If you put it too far
back, the hook will stick out the back—it is supposed to be roughly even with
the rear of the beaver tail. The housing should go right up to the edge of the
missile storage groove.
The front office: Hasegawa molds all the side consoles separately. They should all be test-fitted before gluing, holding the cockpit tub up against the front fuselage sides frequently to make sure it all fits. The instrument panels will also need a little trimming before the coamings will fit properly over them. Frequent test fitting here too! The fuselage sides have no detail along the sidewalls of the cockpit which doesn’t bother me. I was planning to keep the canopy closed but even with it open, precious little will be seen there. I painted everything a custom light gray mix using Tamiya paints, picking out the consoles and instruments with Model Master flat black. Then more work with a tiny brush, picking out dials and switches with white, yellow, and red paint according to online research. The whole thing was lightly dry-brushed with Tamiya metallic grey and then given a wash of black paint to tone it all down. Screens were painted a custom green mix, and then hit with Microscale Krystal-Kleer to simulate glass.
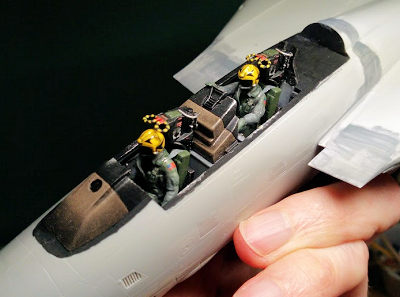 I like to
add people to my models, but the pilots provided with the kit are a little
scrawny. Their heads are also eerily small. Very weird. I had ordered Hasegawa’s
accessory kit of carrier deck personnel which also includes seated pilots. I
figured they were from the same mold, but to my pleasant surprise, the accessory
pilots are much closer to scale! I would definitely recommend upgrading to
those, or some other aftermarket figures. Both the pilot and RIO will need some
filing down to get their legs to fit around the center consoles. And the pilot’s
rudder pedals won’t fit if installed as described in the plans. Test fit your
pilot and reposition them if you plan to use figures, or omit them altogether
since they won’t be seen. I painted both pilots with various mixtures of Tamiya
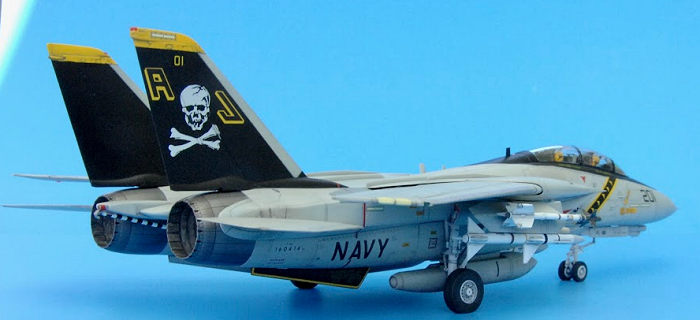
paints. The helmets were painted yellow since I opted to build the VF-84 version
of the playne. The deck crew kit provides shoulder patch and helmet insignia
decals.
I like to
add people to my models, but the pilots provided with the kit are a little
scrawny. Their heads are also eerily small. Very weird. I had ordered Hasegawa’s
accessory kit of carrier deck personnel which also includes seated pilots. I
figured they were from the same mold, but to my pleasant surprise, the accessory
pilots are much closer to scale! I would definitely recommend upgrading to
those, or some other aftermarket figures. Both the pilot and RIO will need some
filing down to get their legs to fit around the center consoles. And the pilot’s
rudder pedals won’t fit if installed as described in the plans. Test fit your
pilot and reposition them if you plan to use figures, or omit them altogether
since they won’t be seen. I painted both pilots with various mixtures of Tamiya
paints. The helmets were painted yellow since I opted to build the VF-84 version
of the playne. The deck crew kit provides shoulder patch and helmet insignia
decals.
The ejection seats are nice; I added a loop of wire at the top of each seat that I could see from the research was pretty prominent, and added decals from the Furball sheet I got for this kit. The front seat seems to me to be too far forward. There’s almost no room for the pilot to exit the plane, and his left hand, meant to be holding the throttle, ends up way too far forward. The rear of the seat was filed down to allow it to slide back against the RIO’s instrument coaming, and the pilot himself received some back and butt surgery as well. I added metal foil shoulder straps to connect the pilots to their seats. There is some sort of triangular armor plate or bulkhead (F20) behind the RIO. This piece, if used as directed, will not fit under the rear turtle deck (F41) and may even prevent the cockpit from closing. Don’t glue it to the center rear wall as instructed: add it after you have installed the cockpit and turtle deck and closed up the front fuselage, and then test fit. You will probably need to shorten it considerably. The turtle deck itself has raised details that won’t be seen after the rear canopy lining is installed, and these details also prevent the canopy from closing. I had to file the turtle deck flat so the canopy would close properly. The instrument coamings are covered with a canvas shroud. On most photos this is sun-faded, so I painted them a suitable Tamiya color and used black oil paint over it, rubbing some away to simulate fading. The HUD lens got a coat of Krystal Kleer and I also used that to glue a piece of green theatrical lighting gel onto the front windshield to simulate the green tint of that panel.
I epoxied a 30-gram egg-shaped fishing weight in the nose cone; I also glued a sideways spreader, made of sprue, to flatten the cone’s shape to better match the front of the fuselage—test fit!! The cannon access panels don’t fit well; use scrap styrene to bulk up the interior a little so they will be flush with the fuselage. I also used a file and sanding sticks to rework the bulges on these doors to line up better.
There is very little material to join the front and rear fuselage sections. I 3D printed a plug for the rear of the cockpit section to make some more gluing area where it meets the forward fuselage, as well as gluing in some sheet styrene tabs. The kit instructions have you glue the front and back fuselage together, then install a rectangular plate (B4) behind the front gear well. I test fitted and glued this into place first, so I could get a nice tight fit at the front and sides. I had to file down the sides of the rear part of the gear well that holds the hydraulic actuator, it was not allowing the rectangular piece to sit flush.
Once glued together, the front/rear joint needs a little work. I used a detail file to match up the curves behind the cockpit, and built up some white putty to smooth the joint. A similar process was used for the nose cone.
 There are
some weird sink marks here and there, including on the tops of the air intakes,
a visually prominent spot. I used white putty to fill these tiny depressions. I
find that white putty will only tolerate so much sanding. If you go down into
superfine grits, the dried putty just pulls up and the edges get burnished,
creating a mess that has to be sanded out and puttied again. I would still
rather use this any day, instead of breathing any more toluene than I already
have by using Squadron or other types of solvent putty. So I backed off on the
aggressive sanding and coated the areas several times with a little grey paint
to check my progress on sanding smooth. It worked pretty well, and I got it
smooth enough that it isn’t noticeable under paint.
There are
some weird sink marks here and there, including on the tops of the air intakes,
a visually prominent spot. I used white putty to fill these tiny depressions. I
find that white putty will only tolerate so much sanding. If you go down into
superfine grits, the dried putty just pulls up and the edges get burnished,
creating a mess that has to be sanded out and puttied again. I would still
rather use this any day, instead of breathing any more toluene than I already
have by using Squadron or other types of solvent putty. So I backed off on the
aggressive sanding and coated the areas several times with a little grey paint
to check my progress on sanding smooth. It worked pretty well, and I got it
smooth enough that it isn’t noticeable under paint.
The exhausts are multi-part constructions. Open and closed nozzles are provided. The main tubes are built up from halves, like the intake trunks. Again I prepainted them and just lined up the seams as best I could—they look good enough to me, and they have a ridged detail that would seem to make any attempt at sanding the seam impossible. They were painted Tamiya flat white to replicate their ceramic coating. Then I used Liquitex artist acrylics to build up stains by dry-brushing. The flame holders were painted black, and details picked out with Tamiya titanium. For the nozzle exteriors, I followed the recommendations from the Tamiya paint guide for their Tomcat.
When fitting the exhausts, I realized there was a missing fuselage piece on either side of the beaver tail where it meets the nozzles. Although there are clearly slots for attaching pieces, no such pieces were to be located on the sprues or described in the instructions. After checking research photos, I built up the fairings with a little Milliput. Once these areas were cured, I had to file and sand them and add a little white putty to get them into shape.
Wing construction: the kit is designed to be built with slats and flaps deployed. A little trimming is necessary to portray these retracted, which is what I wanted to do. The fit is tricky to get everything flush and aerodynamic. The slat actuators all need to be sliced off and sanded down, and even after that, there are a few odd lumps in the lower wing that I couldn’t figure out how to remove without destroying engraved detail. The wings themselves are designed with an open slot allowing them to snap into the fuselage wing pivot after painting. Nice. Two separate pairs of wing sealing “bags” are provided for wings extended or retracted.
Landing gear is well
detailed. Hasegawa gives you the option of a fully extended nose gear or
“crouched” for catapult launch. The kit provides metal wheel hubs with rubber
tires. I opted to use aftermarket wheels made by Wheeliant. These are stunning
in the level of detail in the castings. The resin is soft and easy to sand and
file to get the hubs to fit in the wheels. They also provide wire to make brake
lines. All pieces were sprayed Tamiya flat white and weathered with oil paints.
Oleos were wrapped with Bare Metal Foil. The main gear need to be test fitted
extensively. The hole provided for the main folding linkage (F78-79) seems to be
too far back. the Tomcat’s main gear does have a rearward slant when parked, but
I thought it looked too extreme, and moved the hole further forward. I also had
to finagle the main gear legs so that they would line up with the notches in the
engine housings. When a Tomcat’s gear is lowered, it locks into this no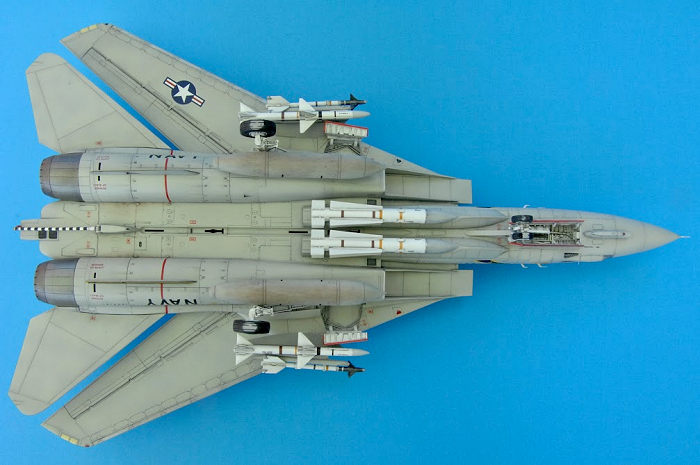 tch
for added support (Parts F65-66 fit in the notches). Sanding and filing of the
base of each gear leg was needed for it to get close to that notch. After all
painting and into final assembly, I realized too late that the front gear’s
hydraulic reservoir (F77) interferes with the gear doors, skewing the gear to
one side. I trimmed the door hinges and did my best, but realized only later
that the gear was still a few degrees out of line. Ugh. This means the
dual-wheel nose gear didn’t meet the deck evenly, and I had to file down one of
the tires to make up the difference. Not great.
tch
for added support (Parts F65-66 fit in the notches). Sanding and filing of the
base of each gear leg was needed for it to get close to that notch. After all
painting and into final assembly, I realized too late that the front gear’s
hydraulic reservoir (F77) interferes with the gear doors, skewing the gear to
one side. I trimmed the door hinges and did my best, but realized only later
that the gear was still a few degrees out of line. Ugh. This means the
dual-wheel nose gear didn’t meet the deck evenly, and I had to file down one of
the tires to make up the difference. Not great.
The arresting hook (C37) is designed to be captured in a fairing during construction, but I wanted to leave it off to paint separately, so I sanded off the pegs that would have fit into the fairing. There is a little hydraulic actuator (C49) that fits under the hook which is too tall to allow it to sit properly, and needs to be shortened.
Hasegawa kits of this time were notorious for not including armament. I raided the Monogram kit for its Sidewinders, Sparrows, and Phoenixes. The Sparrows are molded into the pylons, so they needed to be surgically removed. The Phoenixes are very basic. They only have 2 of the 4 target detecting bumps—I added the missing bumps with sheet styrene. And also 3D printed rocket nozzles for the gaping rear openings. Homemade decals finished off the presentation—not as good as aftermarket, but it works.
Clear parts are nicely done; the canopy has a seam down the middle as well as the strips for the lighting arrestors. I sanded that all away and buffed it out with a 3-in-1 sanding stick and dipped it in Future for a nice result. I thought about using Bare Metal Foil to add the lightning strips back on, but felt it might look too gaudy. Hasegawa provides photo-etch canopy mirrors, canopy hooks, and boarding ladder sides. I only used the mirrors. I glued them into the canopy with Krystal Kleer.
| COLORS & MARKINGS |
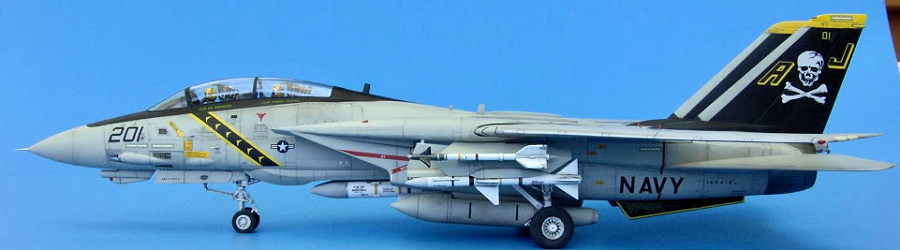
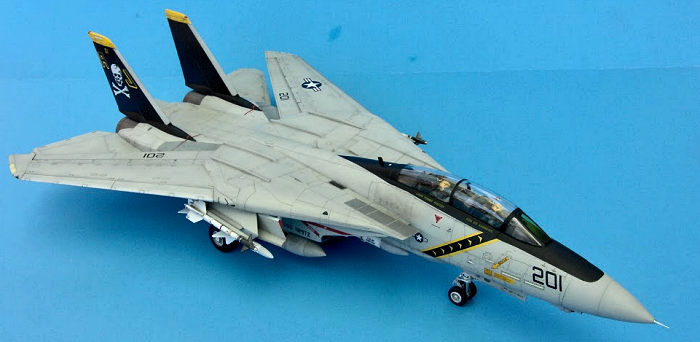
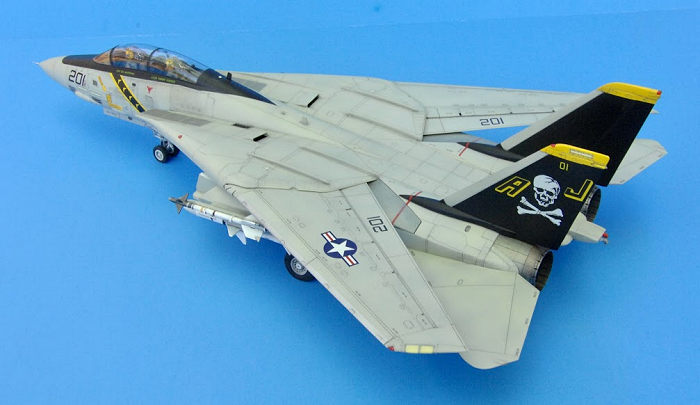
The kit includes marking for 4 different aircraft, all from the 1990’s in the Atlantic Fleet, and all with overall light gull grey paint. I decided not to prime the model, to minimize paint build-up in some of the more petite panel lines. I did try pre-shading for the first time however. Using Tamiya German Grey, I liberally applied splotches of color to add dimension to the final finish.
My usual paint of choice is always Tamiya acrylics, but I decided to try AK’s “Real” lacquer paints on this one, as they have the exact FS-number for the light gull grey. Wearing a respirator to keep from keeling over from the fumes, I thinned the AK paint about 50/50 with Tamiya’s lacquer thinner, which worked fine. The AK paint applies extremely well. I was able to successively and carefully build up many thin coats to obscure the pre-shading just enough that it forms a subtle undertone to the monochrome finish. However I don’t know that I would use lacquers again. A major drawback for me is the difficulty of doing touch-ups. I can usually get away with it when using Tamiya acrylics, but when trying to touch up spots of the AK finish with a brush, the lacquer instantly dissolves the paint below and makes a much bigger eyesore than the original goof-up. I ended up mixing oil paints to the shade required later on to fix my boo-boos.
 The yellow
tips of the fins were primed in white first and hit with a few coats of Tamiya
yellow. Then these were masked off and the rest of the tail fins and the “skunk
stripe” over the canopy were painted Tamiya flat black. I had no issues with
adhesion despite the lack of primer or the different paint brands and formulas
being used. Then came several cots of thinned Future. I don’t remember who
tipped me off to thinning Future with alcohol, but it sure does help avoid runs
and puddles! I thinned it 50/50 or even a little more. Leading edges of the
wings were masked and painted with Tamiya aluminum. Red outlines on the gear
doors were done with a fine-tip paint marker.
The yellow
tips of the fins were primed in white first and hit with a few coats of Tamiya
yellow. Then these were masked off and the rest of the tail fins and the “skunk
stripe” over the canopy were painted Tamiya flat black. I had no issues with
adhesion despite the lack of primer or the different paint brands and formulas
being used. Then came several cots of thinned Future. I don’t remember who
tipped me off to thinning Future with alcohol, but it sure does help avoid runs
and puddles! I thinned it 50/50 or even a little more. Leading edges of the
wings were masked and painted with Tamiya aluminum. Red outlines on the gear
doors were done with a fine-tip paint marker.
The decal sheet is large and accurate, but Hasegawa’s decals are thick and sluggish to come off the sheet. (As a note, older Hasegawa and Tamiya decals need hot water to come off the backing in a reasonable amount of time. Ed). I augmented their decals with a stencil set from Furball and a VF-84 sheet from Mil-Spec. I still ended up using a fair amount of the Hasegawa decals after all, because they are just really crisp and accurate. The Mil-Spec sheet seemed to have a few issues: the nose number looks too big and the skull emblem was not as crisply printed as Hasegawa’s. But I will say the Mil-Spec decals are amazingly thin and are very easy to work with. I had trouble with the wingtip “slime light” decals. These just would not fold over the wingtip and conform to this difficult shape. I ended up scraping them off and mixing Tamiya yellow, white, and a few drops of green to get that distinctive color, and hand-painted them. A protective coat of Future was then applied and I went to work with my oil paint set. I mixed a dark grey and used paint thinner to bleed the paint into all the panel lines, strategically wiping here and there in the direction of the airflow.
| FINAL CONSTRUCTION |
I attached all the subassemblies at this point. The vertical fins sit way too far forward, their mounting notches need to be cut open and elongated so the fins don’t cover over the inflatable wing sealing bags. Do this before you get everything painted, not after, like I did!
 When
installing the engine nozzles, care must be taken to make sure they are lined up
and at equal height. There’s a lot of wiggle room, and the tabs provided to line
them up don’t really engage with anything. I didn’t quite get the nozzles
perfect, and then the last bits of fuselage trim, side pieces that glue onto the
outboard sides of the nozzles, (A8, A9) those were the worst. I should have
really taken time to test fit and trim these, but I was running out of patience.
These little clamshell-shaped pieces just don’t match up well with the rear of
the fuselage, and after gluing they sit proud when they should be flush and
streamlined. Ugly. I glued the stabilators in a slightly down attitude, which
covers most of the worst looking fitment here--unless you happen to look
underneath them! The mounting pegs for the stabilators are much smaller than the
holes they fit into.
When
installing the engine nozzles, care must be taken to make sure they are lined up
and at equal height. There’s a lot of wiggle room, and the tabs provided to line
them up don’t really engage with anything. I didn’t quite get the nozzles
perfect, and then the last bits of fuselage trim, side pieces that glue onto the
outboard sides of the nozzles, (A8, A9) those were the worst. I should have
really taken time to test fit and trim these, but I was running out of patience.
These little clamshell-shaped pieces just don’t match up well with the rear of
the fuselage, and after gluing they sit proud when they should be flush and
streamlined. Ugly. I glued the stabilators in a slightly down attitude, which
covers most of the worst looking fitment here--unless you happen to look
underneath them! The mounting pegs for the stabilators are much smaller than the
holes they fit into.
Pitot tubes and sensors: Hasegawa provides nicely molded pitots and an AOA indicator is molded onto the left front fuselage side, which I snapped off on the first day I took the sprues out of the box. I ordered a set of AOA and nose cone pitot tube from Master, made of turned brass. Incredibly tiny and perfectly shaped, they really add to the model and hopefully won’t be as easy for me to break off. Once done, everything got a couple coats of Tamiya matt spray from the rattle can. Then for the harrowing moment when you remove the canopy masking to see if anything bled under the tape—nope! Whew, good to see the pilots again after many weeks of on-again, off-again modeling. Lastly, navigation lights were painted and installed. Hasegawa provides these all as clear parts, which fit more or less well. Not the best part of the kit.
| CONCLUSIONS |
Despite the well-documented problems, there is nothing most modelers can’t tackle in this kit. I had a great time building it and it provides an extremely satisfactory end product. Just make sure to test fit!!!
| REFERENCES |
F-14 Tomcat in Action (1977), Squadron Pub.
The Cutting Edge, by CJ Heatley
Warplanes of the Fleet, David Donald, ed.
A second article will detail the construction of the carrier deck display base and accompanying figures.
Martin
McClendon 12 July
2024 Copyright ModelingMadness.com. All rights reserved. No
reproduction in part or in whole without express permission. If you would like your product reviewed fairly and fairly quickly, please
contact the editor or see other details in the
Note to
Contributors.