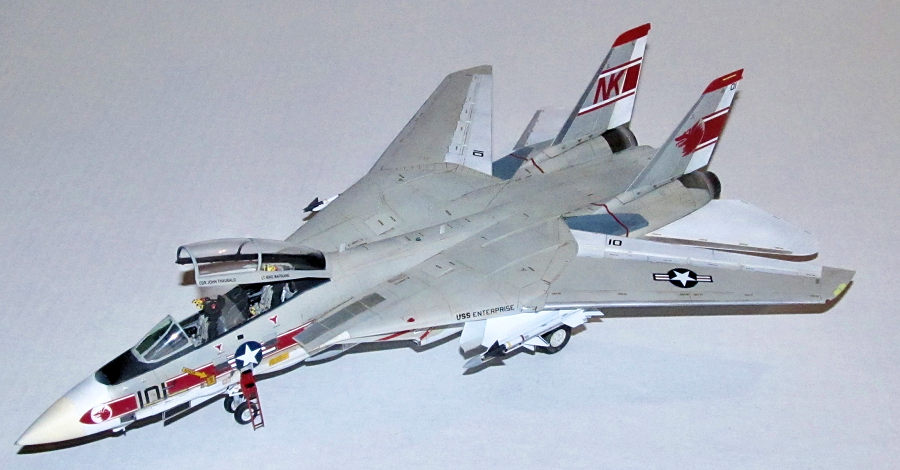
Tamiya 1/48 F-14A Tomcat
| KIT #: | 61114 |
| PRICE: | $115.00 SRP |
| DECALS: | Three options |
| REVIEWER: | Dan Lee |
| NOTES: | Fightertown Decals VF-1 Wolfpack 48014 Decal Set, Quickboot Beavertail/Early Vent Gun Panel/IR sensor and True Details GRU-7 Ejection Seats used. |
| HISTORY |
“There isn't enough thrust in Christendom to fix this plane.”
With that sentence, Vice Admiral Thomas Connolly sealed the fate of the F-111B and his Navy career. Out of the ashes of a plane totally unsuited for carrier operations appeared the F-14 Tomcat (aka the Turkey) in which Thomas Connolly played a big role in its development and was said to be named after him.
The US Navy realized in the early 60s that the F-4 Phantom wasn’t going to be the 1970s/80s Fleet Defender as it did not have the sophisticated radar and long ranged missiles to intercept Soviet Missile Armed Bombers before they could attack the Carrier Battle Groups (CVBGs.) In the days of the Cold War, the US Navy’s primary offensive mission in World War 3 was to push several carrier battle groups past the GIUK (Greenland-Iceland-United Kingdom) gap and attack the numerous submarine/missile/bomber bases on the USSR’s Kola Peninsula. They would have had to fight their way through a gauntlet of missile armed bombers (and subs) just to get into strike range. The main threat were the USSR’s Badger bombers (and soon the much faster/better Backfire Bombers) carried a variety of anti ship missiles that flew at speeds of Mach 4+ and had a range of almost 200 nautical miles to 300 nautical miles. Against that kind of opposition it was in the Navy’s best interest if the Fleet Defenders could intercept them before they were within range of the Fleet’s CVBGs (the doctrine known as “shooting the archers, not the arrows.”)
 Originally,
the “ideal” new Fleet Defender was supposed to be the Douglas Missileer which
proved that some ideas are better left on paper. It carried a radar (later known
as the AWG-9) that can lock on while scanning up to 6 targets simultaneously and
carried up to eight monster missiles called Eagles. The major flaw with this
plane was that it was a subsonic pure interceptor (no dogfighting required.) The
weirder proposals had the Missileer based on the Intruder and Tracker (!)
Fortunately, someone wisely pointed out that subsonic didn’t really make sense
as interceptors often had a need for speed while flying the highway to the
danger zone.
Originally,
the “ideal” new Fleet Defender was supposed to be the Douglas Missileer which
proved that some ideas are better left on paper. It carried a radar (later known
as the AWG-9) that can lock on while scanning up to 6 targets simultaneously and
carried up to eight monster missiles called Eagles. The major flaw with this
plane was that it was a subsonic pure interceptor (no dogfighting required.) The
weirder proposals had the Missileer based on the Intruder and Tracker (!)
Fortunately, someone wisely pointed out that subsonic didn’t really make sense
as interceptors often had a need for speed while flying the highway to the
danger zone.
Along came SecDef McNamara and his PhD geniuses who decided that the US Navy Fleet Defender and the USAF’s low level strike aircraft were similar and decided to base them off the same airframe known as the TFX or F-111 in probably one of the first ever examples of that dreaded corporatese word, synergy. Unlike the combination of peanut butter and chocolate, these two missions did not go well together as low level strike was really a different kind of plane than a carrier based fighter. The F-111B could not meet the Navy’s requirements on pretty much everything including being able to take off and land on a carrier as the all so important forward visibility for a carrier landing was pretty poor and made already tough carrier landings even tougher. By 1968, it was obvious to everyone but the main contractor, top bureaucrats and certain top brass that this was a spectacular failure. It took Senator John C. Stennis (probably one of the reasons why the Navy named a carrier after him) to goad the truth out of Vice Admiral Connolly to kill it.
Fortunately, Grumman (a prime sub contractor on the F-111B) had some ideas about a replacement. Grumman redesigned the airframe and kept the swing wing to optimize performance at low speeds for landing and dogfighting based on the Vietnam experience where old school dogfighting proved to be as critical as firing long range missiles. Like the F-111B, the Tomcat carried the AWG-9 radar and the very large Hughes Phoenix missile which were the longest ranged AAM (over 100nm) at the time but also very expensive and sophisticated (and sadly, have a US Navy combat record of no kills in 3 combat launches.) Unlike the F-111B, the F-14 Tomcat was designed for carrier operations with a bubble canopy for high visibility and a crew seated in tandem not side by side. It was armed with a 20mm Vulcan M61 cannon for close in work as well as fire Sidewinder and Sparrow Missiles. Later a long range camera system and IR sensor were added to compliment the AWG-9 radar.
 Unfortunately,
the designers used the same TF-30 turbofan engines that helped doom the F-111B.
These engines would be the bane of the Tomcat’s existence as it led directly to
the loss of many aircraft and aircrew as they were not really designed to be
used in a fighter plane (!) A replacement engine might have been developed
sooner, except for the pain of dealing with the lingering financial costs of the
Vietnam war and the bureaucratic mindset which believed that losing trained
aircrew and Tomcats was more cost effective than funding a replacement engine.
Another of the Tomcat’s drawbacks was that it was a very large plane, the
largest two seat fighter in US Navy history, combined with its weak TF-30
engines wasn’t as good a dogfighter as the Navy or the movie Top Gun would have
you believe.
Unfortunately,
the designers used the same TF-30 turbofan engines that helped doom the F-111B.
These engines would be the bane of the Tomcat’s existence as it led directly to
the loss of many aircraft and aircrew as they were not really designed to be
used in a fighter plane (!) A replacement engine might have been developed
sooner, except for the pain of dealing with the lingering financial costs of the
Vietnam war and the bureaucratic mindset which believed that losing trained
aircrew and Tomcats was more cost effective than funding a replacement engine.
Another of the Tomcat’s drawbacks was that it was a very large plane, the
largest two seat fighter in US Navy history, combined with its weak TF-30
engines wasn’t as good a dogfighter as the Navy or the movie Top Gun would have
you believe.
In the 70s and 80s, all VF squadrons (except those that served on the USS Midway and USS Coral Sea which were too small to handle the Tomcat) transitioned from the F-4 Phantom to the F-14 where they served as the primary Fleet Defender till complimented by the Ticonderoga class Aegis CGs.
The Tomcat project also proved to be a very expensive one as the problems with the engine, various cost overruns and cuts to the number of Tomcats bought nearly bankrupted Grumman. When the Shah of Iran looked for a plane that could intercept Soviet Mig-25 recon planes, Grumman leapt at the chance to supply an export version and won a contract for 80 Tomcats which saved both Grumman and the F-14 program. Of course, no one realized that this would backfire when the Shah was forcibly removed from power in 1978 as the Iranian revolution put religious extremists in power.
Like the F-15, the F-14 export version saw more action than their US counterparts as the Islamic Iranian AF Tomcats fought the Iraqi AF during the Gulf War of 1981-1988. The Iranian Tomcat pilots were well trained/skilled and kept the Iraqis from gaining air superiority. In those rare times when US Naval Aviators could go “fangs out”, the Tomcat showed it could fight well for such a large and underpowered plane. The Libyan Air Force found out how lethal US Naval aviators and the Tomcat could be on two separate occasions in the 80s.
 It was only
16 years after the Tomcat was introduced to the Fleet when the F-14B/A+ with the
much better F110 turbofan engines appeared giving the Tomcat the engines it
should have had 16 years earlier. The F110s gave it a 1:1 thrust to weight ratio
and improved dogfighting performance. Later electronics upgrades gave it the
ability to carry various air to ground weapons which allowed the Tomcat to be
used for long range strike missions which was necessary as the Navy had to
retire the Intruder without a true replacement. Unfortunately, the Tomcat did
not get any radar upgrades to fire the AIM-120 AMRAAM and when the Phoenix was
retired in 2004, it was a sure sign the end was near for the last ever Grumman
naval fighter. The Tomcat ended its 32 year association with the US Navy in
2006.
It was only
16 years after the Tomcat was introduced to the Fleet when the F-14B/A+ with the
much better F110 turbofan engines appeared giving the Tomcat the engines it
should have had 16 years earlier. The F110s gave it a 1:1 thrust to weight ratio
and improved dogfighting performance. Later electronics upgrades gave it the
ability to carry various air to ground weapons which allowed the Tomcat to be
used for long range strike missions which was necessary as the Navy had to
retire the Intruder without a true replacement. Unfortunately, the Tomcat did
not get any radar upgrades to fire the AIM-120 AMRAAM and when the Phoenix was
retired in 2004, it was a sure sign the end was near for the last ever Grumman
naval fighter. The Tomcat ended its 32 year association with the US Navy in
2006.
Iran is still flying an unknown number of them at the time of this review. These are kept flying in large part due to parts made locally, sold to them through IranContra and/or bought (through intermediaries and front companies) from clueless Pentagon bureaucrats in 2006 as they sold off remaining Tomcat part stocks as surplus forgetting that Iran (supposed threat) was the only other nation that flew the Tomcat. Naturally, this led to a stupid Pentagon over reaction that caused conflict with various airplane museums over the legality of their newly acquired Tomcats.
The Squadron
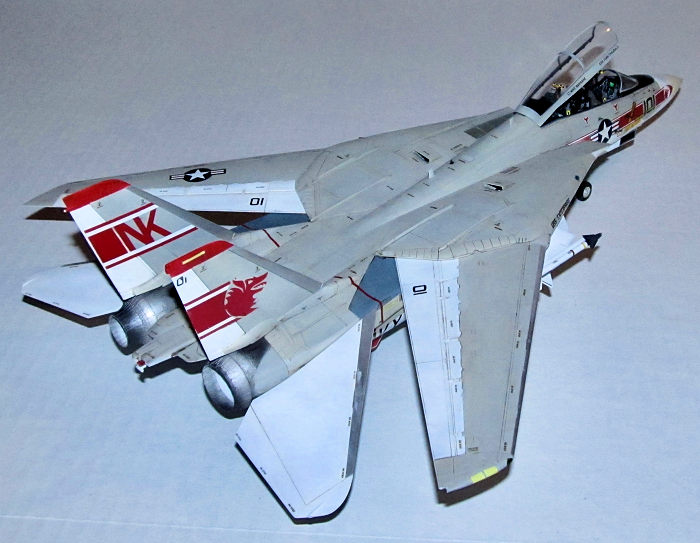
VF-1 Wolfpack and VF-2 The Bounty Hunters were newly established squadrons assigned to fly the Grumman Tomcat in 1972. They had no history or shared lineage with the previous VF-1s and VF-2s. VF-1's distinctive Wolf's head was designed by Grumman artist George M. Kehew.
The squadron first flew Tomcats off the USS Enterprise and participated in Operation Frequent Wind (the final US evacuation of Vietnam in 1975.) Among the VF-1's early squadron commanders was the late Ronald “Mugs” McGowan who shot down two Migs in the late days of the Vietnam war and later became the first CO of Top Gun.
 The
Wolfpack served mostly in the Pacific, Persian Gulf (the Tanker war) and Gulf
War (getting the USN's only air to air kill). They once flew 22000 hours without
an accident. The Wolfpack was assigned to the USS Enterprise, USS Kitty Hawk and
the USS Ranger over the period of its existence. In late 1993, the USN decided
to disestablish 1/2 the Tomcat squadrons due to limited resources and the
increasing age of the Tomcat airframes. Among them was VF-1 which was
disestablished on Sept 30, 1993.
The
Wolfpack served mostly in the Pacific, Persian Gulf (the Tanker war) and Gulf
War (getting the USN's only air to air kill). They once flew 22000 hours without
an accident. The Wolfpack was assigned to the USS Enterprise, USS Kitty Hawk and
the USS Ranger over the period of its existence. In late 1993, the USN decided
to disestablish 1/2 the Tomcat squadrons due to limited resources and the
increasing age of the Tomcat airframes. Among them was VF-1 which was
disestablished on Sept 30, 1993.
A side note: VF-1 was supposed to be movie Top Gun main character Lt Pete “Maverick” Mitchell's duty squadron, but instead of the lovely Wolfpack Symbol, the squadron emblem in the movie appears to be a diving giant red turkey, chicken or pigeon. Why they did this I don't know.
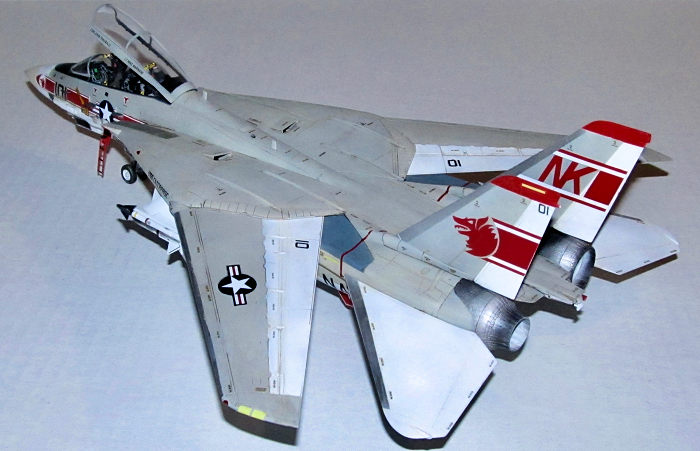
The Plane
158627 was part of the Block 65 group of Tomcats produced in 1973. 158627 was designated as NK101, the squadron commander's bird which was made famous by the Airfix 1/72 Tomcat kit. It served with the Wolfpack from the beginning till the end. The plane was later transferred to VF-101 Grim Reapers and stricken in 2000. Info from the wonderful F-14 Tomcat site, MATS.
| THE KIT |
When Tamiya came out with their F-14A in late 2016, it was met with a chorus of “WHY? WE GOT A GOOD ONE IN THE HASEGAWA KIT!” It turned out that Tamiya took a long hard look at the now 30+ year old Hasegawa kit and decided to make one better. Boy did they. Hasegawas's kit while nice looking is a pain in the rear to build (I can attest to among many others who suffered through a build.)
For all the details see Scott's preview of the F-14A kit.
| CONSTRUCTION |
I began the model by painting the main landing gear well walls (as well as certain fuselage and intake parts) flat white and then assembling them. Once done I added wheel well walls to the lower portion of the main fuselage. I then added the wing swivel mounts to the forward upper main fuselage and then mated the rear upper half of the fuselage to the forward half as per instructions. FYI, there is a step between the rear and forward section of the fuselage. It is supposed to be there so there is no need to sand it.
 Next step I
glued the wings together. Don't expect dropped flaps or slats on the Tamiya
wings, but that is a deliberate design compromise to improve ease of assembly.
This is fine with me as I remember how notoriously fiddly the Hasegawa Tomcat's
wings are to assemble.
Next step I
glued the wings together. Don't expect dropped flaps or slats on the Tamiya
wings, but that is a deliberate design compromise to improve ease of assembly.
This is fine with me as I remember how notoriously fiddly the Hasegawa Tomcat's
wings are to assemble.
The internal intake parts were glued together and the seams were filled with Vallejo plastic putty (excess putty removed with damp Q-Tips) and then re-painted flat white. The inlet fan faces were painted according to the instructions. The internal intakes were glued to the inlet pieces, but I did not add the intake chin lips as they would need to be painted silver.
The upper and lower fuselage halves were glued together. As is my norm now, I used CA glue to attach any visible seams while I used Tamiya Extra thin everywhere else. Unlike the Hasegawa kit, the fuselage is reinforced so that it will prevent flexing (and cracking of seams) that plagued me before. FYI, Tamiya designed the kit to minimize the seams that need to be dealt with. The intakes were then glued in place as well as the inserts. I ended up having to fill and sand off certain panel lines as per instructions.
I started building the cockpit. The tub was painted Xtracrylix Dark Gull Grey while the rest of the parts were painted as per instructions (as well as various small decals added when the paint was dry.) The cockpit is actually rather complicated so it takes some care and patience to build it. Tamiya tried to make installing the nose wheel wel easier than the Hasegawa nose wheel well. I painted the nose wheel well parts flat white and glued it together. The cockpit tub was glued onto the top of the wheel well.
T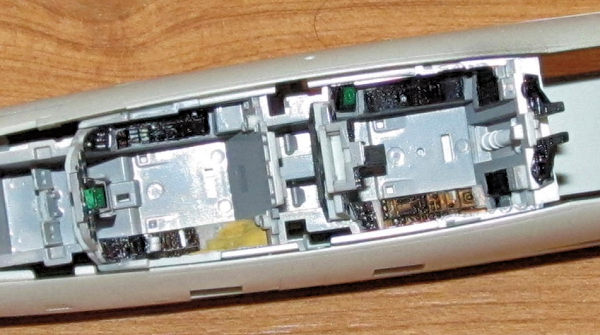 he
tub attaches to the nose portion of the fuselage parts extremely well. The only
part I had some issue with was the refuelling probe door. It is not a firm
attachment so I cut a thin strip of plastic card and glued it to the refuelling
probe door to hold it in place. I filled and sanded the seams of the nose before
attaching it to the main fuselage. The fit and engineering of the join is much
better than how the Hasegawa nose attaches.
he
tub attaches to the nose portion of the fuselage parts extremely well. The only
part I had some issue with was the refuelling probe door. It is not a firm
attachment so I cut a thin strip of plastic card and glued it to the refuelling
probe door to hold it in place. I filled and sanded the seams of the nose before
attaching it to the main fuselage. The fit and engineering of the join is much
better than how the Hasegawa nose attaches.
The rest of the Tomcat went together as per instructions.
I left off the Tamiya beavertail, the gun panels and cut off the chin mount because I replaced the Tamiya parts with Quickboost parts. The QB parts are better detailed and/or correct for the early F-14A which I was trying to model. I cut off the gun panel and attached the correct seven vent gun panel using CA glue. It took a bit of sanding to get it to fit and required some Vallejo putty to fill in the seams. Similar steps were done for the beavertail.
Once the seams were filled/sanded and when they all passed inspection I was ready to paint the model.
| COLORS & MARKINGS |
I normally preshade my models, but
did not do that with this one. I sprayed on flat white for the lower surfaces on
the fuselage (and landing gear doors) and the underside of the wings and topside
of the flaps When the paint was dry, I masked off the lower portions of the
fuselage, both sides of the stabilizers and the white portion of the wings
(which required a lot of cutting because they are not a straight line but there
are premade masks for sale for those if you don't want to do that). I sprayed on
Xtracrylix Light Gull Grey on the topside portions of the Tomcat as well as the
main landing gear doors. Next I masked off the leading edges of the tail and win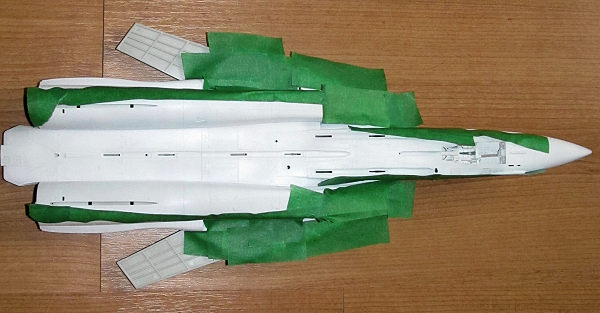 gs
and sprayed on Vallejo Metal Color Silver to represent the corroguard that was
painted on the leading edges. Later on in the build I painted the landing gear
legs flat white and the rubber portion of the tires NATO black.
gs
and sprayed on Vallejo Metal Color Silver to represent the corroguard that was
painted on the leading edges. Later on in the build I painted the landing gear
legs flat white and the rubber portion of the tires NATO black.
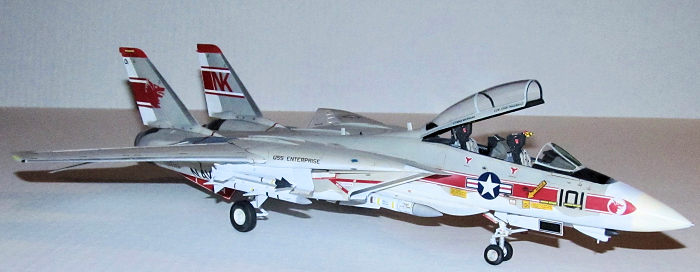
The exhausts were painted according to instructions. Next the fuselage air bags that inflate behind the wings depending on the sweep were painted Ocean Gray as per instructions. I used the kit supplied masks for the canopy parts and sprayed on flat black for the interior color then Light Gull Grey for the exterior color. Later on I masked off the various areas to spray on the black for the glare panel. Lastly, I masked off the windscreen center panel and used a diluted mix of clear green and gloss (with a 1:3 ratio of paint to gloss) to get an approximation of the light clear green tone (the reason for this was the windscreen acted as the HUD in the A series Tomcat.)
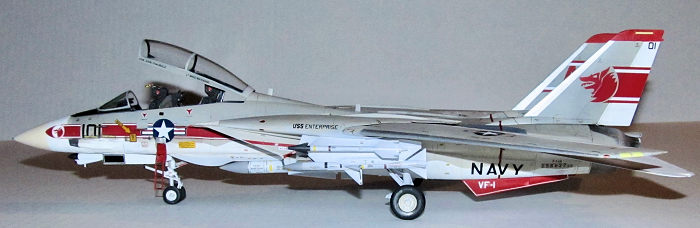
The glare panel and nose proved to the most difficult part of the painting as it was the last time I built a 1970s era Tomcat. It took several tries to get the correct shape for the white band around the nose and the radome color of the nose (I used Model Master Acrylic Radome Tan). The glare panel needed a couple of tries as I ended up with overspray and leaking underneath the mask. I had a hard time cutting the semicircle using scissors and my circle cutter and ended up improvising. I took a single round wheel mask from an unused mask set for tank road wheels to provide the perfect curve needed for the glare panel. Finally, I sprayed on Tamiya gloss over the model in preparation for the decals. The missiles were painted flat white and light grey as per instructions.
I have always had a fondness for the high viz VF-1 Wolfpack
markings ever since I saw the 1970s era Airfix 1/72 F-14A Tomcat. When I was a
kid, a childhood friend of mine built one and later gave it to me when he moved
away so it became a favourite model I played with. A couple of years later, the
model was repainted (badly) when the decals wore off due to heavy handling. It
did not survive my mom's great Model Purge of 1984. The Wolf's head on the tail
and the dark red flashes have always appealed to me so I was determined to make
one. I like th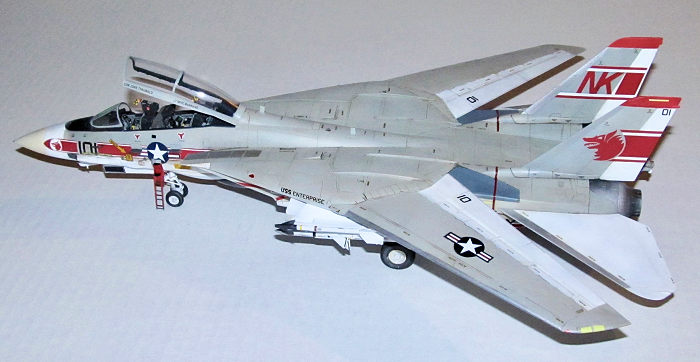 e
kit's markings, but I preferred to have a Wolfpack Turkey on my shelf (this is
the 2nd time I've passed on building a Turkey in VF-84 Jolly Rogers'
markings.)
e
kit's markings, but I preferred to have a Wolfpack Turkey on my shelf (this is
the 2nd time I've passed on building a Turkey in VF-84 Jolly Rogers'
markings.)
Several years ago I purchased Fightertown Decal's Wolfpack Sheet 48014 for this reason. At the time I bought these decals I had hoped to be over the trauma of building the Hasegawa F-14A and build another with these markings. That changed when I got my hands on the Tamiya F-14A early in 2017. The decal sheet has markings for most of the planes flown in the first cruise, but I opted to use the decals for the famous VF-1 NK 101 Tomcat.
I began adding the main decals and found out that the Fightertown decals were kind of fragile as they chipped on the edges or broke in two. Like my previous Tomcat, the decaling stage took much longer than I expected. I did all the decals on the tail fins and starboard side first. I fixed the chipped decals by brush painting them over with Model Master Acrylic Insignia Red. I did not do the portside as I needed to cut and remove the portions of the decals which were where the foot step panels and ladder were located. I procrastinated for a couple of weeks because of how fragile the decals were. Finally I bit the bullet and cut the decals. Lucky for me, the portside banner did not break up where I cut it. Unlucky for me, it broke somewhere else and is sort of noticeable.
Afterwards I added all the
stencils. The newer Tamiya decals are thinner than the thick ones, but I find
they tend to stick to the paint and refuse to slide easily. Eventually I added
all the stencils including the missile stencils. I also had to use some Hasegawa
decals (for the slime lights) as I misplaced the Tamiya and Fightertown slime
light decals and needed replacements.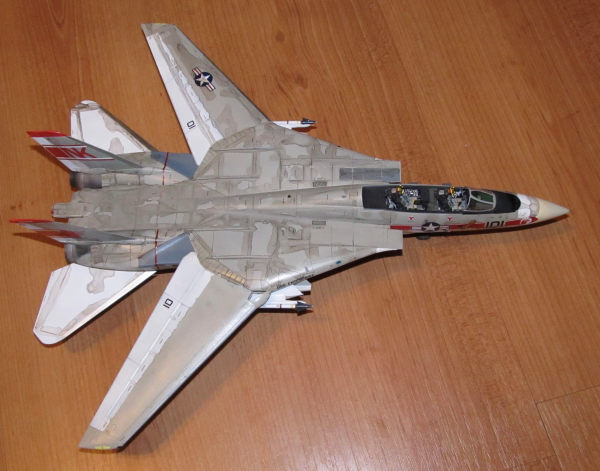
There are plenty of photos of pre first cruise VF-1 Tomcats available and they show quite clean Turkeys. The ultra clean look appears a bit odd to me so I opted to use a light watercolor wash of one drop of dish soap, one drop of black, two drops of burnt umber and five drops of waters. This worked well to lightly highlight the panel lines and some operational smudge. Unfortunately, I applied the wash just before I left for work which came back to burn me as the watercolor wash soaked into the water based acrylic paint (especially the white paint!) when I tried to remove the excess with damp Q-Tips. I buffed off most of the stains using a 6000 grit polishing cloth. The rest of the stains were painted over using post-it notes as masks so as not to remove the decals. Once everything was done, I sprayed on a couple of thin coats of Tamiya Flat Coat to seal everything in.
| FINAL CONSTRUCTION |
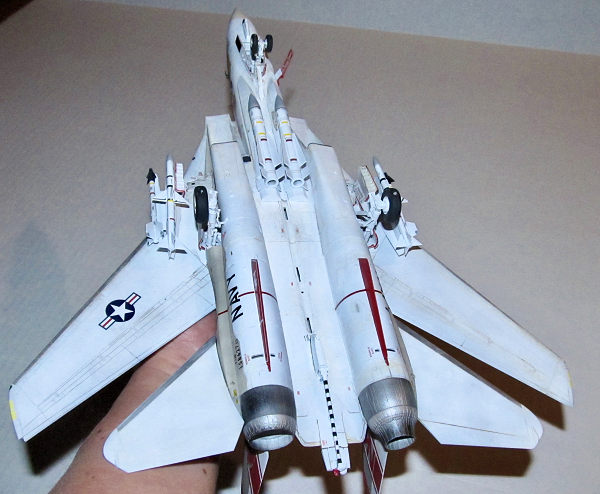
First off I glued on the twin tails, the fuselage air bags and after painting, but before decals. Next the wings were inserted into the swing wing mechanism but I did not glue them in place. Tamiya allows you to pose them open or closed with the appropriate inflated air bags and wing sealing plates, but I glued in both the air bags and sealing plates for the swept back wing.
After the landing gear was painted, they were assembled and inserted into place. The one thing I liked was that Tamiya split apart the nose landing gear so only the anchor/mount was needed when assembling the nose wheel well but I still broke off part of the actuator anyway (no good deed goes unpunished.) I repaired the actuator and glued the nose wheel landing gear in place. The clear part for the landing lights was painted flat white and then the lights were painted clear green, clear red and clear orange using a toothpick dipped in those colors.
 The
missiles were added as per Fightertown Decals instructions. The Wolfpack carried
at most 2 Phoenix AAMs, 2 Sparrow AAMs and 2 Sidewinder AAMs which is what I
used. Tamiya designed the outboard missile racks with a slot for the Sparrow's
upper fin so that you don't need to clip it off. The fit is so good that you
don't even need glue.
The
missiles were added as per Fightertown Decals instructions. The Wolfpack carried
at most 2 Phoenix AAMs, 2 Sparrow AAMs and 2 Sidewinder AAMs which is what I
used. Tamiya designed the outboard missile racks with a slot for the Sparrow's
upper fin so that you don't need to clip it off. The fit is so good that you
don't even need glue.
I added the prepainted and decaled ejection seats into place with a drop of CA glue. I used the ejection pull handles from the Tamiya kit which were painted yellow and black with a fine brush. Soon after I completed working on this I saw a build article on another site which used yellow and black thread instead of plastic loops. Next time, I guess.
The canopy masks were removed and the various painted frame parts were glued onto it using white glue so as to prevent Tamiya clear from accidentally crazing the clear sections. It was put into open position and rested on the canopy actuator which was already glued in glace. The windscreen was glued on with a thin bead of white glue.
Next the various pre-painted fins and antenna were glued in place along with the engine nozzles. I ended up having to repaint the Gull Grey portions of the engine nozzle parts because it was much darker in tone than the rest of the Tomcat and it looked quite bad. I had to use pre cut Post-It notes to mask off those areas and prevent overspray. The various landing lights were painted according to the instructions.
Lastly, I clipped off the mounting strip provided by Tamiya and then added the Quickboost early chin mounted IR sensor resin part secured to the Tomcat with a drop of CA glue. The fin and clear resin red light was glued in place and I was finally finished this F-14A.
| CONCLUSIONS |
The Tamiya F-14A Tomcat is an excellent update to what has traditionally been a difficult model to build. It still isn't all that easy due to the number of parts and build, but it is certainly a giant step up from the venerable Hasegawa version in terms of both detail and ease of build.
Despite it being a Tamiya kit, I don't recommend this kit for the beginner. However if you have a few kits under your belt and don't mind adding lots of stencils then I can recommend this kit for you. There are a few areas that can be improved with aftermarket parts, but not that many. Even straight out of the box, the Tamiya makes an excellent kit.
Copyright ModelingMadness.com.
March 2015
If you would like your product reviewed fairly and fairly quickly, please contact the editor or see other details in the Note to Contributors.
Back to the Main Page Back to the Review Index Page Back to the Previews Index Page