| TAMIYA 1/48 TOMCAT KIT DESCRIPTION |
Hasegawa provided the best F-14A/B and D Tomcat’s in 1/48 for many years. Now, the best F-14A is provided in this release from Tamiya. Tamiya’s F-14A features excellent molding, elegant recessed panel lines and petit fastener/rivet detail. This kit addresses any disappointment you may have had in the past with other F-14A Tomcats in 1/48th scale. The intakes are correct, the forward fuselage to mid-fuselage joint design is firm and secure with no visible mating joins, and the integrated boat tail (it is part of the fuselage halves) will clearly prevent the kinds of ugly fit issues that I had with my Hasegawa kits. The boat tail itself, parts D25 + D26 is separate to allow future releases with the different boat tails used on F-14’s. Since the issue of panel lines and rivets comes up in any model review rest assured they are no distraction on this kit. Tamiya got the rivets right, showing a consistent attention to detail and accuracy.
When you assemble the kit everything fits. Almost no filler is required for gaps or problems. I say almost because some might want to clean up some spot or perceived gap here or there but that is a rare individual with AMS mental issues perhaps. I only put a trace of putty in the rear of the airframe.
Tamiya provided locating pins and tabs at all the right places. After building up the cockpit it is very securely held in place. Overall its assembly approach uses an internal bracing structure whereby as you add parts they layer together forming a solid base. This dimensional rigidity really helps provide the support needed for the complex geometries of the F-14 Tomcat structure. I think it is brilliant and missing in so many other models. This approach does not add to any building complexity – just adds to building and modeling satisfaction. The way the main wing is built up with an inner part (parts A3+A4) and removable wings (parts A1, A2, A7, and A8), using an interlocking gear approach for the wing sweep mechanism, all securely held together with screws and washers is just superb.
Assembly starts with the cockpit. The cockpit tub works as the foundation for a number of separate instrumentation section parts that can be easily painted before assembly. The throttle is the only part I would have preferred to see as a separate component for added realism. Cockpit detailing will suffice OOB for most modelers. All that is needed for most of us would be some etched seat belts and maybe the ejection seat face curtain pull handles and you are good to go. Using some cockpit dial decals from Mike Grant, AirScale or Fightertown Decals provides a nice finishing touch.
Replacement resin cockpits are available from Aires as well as Eduard. The Aires cockpit set also includes a resin cockpit frame assembly with the clear kit cockpit part, part # J6, being attached to that assembly. The rest of the Aires cockpit appears to be similar in shape and dimensions to its Hasegawa predecessor and not a new resin casting with any dimensions changed for the Tamiya kit. That means be prepared for lots of cutting, sanding and dry fitting. Also, the Aires pit does not have any adaption for the Tamiya cockpit locating pins and tabs. The Aires pit details look beautiful with finely sculpted components, providing a real gem of a cockpit. I enjoyed using it with my Hasegawa F-14 Tomcats but did not appreciate the dry fitting and considerable fit issues required to get the fuselage to close together and to properly position the cockpit.
Eduard also has a resin cockpit which I have not yet completed since it is for another planned build of the Tamiya 1/48th Tomcat. From other build reviews it appears Eduard has recognized the need for properly preparing the overall resin cockpit to fit within the fuselage with minimal dry fitting using Tamiya’s slot and tabs for alignment.
The instructions, steps 1 - 4 have you start assembly with the cockpit. Steps 5 – 6 deal with the nose landing gear bay and cockpit attachment to this bay. The connections are so tight you realize Tamiya really is fantastic by providing parts that can be easy painted since they are flat injection moldings with excellent three-dimensional casting. Once painted they click together unlike Hasegawa’s loose fitting components. For those of us like me, Tamiya engineered the tabs and connections using different sizes and shapes to prevent gluing the parts incorrectly.
Step 7 has some interesting components. This step has you enclose the cockpit into the front fuselage section. Notable pieces are the 20mm gun plate, part B11 and part B1 for the gun gas purge vent. I have seen four different gun gas purge vents used by the F-14. If you want a really accurate build then in the construction section I will detail what to look for when you want to have a reasonably accurate model that is using the correct decal and color scheme. Tamiya on its part B18 provides the third type of vent and it is correct for the three versions on the decal.
Step 8 has a part, D18 for the chin pod, which shows Tamiya’s future thinking. This part is correct for the versions on the kit decal sheet. The Tomcat used several varieties of chin pods (seven different types of TCS/IRS on operational Tomcats) and a new part similar to D18 would be needed to correctly portray the range of color schemes aftermarket decals represent. Hasegawa provided several versions of chin pods in their kit plastic sprues. In step 9 and 10 you add the wings which have an interlocking sweep mechanism tied together with metal washers, screws and plastic washers. Step 10 adds the air intake ramps.
Step 13 is where Tamiya makes the venerable Hasegawa Tomcats look bad. The multi-part main landing gear side-walls are assembled and installed into the lower fuselage half. They fit – perfectly and you can close the top fuselage half onto the lower part in step 14 – imagine that. This is where many Hasegawa F-14’s went onto the unbuilt shelf-of-doom. Steps 15, 16, 17 have you assemble and add the intakes to the rear fuselage section. This is also where many Hasegawa F-14’s went onto the unbuilt shelf-of-doom never to see the light of day. With Tamiya it is just time to move on when the glue dries. Step 18 has you join the front fuselage to the rear in a very smooth and secure coupling. Steps 19 – 29 have you add engine exhaust components, landing gear assembly and attachment, doors and landing hook. Steps 30 – 35 have you add the AIM-54A/E Phoenix, wing pylons and missile armament. Unlike Hasegawa, Tamiya provides a complete, well molded, armament load with complete decal stenciling as well. For the detail enthusiasts note Tamiya did not use different Phoenix missile serial numbers on their stencils. You can fix this with one of the aftermarket F-14 Tomcat decal detail sets. Step 36 has you assemble and attach the vertical tail fins. The attachment base helps you maintain the accurate 5 degree tail alignment since they are a keyed attachment.
Steps 37 – 45 has you add the ejection seats, air crew and all the remaining small components like the air refueling probe (the refueling probe is not found on the Hasegawa kit). Paint and decal the bird and you are done! Tamiya has chosen to do things a little differently regarding the parts breakdown of this kit and it is a definite improvement. For example, the forward windscreen is molded as part of a larger extended part. The part includes the sides and front of the upper nose section. This eliminated the problem of gluing, fairing in a mismatched windscreen to fuselage join, and seam-filling of the windscreen’s edges found with the Hasegawa kit. The problem getting the nose to fit without a step is gone since Tamiya made the fuselage include a nose by molding the front section into two halves, a left and a right component, parts B1 + B11 that include the nose cone.
We should expect future re-boxing’s of this kit representing the other F-14B & D Tomcat versions. During assembly and reviewing the assembly instructions you can find parts that can be replaced to permit changes to variant-specific areas such as the gun gas purge vents, boat tail, chin pod, and aft fuselage engine area for engine changes.
For example, the Phoenix pallets have modular fittings that can fit a BRU-32 bomb rack. There are unused parts on the kit sprue trees that can be used for AIM-9L’s as well. I for one can’t wait for more Tamiya F-14 versions providing the earlier and later F-14A models, as well as the GE-powered F-14B and F-14D’s. With just a few parts for “Bombcats” such as the LANTIRN pods with the correct pylon for holding the LANTIRN pod on the F-14 and the LAU-137 sidewinder launcher rail introduced in 1997 with its BOL countermeasures dispenser you will be good to go. There are many potential configurations for air-to-ground loadouts that were seen on Tomcats between 1995 and 2006 that can be enhanced with some resin aftermarket weapons.
The decals do not disclose the printer so they may be printed in-house by Tamiya. They are beautiful, in register, with great color opacity and saturation. The decal is vibrant even replicating the intricate designs on the Iranian flag and various stencils for example. Thin carrier film and lots of stencils are on this kits sheet.
So the kit is perfect? Well, it is a fantastic kit but there are a few items that I would not call imperfections or errors as much as call out some spots that have potential alternatives you may prefer. I am 100% satisfied and very happy with this kit so these comments are just to record some observations. I wish the formation and beacon lights parts were separate on a clear or transparent sprue tree. There are lots of lights on the fuselage and tail that look better using transparent plastic.
The Tamiya kit does not offer the open of lowered flaps and leading edges. I like to have a choice of extending the wings and dropping the flaps for a landing or takeoff appearance. For some curious reason I like to see the F-14 Tomcats speed brakes open, maybe it is the contrast of the red exposed inside area that adds an interesting dimension to a model? For other airframes I usually prefer closed speed brakes to maintain a sleek look and because they are usually closed when the airframe is stationary. I have never enjoyed the look of extended glove vanes so a decal for their panel line works for me. Having said that glove vanes are missing from the Tamiya kit – but the panel line is there.
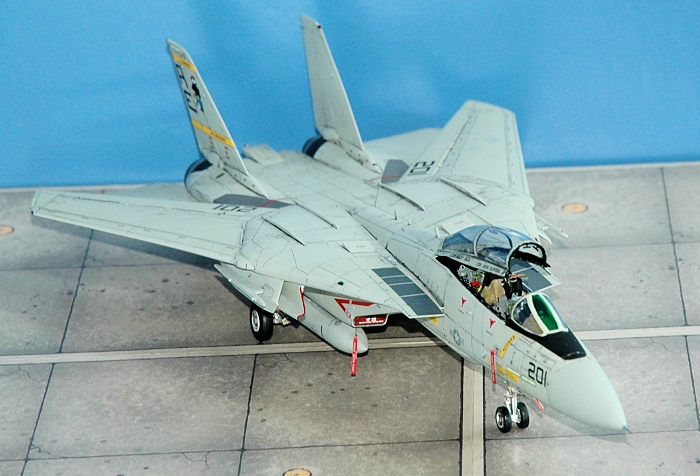
The Tamiya boarding ladder is nice but I prefer a thinner etched metal replacement. The canopy hooks are represented in plastic on the insides of the canopy. I dry brushed them in silver, and they look acceptable. My choice is they would look better if they were extended below the edge of the canopy rail. Most F-14 Tomcat photos of an open canopy show a prominent saw-blade look with all the extended canopy closing hooks clearly visible. Last item on the nice to have but missing list is there is no tubing or plumbing inside the canopy for the defrosting air pipes which are visible inside the canopy.