| KIT #: | 04894 |
| PRICE: | ~15 Euros |
| DECALS: | Two options |
| REVIEWER: | Mario Del Toro |
| NOTES: | Italeri tooling. Series Españolas SE3472 50º Aniversario Ala 46 decals |
| HISTORY |
 The 46 Ala
Mixta (mixed airwing), from Gando airbase (next to to Gran Canaria’s airport,
you must have seen it if you have been there (hangars on the right of the
runway)), was established on 1965 in Gran Canaria. Back in the day, its
squadrons were equipped with DC-3, He111, Bf-109E, Chirris, Breguets and, the
SAR squadrons had Dornier Wal Seaplanes for their objectives. Later, the
Buchones arrived, together with son Ju-52 and T-6 Texans (the older versions).
Going along, CASA Saeta came, together with helicopters for the SAR squadron.
Going along, some Coribous and Sabres came and went. Now in 1982, we are in kind
of modern aircraft ages, with F-5, C212 and Puma helicopters. While this was
going on, Fokker F-27 Friendship and Mirage F-1 were flying through Canary
skies.
The 46 Ala
Mixta (mixed airwing), from Gando airbase (next to to Gran Canaria’s airport,
you must have seen it if you have been there (hangars on the right of the
runway)), was established on 1965 in Gran Canaria. Back in the day, its
squadrons were equipped with DC-3, He111, Bf-109E, Chirris, Breguets and, the
SAR squadrons had Dornier Wal Seaplanes for their objectives. Later, the
Buchones arrived, together with son Ju-52 and T-6 Texans (the older versions).
Going along, CASA Saeta came, together with helicopters for the SAR squadron.
Going along, some Coribous and Sabres came and went. Now in 1982, we are in kind
of modern aircraft ages, with F-5, C212 and Puma helicopters. While this was
going on, Fokker F-27 Friendship and Mirage F-1 were flying through Canary
skies.
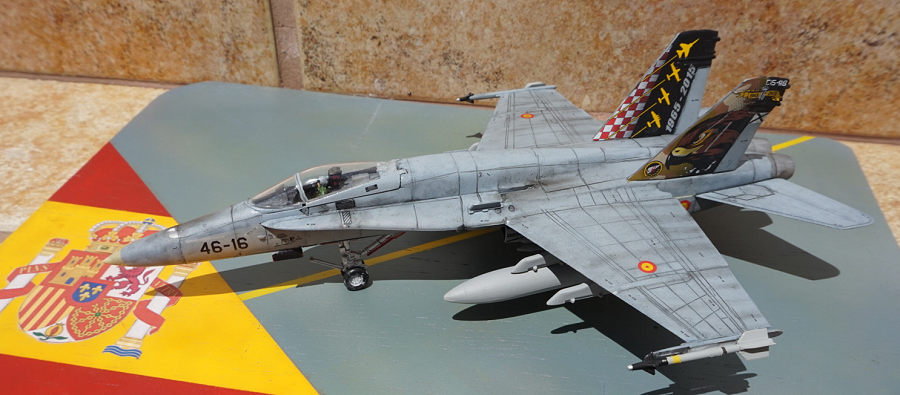
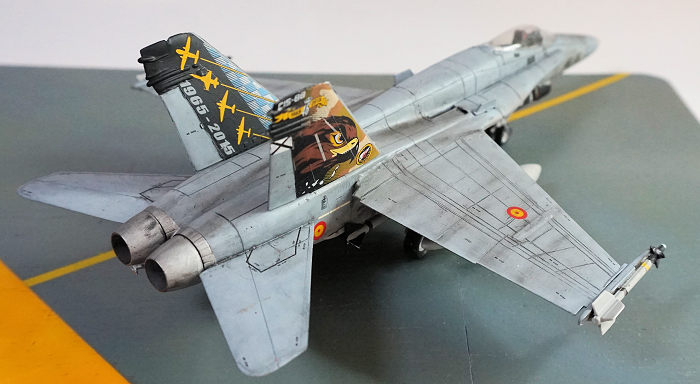
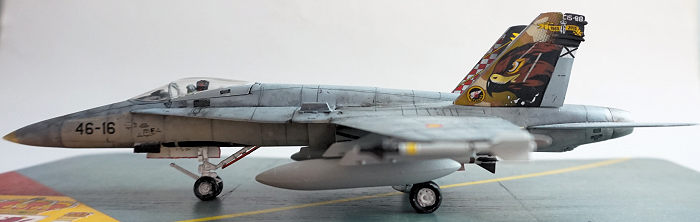
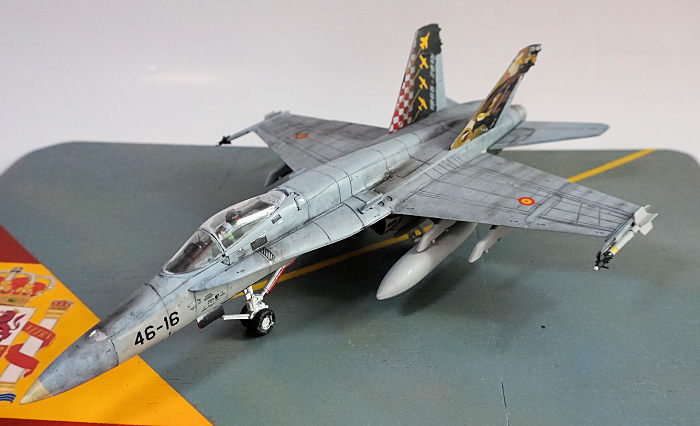
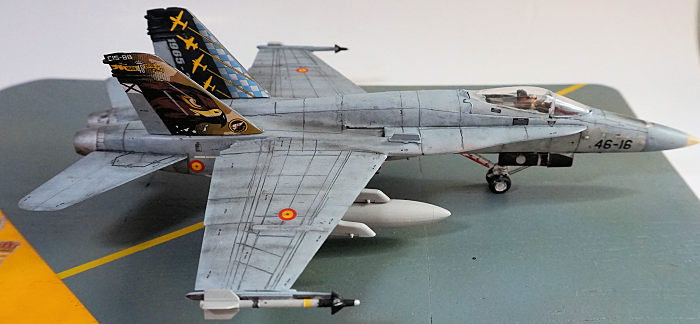
It wasn’t until the late eighties or early nineties that F-18A started to arrive. These were surplus from the US Navy (so, already with some flying hours), and came still wearing their Navy aggressor schemes. The aircraft I modelled is a member from the 462 escuadrón, as seen in 2016, with big decorations on its tails as a celebration to the 50 years of the airwing.
| THE KIT |
 I received
this kit as a present last Christmas, and it is a Revell 2014 release of the
1980 Italeri mould of the hornet. Being the age that it is, there is a little
bit of flash, especially around the one piece bang seats (that you’d better
replace), and it has raised detail. Even if you only get decals for a single
seat F-18C, the kit comes with the pieces necessary to make a double seat
aircraft.
I received
this kit as a present last Christmas, and it is a Revell 2014 release of the
1980 Italeri mould of the hornet. Being the age that it is, there is a little
bit of flash, especially around the one piece bang seats (that you’d better
replace), and it has raised detail. Even if you only get decals for a single
seat F-18C, the kit comes with the pieces necessary to make a double seat
aircraft.
Wheel wells have decent raised detail, as do the side panels (no detail in the instrument panel), but you have a decal for the main instrument panel. You have options for raised or lowered landing gear and canopy.
| CONSTRUCTION |
All starts, you guessed it, in the cockpit. I just painted most of it Tamiya XF-54, panels picked up in XF-1 flat black and the glare shield also flat black, as did the ejection seat, that was had its cushions painted in dark grey. That is trapped between the two nose halves, with the nose wheel well under it. Surprise surprise, we have massive gaps. Break out Tamiya’s light-curing putty and fill them in. Next, glue the nose to the rest of the fuselage and the wings to the stub wings that are already moulded with the bottom main fuselage. More huge gaps, more putty, more sanding.
 Then I had the
amazing idea that I didn’t like raised panel lines (most of them had already
gone away while sanding the putty. Cue the sandpaper, 800 grit and wetsanded all
of the airframe. Next, I found really good blueprints for the A version of the
Hornet in Google Images, I printed them, took some measurements from the
blueprints and the aircraft and enlarged the blueprints in my photocopy machine.
Let the panel line marking in the plane begin. I marked all of the panel lines
in the airframe and rescribed them with a drawing compass needle chucked in a
knife handle, using dymo tape as a guide. After this, a added some lead sinkers
to the separate nose cone for good measure, ad glued it to the rest of the
airraft.
Then I had the
amazing idea that I didn’t like raised panel lines (most of them had already
gone away while sanding the putty. Cue the sandpaper, 800 grit and wetsanded all
of the airframe. Next, I found really good blueprints for the A version of the
Hornet in Google Images, I printed them, took some measurements from the
blueprints and the aircraft and enlarged the blueprints in my photocopy machine.
Let the panel line marking in the plane begin. I marked all of the panel lines
in the airframe and rescribed them with a drawing compass needle chucked in a
knife handle, using dymo tape as a guide. After this, a added some lead sinkers
to the separate nose cone for good measure, ad glued it to the rest of the
airraft.
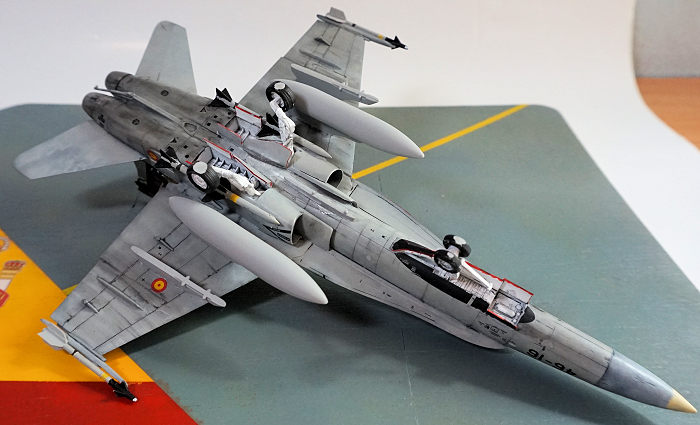
Preparing for paint, I glued the front windshield, masked with Tamiya tape, and stuffed the cockpit full of wet tissue and added tape to cover that. Glued the gear doors with white glue, as to keep them removable for later, after giving a coat of gloss white to all undercarriage elements.
| COLORS & MARKINGS |
 Now in the
paint table, I black based the whole aircraft with X-1, in preparing for a beat
up paintjob. Cue Series Españolas’ decals paint references. I left my vertical
tails unattached to the aircraft and painted black, except the rudders, which
were painted upper fuselage colour. I started with the lightest color, the
bottom one which was Light Ghost Grey FS36375, which I substituted for Tamiya
XF-83, starting with a squiggle pattern, and then blasting it from far back
until it looked right, then onto the top colour, Dark Ghost Grey FS 36320, using
Vallejo 71.120. I painted the metal parts with Vallejo Model Air Chrome and the
nose radome with Vallejo 71.074. All of the above colours are airbrush-ready
acrylics, except the Tamiya ones, which were acrylic lacquers, thinned with
X-20a thinner.
Now in the
paint table, I black based the whole aircraft with X-1, in preparing for a beat
up paintjob. Cue Series Españolas’ decals paint references. I left my vertical
tails unattached to the aircraft and painted black, except the rudders, which
were painted upper fuselage colour. I started with the lightest color, the
bottom one which was Light Ghost Grey FS36375, which I substituted for Tamiya
XF-83, starting with a squiggle pattern, and then blasting it from far back
until it looked right, then onto the top colour, Dark Ghost Grey FS 36320, using
Vallejo 71.120. I painted the metal parts with Vallejo Model Air Chrome and the
nose radome with Vallejo 71.074. All of the above colours are airbrush-ready
acrylics, except the Tamiya ones, which were acrylic lacquers, thinned with
X-20a thinner.
On to decals. It is now time to use the beautifully designed decals, which are what you can expect about something printed by Cartograf in Italy, thin, opaque and in register. They all snuggled with a bit of Microsol, except the tail fin decals, which I heated with a hair dryer until they conformed all of the details.
I weathered the aircraft heavily with black oil paint (washes) after I gloss coated the aircraft with X-22 Clear, and add some grime, also with black oils and some flat black mixed with clear varnish after I matt coated the aircraft. Last painting I did was another flat coat to secure the weathering in palce.
| FINAL TOUCHES |
 Realising
that I wanted to add the AIM-7 Sparrow, and Revell had moulded the cheek
pylons already with the adaptors for targeting and travel pods, I broke out
the dremel and grinded them down with a milling cutter (I repainted them). I
then popped out the landing gear doors, cut them apart, painted the red bits
on them and glued them with CA to the aircraft. I did the same for the
already painted pylons, and robbed some sidewinders from the spares box,
painted the external stores and added them also with CA.
Realising
that I wanted to add the AIM-7 Sparrow, and Revell had moulded the cheek
pylons already with the adaptors for targeting and travel pods, I broke out
the dremel and grinded them down with a milling cutter (I repainted them). I
then popped out the landing gear doors, cut them apart, painted the red bits
on them and glued them with CA to the aircraft. I did the same for the
already painted pylons, and robbed some sidewinders from the spares box,
painted the external stores and added them also with CA.
I then got a pilot from an Airfix Harrier, painted him with the squadron badges and added him, along with the seat to the cockpit. The canopy sits unglued so I can get the pilot out if I want.
| CONCLUSIONS |
Although a good kit, I doubt I will ever build one again, especially if one sees how good the offering by Academy is. I am pleased with the result and with the decals. I will use these decals on future projects more than probably.
| REFERENCES |
Google Images
https://publicaciones.defensa.gob.es/media/downloadable/files/links/P/D/PDF628.pdf for the history (it is in Spanish, tho)
I wrote to members of the squadron for most of the questions I had.
Copyright ModelingMadness.com
If you would like your product reviewed fairly and fairly quickly, please contact the editor or see other details in the Note to Contributors.
Back to the Main Page Back to the Review Index Page Back to the Previews Index Page