Academy 1/35 AH-1Z 'Viper'
| KIT #: | AC 12127 |
| PRICE: | around $50.00 |
| DECALS: | Four options |
| REVIEWER: | Donald Zhou |
| NOTES: | Advantages: Well detailed, plenty of weapons and Big. Disadvantages: Some minor fit problem, instructions all over the place, no folding rotor options, no crew. |
| HISTORY |
The AH-1 Cobra gunship/attack helicopter was developed during the Vietnam War. That war eventually became known as the “helicopter war” because there were very few roads in and out to the cities from the country side and most of the areas are jungles that are not suited to any vehicles. Since any roads are choke points waiting for an ambush, American soon started using the UH-1 Iroquois to transport troops in and out of “hot” zones. The Americans quickly found out the “Hueys” were vulnerable to attack and once landed, the troops need fire support on call in an instant. To this end, they started to arm the Hueys with various rocket, gun pods and side machine guns. However, the Hueys were first and foremost a troop transport helicopter and didn’t have the armor or carrying capacity to really be an armed one. What was needed was a helicopter built from the ground up specifically for the job.
The fact of the matter was, U.S. was exploring
armed helicopter for the escort role long before Vietnam. The war pushed
that to the forefront. Bell Helicopter, the maker of the Huey quickly came
up with the solution. To save time and money, they adapted the engine,
transmission and rotor system from the Huey, dropped the fuselage and
designed a new one around the system. The new fuselage was very narrow, only
slightly more than three feet wide in some places. Two crew members will
pilot the helicopter. The pilot sits up and behind the co-pilot/gunner, who
is at the front. Armor panels protects various vital places such as the
cockpit and engine compartments. For armament, a nose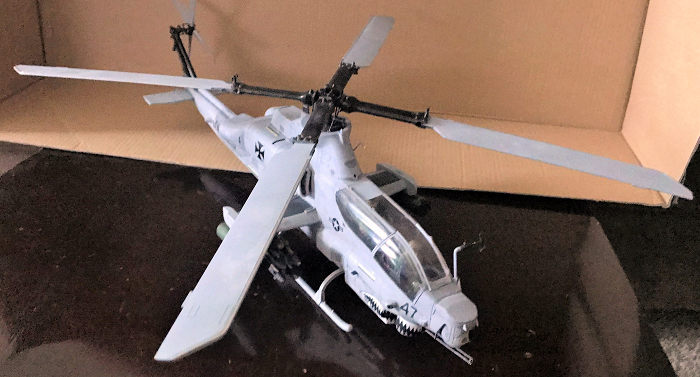 turret with a mini-gun was standard equipment. Further armaments, including
more mini-guns, rocket pods and later on, even guided missiles can be armed
on to two small wings mounted mid-ship, each with two hard points for
weapons. Early versions did not have sighting units so everything was done
by the naked eye, later version started to carry far more complex aiming
equipment.
turret with a mini-gun was standard equipment. Further armaments, including
more mini-guns, rocket pods and later on, even guided missiles can be armed
on to two small wings mounted mid-ship, each with two hard points for
weapons. Early versions did not have sighting units so everything was done
by the naked eye, later version started to carry far more complex aiming
equipment.
When it was first introduced, the “Cobra” gunships quickly proved to be very popular. Since it didn’t have any troop carrying ability, it was light, fast and very maneuverable. This is something I still don’t understand about Russians attack helicopters like the Mi-24 (comparing this kit to my Trumpeter 1/35 Mi-24….The Hind fuselage is about twice as big as the Cobra. Hence why it had stayed in the box all these years and will remain so for the foreseeable future….That stupidly big main rotor…….) and even their Mi-28 required carrying at least three troopers, which enlarged the helicopter and reduced its carrying capacity. In Vietnam, it was quickly used as an escort for the Huey, often peppering landing zones to “soften” them up before the troop carriers arrived and then staying on station to provide needed fire support should the troops on the ground become stuck and there was at least one incident where a bunch of Cobras were providing ground support when a F-100 Super Saber was shoot down. The pilot ejected close by and one the Cobra, being covered by its brethren, was able to move in and picked up the downed pilot on its skid. In fact, by its peak, out of total of 1,110 AH-1G Cobras built, nearly 1,018 were in service in Southeast Asia. Of these, over 300 were lost, either shot down or in accidents.
The next development of the Cobra came from the
U.S. Marine Corp. When it was first revealed, the Marines quickly became
interested cause the helicopter was an obvious fit to their need for close
ground support and can be easily operated off of an amphibious assault ship.
However, two requirement made the Army and Pentagon bulk at the request.
Namely, Marines always wanted two engines for safety over water and a much
heavier and harder hitting cannon in the nose turret. Army and Pentagon felt
commonality would override these requests. In the end, the Marines won and
the AH-1J, with two engines was developed along with the capacity to carry a
M197 three barreled 20mm gatling cannon in the nose turret. This is a
development of the famed M61 Vulcan gatling cannon in fighter jets, but
reduced to three barrel to save ammo and to lighten it. These were used in
the tail end of the Vietnam War. Further development led to the AH-1T.
These, along with their Army brethren were soon tasked with another
important mission, interdiction of Soviet armor in Europe. To this end,
various sensors, mounted to the nose were added along with more powerful
engines and carrying capacity, weapons were expanded to include the TOW,
Tube-launched, Optically tracked, Wired guided anti-tank missiles and
various rockets. Of these, 202 versions of the AH-1T were sold to Iran, then
under Shah’s control. After the Islamic Republic took over, they were
pressed into Islamic Iran service and were heavily used alongside the older
AH-1G’s in the “Two I”
 or
Iran and Iraq War were they performed exceptionally well, especially in the
anti-armor role. Overall, these Cobras saw the heaviest usage of the type in
any conventional war, were many were destroyed simply because the Iranians
used them and flew them until they simply can’t fly any more. Victories
included the first ever dogfight between helicopters, between the Iranian
AH-1T’s and the Iraqi’s Mi-24 Hind. As for the U.S. Army, they eventually
stopped development of the Cobra in favor of the much larger AH-64 Apache
attack helicopter. The Marines however, continued to favor the lighter
copter since it’s very small and narrow, meaning it can be fitted far more
easily on a small amphibious assault ship. The next major development was
the AH-1W Super Cobra. This is not just a step up, but several floor up from
the previous versions. These include two powerful engines mounted on top
mid-ship of the helicopter with improved exhaust outlets. These engines
allowed the helicopter to finally carry the much larger Hellfire missile.
Much improved sensor suite that allowed the helicopter to fly in any weather
and at night, better ballistic protection and improved wider cord blades.
These, alongside their older versions, all served in the first Gulf War,
where they destroyed numerous Iraqi tanks and other vehicles and provided
close support to Marines on the ground, including the Battle of Khafuji.
After the war, further improvements were explored.
or
Iran and Iraq War were they performed exceptionally well, especially in the
anti-armor role. Overall, these Cobras saw the heaviest usage of the type in
any conventional war, were many were destroyed simply because the Iranians
used them and flew them until they simply can’t fly any more. Victories
included the first ever dogfight between helicopters, between the Iranian
AH-1T’s and the Iraqi’s Mi-24 Hind. As for the U.S. Army, they eventually
stopped development of the Cobra in favor of the much larger AH-64 Apache
attack helicopter. The Marines however, continued to favor the lighter
copter since it’s very small and narrow, meaning it can be fitted far more
easily on a small amphibious assault ship. The next major development was
the AH-1W Super Cobra. This is not just a step up, but several floor up from
the previous versions. These include two powerful engines mounted on top
mid-ship of the helicopter with improved exhaust outlets. These engines
allowed the helicopter to finally carry the much larger Hellfire missile.
Much improved sensor suite that allowed the helicopter to fly in any weather
and at night, better ballistic protection and improved wider cord blades.
These, alongside their older versions, all served in the first Gulf War,
where they destroyed numerous Iraqi tanks and other vehicles and provided
close support to Marines on the ground, including the Battle of Khafuji.
After the war, further improvements were explored.
In fact, as far back as the 1980’s Bell showed off plans for a radically improved “Cobra II” attack helicopter with four rotor blades and much more powerful T700 engines. The Marines were interested but the project was dropped due to the fact the original one potential hasn’t been realized yet. However, Bell didn’t give up and kept on exploring options using its own funding. In 1993, Bell designed a much improved copter based on U.K.’s emerging attack helicopter requirement. Of course, U.K. eventually selected the AH-64 Apache, Bell kept on persevere. In 1995. This was changed to a four-blade type, with much improved avionics. This drew interests from the Marines and in 1996, they started a program to improve both the UH-1 “Twin Harvey” and the AH-1W. The main proposal was both types should share as much commonality as possible. Development started slowly from 1996-2003. The first biggest change was the drooping, normal rotor blades were changed to a hingeless, bearingless, composite rigid type. Four main and four tail rotors were used. Second, much more powerful General Electric T700-GE-401C, each rated at 1,800 SHP were selected to power the new copter, this improved the attack ship’s speed, climb, maneuverability, and carrying capacity. A new oval exhaust port, from the AH-1W, was added. Next are longer stub wings, improved to handle more weight was added. These wings have one more station to allow the new copter to carry more weapons. The final one was massive improved sensor and avionics were added including the new TSS, Targeting Sighting System with third-generation FLIR sights in a brand new vision turret housing was selected. This is coupled to the “Top Owl” helmet mounted cueing and sighting system for the crew. All in all, even though the new helicopter is obviously a development of the Cobra, everything about it is new and improved. It saw development throughout the 2000’s, becoming operational in 2010. The helicopter was given the name Viper but crews like to call it the “Zulu Cobra” after the military phonetic alphabet. It’s now in operation with the U.S. Marines, with the Czechs becoming the first foreign operator after signing a deal for 4 helicopters to replace their aging Mi-24 Hind. Followed by Bahrain with 14. Other potential operators include Thailand, Philippines, Poland and Australia.
| THE KIT |
I actually always wanted a 1/35 version of the AH-64 Apache. When I was kid, I built the ancient Monogram, now Revel 1/48th scale of the machine, and was and still is fascinated by its mean, ugly, no non-sense look. Alas, so far, no one has made a proper Apache in 1/35th scale. There is only one option, made by an ad-hoc copycat Chinese company that copied an ancient 1/35 kit by another company…Yeah, you can guess how that goes! Last year, I found Academy made a 1/35th scale kit of the AH-1Z, the latest version of the venerable Cobra attack gunship. As a kid, I had the MRC 1/35th scale of the AH-1W “Whiskey” Cobra. It may not be as mean looking as an Apache, it’s still mean enough. It was long broken by the time I graduated college and got thrown away and it’s in a landfill somewhere, but that copter struck me as the Apache’s smaller but no less capable brother. So one day trolling Amazon, I saw someone selling the Academy’s kit for $45, with my bonus, I can cut the price to $35! And yes, jump I did!
 Upon
opening the box, one is greeted with five sprues, two of which are identical and
contains the rotors, tail rotors, and weapons. The rest deals with the main
fuselage and cockpit. Now, the cockpit is pretty anemic at this scale but since
it’s basically all black, it’s not all that noticeable. Details on the outer
surface is excellent, with raised rivets and panels where applicable. This is
astonishing since some manufactures uses recessed details no matter what, even
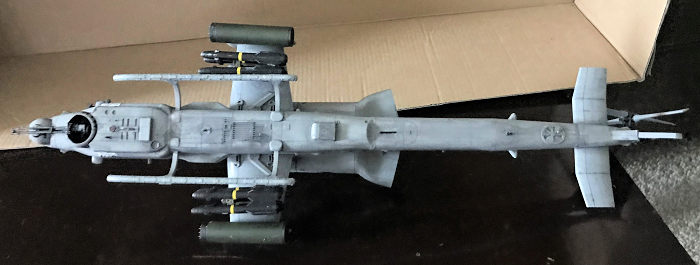
if on the real thing the details are raised. An excellent source of weapons are
provided. These include eight Hellfires, four on each pylon, two types of Hydra
rocket pods, the seven shot Mark 260 and the 19 shot M261 version and two
Sidewinder missiles. Now, in operation, the Viper hardly carries the sidewinder
since that tends to weight down the copter and reduce range. Normal combat
weapons include the fully loaded 20mm gatling, two M261 19 shot rocket pods and
eight Hellfires.
Upon
opening the box, one is greeted with five sprues, two of which are identical and
contains the rotors, tail rotors, and weapons. The rest deals with the main
fuselage and cockpit. Now, the cockpit is pretty anemic at this scale but since
it’s basically all black, it’s not all that noticeable. Details on the outer
surface is excellent, with raised rivets and panels where applicable. This is
astonishing since some manufactures uses recessed details no matter what, even
if on the real thing the details are raised. An excellent source of weapons are
provided. These include eight Hellfires, four on each pylon, two types of Hydra
rocket pods, the seven shot Mark 260 and the 19 shot M261 version and two
Sidewinder missiles. Now, in operation, the Viper hardly carries the sidewinder
since that tends to weight down the copter and reduce range. Normal combat
weapons include the fully loaded 20mm gatling, two M261 19 shot rocket pods and
eight Hellfires.
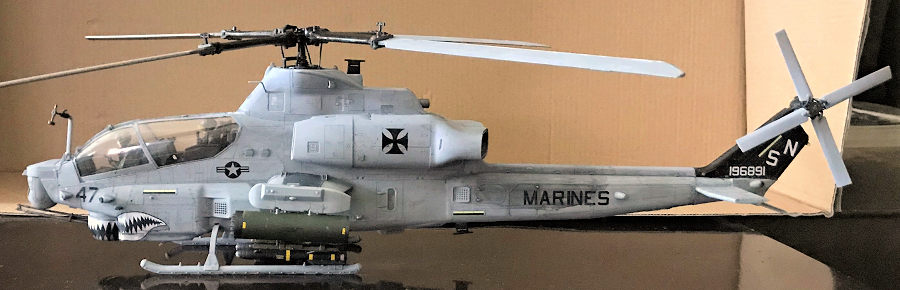
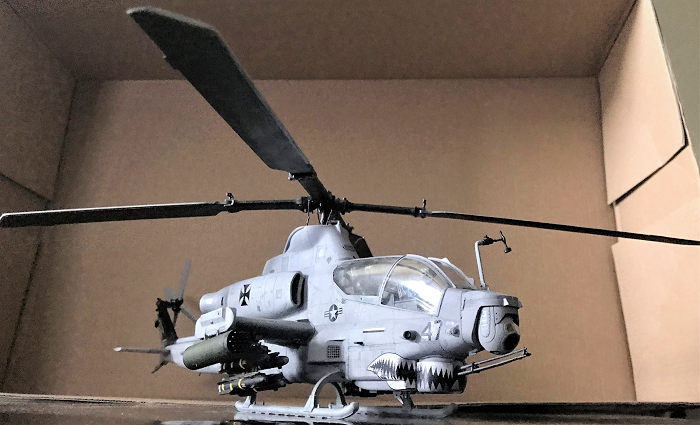
The greatest problem with the kit though, are the rotors. There is nothing wrong with them. The detail is good and accurate. The problem is, they can not be folded. This meant the crews should be provided but aren’t. Why this is important? This is because other than when armed and ready to take off, even on land but especially on ships, that rotor is folded into compact storage position! So, if the rotors are unfolded, crews should be provided but the kit doesn’t have them, forcing me to buy extra from aftermarket. The second issue is that details are generally good, but some are not offered or soft. As mentioned, the cockpit generally is softer than usual, especially the seats, which came without seat belts. The engine compartments are empty, even though the maintenance panels are separate, and no provision to open the avionic bays like my AH-1W kit. However, whatever is there does work, and a very good helicopter kit can be made. Besides, this kit cost less $50, $45 usually so for that price, I guess I can’t complain much.
| CONSTRUCTION |
Construction begin with the cockpit naturally. Since by this time, all “glass” cockpit is the norm, it’s pretty boring! For the MFD, Multi-Function Display screens, the kit provide generic green colored decals. I just used green paint as substitute. The seats are pretty anemic as mentioned, luckily, the crew figures I ordered has a set of seat belts if you wish to display the cockpit empty. Afterwards, the whole entire assembly is put into the fuselage half. Notice that the main rotor retaining rod is attached to the peg on the cockpit roof behind the pilot station. I didn’t do this as that is asking for trouble later on. So I can it and assembled the retaining rod onto the main rotor head instead. Notice the instruction says to put around 10 grams of weight into the nose to prevent tail sitting. I used fishing weight for this.
 All sorts
of details needed to be assembled before the fuselage halves can come together.
These include the fan blades, turret with the M197 20mm three-barrel gatling,
and the “Hawkeye” sighting unit. Notice the sighting unit offers both clear and
solid plastic block versions. I chose the clear one since the kit is kind enough
to offer pre-cut masking tape for all clear parts, which is nice. Wish all
manufacture does this. The only thing I got wrong is one of the large lens
should be in “tail light amber yellow”, not the black I painted from the inside.
Ohh well, no one will notice! When it comes to cement the parts, be judicious
and watch where you cement since these are designed to be moveable when inserted
into the fuselage so also be careful when putting the fuselage halves together!
All sorts
of details needed to be assembled before the fuselage halves can come together.
These include the fan blades, turret with the M197 20mm three-barrel gatling,
and the “Hawkeye” sighting unit. Notice the sighting unit offers both clear and
solid plastic block versions. I chose the clear one since the kit is kind enough
to offer pre-cut masking tape for all clear parts, which is nice. Wish all
manufacture does this. The only thing I got wrong is one of the large lens
should be in “tail light amber yellow”, not the black I painted from the inside.
Ohh well, no one will notice! When it comes to cement the parts, be judicious
and watch where you cement since these are designed to be moveable when inserted
into the fuselage so also be careful when putting the fuselage halves together!
Next important part is the landing skid. Now, on my previous AH-1W kit, MRC just have you put each side skids on through the fuselage, each skid is held on but two measly small pegs. Over time, the weight of the helicopter simply crushed the pegs and I had to recement the skids on again and again. This time, Academy solved this problem by slicing off a portion of the bottom fuselage. This of course left a small seam to cure later but for what’s about to come, more than worth it! You see, two long “U” shaped skid legs are provided. These are attached to the cut off bottom piece. I slobber the inside with superglue since the round portion of the “U” legs are attached firmly against the entire length of the bottom piece for added strength. Then the whole entire assembly is attached to the fuselage bottom before the skids are attached to the legs. This mean the landing skid is now very strong and can handle the weight of the kit easily! So tackling that minor seam is a small price to pay for such good engineering!
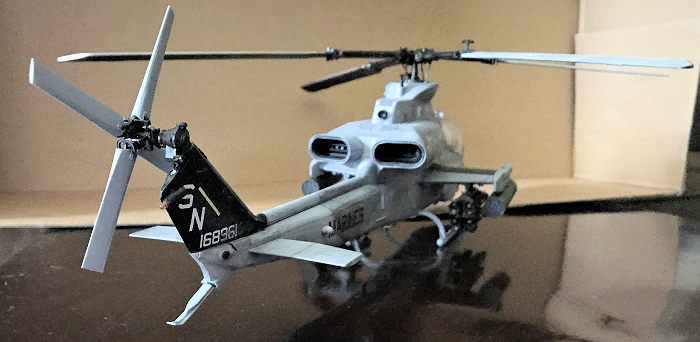
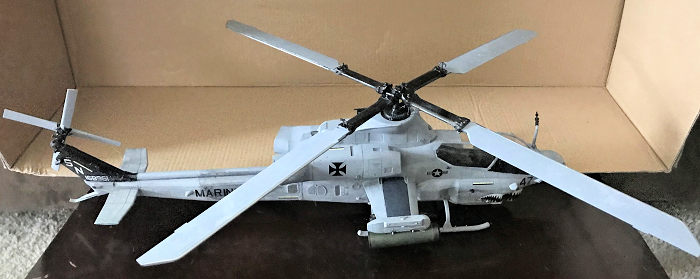
Tail boom is next. Strangely, this part is separate and is a whole cast, using slide mold technology…Makes me wonder if Academy will make previous version of the Cobra, the AH-1G comes to mind. I assembled the tail rotor housing but skipped the tail rotor blades until later since they are two different colors.
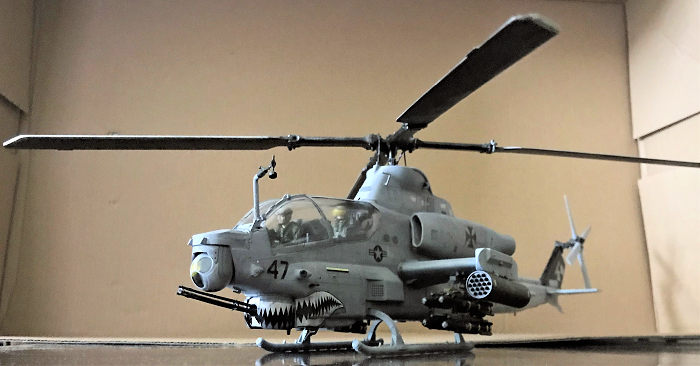
Main rotor assembly was next. Again, Academy could’ve easily made sure that the rotor head clamps and the blades themselves are separate so that you can make the blades able to be folded but chose to mold the bottom of the blade clamps on the blades bottom. This means the rotor can only be assembled in the unfurled position, hence why I got the crews. I assembled the blade head only. Do be careful with the rotor to blade pitch rods. They are so thin I snapped two in halves and had to put them back with superglue. Once the wings are done, the model is generally complete. However, since I’ll be closing the canopy, I have to make the crew members now.
 The crews
are nice and detailed and goes together fine. I painted their flesh parts with
Testor’s skin tone light, uniform with Tamiya Green Drab, gloves and boots flat
black and for the pilot’s “Top Owl” visor, tail light amber. The gunner, I used
regular helmet with the visor in the “up” positon to show his face since he’s
holding a clip board. I want to show him as looking down as if checking wayward
checkpoint or something. The gunner went in his seat fine but the pilot was a
huge PITA! His head kept on jutting out of the roof and I had to sand his butt
down until I can’t anymore. Then I drilled out his seat to the point where I
removed the cushion until the bottom support is shown then had to dig down some
more until he is finally only 2mm below the top of the canopy! Finally I gave up
since he won’t go down anymore so he’ll have to do. The windscreens are in five
pieces since they can be posed in both open and closed position. All cement
points are along the ridge lines so as long as you are judicious with the glue,
you should not mar the canopy. Again, the masking tape is provided and based on
the instruction, I put them in place. They adhere well…About as well since my
hands are a sweaty mess usually but they stick and stuck well. Then carefully
following the contours of the canopy ridge lines, I used dabs of Tamiya extra
thin cement and even a bit of superglue to hold them in place. Paint shop time!
The crews
are nice and detailed and goes together fine. I painted their flesh parts with
Testor’s skin tone light, uniform with Tamiya Green Drab, gloves and boots flat
black and for the pilot’s “Top Owl” visor, tail light amber. The gunner, I used
regular helmet with the visor in the “up” positon to show his face since he’s
holding a clip board. I want to show him as looking down as if checking wayward
checkpoint or something. The gunner went in his seat fine but the pilot was a
huge PITA! His head kept on jutting out of the roof and I had to sand his butt
down until I can’t anymore. Then I drilled out his seat to the point where I
removed the cushion until the bottom support is shown then had to dig down some
more until he is finally only 2mm below the top of the canopy! Finally I gave up
since he won’t go down anymore so he’ll have to do. The windscreens are in five
pieces since they can be posed in both open and closed position. All cement
points are along the ridge lines so as long as you are judicious with the glue,
you should not mar the canopy. Again, the masking tape is provided and based on
the instruction, I put them in place. They adhere well…About as well since my
hands are a sweaty mess usually but they stick and stuck well. Then carefully
following the contours of the canopy ridge lines, I used dabs of Tamiya extra
thin cement and even a bit of superglue to hold them in place. Paint shop time!
| COLORS & MARKINGS |
Main colors are Light Ghost Grey and Dark Ghost Grey.
After the first coat is on, I washed the whole entire thing with flat black to
dirty it up. After that is dried, decals can begin. There are A LOT so take your
time, especially with the shark mouths. These are divided into no less than more
than half a dozen pieces due to the complex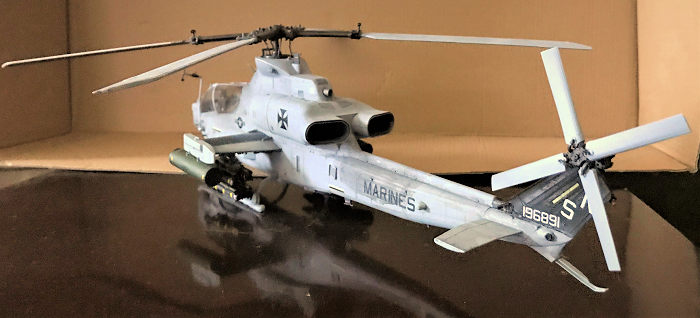 contours around the gun turret area. The mouth that goes over the gun barrels
especially can be tough. Recommend cutting it into two pieces along the gun
barrel hole to make this easier. The only thing I messed up is I didn’t paint
the area white on the bottom. Ahh well, still looks good. Then the tail section,
bottom of the main blades are sprayed with flat black. Top of the rotor along
with the very top portion of the fuselage are dark ghost grey, main rotor head
Tamiya Gunmetal, tail rotor head Testor Gunmetal (they are different), tail
rotor blades light ghost grey. After the decals are dried, I washed everything
again with flat black since these things gets very dirty sometimes. I then took
Apple Barrel “Pavement Grey”, which is very dark, but not completely black, and
also dry with a slight golden yellowish sheen. This is important since I’ll use
this around the tail boom area right below the exhaust ports since all the
pictures of twin engine Cobras/Vipers show this area to be blackened exhaust
mess with a very slight goldenish tone. This is because as exhaust is spilled
out, they get pressed down by the rotor downwash from above so the exhaust
usually gets stuck to that tail boom area. I used pavement grey to heavily
denote this. You can’t see it since the light washed it out, but it does contain
a very slight goldenish highlight in the blackened mess. After this, I also used
silver to highlight the leading edge of the rotor. Main helicopter done!
contours around the gun turret area. The mouth that goes over the gun barrels
especially can be tough. Recommend cutting it into two pieces along the gun
barrel hole to make this easier. The only thing I messed up is I didn’t paint
the area white on the bottom. Ahh well, still looks good. Then the tail section,
bottom of the main blades are sprayed with flat black. Top of the rotor along
with the very top portion of the fuselage are dark ghost grey, main rotor head
Tamiya Gunmetal, tail rotor head Testor Gunmetal (they are different), tail
rotor blades light ghost grey. After the decals are dried, I washed everything
again with flat black since these things gets very dirty sometimes. I then took
Apple Barrel “Pavement Grey”, which is very dark, but not completely black, and
also dry with a slight golden yellowish sheen. This is important since I’ll use
this around the tail boom area right below the exhaust ports since all the
pictures of twin engine Cobras/Vipers show this area to be blackened exhaust
mess with a very slight goldenish tone. This is because as exhaust is spilled
out, they get pressed down by the rotor downwash from above so the exhaust
usually gets stuck to that tail boom area. I used pavement grey to heavily
denote this. You can’t see it since the light washed it out, but it does contain
a very slight goldenish highlight in the blackened mess. After this, I also used
silver to highlight the leading edge of the rotor. Main helicopter done!
| FINAL CONSTRUCTION |
There are quite a few things left, namely all the antennas, tail skid, main rotor and tail rotor assembly and especially the weapons!
Now, again, I sanned the Sidewinders since Vipers usually did not carry them. I colored the Hellfire pylons as olive drab, the missile themselves are Apple Barrel’s Jet Black since all the Hellfires I see are a very flat flat black color. The M261 19 shot rocket pods are in Tamiya’s olive green with gunmetal head and tails with flat black rocket heads. Now, these have either empty or loaded heads but since the tail section only offers loaded tails, you can’t use the empty heads, especially since the empty heads are stuffed and not really empty. Afterwards, the sway braces are painted in silver and attached. The weapons then are superglued to their respective positions. The Hellfire stations however, are very anemic since they only have two very small measly attachment points so becareful here. I allowed them to be fully dried before attaching the rest.
 Next I
painted the main rotor, after painted, are attached. Despite my best
efforts, seams still showed, so I had to tape up the blades, and then fill
the seams, sand, and then respray the head with gunmetal. Next are what look
like two gunmetal pins, and there are fairly large and attach only to two of
the blades. It took me a minute but then I figured out these are the two
pins that holds the blades that fold back in place when in storage so they
were put in the right place. Main rotor done. Tail rotors are more complex.
There are four “U” shaped retractor pins, one on each blade. These are small
so becareful and do becareful since two blades lie on top of the two bottom
blades, this mean two pins are longer than the rest. These of course goes on
the two top blades so don’t get confused and tried not to lose one to the
carpet monster. Afterward, the whole entire assembly is attached to the
tail. Like the main rotor, you don’t need to cement it.
Next I
painted the main rotor, after painted, are attached. Despite my best
efforts, seams still showed, so I had to tape up the blades, and then fill
the seams, sand, and then respray the head with gunmetal. Next are what look
like two gunmetal pins, and there are fairly large and attach only to two of
the blades. It took me a minute but then I figured out these are the two
pins that holds the blades that fold back in place when in storage so they
were put in the right place. Main rotor done. Tail rotors are more complex.
There are four “U” shaped retractor pins, one on each blade. These are small
so becareful and do becareful since two blades lie on top of the two bottom
blades, this mean two pins are longer than the rest. These of course goes on
the two top blades so don’t get confused and tried not to lose one to the
carpet monster. Afterward, the whole entire assembly is attached to the
tail. Like the main rotor, you don’t need to cement it.
Next are all the details left, the pitot tube, the tail skid, and the pitch sensor near the cockpit. I left these off cause these are just carpet monster food. The tail skid for example, I cemented it on twice and nearly lost it twice…I’m still thanking God I didn’t permanently lose it! Eventually, I just consigned it to the box and took it out when everything else was done! Moral? Leave obvious carpet monster food until final assembly! Anyways, with that out of the way, model done!
| CONCLUSIONS |
Again, not as mean as an Apache but sure mean enough! That shark mouth especially put the OMPH into that meanness! It’s accurate and makes into a nice size model that’s big, but will not overwhelm your shelf like the Mi-24 Hind. There is a reason why that model is in the box. It’s too big for its own good. The weapon selection is nice. Yeah, it would be nicer if you can fold the blades back but that does not detract from the kit. If you are interested in something whirly and twirly, and 1/48th scale is a bit small, then this kit is for you! It’s big, nicely sized and more complex than a 1/48 size bird but will not overwhelm you like the several kit that each contain over 1000 pieces that are still in the box that I have!
5 January 2021
Copyright ModelingMadness.com. All rights reserved
If you would like your product reviewed fairly and fairly quickly, please contact the editor or see other details in the Note to Contributors.
Back to the Main Page Back to the Review Index Page Back to the Previews Index Page