
Kitty Hawk 1/48 F-35A Lightning II
| KIT #: | KH 80103 |
| PRICE: | around $50.00 |
| DECALS: | Two options |
| REVIEWER: | Donald Zhou |
| NOTES: | Advantages: Well detailed, full weapon fit, and choice of open or closed weapon bay. Disadvantages: Two mysterious holes in the back, fit problems, RAM putty/mat too prominent. P.S. Initial release contains a photo-etched set. |
| HISTORY |
The F-35 long gestation can be traced to around late 1980’s. At that time, when the first YF-22 and YF-23 first rolled out, there was a need to also replace the F-16, F/A-18 and the Navy’s F-14 Tomcat. The aircraft the Navy most wanted was the NATF, a navalized version of the F-22. All of these plans were shoved when in 1992, the good ol’ USSR decided it had had enough and threw in the towel to become just Russia. With the Cold War over, the military was instantly thrown into a state of flux with many projects and plans canceled. In fact, the F-22 was eventually cut down from over 800 airframes to only 130 or so. So a “cheaper” and more “common” option was sought.
Starting in 1993, under DARPA, the CALF, or Common Affordable Lightweight Aircraft was started to explore a single common airframe that could satisfy the V/STOL program for the Marines to replace the AV-8B Harrier II, a Navy version to replace the F-14 and the defunct NATF, and an Air Force version to replace the F-16 and A-10. This program was eventually rolled over to the JAST or Joint Advanced Strike Technology demonstrator program. And yes, like everything else, politics played a huge role with Les Aspin forcing the Air Force and Navy into a single program in order to find a single airframe for a “common” solution. Many now criticize this decision since it drove the price up into the stratosphere.
 Three manufacturers answered the
call, Lockheed-Martin, Boeing, and McDonnell Douglas. The most stringent and
eventually, the biggest tripping point for the whole entire project was the
V/STOL, or later STOVL or Short-Take-Off Vertical Landing version for the
Marines. The three companies came up with three very different solutions. Boeing
would take the F-135, an engine modified by Pratt & Whitney based on the F-119
that powers the F-22 Raptor, stretch it, adding two more “scarf” nozzles like on
the AV-8B to the front of the engine in order to achieve the STOVL requirement.
McDonnell Douglas would channel the exhaust to power a gas powered fan for STOVL
mode. Lockheed, after research, devised a centrally mounted “lift-fan” system
powered by the front of the engine through a long axle with a three point,
twisting “lobster back” nozzle in the rear.
Three manufacturers answered the
call, Lockheed-Martin, Boeing, and McDonnell Douglas. The most stringent and
eventually, the biggest tripping point for the whole entire project was the
V/STOL, or later STOVL or Short-Take-Off Vertical Landing version for the
Marines. The three companies came up with three very different solutions. Boeing
would take the F-135, an engine modified by Pratt & Whitney based on the F-119
that powers the F-22 Raptor, stretch it, adding two more “scarf” nozzles like on
the AV-8B to the front of the engine in order to achieve the STOVL requirement.
McDonnell Douglas would channel the exhaust to power a gas powered fan for STOVL
mode. Lockheed, after research, devised a centrally mounted “lift-fan” system
powered by the front of the engine through a long axle with a three point,
twisting “lobster back” nozzle in the rear.
In November 1996, two contracts were awarded to Boeing and Lockheed for further development. McDonnell concept was rejected due to mechanical complexity. It was a mortal blow for the proud company, a blow in which it never recovered from. A year later, it was absorbed into one of the now JSF, or Joint Strike Fighter winner, Boeing. Boeing bid would be the X-32, Lockheed’s X-35 (a misnomer if there ever was one. I still wonder why it wasn’t termed YF-32 and YF-35 like the YF-22 an YF-23. Y of course is the abbreviation for “evaluation” while X is for one off “Experimental” abbreviation). Even before the contest truly began, the JSF program already claimed its first victim!
After an intense fly-off, Lockheed was declared the winner in 2001. The biggest reason was the STOVL concept. Two X-35’s were produced. One a conventional airframe later converted to STOVL demonstrator. The other for the Navy. A critical decision was Lockheed decided to use the Air Force’s “boom” in-flight refueling system. Boeing went with the Navy’s “Drogue” method. In tests, the drogue on the X-32 developed problems and was never fixed, meaning it cannot inflight refuel, a huge blow. The other critical test was during STOVL demonstration cycle, Lockheed were able to fully load an X-35, take-off in less than 500 feet, inflight refuel, then go supersonic before returning. Boeing could not match because they had to remove several key items from the X-32 in order to save weight. This, plus the fact the lift-fan system offers more simplicity and reliability than Boeing concept won the JSF competition for Lockheed.
The first F-35 was rolled out at Fort Worth in 2006. The design look like a smaller F-22 with DSI or Divertless Supersonic Intakes, instead of the CARET intakes on the Raptor and a single F-135 engine. The due date however, was already late since the program ran into trouble and cost overruns due to weight issues. The biggest tripping point was again, the STOVL version due to the “dead weight” of its lift system and the requirement of the Air Force version of minimum of 600 miles of combat radius with internal fuel only and carrying 2 200lbs JDAMs and two AMRAAM’s in its weapon bays! This meant the aircraft had to carry 8 tons of fuel, resulting in a large open airframe with heavy strength needed. In the end, by redesign and limiting the STOVL version to two 1000lbs JDAM, instead of two 2000lbs JDAM in the other versions, Lockheed were able to resolve the issue, but not without billions in cost overruns and delays.
As soon as testing started,
problems galore started to pop up. One of the biggest reason was the electronics
and avionics. The F-35 packs even more sensor fusion and even more capabilities
than the Raptor. Imagine an aircraft with the sensor capabilities of the Raptor,
more info and data sharing than ever before, so much so, with six aircrafts
(eventually), could do the job of an AWACS, even more detection capabilities
with EODAS and EOTS and 70% EW capability of the EA-18G Growler in one airframe,
and that’s the F-35 for you! Unfortunately, this resulted in an almost 25
million lines of codes. Bugs after bugs started to affect the system. One of the
more curious one was the problem affecting the Helmet Mounted Display, which not
only display all the plane’s critical information right on the helmet (hence why
the plane do not have a HUD), but also give a 360 degree bird’s eye view to the
pilot from the plane’s EODAS systems, which are six cameras mounted throughout
the airframe. Unfortunately, due to a
 pilot. This
problem was resolved now with the third generation helmet but it’s a symptomatic
example of just how complex the aircraft is. The Pentagon, like with the 4th
gen aircrafts, was betting on technologies will mature by the time the aircraft
was produced, they were mostly right, but the wrong parts were extremely
painful. This, plus continuing headaches with the STOVL version led to delays
and overruns one after another.
pilot. This
problem was resolved now with the third generation helmet but it’s a symptomatic
example of just how complex the aircraft is. The Pentagon, like with the 4th
gen aircrafts, was betting on technologies will mature by the time the aircraft
was produced, they were mostly right, but the wrong parts were extremely
painful. This, plus continuing headaches with the STOVL version led to delays
and overruns one after another.
The second problem was concerning the aircraft’s maneuverability. Questions about the plane’s dogfighting capability persists to this day, especially from critics of the program. It does not help many critics’ uses “fudged” numbers to make the F-35 look bad. One big example is the 0.86 thrust to weight ratio. This was calculated based on a F-35 fully loaded with 8 tons of fuel and 8 tons of ordinance, including wing mounted loads. Of course this is not realistic but “no knowledge” reporters simply ate it up! Even more damaging was a leaked report by a pilot, piloting AF-3 in a simulated dogfight with an F-16D. Many used the report as a prime example that the F-35 can’t dogfight worth a damn. However, what they are missing the F-35 was G restricted and fought the F-16 game, not the F-35 and most importantly, did not include any medium range engagement. A more recent report by a Norwegian pilot paint a far more realistic picture. The F-35 game is to use its instantaneous “pulls” to quickly point its nose at its opponent before they can react. The F-35 have a controlled alpha of up to 60% and extremely fast “nose pointing” ability with good acceleration. That’s its game. Quick engagement from medium ranges using its sensor fusion and stealth, force the other guy into the defensive and if misses, come in quickly and quickly point its nose in its AIM-9X engagement envelope, squeeze off a shot, quickly accelerate away from dodge. But of course, critics and “no knowledge” reporters will not notice this. This is why F-35 problem was so “bad”. Living in the internet age, every single problem small or large gets magnified up to 1000 times or worse! No one these days remember all the engine problems the F-14 suffered from or the fact the F-15 was once called the “hanger queen” or the problems F-16 faced, especially the “bolt to screw” fiasco that cost over a dozen airframes and four lives.
In the end, like the V-22 Osprey, the F-35 may actually become an excellent aircraft. It’s got more range than the F-16, with more sensor options, more EW (hence why the Air Force never ever bought into the EA-18G concept), and more capability. It’s deadly from medium range and as long as the pilot forces the other guy into the defensive early and play its own game, it should more than survive in a close range knife fight. In fact, 2 on 2, the F-35 may not survive against the F-22, 4 on 4 maybe an even fight, but 6 on 6? That’s when the F-35 comes to its own! With over 100 airframe produced, closing on 200, this aircraft looks to stay for a long time. Two good telling point would be South Korea and Israel. When S. Korea decided to choose its next gen combat aircraft, Boeing went all out to sell its F-15SE Silent Eagle. Many pundits and critics said the Koreans will go for the Eagle since they already operate the F-15K Slam Eagles and it’s far cheaper and “capable” than the F-35. That’s why it was surprising when the Korean chose the F-35. Critics immediately threw out the politics card. Not that politics didn’t play a role, but the fact that the F-35 is far more capable than the F-15SE never crossed their minds speaks volume. The second is Israel. When the F-22 was put off the market by Congress, they went immediately after the F-35. Now, Israel never ever buy anything second best and to tell how they feel about the plane, they named it “Adir” which in Hebrew means “Awesome”.
| THE KIT |
You can actually preview Scott’s
sample on the F-35B and F-35C. The F-35A is pretty similar to the other two
kits. The only major differences are of course, the fuselage parts are for the
F-35A, which are in two halves, rather than the F-35B’s three. The wings are
smaller than the Navy’s F-35C. A full weapon load are provided in two AIM-120C,
two AIM-9X and two GBU-32. Overall, the kit is well detailed with a nice cockpit
and a somewhat complete engine you will never see after assembly. The only major
detail fault would be t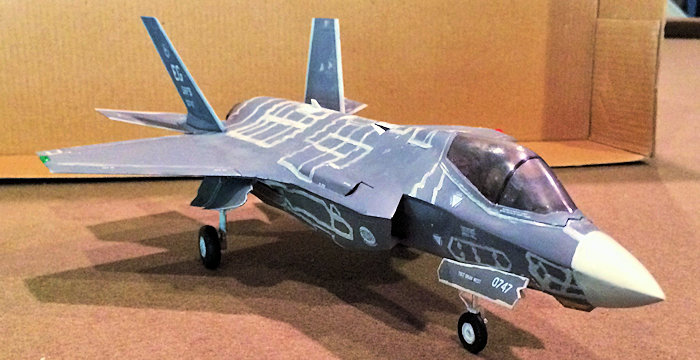 he RAM putty/mat. For the F-35, Lockheed developed a new
maintenance RAM for the maintenance hatches. This have always been one of the
biggest maintenance headaches and why maintenance hours on stealth aircrafts are
so long. Previously, cutting up the RAM tiles require the replacement of the
whole entire mat, with heating and joining involved so no cracks will be left to
reflect radar. For the F-35, a putty like substance was developed. Ground crews
can cut them up, heat them and insert them into the maintenance hatch line. You
can cut them up and they reseal upon cooling so they can be cut open, resealed
and reused multiple times without worrying about cracks or crevasses that
reflects radar. On the real plane, these lines are very prominent and are a
different color than the rest of the airframe. For the kit, Kitty Hawk made the
lines a little too prominent and stand out than the rest of the airframe. You
could sand it down a bit but they do come down after several coats of paint so
the choice is up to you.
he RAM putty/mat. For the F-35, Lockheed developed a new
maintenance RAM for the maintenance hatches. This have always been one of the
biggest maintenance headaches and why maintenance hours on stealth aircrafts are
so long. Previously, cutting up the RAM tiles require the replacement of the
whole entire mat, with heating and joining involved so no cracks will be left to
reflect radar. For the F-35, a putty like substance was developed. Ground crews
can cut them up, heat them and insert them into the maintenance hatch line. You
can cut them up and they reseal upon cooling so they can be cut open, resealed
and reused multiple times without worrying about cracks or crevasses that
reflects radar. On the real plane, these lines are very prominent and are a
different color than the rest of the airframe. For the kit, Kitty Hawk made the
lines a little too prominent and stand out than the rest of the airframe. You
could sand it down a bit but they do come down after several coats of paint so
the choice is up to you.
The second biggest thing is for the initial release, which I bought in China (and probably elsewhere too), a photo-etch detailed set is included. These includes such things as the afterburner ring holder, seat belts, cockpit seals, pegs and holes and a replacement afterburner exhaust nozzle. Evidently, this set is also in the F-35C kit (see Scott’s preview of that kit). However, I do not know if the etch set is included in later release as later on, looking at the box in a shop, it did not say this is included.
Other than that, the kit looks good in the box. However, as you will see, several problems do crop up in the build.
| CONSTRUCTION |
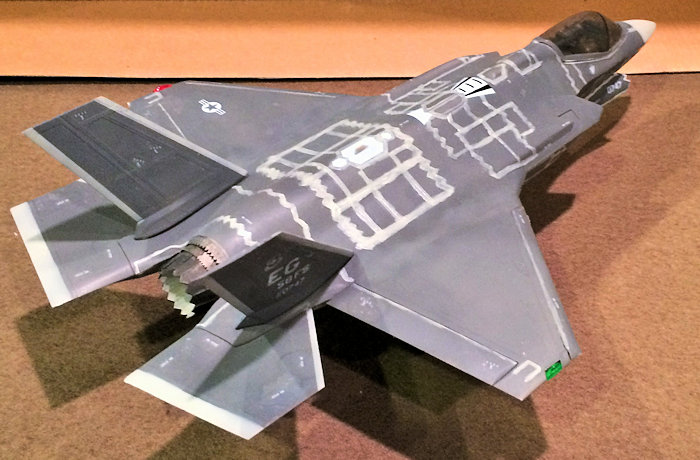
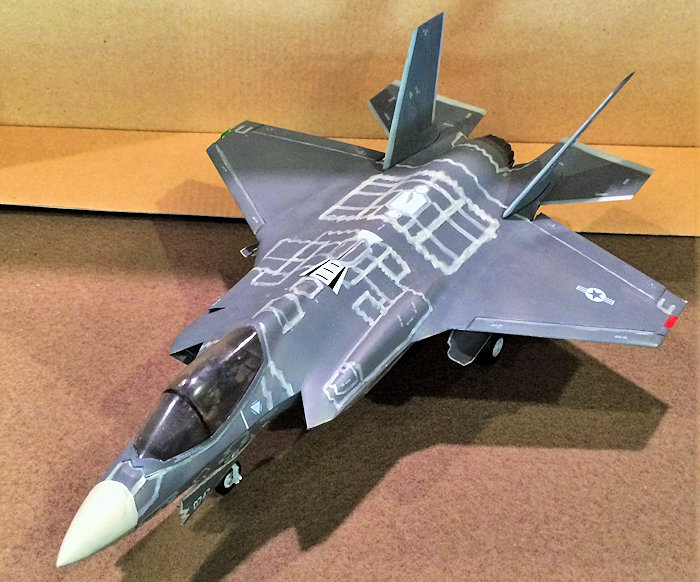
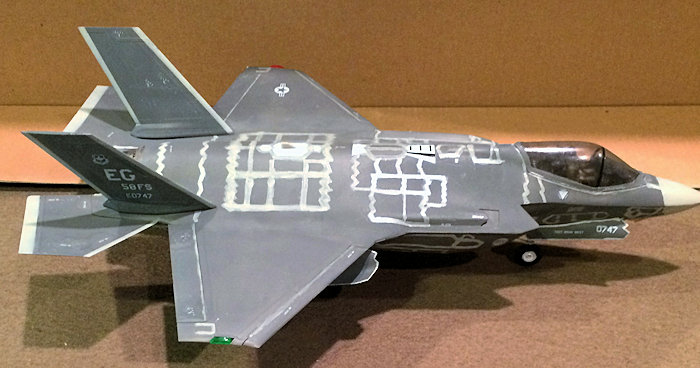
Before construction even begin, a choice needs to be made since the weapon bays can be build either open or close (even though the close option is not in the instruction, it’s not hard to figure out). For this review, I decided to build AF-6, with the bays closed, cockpit closed with pilot. I will review AF-1 later, with the bays open since I got two of the kits!
As expected, construction starts with the cockpit. Like all modern day fighters, this is a simple affair with a glass cockpit, a good looking Martin-Baker ejector seat and side consoles. I painted the cockpit overall light ghost grey, consoles flat black. A decal is provided for the panoramic single screen MFD display. I used that for the instrument panel. The instrument panel and ejector seat are flat black also. There is no way around that. A photo-etch piece goes to the top of the seat. I did not add the seat belts, rather, I assembled the pilot and paint him with flat black visor, semi-gloss black helmet and olive green suit. The pilot looks accurate with first or second generation helmet and inserted him into the tub, carefully guiding the hands so they will hold onto the stick and throttle. Next, I tackled the canopy. This is accurate sans the fact it does not have the smoky/brass tint. This tint was invented for the F-117 since the cockpit reflects radar (the pilot head alone will double the F-117 RCS!) and eventually, it was applied to all U.S. jets. It works by allowing radar waves in, but blocks them from going out. To replicate this, I heavily diluted Tamiya Smoke and carefully applied it to the inside of the canopy. This was left to dry and saved for later.
Next comes some accessories. The front nose well was assembled but I did not assemble the nose gear until later. Then comes the intake trunking, which came in two pieces. The seam disappears since the “S” piping is so “curvy”, it virtually hides the seams. Next comes the engine. Which is basically complete if you want to display it outside but I did not so I didn’t even bother to paint it. I only painted the front on the fan but even that was so well hidden by the intake trunking “S” pipe, you can’t even see it no matter how much you twist the plane around. I did not add the exhaust nozzle. Next are the main landing gear bays. Again, I did not assemble the main gears until later after main painting and decaling. The next few steps deals with the main weapon bays. Since for AF-6, I decided not to open the bays, I skipped them. However, I did add the bays to the bottom fuselage piece since they look like they will keep the nose down since the bays are well forward of the main gears. This proved to be true so you need to put in the bays no matter what. To help matters further, I added several small nails, taped completely down near the nose wheel well. As you can see, the first couple of steps deal mainly with subassemblies that you need to bring together in the later steps.
 Once all the major
subassemblies are done, it’s time to bring them all together. First to go was
the nose wheel well, then the main weapon bays. The intake trunking was attached
next. Just be sure the DSI plates, B14 and B15 are securely in place first
before inserting the trunking. Fit is a bit tight here and you can easily screw
this up! The right side on mine need just a bit of filler to fill the seams that
I ended up with. Engine was attached next followed by the main gear wells. The
bottom is now done and pretty much filled to the brim.
Once all the major
subassemblies are done, it’s time to bring them all together. First to go was
the nose wheel well, then the main weapon bays. The intake trunking was attached
next. Just be sure the DSI plates, B14 and B15 are securely in place first
before inserting the trunking. Fit is a bit tight here and you can easily screw
this up! The right side on mine need just a bit of filler to fill the seams that
I ended up with. Engine was attached next followed by the main gear wells. The
bottom is now done and pretty much filled to the brim.
Before you can put on the top fuselage, parts C21 and C20 need to be attached. Just be aware C20 is for the inflight refueling receptacle. If you choose not to open the inflight refuel hatch like I did, then leave this part off.
The fuselage was then closed at this point. It was during the dry fit though that I discovered a rather mysterious mistake with the kit. Two small tiny holes appeared at the rear, near the exhaust nozzle juncture of the aircraft. The real aircraft does not have this and although it looked like it will be somewhat blocked by the nozzle, they are still very prominent. I searched through the instruction and the kit through and through but there are no parts for these two holes. Completely miffed, I decided to give up on the fuselage for a while to make the wings.
The wings came along nicely. They are separated by two halves, with separate flaps and ailerons. The horizontal and vertical stabilizers was also assembled. Unfortunately, the fit with these are not optimal. The stabilizers all have what look like “inserts” that go on the bottom or rear. Unfortunately, this left you with big seams. The horizontal ones are especially convoluted with “compound curves” around the “inserts”. Why didn’t Kitty Hawk just make them single pieces is beyond me but out came the fillers to do the job.
Well, it was at this point that I had to give the entire thing to come back to the U.S. It wasn’t two years later until I got the kit(s) back.
I restarted on this kit while I was getting tired of doing my 1/16 scale King Tiger. The first was the two holes on the rear. When I was sure this was a mistake and no parts are in the kit to rectify it, I carefully cut off some plasticard pieces, inserted them into the hole areas and slobber on super glue to fix it in. After the fuselage was joined, I filled the holes with milliput and problem was actually solved! It’s at this point that I also attached parts C11 and C12, the inflight refueling hatches by cutting off the bottom tabs and then carefully cementing them in place.
Next one just want to make me laugh when I now think about it. But OHHHH BOOOYYY it sure made me blew a fuse way back when!
What happened was no matter what I tried, I could not find the nose cone piece F25! After giving up, I decided to cut up a 1/32 Bullpup missile from my A-4 kit. It went in fine. I then build up the nose with Squadron white putty and red spot glazing. It look nothing like the real nose. The chines were completely missing and was way too long but it will work. After I calmed down a bit. What happened next made me really blew my top…So I was looking around my other instruction books and flipping through a box of spares when lord and behold….Upon opening a page, guess what flopped out? Yep, the offending nose cone! It suddenly struck me I put it there for “safe keeping”…..Well….Ummm…..Ahh…..ARRRRRRGGGGHHHHHHH!!!!.....I had completely forgot about THAT!
 Ok…….Screaming and
throwing out expletives left and right, I took a hobby knife, sliced off the
putty, then using a piler, pulled out the cut off missile nose cone and glued on
the real nose cone…And promptly threw the kit up on the shelf of doom to go back
to the King Tiger….
Ok…….Screaming and
throwing out expletives left and right, I took a hobby knife, sliced off the
putty, then using a piler, pulled out the cut off missile nose cone and glued on
the real nose cone…And promptly threw the kit up on the shelf of doom to go back
to the King Tiger….
After finally stop seething at the seams, and realizing that one was totally on me, I went back to the kit. Next came to join the wings to the fuselage. Here there was a huge fit problem. I heard other had a better time with it. Maybe it just for the first edition of the kit, but with mine, I found out there was a large seam between the fuselage and the wing connection joint. No matter how hard I clamp them down, the seam was very prominent. It took several nights of puttying and sanding to knock the seam down where they were not noticeable.
Meanwhile, while working on the seams, I skipped steps 15, 16, and 17, which were about the weapon bays, weapons and loadouts to cement the bay doors shut. They were a little bit of distraction while working on the wing seams. Just be sure to look at the instructions as there are actually quite a bit of doors here, especially which small side maintenance doors go where and tape them down so they don’t leave any large seams behind. Other than that, I also putty up the nose. As can be imagined, after the above trip to “blow up my top-ville”, the nose joint was ill fitting all around and required a bit of effort to become smooth.
After all of this, I assembled the nose gear, the main landing gears, and the various gear doors since their actuator arms are all separate. Time to hit the paint shop!
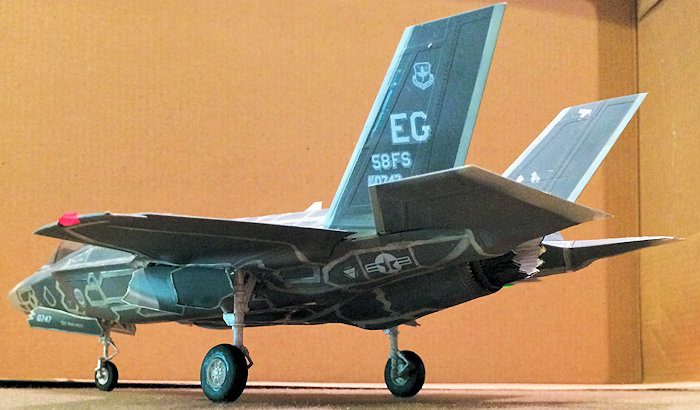
| COLORS & MARKINGS |
Before main painting can begin, I used Insignia White and sprayed the gear doors, the gears and wells white. Then after 12 hours, I ripped off several sheets of toilet paper and stuffed the wells. Next, I taped the canopy, spray the strengthening frame flat black from the inside and then glued it on.
The main color call out is wrong. The main color is not gunship grey. It’s a shade lighter. However, right now there are no manufacturers that make this color. Also, if you look at F-35 pictures, you will notice from certain angles, it has a metallic sheen to it. This is the “raptor sheen” named after the F-22. The paint itself contain radar absorbent materials that make the paint shimmer in certain light. To create this, I dropped several paint brush full of “steel” into the airbrush to mix with gunship grey to not only lighten it, but to produce the raptor sheen.
I did not give the plane a wash to start off. This is because these aircraft are still new, are well maintained and are very clean since dirt will ruin their RAM coating and paint. The paint was sprayed on in several sessions starting with a very light coat, then progressively heavier until the coverage is even. After the paint was dried completely after 12 hours, I pulled off the paper stuffing and the tape off of the canopy.
Next comes the RAM putties. Again, this is applied to all maintenance hatch seams and is a different lighter color. This is not called out on the AF-6 color and decal diagram. I chose flat gull grey for this color.
 Yes, yes, I know! I
should’ve taped up the RAM lines and then spray on the color. But by this time,
I was in a bit of a hurry and getting tired and just wanted it done….I just
simply wing it and hand painted with my eye balls. So, if the RAM line paint
looks a bit razzled, you know why! With a thin brush, I painted them starting
with the bottom and working my ways to the side and top. After two days and
getting the bottom and left side done, my eye balls gave up the ghost and I
moved back to my King Tiger…
Yes, yes, I know! I
should’ve taped up the RAM lines and then spray on the color. But by this time,
I was in a bit of a hurry and getting tired and just wanted it done….I just
simply wing it and hand painted with my eye balls. So, if the RAM line paint
looks a bit razzled, you know why! With a thin brush, I painted them starting
with the bottom and working my ways to the side and top. After two days and
getting the bottom and left side done, my eye balls gave up the ghost and I
moved back to my King Tiger…
…After a week though, I had to hurry back. This is because while messing around with the decals on the nose gear doors, I discovered to my horror that the decals were starting to break up due to time and probably exposure to the elements while on a ship across the Pacific here! So I got to hurry and finish this (and AF-1) up before the decals are gone for good! Thank God I have two sets of decals so I can mess up a bit!
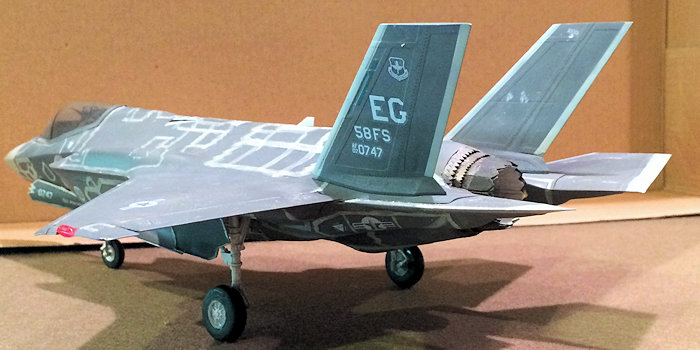
After finishing painting the rest of the RAM lines, I sprayed the nose, the stabilizers parts that requires it flat gull grey also. These of course are “transparent” since the radome contains the radar and the leading edges of stabilizers contains the antennas for various electronic and EW devices. Decals can now begin. Just a note: Follow AF-6 carefully if you are doing this bird as there are subtle maintenance stencil decal differences between AF-6 and AF-1.
The decals works fine. They are a bit thicker than Trumpeter’s but goes on without a quibble. The problem with mine again, they are starting to break up but still held on. I let them soak for a bit longer, just move them into position and then let Mr. Mark Softer to do the work. This worked out beautifully since Mr. Marks will just melt them right on. Any extra touching will break them up as I found out painfully. The only quibble from me is that the decal sheet are packed. Too packed. Many of them are so small that getting around them is almost impossible while after they get dipped in water, the ghost grey parts simply disappears! Making spotting them extra hard! Wish manufactures just give us a bigger sheet with extra spaces to move around! The good thing is, Kitty Hawk do give you extras for the smaller ones such as “No Step” so you can lose a few without worry.
| FINAL BITS |
Now that decals are
done, the “fiddly bits” can be attached. The first thing to go was the
afterburner nozzle. Unfortunately, the plastic one was truly lost and no, I did
not put it elsewhere for “safe keeping”. It’s truly and completely gone.
However, I do have two sets of the photo-etch frets and they contain brass
replacements. With a sigh, I carefully cut them off of one fret and rolled them
into shape with sequential smaller circle things such as paint bottles etc. It
was a bit messy made worse by the fact the bottle super glue I was using stayed
in the open air for too long and the glue strength was gone so I had to get a
new bottle. But they did went on and they look far more detailed than the
remaining plastic one left, which will
 go on AF-1. Personally, I would still use
the plastic one since it’s far less of a hassle. For painting, I used various Testors Metallizers. The inside was painted white as the inside of modern jet
engines are a white ceramic color to resist the massive heat that result,
especially in afterburner mode.
go on AF-1. Personally, I would still use
the plastic one since it’s far less of a hassle. For painting, I used various Testors Metallizers. The inside was painted white as the inside of modern jet
engines are a white ceramic color to resist the massive heat that result,
especially in afterburner mode.
Next are the vertical stabilizers. This was put on near the end since they are canted and various decals goes on the inside and outside.
The majority of the final efforts goes to the landing gears and the associated doors. They are already painted insignia white. The wheels are insignia white wheels with flat black tires, and a wash of NATO black to tone it down. A speckle of dirt was represented by artist acrylic “cream” color. This was not overdone since these birds are constantly cleaned. Silver was added to the nose landing light and exposed hydraulic gear sections. After all this, they were added to the correct placement and the retraction gears attached. Lastly, the doors are attached. A couple of decals have to be placed on the nose gear doors before attachment.
Finally, the model concludes with the attachment of wingtip lights and the EOTS dome. The EOTS or Electro-Optical Targeting System is basically a Sniper weapon pod squeezed under the nose, right in front of the nose gear. From various pictures, the dome is a goldenish/brassish color. I painted it brass inside and glued it on for the final touch.
| CONCLUSIONS |
And there you have it! Despite all the problems I encountered, some of which was completely my doing and a great hell of an “I totally forgot I placed this thingofajiggly” mind fart, the model turned out great. Keep these notes in mind and you might save yourself some hassle. At one time I thought about doing AF-1 and AF-6 in the same review. But the thing is, the open bay version is different enough that it warrants a separate review and adding it here would drag it out too long so stay tuned for the AF-1 review! Anyway, now to play really hurry up offense and get that bird done before the decals really start to go bad!
2016
Copyright ModelingMadness.com
Thanks to for the review kit. You can find this kit at your favorite
hobby shop or on-line retailer.
If you would like your product reviewed fairly and fairly
quickly, please
contact
the editor
or see other details in the
Note to
Contributors.