Monogram 1/48 A-10A Thunderbolt II
| KIT #: | 85-5505 |
| PRICE: | $26.95 SRP |
| DECALS: | One option |
| REVIEWER: | Stephen Young |
| NOTES: | Initial boxing |
| HISTORY |
The Fairchild Republic A-10
Thunderbolt II is well known to anyone who follows current events as the
aircraft has seen much combat since the first Gulf War in 1991 throughout
Iraq, the Mideast, and Afghanistan. Developed by Fairchild-Republic in
response to a 1967 United States Air Force directive for a low-cost attack
aircraft specifications were developed using the feedback from combat in
Vietnam based on the experience with the Douglas AD Skyraider and other
contemporary jet aircraft and their specific short comings with regard to
the close air support role. Revised specifications r equired the aircraft be
designed specifically for a 30 mm rotary cannon, a relatively low maximum
airspeed, a 16,000 pound external weapons load, and a 285 mile mission
radius. Fairchild-Republic won the prototype fly-off against the Northrup
Aviation design. The first production A-10 flew in October 1975, deliveries
commenced in March, 1976 and the last of 715 airplanes was delivered in
1984. Since then the A-10 has received many upgrades, undergone a wing
replacement program, and service life upgrades. In 2005 the entire fleet of
356 surviving aircraft began receiving Precision Engagement upgrades
improving the fire control system, electronic countermeasures, smart bomb
targeting, and all weather capability. Upgraded aircraft were redesignated
A-10C. Operationally the A-10 has demonstrated close air support capability
unmatched by any other western aircraft but despite a stellar record of
battle tested accomplishment has been a target of budget and politically
driven conflict regarding future use and future replacement. Through it all
retirement of this great aircraft appears to have been deferred by the Air
Force until 2022 when it will be replaced by the less capable (for close air
support) F-35.
equired the aircraft be
designed specifically for a 30 mm rotary cannon, a relatively low maximum
airspeed, a 16,000 pound external weapons load, and a 285 mile mission
radius. Fairchild-Republic won the prototype fly-off against the Northrup
Aviation design. The first production A-10 flew in October 1975, deliveries
commenced in March, 1976 and the last of 715 airplanes was delivered in
1984. Since then the A-10 has received many upgrades, undergone a wing
replacement program, and service life upgrades. In 2005 the entire fleet of
356 surviving aircraft began receiving Precision Engagement upgrades
improving the fire control system, electronic countermeasures, smart bomb
targeting, and all weather capability. Upgraded aircraft were redesignated
A-10C. Operationally the A-10 has demonstrated close air support capability
unmatched by any other western aircraft but despite a stellar record of
battle tested accomplishment has been a target of budget and politically
driven conflict regarding future use and future replacement. Through it all
retirement of this great aircraft appears to have been deferred by the Air
Force until 2022 when it will be replaced by the less capable (for close air
support) F-35.
| THE KIT |
Initially released in
1986, Monogram's 1/48th scale
A-10A remains widely available in different boxings on Ebay and commercially
as the Revell/Monogram boxing. I am primarily a out of the box builder
although as my building techniques have improved I will tend to add or
change things that seem to improve my technique, building experience and end
result. I obtained the Revell/Monogram kit on Ebay after reading about it
and like many long time modelers I have a soft spot for Monogram’s kits.
With so much attention to the A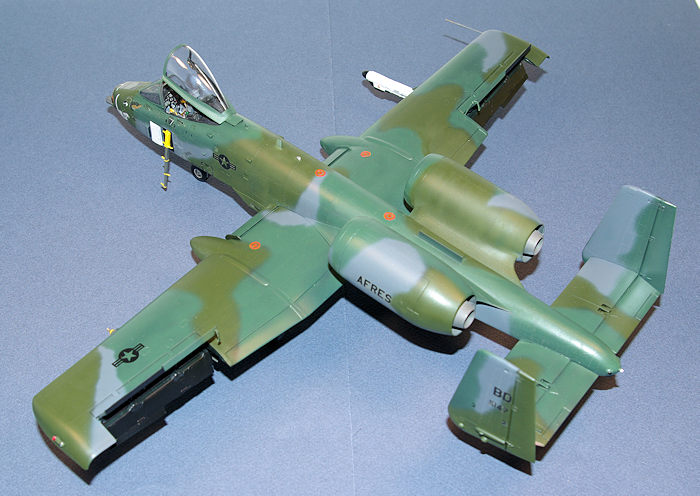 -10 over the past 15 years due to active
combat I decided to build it before the A-10 faded from the scene. The Revell/Monogram kit represents a A-10A and features in the kit that are
missing from current aircraft in operation including any features of the
LASTE (Low Altitude Safety and Targeting Enhancement) upgrade that includes
multiple added antennae, sensors, and formation lights.
-10 over the past 15 years due to active
combat I decided to build it before the A-10 faded from the scene. The Revell/Monogram kit represents a A-10A and features in the kit that are
missing from current aircraft in operation including any features of the
LASTE (Low Altitude Safety and Targeting Enhancement) upgrade that includes
multiple added antennae, sensors, and formation lights.
My understanding is that the Hobby Boss kit (which I do not have) does include these features. Since some of these are readily visible I decided to add some of the most visible missing features to the model. This would involve some simple scratch building as no after market upgrade with these features seems to be currently available. The Monogram kit models a production A-10A and has refined pylon detail including separate molded bomb shackles. The surface detail is raised panel lines with raised rivets (the real A-10 is covered with raised rivets in many areas). Included are a 600 gallon fuel tank, AGM-65 Mavericks, Mk-82 bombs, and cluster bombs. I decided to customize the weapons set up for the model by replacing some ordnance items and adding items from the 1/48th scale Hasegawa Weapons Sets A and C which are better quality parts. Instructions in the Revell/Monogram boxing are the typical single sheet with universal picture instructions with a painting and decal diagram for a single aircraft in the European I camouflage of the 47th Tactical Fighter Squadron, 917th TFW, United States Air Force Reserve.
| CONSTRUCTION |
My intent was initially to build the
model essentially out of the box so the cockpit areas of the fuselage were
airbrushed with Testors Model Master Aircraft Gray FS16473. The cockpit tub
was also sprayed Aircraft Gray and the interior components painted by hand
with Testors Acrylic Interior Black FS37031. For hand painting of flat
surfaces I get the best results not using a traditional brush but rather
Microbrush Superfine tuft brushes. The instrument panel and consoles have
molded relief instruments so the visible surface was airbrushed with gloss
white and after the paint was dry the panels were coated with Future. Flat
black was then airbrushed over the dried Future and the dials and switches
were picked out by wiping away the black paint using a enamel thinner dry
brush technique. For me this is much easier and gives a much better result
than dry brushing color over the raised relief. I did give some
consideration to replacing the kit ejection seat with a Squadron True
Details resin ACES II seat but this would require major surgery or
replacement of the cockpit so I decided to use the kit sea t. The kit seat
represents a ACES II but the detail is soft; adding masking tape harnesses
and some spare Monogram photo etch seat buckles from Monogram’s F-117 kit
improved the appearance. From this point on the engineering of the kit
starts to let the builder down as fit and assembly issues start manifesting.
The cockpit needs to be glued to one side of the fuselage before joining the
two halves so it was glued into the right fuselage side with Devcon 5 minute
epoxy. The fit is not good as the locating attachments are very
unsatisfactory due to loose/sloppy fit. Despite lots of adjustment the fit
was not perfect and I ended up with the cockpit slightly low on the left
side; once the canopy is attached it will not be noticeable but it is
annoying.
t. The kit seat
represents a ACES II but the detail is soft; adding masking tape harnesses
and some spare Monogram photo etch seat buckles from Monogram’s F-117 kit
improved the appearance. From this point on the engineering of the kit
starts to let the builder down as fit and assembly issues start manifesting.
The cockpit needs to be glued to one side of the fuselage before joining the
two halves so it was glued into the right fuselage side with Devcon 5 minute
epoxy. The fit is not good as the locating attachments are very
unsatisfactory due to loose/sloppy fit. Despite lots of adjustment the fit
was not perfect and I ended up with the cockpit slightly low on the left
side; once the canopy is attached it will not be noticeable but it is
annoying.
Moving on to joining the fuselage halves care must be taken to align the surfaces; I glued a small section at a time using generic fast setting acrylic cement from Tap Plastics. The nose gear bay assembly must be completed in the Revell kit next and 5 minute epoxy was used for strength since the part fit was not precise. Just before completing the nose gear compartment assembly weight needs to be added if you want to avoid a tail sitter in either model. There is no instruction to do this and the kit provides a clear styrene plastic prop rod to place near the tail. Unfortunately the amount of weight is a lot as the long tail, twin tail, and engine nacelles move the natural center of gravity far rearward. I added about 1.8 ounces in the form of five .38 caliber lead bullets epoxied with Devcon 5 minute epoxy into the nose in model to shift the center of gravity in front of the main gear. There was adequate room provided some test fitting is done before gluing. From that point on is where the kit really starts to get challenging. The wing top and bottoms join up fine. The engine nacelles and the fit of the inlet turbine to the nacelle is poor but I did not attempt to rectify this with putty work. Both inlet and outlet need to be finished/painted before assembly. However the fun really starts with the attachment of the engine nacelle assembly to the fuselage and the wings to the fuselage. Fit in both the wing and stabilizer attachment to the fuselage leaves a lot of play and consequent opportunity for misalignment.
For the wings I attached one side at a
time with Devcon 5 minute epoxy holding all parts in correct (per eyeball)
alignment. Once the first side was set in place the other side was glued on and
held in alignment to overcome the sloppy fit until the glue set. For the engine
nacelle assembly attachment was simple since it lies across both halves of the
fuselage but due to a poor fit much putty was needed at the front and r ear of
the nacelle attachment to the fuselage. The wing fit is the worst I’ve
experienced in any Revell/Monogram kit I have built, leaving a large, almost
1/16th inch gap on the bottom where the wing meets the fuselage although the top
surface seam is tight. I filled this gap with a rolled out rope of Green Stuff
epoxy putty followed by Bondo Auto body putty applied on top flush with the
surface after the Green Stuff set up. Putty filling is required intermittently
along the fuselage joint and unfortunately the consequence of the putty and
sanding is loss of the panel line and rivet detail. I re-scribed the panel lines
where it was lost and restored the rivet detail as best I could using a Tamiya
rivet tool (I don’t recommend this tool as its configuration makes it difficult
to see the rivet wheel and thus alignment along a scribe line; I’m searching to
buy a better tool). Next up was deciding upon the ordnance load for the plane. I
checked the references and settled on a mix of Mk 82 500 pound bombs, two AGM-65
Maverick missiles on the triple launch rail provided, and one cluster bomb. Once
the pylons were completed and each pylon’s ordnance test fitted the pylons were
attached to the model using the thin acrylic cement. The model has moulded
styrene shackles that require some fitting to glue to the pylons. Care is needed
to align the pylons at the correct angle; all hang vertically from the wing even
in the sections that have dihedral. After wiping down the models with isopropyl
alcohol to remove oil and residue the engine openings, landing gear openings and
cockpit were masked off in preparation for painting.
ear of
the nacelle attachment to the fuselage. The wing fit is the worst I’ve
experienced in any Revell/Monogram kit I have built, leaving a large, almost
1/16th inch gap on the bottom where the wing meets the fuselage although the top
surface seam is tight. I filled this gap with a rolled out rope of Green Stuff
epoxy putty followed by Bondo Auto body putty applied on top flush with the
surface after the Green Stuff set up. Putty filling is required intermittently
along the fuselage joint and unfortunately the consequence of the putty and
sanding is loss of the panel line and rivet detail. I re-scribed the panel lines
where it was lost and restored the rivet detail as best I could using a Tamiya
rivet tool (I don’t recommend this tool as its configuration makes it difficult
to see the rivet wheel and thus alignment along a scribe line; I’m searching to
buy a better tool). Next up was deciding upon the ordnance load for the plane. I
checked the references and settled on a mix of Mk 82 500 pound bombs, two AGM-65
Maverick missiles on the triple launch rail provided, and one cluster bomb. Once
the pylons were completed and each pylon’s ordnance test fitted the pylons were
attached to the model using the thin acrylic cement. The model has moulded
styrene shackles that require some fitting to glue to the pylons. Care is needed
to align the pylons at the correct angle; all hang vertically from the wing even
in the sections that have dihedral. After wiping down the models with isopropyl
alcohol to remove oil and residue the engine openings, landing gear openings and
cockpit were masked off in preparation for painting.
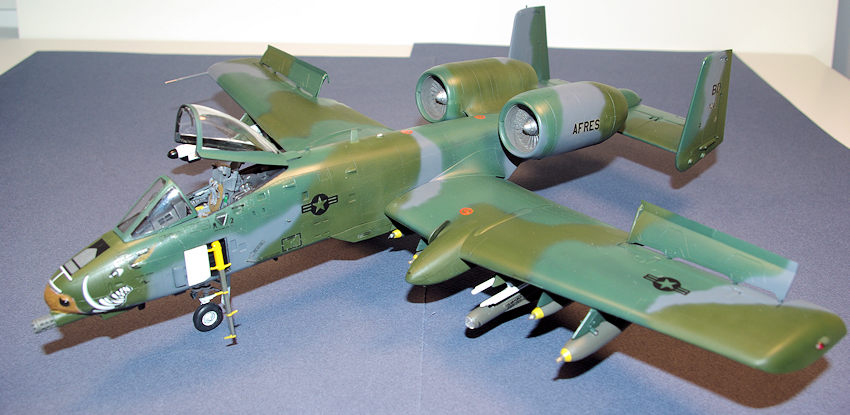
| COLORS & MARKINGS |
I’m not an expert on the A-10 and its
variant camouflage but most photos show either the two tone gray scheme which
seems to be the current in use and the European I scheme when the planes were
primarily tasked to the European NATO region for operations. The Euro I scheme
was used as shown on the instructions and the model was primed with Rustoleum
gray primer and then preshaded along panel lines with Rustoleum gloss black both
decanted from the spray can for airbrushing. The three colors were then air
brushed free hand following the pattern diagrams with the order of application
being gray followed by the two greens. I did not have European Gray FS36081 so I
used Humbrol Matt Gray #27, foll owed by Testors Model Master Medium Green
FS34102 and MM European I Dark Green FS34092 all airbrushed free hand following
the camouflage scheme diagram. The model was then given a coat of Testors
Glosscote lacquer in preparation for the decals.
owed by Testors Model Master Medium Green
FS34102 and MM European I Dark Green FS34092 all airbrushed free hand following
the camouflage scheme diagram. The model was then given a coat of Testors
Glosscote lacquer in preparation for the decals.
I decided to use the Revell kit decals since I did not have a good after market set but my suspicion of application problems to come was soon realized. The film is thick and does not apply against the surface well leading to a lot of silvering in the areas of clear film. I had cut off the peripheral clear film with a sharp scalpel before application but despite using Solvaset in addition to Microset silvering of the clear film was prominent. I ended up carefully slicing out the clear film as much as possible from the applied decals with a sharp scalpel, steady hand, and magnification viewing and after several applications of Solvaset the result is passable (for me) but this is probably the last time I will go with the Revell (Monogram) kit decals over a non-silver/metallic finish. The nose art decal comes in a right and left side decal with a lot of clear film connecting the jaws, eyes, and eyebrows. To reduce the silvering issue I removed most of the clear film when cutting out the decals. The brown area has one built in slit but that turned out to be insufficient as the thickness of the decal prevents conforming to the compound curves of the nose; you will need to slit the decals to improve the adhesion. The nose art required a lot of repeated Microset and some Solvaset but even with that you get a barely passable result due to silvering and the compound curves involved. In addition I needed to touch up gaps with some Vallejo acrylic paint using a mixture of Khaki and Flat Earth mixed to match. After several days of drying for the decals the entire model was airbrushed with a coat of 50/50 Dullcote and Glosscote for a satin/semi-matt finish followed by some minimal weathering with Vallejo black.
The small parts including
the landing gear doors, canopy, wheels, landing lights, pitot tube and ordnance
were at tached. I used Testors clear parts cement for the canopy hood to the
canopy frame and the same cement to attach the windscreen. The attachment hole
in the main wheels is too a large diameter for the landing gear strut. I filled
the hole with a section of cylindrical sprue, filed it flat and re-drilled the
hole to the correct diameter of the landing gear strut. The complex landing gear
of the A-10 requires close attention. The A-10 separate landing gear doors add
complexity to the structure and assembly process and Monogram’s representation
and fit of these parts is poor with unclear locating. The instructions actually
specify the wrong door part number and one needs take care to align the door
components correctly according to the right and left side. The fit and alignment
of the supplied door linkage parts is poor and further complicated by inaccurate
placement of the parts compared to the full size aircraft. After struggling with
the kit linkage parts I ended up discarding these for links made of stretched
sprue although the result still lacks accuracy. I replaced the pitot tube which
is provided as integrally molded to the upper half of the right wing. However,
the mould is completely unsatisfactory with only the upper side correctly molded
and the lower side being a non-descript piece of plastic. I fabricated a
replacement using two sizes of hypodermic needle, fitting one inside the other.
It was then glued with CA into a hole drilled in the wing at the correct
location.
tached. I used Testors clear parts cement for the canopy hood to the
canopy frame and the same cement to attach the windscreen. The attachment hole
in the main wheels is too a large diameter for the landing gear strut. I filled
the hole with a section of cylindrical sprue, filed it flat and re-drilled the
hole to the correct diameter of the landing gear strut. The complex landing gear
of the A-10 requires close attention. The A-10 separate landing gear doors add
complexity to the structure and assembly process and Monogram’s representation
and fit of these parts is poor with unclear locating. The instructions actually
specify the wrong door part number and one needs take care to align the door
components correctly according to the right and left side. The fit and alignment
of the supplied door linkage parts is poor and further complicated by inaccurate
placement of the parts compared to the full size aircraft. After struggling with
the kit linkage parts I ended up discarding these for links made of stretched
sprue although the result still lacks accuracy. I replaced the pitot tube which
is provided as integrally molded to the upper half of the right wing. However,
the mould is completely unsatisfactory with only the upper side correctly molded
and the lower side being a non-descript piece of plastic. I fabricated a
replacement using two sizes of hypodermic needle, fitting one inside the other.
It was then glued with CA into a hole drilled in the wing at the correct
location.
| CONCLUSIONS |
The Republic A-10 is an aircraft that always seemed imposing in its brutish form and function. I saw and took photos of one up close in the early 1980’s at the McClelland Air Force Base (Sacramento, CA) open house and all those in attendance were witness to an impressive flying display of the aircraft. It just took me over 30 years to finally build a model of this great airplane. The Revell/Monogram A-10 shows its age in molding technology and it was certainly a struggle to build. I would strongly recommend using a aftermarket decal set of your choice since the kit decals perform so poorly. Nonetheless it still looks great in my model line up.
| REFERENCES |
A-10 Warthog in Detail & Scale, Dana Bell, Detail & Scale, Vol. 19, 1986
Fairchild/Republic A-10 Thunderbolt II, Robert DeMaio, 1981
A-10 Warthog in Action, Lou Drendal, Squadron/Signal Publications
A-10 Warthog, Mini in Action #4, Ken Neubeck, Squadron/Signal Publications, 1995
Fairchild Republic A-10 Thunderbolt II, Wikipedia
Back to the Main Page Back to the Previews Index Page
Back to the Previews Index Page