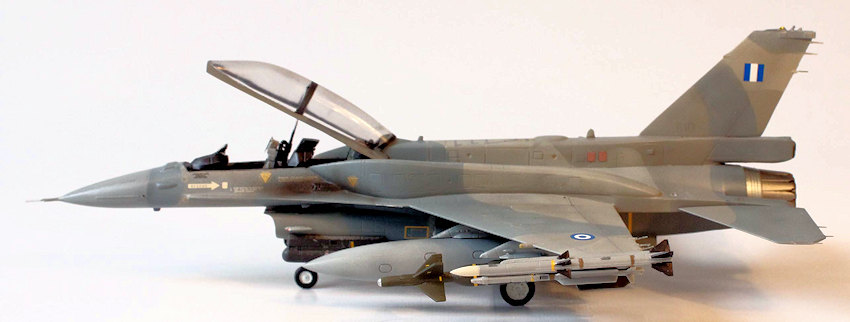
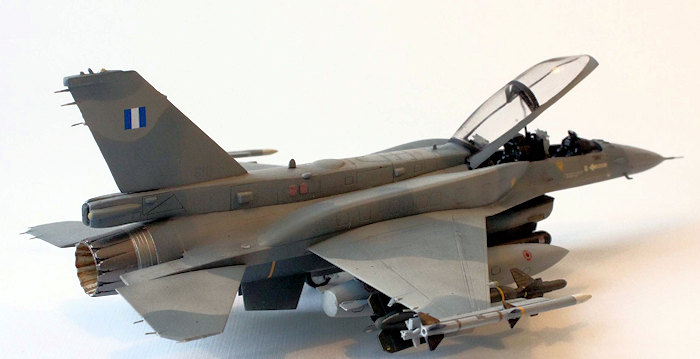
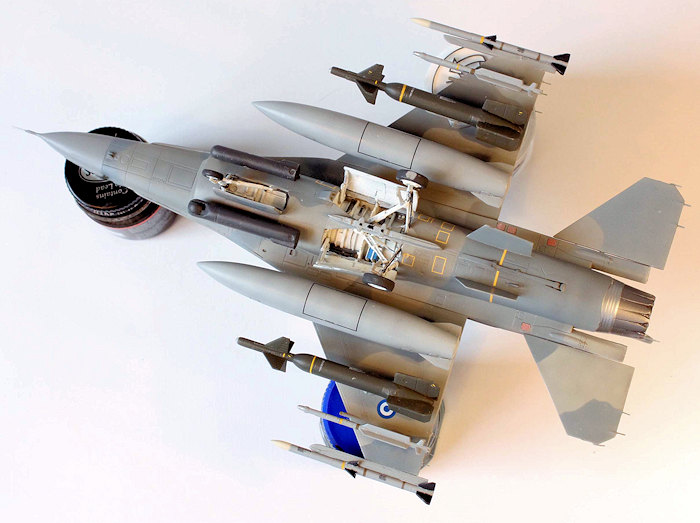
Kinetic 1/72 F-16D Block 52+
| KIT #: | 70220 |
| PRICE: | 24 Euros |
| DECALS: | Two options |
| REVIEWER: | Fernando Rolandelli |
| NOTES: |
| HISTORY |
The
Greek military had a requirement for a deep-strike aircraft because of an
agreement that Greece had with Cyprus under which the Greek armed forces would
protect Cyprus in case of attack. In 1999, Greece announced that it would
acquire the Block 50/52+ in preference to the F-15H, a "Hellenized" version of
the F-15E Strike Eagle. On March 10, 2000, the Greek government signed a Letter
of Offer and Acceptance for 34 single seat and 16 two-seat F-16 Block 50/52+
aircraft. An option for ten additional examples (6 Cs and 4
 Ds) was firmed up in
September 2001. They were handed over to the Greek Air Force as part of the
Peace Xenia III FMS program in October of 2002
Ds) was firmed up in
September 2001. They were handed over to the Greek Air Force as part of the
Peace Xenia III FMS program in October of 2002
The Block 52+ aircraft are AMRAAM-capable. They also have the Northrop Grumman APG-68(V)9 radar with a new extended-range search mode which replaces the existing air-to-air search mode and provides an increase in detection range, an improved data modem, a digital terrain system, a Joint Helmet Mounted Cueing System, a horizontal situation display, an APX-113 IFF, a laser ring embedded GPS/INSD system, and the Raytheon Advanced Self Protetection Integrated Suite II. The radar can also perform high-resolution ground mapping, giving the aircraft a full all-weather capability, and it is served by color flat-panel multifunction displays in the cockpit, fully compatible with night vision imaging systems. They also have full provisions for an APSIS internal electronic countermeasures suite
The conformal fuel tanks provide a total of 366 Imp Gall of additional fuel. The tanks do not affect maneuverability to any significant extent, although they do lower the maximum speed by about 5 percent. (Data from JBaugher’s website)
| THE KIT |
 Kinetic’s 1/72 F-16s followed their much criticized 1/48 kit. Though much
simpler kits, they share most of the woes of its big brother. The surface is
rough, details and small pieces are oversized or indistinct, and panel lines are
virtually the same as in the 1/48 kit (imagine!) There are big ejection marks in
the undersurface of the wings, made integral to the upper fuselage. Static
dischargers are unacceptably thick. Nose profile, however, looks correct and
there is no hint of the droop that haunted the early 1/48 kit. There is a good
weapons selection, coming from the “NATO Weapons” set. Decals are included for
any Greek or Polish F-16D (not that there are many). The under-intake ECM
antenna typical of Polish machines is included. I seriously considered
kitbashing it with a Revell B, but finally decided to bite the bullet and try to
build it.
Kinetic’s 1/72 F-16s followed their much criticized 1/48 kit. Though much
simpler kits, they share most of the woes of its big brother. The surface is
rough, details and small pieces are oversized or indistinct, and panel lines are
virtually the same as in the 1/48 kit (imagine!) There are big ejection marks in
the undersurface of the wings, made integral to the upper fuselage. Static
dischargers are unacceptably thick. Nose profile, however, looks correct and
there is no hint of the droop that haunted the early 1/48 kit. There is a good
weapons selection, coming from the “NATO Weapons” set. Decals are included for
any Greek or Polish F-16D (not that there are many). The under-intake ECM
antenna typical of Polish machines is included. I seriously considered
kitbashing it with a Revell B, but finally decided to bite the bullet and try to
build it.
As usual, an Eduard Zoom PE set was included. It fit like a glove and really adds to the cockpit appearance.
| CONSTRUCTION |
The first step was polishing the whole external main surfaces with wet’n’dry and Tamiya polish. Then some coats of primer and further buffing. After a week or so of this process, the surfaces had changed a lot for the better.
 Assembly was not easy but not inordinately difficult. The kit is well designed,
but the injection technology used was a step behind the design tolerances (much
like Eastern Europe kits of old) Main undercarriage is one piece, and should be
inserted before closing the wheel bay. I choose to separate the two legs and
follow a more orthodox sequence (the amount of sanding required would have
compromised the u/c integrity) but it was then a chore to fit and align. The
intake is complex but well designed, but then the fit of the pieces is
indistinct, so that a lot of dry fitting and care is needed. The
Assembly was not easy but not inordinately difficult. The kit is well designed,
but the injection technology used was a step behind the design tolerances (much
like Eastern Europe kits of old) Main undercarriage is one piece, and should be
inserted before closing the wheel bay. I choose to separate the two legs and
follow a more orthodox sequence (the amount of sanding required would have
compromised the u/c integrity) but it was then a chore to fit and align. The
intake is complex but well designed, but then the fit of the pieces is
indistinct, so that a lot of dry fitting and care is needed. The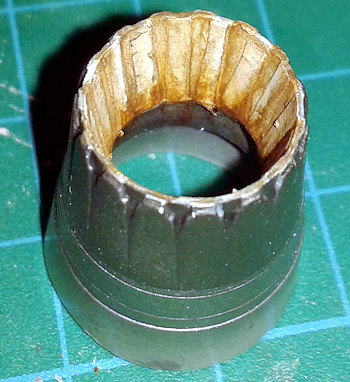 fearful looking
exhaust “tube” matches reasonably well the rear fuselage; I detailed the exhaust
itself with Tamiya tape petals. Pylons leave a wide gap to the wing’s surface.
The long spine requires a lot of puttying and sanding along the center line, but
it fits well the fuselage. The CFTs look like well fitting, but they are not:
gluing one end makes the other pop up. Self-inflicted damaged included the pitot
tube, which broke off in the final stages of painting, and the canopy (easily
the best single piece in the entire kit) which I ruined when clumsily attempting
to tint it. Luckily, I had a Revell B which had come with two canopies; it
fitted perfectly (therefore I think an aftermarket like Rob Taurus’ would also)
Dihedral symmetry (not to speak of a completely correct angle of incidence of
the wing) was not perfect and I resorted to some u/c leg bending and even to
sanding differentially flat the wheels to get anywhere near it. Leave off ASPIS
antenna on the left side of the tail extension if building a Greek machine.
fearful looking
exhaust “tube” matches reasonably well the rear fuselage; I detailed the exhaust
itself with Tamiya tape petals. Pylons leave a wide gap to the wing’s surface.
The long spine requires a lot of puttying and sanding along the center line, but
it fits well the fuselage. The CFTs look like well fitting, but they are not:
gluing one end makes the other pop up. Self-inflicted damaged included the pitot
tube, which broke off in the final stages of painting, and the canopy (easily
the best single piece in the entire kit) which I ruined when clumsily attempting
to tint it. Luckily, I had a Revell B which had come with two canopies; it
fitted perfectly (therefore I think an aftermarket like Rob Taurus’ would also)
Dihedral symmetry (not to speak of a completely correct angle of incidence of
the wing) was not perfect and I resorted to some u/c leg bending and even to
sanding differentially flat the wheels to get anywhere near it. Leave off ASPIS
antenna on the left side of the tail extension if building a Greek machine.
External load was numerous and varied; those cylindrical objects are never easy to assembly, but the general assembly took so long that I had enough time to perfect them; so that they are unusually well finished for a build of mine.
| COLORS & MARKINGS |
At last
I had a kind of a blob of putty and primer; I knew that only a killer painting
scheme would save the day. The Greek “Fantasma” (“Ghost”) scheme, said to have
been taken after a USAF Aggressor scheme, certainly provides it, but in this
scale is daunting. I choose to mask the surfaces in layers using Blue-Tack; then
flaws were corrected with Tamiya tape masking. The schematic in the inst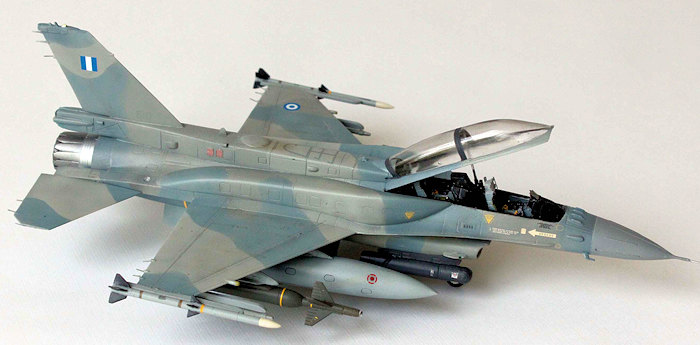 ructions
is very vague; I had a better one (that in Icarus decals) at hand; however, I
cannot say I matched the scheme to perfection. I used Xtracolour paints over
Grey primer with a dark preshade, painting unevenly to approach the dirty look
of these machines. Pylons and tanks were painted FS36375. General weathering was
achieved with Tamiya Smoke liberally sprayed in mottles and streaks over the
upper surfaces, and some MiG Grime streaks and spills. The weathered effect was
attained to a degree.
ructions
is very vague; I had a better one (that in Icarus decals) at hand; however, I
cannot say I matched the scheme to perfection. I used Xtracolour paints over
Grey primer with a dark preshade, painting unevenly to approach the dirty look
of these machines. Pylons and tanks were painted FS36375. General weathering was
achieved with Tamiya Smoke liberally sprayed in mottles and streaks over the
upper surfaces, and some MiG Grime streaks and spills. The weathered effect was
attained to a degree.
I used the kit’s decals, which performed flawlessly, though they took a long time to detach from the backing paper. The serial number looks appropriately dark on the sheet, but when applied over the FS36251 almost disappeared. I gave up applying every single stencil.
The kit comes with both the AN/ALQ-13/14 combo used by the Greeks and the Sniper XL used by the Poles (a multi-piece affair); however it only comes with the IRIS-T used by the former (the latter uses the AIM-9X) Modern jets are seldom seen with full armament; nevertheless, I chose to fit the GBU-24 LGBs and the big tanks provided. The undersurface pylon I left alone (the usual tank carried there is not included; I guess it is made redundant with the CFTs and big underwing tanks) Instructions show an AN/ALQ-28 LITENING, but, exception made of the decals, it is nowhere to be seen.
| CONCLUSIONS |
The model looks the part and it is reasonably accurate. It was a pig to build but nothing out of the ordinary. If you approach it with a high level of expectations it might be you will end up frustrated; it would be difficult to extract a masterpiece out of it. But with patience and some hard work an acceptable result can certainly be attained.
| REFERENCES |
“f-16.net” website
“JBaugher” website
23 June 2016
Copyright ModelingMadness.com
If you would like your product reviewed fairly and fairly quickly, please contact the editor or see other details in the Note to Contributors.