| KIT #: | MA 123/6423 |
| PRICE: | $43.00 |
| DECALS: | Four options |
| REVIEWER: | Stephen Young |
| NOTES: |
| HISTORY |
The Fairchild Republic A-10 Thunderbolt
II is well known to anyone who follows current events as the aircraft has seen
much combat since the first Gulf War in 1991 throughout Iraq, the Mideast, and
Afghanistan. Developed by Fairchild-Republic in response to a 1967 United States
Air Force directive for a low-cost attack aircraft specifications were developed
using the feedback from combat in Vietnam based on the experience with the
Douglas AD Skyraider and other contemporary jet aircraft and their specific
short comings with regard to the close air support role. Revised specifications
required the aircraft be designed specifically for a 30 mm rotary cannon, a
relatively low maximum airspeed, a 16,000 pound external weapons load, and a 28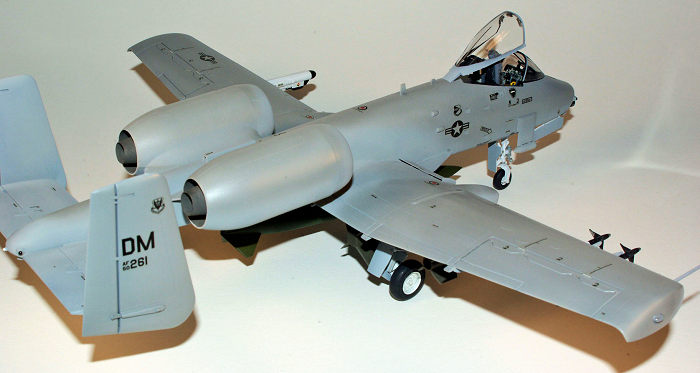 5
mile mission radius. Fairchild-Republic won the prototype fly-off against the
Northrop Aviation design. The first production A-10 flew in October 1975,
deliveries commenced in March, 1976 and the last of 715 airplanes was delivered
in 1984. Since then the A-10 has received many upgrades, undergone a wing
replacement program, and service life upgrades. In 2005 the entire fleet of 356
surviving aircraft began receiving Precision Engagement upgrades improving the
fire control system, electronic countermeasures, smart bomb targeting, and all
weather capability. Upgraded aircraft were re-designated A-10C. Operationally
the A-10 has demonstrated close air support capability unmatched by any other
western aircraft but despite a stellar record of battle tested accomplishment
has been a target of budget and politically driven conflict regarding future use
and future replacement. Through it all retirement of this great aircraft appears
to have been deferred by the Air Force until 2022 when it will be replaced by
the less capable (for close air support) F-35.
5
mile mission radius. Fairchild-Republic won the prototype fly-off against the
Northrop Aviation design. The first production A-10 flew in October 1975,
deliveries commenced in March, 1976 and the last of 715 airplanes was delivered
in 1984. Since then the A-10 has received many upgrades, undergone a wing
replacement program, and service life upgrades. In 2005 the entire fleet of 356
surviving aircraft began receiving Precision Engagement upgrades improving the
fire control system, electronic countermeasures, smart bomb targeting, and all
weather capability. Upgraded aircraft were re-designated A-10C. Operationally
the A-10 has demonstrated close air support capability unmatched by any other
western aircraft but despite a stellar record of battle tested accomplishment
has been a target of budget and politically driven conflict regarding future use
and future replacement. Through it all retirement of this great aircraft appears
to have been deferred by the Air Force until 2022 when it will be replaced by
the less capable (for close air support) F-35.
| THE KIT |
Tamiya’s 1/48th
scale A-10A remains widely available in different boxings on Ebay and is still
in production by Tamiya. I am primarily a out of the box builder although as my
building techniques have improved I will tend to add or change things that seem
to enhance the building experience and end result for me. The Tamiya kit
initially released in 1977 was purchased by me in the 1980’s during a visit to
Hong Kong and sat undisturbed as my professional and family life interfered with
model building. With so much attention to the A-10 over the past 15 years due to
active combat involvement I decided to build the model before the A-10 faded
from the scene. Tamiya’s kit was one of the company’s first 1/48th
scale models and incorporates features that are less refined than their current
new production kits. Molded in light gray plastic it appears to be based on the
pre-production aircraft and many features in the kit are missing from current
aircraft in operation including the radar warning antennas, the under wing and
landing gear sponson flare ejectors, and any features of the LASTE (Low Altitude
Safety and Targeting Enhancement) upgrade. The cockpit is basic with decals for
instruments and a generic looking Escapac
 ejection seat. Instructions are given
to place a 30 gram weight in the nose and front fuselage to prevent tail
sitting. Parts are all cleanly molded although nowhere as sophisticated in
detail as contemporary kits. Ordnance includes Mk-82 500 lb bombs, a laser
guided bomb, a TV guided bomb, a ALQ-119 and ALE-37 ECM pods, AGM-65 Mavericks,
and two multiple ejector racks (which were never used with the A-10
operationally). The comparable ordnance in the well known 1/48th
scale Hasegawa weapons kits looks much more accurate.
ejection seat. Instructions are given
to place a 30 gram weight in the nose and front fuselage to prevent tail
sitting. Parts are all cleanly molded although nowhere as sophisticated in
detail as contemporary kits. Ordnance includes Mk-82 500 lb bombs, a laser
guided bomb, a TV guided bomb, a ALQ-119 and ALE-37 ECM pods, AGM-65 Mavericks,
and two multiple ejector racks (which were never used with the A-10
operationally). The comparable ordnance in the well known 1/48th
scale Hasegawa weapons kits looks much more accurate.
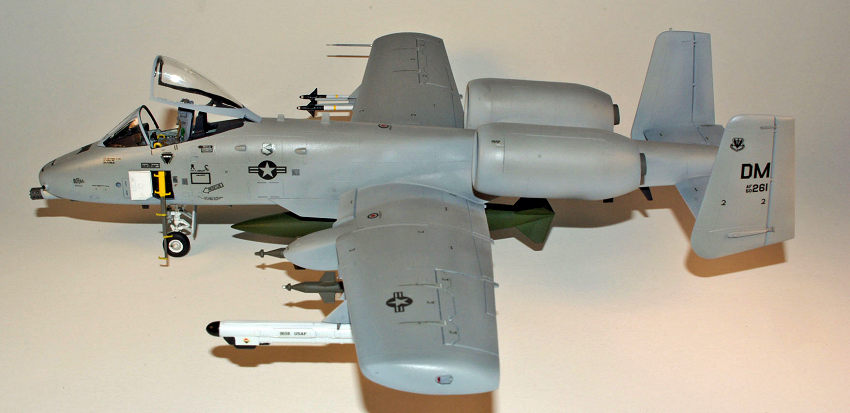
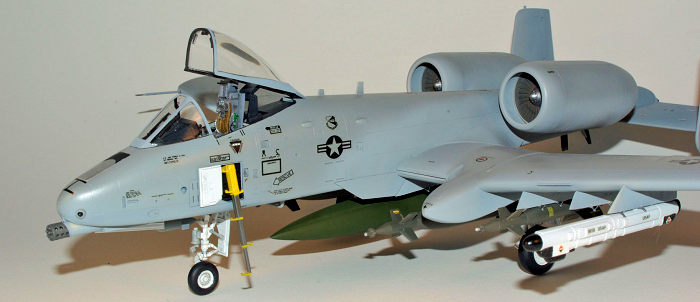
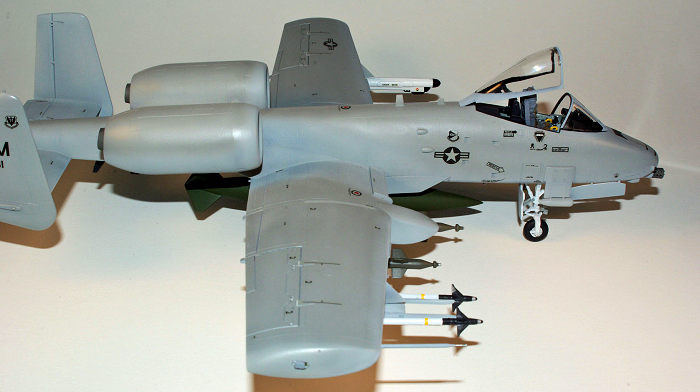
Since some of the LASTE upgrades are readily visible I decided to add some of the most visible missing features to the model. This would involve some simple scratch building as no after market upgrade with these features seem to be currently available. On the Tamiya kit the panel lines are engraved but there are no rivets. Unfortunately there are some definite shape differences on the Tamiya kit regarding the landing gear sponsons, pylons, and engine inlets compared to reference photos. The Tamiya kit ordnance attachments are very simplified presumably for ease of assembly and consist of rather large molded in plastic pins or channels to attach the ordnance to the pylons and no provided shackles. I decided it would look so inauthentic that it would be best to upgrade with some shackle parts from the Eduard Hobby Boss A-10A photo etch set and pins made of brass rod to attach the ordnance. I also decided to customize the weapons set up for the model to add some visual interest by trading some ordnance with the Monogram/Revell A-10A and adding items from the 1/48th scale Hasegawa Weapons Sets A and C. The Tamiya folded 8 page instruction sheet includes detailed assembly instructions including a painting diagram for four aircraft; the pre-production Number 1 and Number 6 aircraft, a all gray aircraft and a later two tone gray aircraft in the markings of the 355th Tactical Fighter Wing 333rd Tactical Fighter Squadron at Davis –Monthan AFB, AZ.
| CONSTRUCTION |
I started construction by washing all
part sprues in warm water with dish washing detergent. My intent was initially
to build the model essentially out of the box so the cockpit areas of the
fuselage were airbrushed with Testors Aircraft Gray. The cockpit tub was also
sprayed Aircraft Gray and the interior components painted by hand with Testors
Acrylic Interior Black. For hand painting of flat surfaces I get the best
results not using a traditional brush but rather Microbrush Superfine tuft
brushes. The kit decals were used for the Tamiya A-10. I decided to replace the
Tamiya seat with a Squadron True Details resin ACES II seat as no fitting was
needed. I did not realize until final fitting of the canopy that the seat sits
too high to allow the canopy to be assembled in the closed position so if one
wants to close the canopy some of the bottom part of the seat will need to be
removed. The Tamiya cockpit installs from below the nose section of th e fuselage
into the previously joined fuselage halves so the fit demonstrates positive
alignment. The fuselage halves were joined a short section at a time using fast
setting Tap Plastics commercial acrylic cement with good alignment. The nose
gear bay fit is good although the appearance is less than completely realistic
due to the lack of a roof to the gear bay. Just before completing the nose gear
compartment assembly weight needs to be added if you want to prevent the model
from being a tail sitter. Unfortunately the amount of weight is a lot as the
long tail, twin tail, and engine nacelles move the natural center of gravity far
rearward. I added about 1.8 ounces in the form of five .38 caliber lead bullets epoxied with 5 minute epoxy into the nose in the model. The wing top and bottoms
join up fine. The engine nacelles and the fit of the inlet turbine to the
nacelle is poor in and both inlet and outlet need to be finished/painted before
assembly. Putty is required intermittently along the fuselage joint and
unfortunately the consequence of the putty and sanding is loss of the panel line
detail. I re-scribed the panel lines where it was lost. Next up was deciding
upon the ordnance load for each plane. The Tamiya ALQ-119 ECM pod is molded
integrally with the pylon so I cut is off with a jeweler’s saw since I was
planning to use the Hasegawa ALQ-119 pod instead. As I mentioned before the
Tamiya pylons have large attachment pins for the ordnance and no shackles so I
cut off all the pins and installed new pins made of 1/64 th inch brass rod and
glued in place with cyanoacrylate glue. I added photo etch Eduard shackles from
the Hobby Boss A-10 set. The radar warning antennae at the nose and tail were
made from sprue turned on a small lathe and atta
e fuselage
into the previously joined fuselage halves so the fit demonstrates positive
alignment. The fuselage halves were joined a short section at a time using fast
setting Tap Plastics commercial acrylic cement with good alignment. The nose
gear bay fit is good although the appearance is less than completely realistic
due to the lack of a roof to the gear bay. Just before completing the nose gear
compartment assembly weight needs to be added if you want to prevent the model
from being a tail sitter. Unfortunately the amount of weight is a lot as the
long tail, twin tail, and engine nacelles move the natural center of gravity far
rearward. I added about 1.8 ounces in the form of five .38 caliber lead bullets epoxied with 5 minute epoxy into the nose in the model. The wing top and bottoms
join up fine. The engine nacelles and the fit of the inlet turbine to the
nacelle is poor in and both inlet and outlet need to be finished/painted before
assembly. Putty is required intermittently along the fuselage joint and
unfortunately the consequence of the putty and sanding is loss of the panel line
detail. I re-scribed the panel lines where it was lost. Next up was deciding
upon the ordnance load for each plane. The Tamiya ALQ-119 ECM pod is molded
integrally with the pylon so I cut is off with a jeweler’s saw since I was
planning to use the Hasegawa ALQ-119 pod instead. As I mentioned before the
Tamiya pylons have large attachment pins for the ordnance and no shackles so I
cut off all the pins and installed new pins made of 1/64 th inch brass rod and
glued in place with cyanoacrylate glue. I added photo etch Eduard shackles from
the Hobby Boss A-10 set. The radar warning antennae at the nose and tail were
made from sprue turned on a small lathe and atta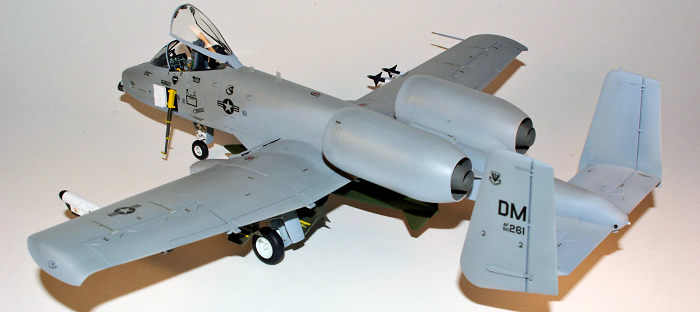 ched with acrylic cement. I
decided to scratch build a LAU-114/LAU-105 Sidewinder missile rail adapter for
the Tamiya A-10 using basswood and rocket railing parts from the spares box. The
ARC.com website has a complete photo feature on this unit. My representation is
not perfect but it looks good on the model. I consulted the references for
allowed combinations of ordnance and decided on a different mix than specified
in the kit instructions. I decided to use the 600 gal fuel tank on the Tamiya
moving it from the Revell kit. Once the pylons were completed and each pylon’s
ordnance test fitted the pylons were attached to the model using the thin
acrylic cement. After wiping down the models with isopropyl alcohol to remove
oil and residue the engine openings, landing gear openings and cockpit were
masked off in preparation for painting.
ched with acrylic cement. I
decided to scratch build a LAU-114/LAU-105 Sidewinder missile rail adapter for
the Tamiya A-10 using basswood and rocket railing parts from the spares box. The
ARC.com website has a complete photo feature on this unit. My representation is
not perfect but it looks good on the model. I consulted the references for
allowed combinations of ordnance and decided on a different mix than specified
in the kit instructions. I decided to use the 600 gal fuel tank on the Tamiya
moving it from the Revell kit. Once the pylons were completed and each pylon’s
ordnance test fitted the pylons were attached to the model using the thin
acrylic cement. After wiping down the models with isopropyl alcohol to remove
oil and residue the engine openings, landing gear openings and cockpit were
masked off in preparation for painting.
| COLORS & MARKINGS |
I’m not an expert on the A-10 and its variant camouflage but most photos show either the two tone gray scheme which seems to be the current in use and the European I scheme when the planes were primarily tasked to the European NATO region for operations. The Tamiya instructions provide for two pre-production all gray as well as the later two tone ghost gray scheme that I decided to do. The model seams where Bondo putty had been applied were sprayed with Rustoleum gray primer. The entire model was then pre-shaded with Rustoleum gloss black which I decant from the can for air brushing. I used Model Master Light Ghost Gray FS36408 for the base color followed by Model Master Dark Ghost Gray FS36320 for the overlay gray. The false canopy was airbrushed free hand with Model Master Gunship Gray FS36118.
 The model was then given a two coats of
Testors Glosscote lacquer in preparation for the decals.
The model was then given a two coats of
Testors Glosscote lacquer in preparation for the decals.
I decided to use the kit decals since I did not have a good after market set. The Tamiya decals have a thin clear carrier film and went on very well with no silvering. There are quite a few individual stenciling decals many of which are very small so you need to pay attention to the direction of the decal on the sheet and match it to the correct direction on the model.
Following the decal stage final assembly proceeded with addition of the small parts such as landing gear struts, doors, links, and weapons all attached with cyanoacrylate glue. The complex landing gear of the A-10 requires close attention. The accessory gear covers are excessively thick but I did not thin these parts. The linkage part engineering lacks scale accuracy but the fit is good.
| CONCLUSIONS |
The Republic A-10 is a aircraft that always seemed so imposing in its brutish form and function. I saw and took photos of one up close in the early 1980’s at the McClelland Air Force Base open house and all those in attendance were witness to a impressive flying display with the aircraft. It just took me over 30 years to finally build a model of this great airplane. The Tamiya A-10, despite some dimensional and shape shortcomings, looks very good in my opinion compared with my only other A-10 that is the Monogram/Revell kit. If I build another I think I will go for the Hobby Boss A-10 since it represents a version with the LASTE features and by most build reviews seems to be regarded as the best in this scale although more expensive. The Tamiya is a fairly easy building project and for less experienced modeler would be a good kit in my opinion and upon completion will look impressive in your display line-up.
| REFERENCES |
A-10 Warthog in Detail & Scale, Dana Bell, Detail & Scale, Vol. 19, 1986
Fairchild/Republic A-10 Thunderbolt II, Robert DeMaio, 1981
A-10 Warthog in Action, Lou Drendal, Squadron/Signal Publications
A-10 Warthog, Mini in Action #4, Ken Neubeck, Squadron/Signal Publications, 1995
Fairchild Republic A-10 Thunderbolt II, Wikipedia
22 May 2017
Copyright ModelingMadness.com
If you would like your product reviewed fairly and fairly quickly, please contact the editor or see other details in the Note to Contributors.
Back to the Main Page Back to the Review Index Page Back to the Previews Index Page