Hasegawa 1/72 F-16C Fighting Falcon
| KIT #: | D18 |
| PRICE: | $20.00 |
| DECALS: | Two options |
| REVIEWER: | Spiros Pendedekas |
| NOTES: | “Kalfakis Afterburner" No 72/1 decal sheet used |
| HISTORY |
 Key
features include a frameless bubble canopy for enhanced cockpit visibility,
a side-mounted control stick to ease control while maneuvering, an ejection
seat reclined 30 degrees from vertical to reduce the effect of g-forces and
the first use of a relaxed static stability/fly-by-wire flight control
system that helps agility. It has an internal M61 Vulcan cannon and 11
hardpoints. Although officially named "Fighting Falcon", the aircraft is
commonly known by the nickname "Viper" among its crews and pilots.
Key
features include a frameless bubble canopy for enhanced cockpit visibility,
a side-mounted control stick to ease control while maneuvering, an ejection
seat reclined 30 degrees from vertical to reduce the effect of g-forces and
the first use of a relaxed static stability/fly-by-wire flight control
system that helps agility. It has an internal M61 Vulcan cannon and 11
hardpoints. Although officially named "Fighting Falcon", the aircraft is
commonly known by the nickname "Viper" among its crews and pilots.| THE KIT |
 This
is the second generation 1/72 F-16 Hasegawa mold and was first issued in 1985
(the first generation was issued in 1976). This newer mold has been reboxed
around 70 (!) times so far, with the occasional addition of extra sprues to
cover newer/different versions.
This
is the second generation 1/72 F-16 Hasegawa mold and was first issued in 1985
(the first generation was issued in 1976). This newer mold has been reboxed
around 70 (!) times so far, with the occasional addition of extra sprues to
cover newer/different versions.
The specific kit is the 2008 exact reboxing of the “original” 2000
F-16CJ (Block 50) version, bought in 2025 at the normal price of around $20 and
for an in depth look, you may read our Editor’s preview found
in the ever growing MM archives.
It was to be a “simple and quick” build (whatever that means), having a
tight time frame, to be presented to an F-16 pilot.
| CONSTRUCTION |
I started by assembling the reasonably detailed for the scale cockpit
and trapped it, together with the main bay sidewalls, between the fuselage
halves. While no nose weight is mentioned (and I am not sure if most F-16 models
need any), just to be sure and since the one piece nose gear/wheel seemed
strong, I trapped 10 grams of fishing weights in the front. Basic cockpit color
was Tamiya XF-66 Light Gray, the stick grip and inner top anti glare areas were
painted black, while for all instruments and side consoles I used the good
looking kit instrument decals.
The seat had the same light gray frame, black head cushion and olive
drab lower cushions. The kit-provided good looking pilot was also attached. He
had gray helmet, black visor and boots, “flesh” face, white scarf, Hu102 Army
Green uniform and gray seat belts and oxygen mask.
 The
correct for my version air intake (a five piece affair, including the nose bay,
which is a part of it) was then assembled and carefully attached in position.
Its innards were painted white and its shallow end matt black, to add a sense of
depth. The one piece wings were next, having their three pylons at each wing
attached, followed by the 2-piece fin, the stabilators, the ventral strake, the
main gear bay divider and its skin cover. The wing tanks were also assembled but
not attached, to facilitate painting.
The
correct for my version air intake (a five piece affair, including the nose bay,
which is a part of it) was then assembled and carefully attached in position.
Its innards were painted white and its shallow end matt black, to add a sense of
depth. The one piece wings were next, having their three pylons at each wing
attached, followed by the 2-piece fin, the stabilators, the ventral strake, the
main gear bay divider and its skin cover. The wing tanks were also assembled but
not attached, to facilitate painting.
Hellenic F-16s sport a drag chute, fitted in a housing located aft of
the fin base. This was simulated by an appropriate sized styrene piece which was
attached aft of the fin base and blended to shape.
This concluded basic assembly which was of average to low complexity.
Fit was generally very good, apart from the “usual suspect” air intake which,
being an insert in order to cater for different versions, needs some extra
attention in order to blend with the fuselage and present a homogeneous result.
After a few rounds of filling and sanding, I temporarily attached (with tak) the
gear doors in position and took the bird to the paint shop!
| COLORS & MARKINGS |
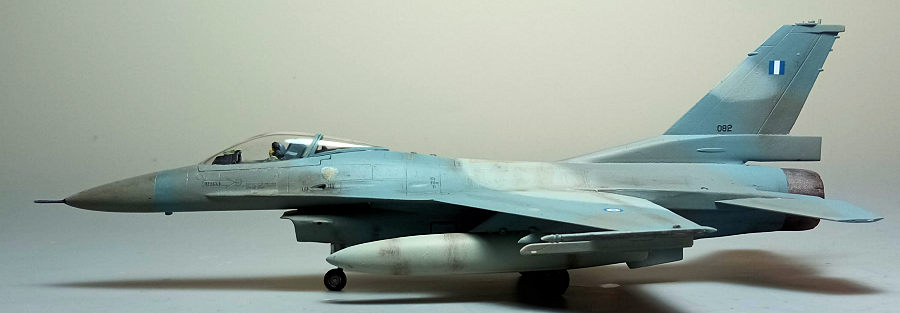
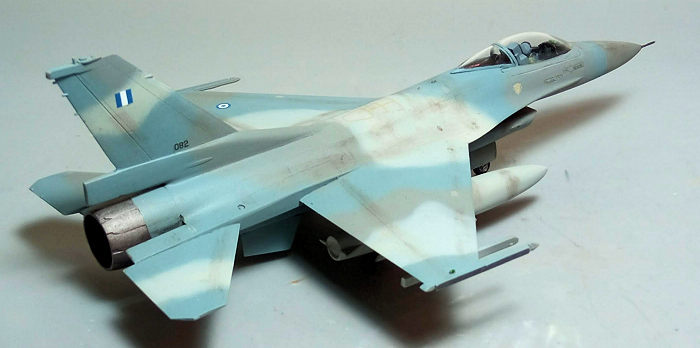
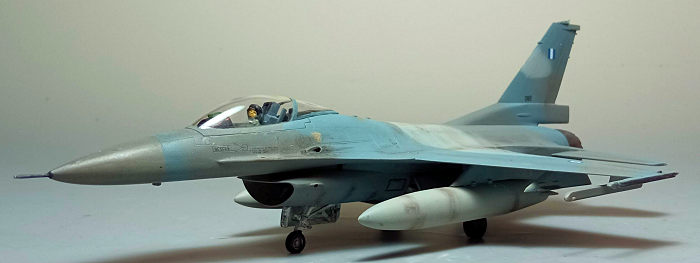 Opting
for the Aegean Ghost very nice scheme (a wraparound light/medium/blue gray
pattern derived from a USAF Aggressor one), I first sprayed the entire model
with Hu140 Gull gray, then masked the nose and freehanded the light gray and
light blue gray shades, using Hu127 US Ghost Gray and Hu145 Medium Gray (the
latter actually dries to a very nice light blue-gray shade). The wing tanks were
painted Hu127 US Ghost Gray. After a few overspray corrections I deemed the
result passable and coated the complete model with Future, to prepare it for
decaling.
Opting
for the Aegean Ghost very nice scheme (a wraparound light/medium/blue gray
pattern derived from a USAF Aggressor one), I first sprayed the entire model
with Hu140 Gull gray, then masked the nose and freehanded the light gray and
light blue gray shades, using Hu127 US Ghost Gray and Hu145 Medium Gray (the
latter actually dries to a very nice light blue-gray shade). The wing tanks were
painted Hu127 US Ghost Gray. After a few overspray corrections I deemed the
result passable and coated the complete model with Future, to prepare it for
decaling.
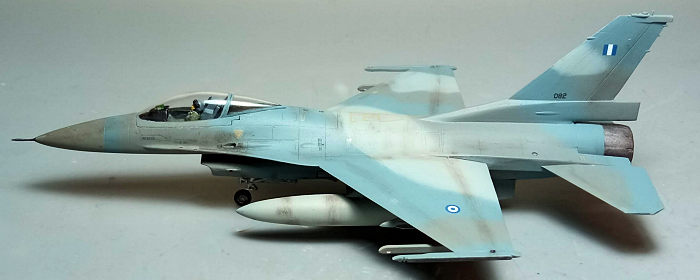
For the insignia I used the beautifully printed (by Cartograf) Kalfakis
Afterburner No 72/1 decal sheet (sadly OOP, likely for good…), while for the
stencils I used the kit decals which, despite their age, behaved beautifully. A
coat of Future sealed the decals.
| FINAL CONSTRUCTION |
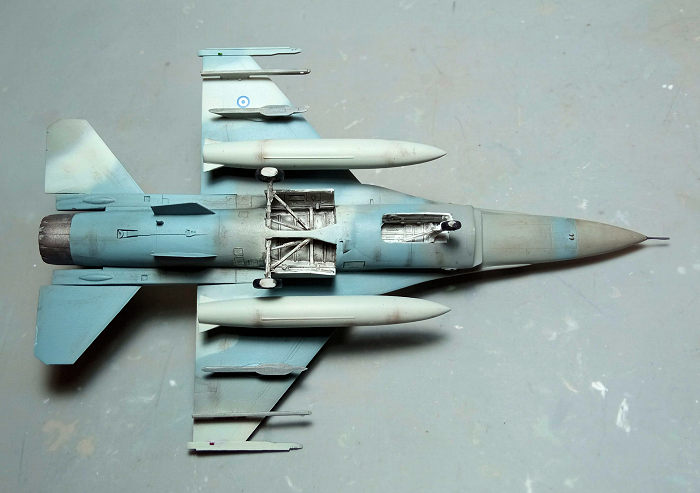
 The
delicate pitot was painted Testors Burned Metal and glued on, followed by
the 2-piece exhaust nozzle, which was simplistically painted Mr Hobby Burned
Iron and also attached. Apart from the wing tanks, which were attached in
position, I did not hang any ordnance (a personal preference). As a note,
the kit provides air-to-air missiles for all pylons but not any air to
ground ordnance, which has to be bought separately should you wish to arm
your F-16 likewise.
The
delicate pitot was painted Testors Burned Metal and glued on, followed by
the 2-piece exhaust nozzle, which was simplistically painted Mr Hobby Burned
Iron and also attached. Apart from the wing tanks, which were attached in
position, I did not hang any ordnance (a personal preference). As a note,
the kit provides air-to-air missiles for all pylons but not any air to
ground ordnance, which has to be bought separately should you wish to arm
your F-16 likewise.| CONCLUSIONS |
The F-16 has been lavishly represented by many kit manufacturers through
the years in 1/72 and this Hasegawa offering is certainly among the top
offerings: general shape is spot on, molding is very good, panel lines are
finely recessed and at the correct places, overall detail is great (the key
areas included), fit is mostly very good, transparencies are well molded and
clear, instructions are typical Hasegawa (excellent) and decals are well
printed.
Out of the box a really nice F-16 can emerge. Though some extra
attention will be required to the intake assembly and attachment, the kit builds
nicely, is not over engineered and I can even recommend it to a beginner who
can take his time and come up with a good looking F-16.
Happy Modeling!
Spiros Pendedekas
9 May 2025 Copyright ModelingMadness.com. All rights reserved. No
reproduction in part or in whole without express permission from the editor. If you would like your product reviewed fairly and fairly quickly, please contact the editor or see other details in the
Note to
Contributors.