Airfix 1/72 F-16A
| KIT #: | 74025 |
| PRICE: | $ |
| DECALS: | Three options |
| REVIEWER: | Spiros Pendedekas |
| NOTES: | Part of the “100 years of Flight” Airfix set that contains 7 kits |
| HISTORY |
The F-16 is a single-engine, highly maneuverable, supersonic, multi-role tactical fighter aircraft. It more or less emerged after the experiences gained in the Vietnam War, calling (among others) for a small, lightweight aircraft with high thrust-to-weight ratio, that could maneuver with the minimum possible energy loss. It had to be relatively inexpensive to build and simple to maintain. Well, the rest is history!
 Much smaller and lighter than its predecessors, but using advanced aerodynamics
and avionics and highly agile, the F-16 was the first fighter aircraft
purpose-built to pull 9-g maneuvers. Its features included a frameless bubble
canopy for better visibility, a side-mounted control stick, and a reclined seat
to reduce g-force effects on the pilot. It was armed with an internal M61 Vulcan
cannon in the left wing root and featured multiple locations for mounting
various missiles, bombs and pods.
Much smaller and lighter than its predecessors, but using advanced aerodynamics
and avionics and highly agile, the F-16 was the first fighter aircraft
purpose-built to pull 9-g maneuvers. Its features included a frameless bubble
canopy for better visibility, a side-mounted control stick, and a reclined seat
to reduce g-force effects on the pilot. It was armed with an internal M61 Vulcan
cannon in the left wing root and featured multiple locations for mounting
various missiles, bombs and pods.
The 138th Attack Squadron (138 ATKS) is a unit of the New York Air National Guard's 174th Attack Wing located at Hancock Field Air National Guard Base in Syracuse, New York. It was formed in August 1942 and has flown a variety of aircraft in a multitude of operations ever since. As of 2021, it is currently equipped with the MQ-9 Reaper Remotely Piloted Aircraft (RPA).
In 1991, the 138th TFS deployed to the Persian Gulf with 516 members in support of Operation Desert Storm. Limitations regarding the performance of their F-16s using gun pods in Close Air Support role resulted in quickly switching to bombing role, where they excelled, receiving the Air Force Outstanding Unit Award, with the "V" device for valor.
| THE KIT |
This is the
venerable Airfix mold, which initially appeared in 1982 and can be built either
as single or double seater. The specific kit appears to be a 1999 reboxing and
is contained in the very attractive 2003 Airfix “100 years of flight”
commemorative gift set. The sprues and clear fret are sealed together in a
single bag, meaning potential scratches. Unsealing the bag, I was greeted with
three light gray sprues that contain all parts of what seems to be a not that
complicated build. Detail is raised all over, except from flaperons, slats and
rudder hinge lines, where it is engraved.
 Cockpit is simplistic with a plain looking seat, an instrument panel and a
stick. An average pilot is supposed to be attached to the seat. Landing gear and
wheel wells are also looking relatively simple, at least they are not looking
toy-ish. Wings, rudder and stabilators are one piece, a nice touch. The intake
not only is shallow, but lacks the distinctive mid-strut. The exhaust is also
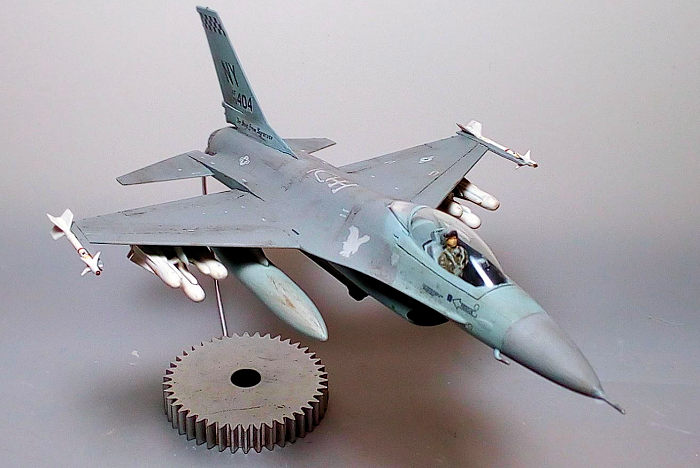
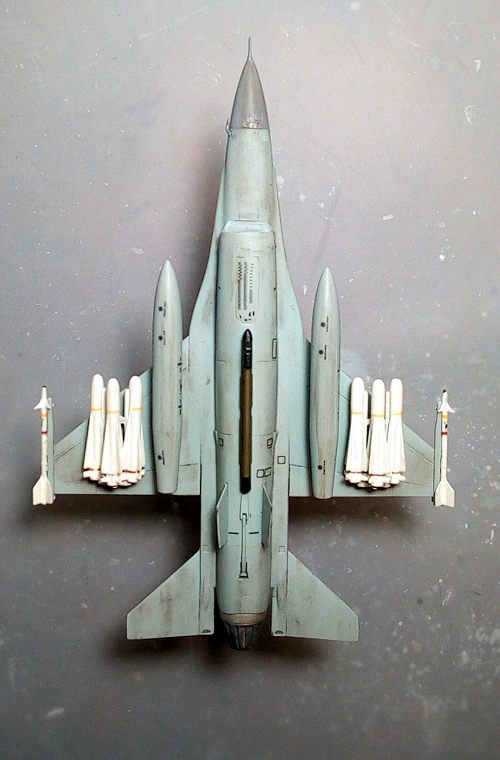
shallow, with the exhaust cone average looking. External stores are well
appointed and include two wing tanks, six AGM-65 Mavericks, two GBU-16s, two
Sidewinders and an AN/ALQ-119 ECM pod.
Cockpit is simplistic with a plain looking seat, an instrument panel and a
stick. An average pilot is supposed to be attached to the seat. Landing gear and
wheel wells are also looking relatively simple, at least they are not looking
toy-ish. Wings, rudder and stabilators are one piece, a nice touch. The intake
not only is shallow, but lacks the distinctive mid-strut. The exhaust is also
shallow, with the exhaust cone average looking. External stores are well
appointed and include two wing tanks, six AGM-65 Mavericks, two GBU-16s, two
Sidewinders and an AN/ALQ-119 ECM pod.
Clear parts are clear but thick and, in my case, not very well molded, with
heavy flash. Instructions are done in typical (now older) Airfix style, two b/w
folded A3 sheets presented as a mini booklet, with a short history at the front
and the construction spread in 11 clear steps. Three schemes are provided, two
are single seaters ANG birds, with the third being a double seater Belgian, all
in Hill Gray camo. Decals contain a lot of stenciling, which might help beefing
up the simplistic kit looks, but are the typical older style Airfix/Heller ones:
their registration is questionable, with some white bleeding off the gray areas.
All in all, the initial impression is that this is an adequate kit, if not a tad
on the simplistic side for the 2020 decade. That said, since I love tackling
older/simpler kits, I decided to give this kit a go, finishing it as a
“wheels-up” 138 TFS bird, as it stood in the Gulf during operation “Desert
Storm”.
| CONSTRUCTION |
 I started by
trapping the cockpit tub between the top and bottom fuselage halves, then
attached the front top spine part that covers the rear cockpit opening (it is
not attached when building the double seater). I then attached the wings,
stabilators, airbrakes and aft fuselage cylindrical part. The two piece air
intake was next, followed by the three gear doors in “closed” position, the two
strakes and the arresting hook. Fit was more or less good, with some care needed
in blending the intake to the lower fuselage (a common “attention” area to most
F-16 kits, especially the “old school” ones). The two wing tanks were also
assembled at this time.
I started by
trapping the cockpit tub between the top and bottom fuselage halves, then
attached the front top spine part that covers the rear cockpit opening (it is
not attached when building the double seater). I then attached the wings,
stabilators, airbrakes and aft fuselage cylindrical part. The two piece air
intake was next, followed by the three gear doors in “closed” position, the two
strakes and the arresting hook. Fit was more or less good, with some care needed
in blending the intake to the lower fuselage (a common “attention” area to most
F-16 kits, especially the “old school” ones). The two wing tanks were also
assembled at this time.
The model was then filled and sanded and the wing pylons were attached. I was
ready to take it to the paint shop, but simply could not live with the
strut-less intake: I thus drilled a hole at an angle from the intake underside
and inserted a stretched sprue piece of more or less appropriate thickness,
which was secured in position with thin glue and the area then filled and sanded
smooth. While it is true that in the real plane the strut has a sort of
hyper-elliptical cross section, I deemed my “circular cross section” approach
passable and headed to the paint shop!
| COLORS & MARKINGS |
 This was
going to be an early Hill Gray F-16, so I first gave the topsides, including the
radome, a coat of Hu140 dark gray, then masked it off with masking tape and also
by using some tack for the distinctive “Hill Gray” curved demarcation line at
the front fuselage sides. I then applied Hu128 (for the interim gray) at the
front, the complete fin, the strakes outer areas, the vertical fuselage areas
aft of the wings and the air intake sides, then masked it off as well. Hu127 was
finally applied for the lightest of the grays, basically covering all undersides
areas. The wing tanks were painted Hu127, as well. After removing the masks, I
gave the whole model and the wing tanks a coat of Future and proceeded to
decaling.
This was
going to be an early Hill Gray F-16, so I first gave the topsides, including the
radome, a coat of Hu140 dark gray, then masked it off with masking tape and also
by using some tack for the distinctive “Hill Gray” curved demarcation line at
the front fuselage sides. I then applied Hu128 (for the interim gray) at the
front, the complete fin, the strakes outer areas, the vertical fuselage areas
aft of the wings and the air intake sides, then masked it off as well. Hu127 was
finally applied for the lightest of the grays, basically covering all undersides
areas. The wing tanks were painted Hu127, as well. After removing the masks, I
gave the whole model and the wing tanks a coat of Future and proceeded to
decaling.
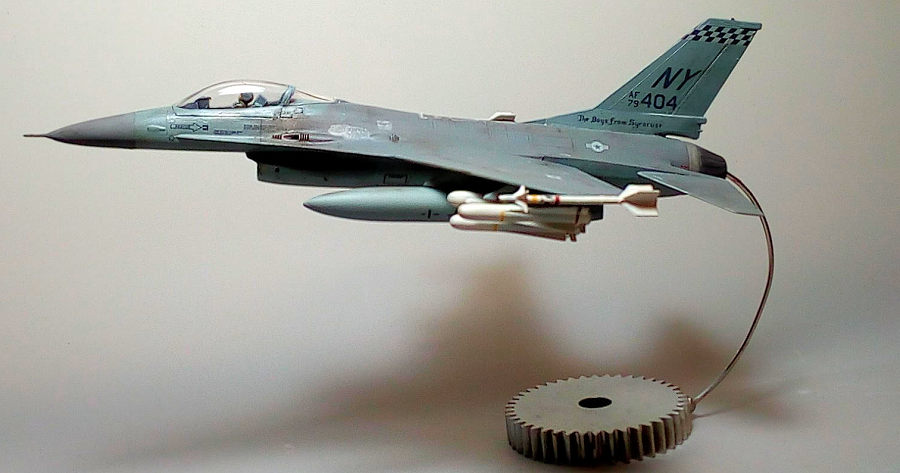
I used the kit decals, in order to represent “The Boys from Syracuse” #79404
bird, as it stood in Al Kharj Air Base in Saudi Arabia during Operation Desert
Storm in 1991. A number (maybe all) of those Gulf War “Syracusian” F-16s carried
a ferocious snake and a falcon on the port and starboard fuselage sides
respectively. The specific bird carried an impressive tally of accomplished
missions onto the nose LG door. Decals detached easily from their backing
paper and adhered well onto the surface, but their registration was off, with
the white bleeding through gray, which, in some cases was not tolerable,
Thankfully, I had a leftover decal sheet of the same kit and it was much better
in registration, so I used those decals. It is true that the hefty number of
stencils added a lot of interest to this simplistic and “all gray” model.
An interesting “discovery” was that some, if not all ANG F-16As of that time
(and definitely "my'' chosen bird, as I was lucky enough to find pictorial
evidence) did not feature walk lines, only the “NO STEP/WALKWAY '' coding.
Typically, my “discovery” took place after having applied walk lines, which were
only correct for the Belgian version of the kit…. Thankfully, they were easily
removed.
A coat of Future sealed the decals.
| FINAL CONSTRUCTION |
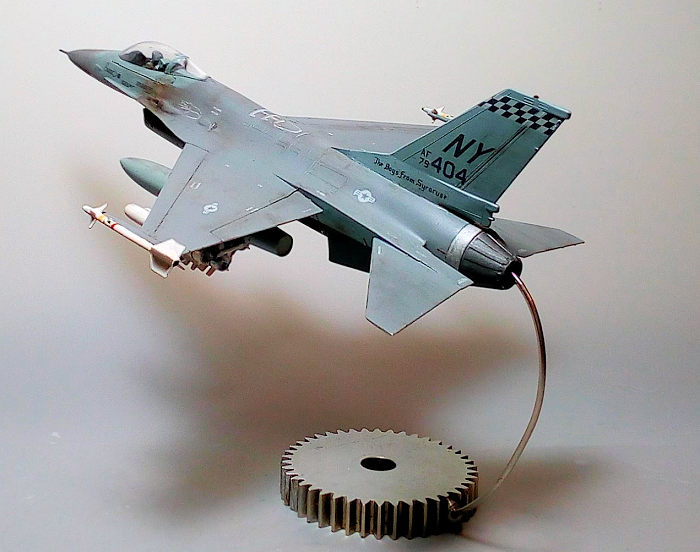
In order to
finish the cockpit, I attached the instrument panel with the tiny transparent
HUD upon it, then the side stick, the seat, followed by the pilot. Basic cockpit
and seat color was Hu140 Gull Gray. Instrument panel, anti glare areas and stick
grip were painted black and seat cushions a lighter gray. The brave “Boy from
Syracuse'' pilot had a dark green suit, gull gray seat belts, helmet, oxygen
hose and gloves, black boots, goggles and vest and “flesh” face. He was then
placed into the cockpit, comfortably sitting on his reclined ACES II seat.
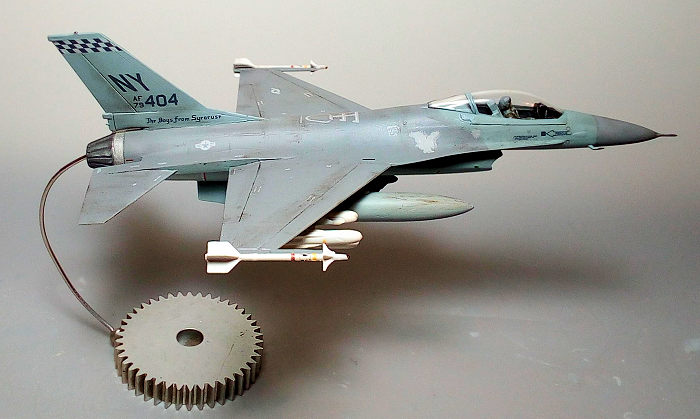
The intake was painted white with its shallow end matt black, in an attempt to
make it look “deeper”. The exhaust cone was painted Testors burned metal and
attached. Its innards were painted white and weathered with black pastels, in
order to simulate the ceramic coating. Its rear end was also painted matt black,
to make it look deeper.
 The wing tanks were decaled and attached, and so were the already painted white
and decaled Sidewinders. I decided to go mean and add two (kit supplied)
triplets of Mavericks, one at each wing. The Mavericks were painted white with
gunmetal exhausts (which were beforehand hollowed for extra realism), decaled
and attached onto their triple ejection racks (also painted white), with the
completed assemblies attached onto their pylons.
The wing tanks were decaled and attached, and so were the already painted white
and decaled Sidewinders. I decided to go mean and add two (kit supplied)
triplets of Mavericks, one at each wing. The Mavericks were painted white with
gunmetal exhausts (which were beforehand hollowed for extra realism), decaled
and attached onto their triple ejection racks (also painted white), with the
completed assemblies attached onto their pylons.
The kit supplied AN/ALQ-119 ECM pod was painted olive drab with black dielectric
panels, decaled and attached at the centerline. The front and side pitots were
attached too, their tips painted gunmetal.
Since this was an intensively used machine at harsh conditions, quite a bit of
weathering was performed, mainly consisting of applying dark brown/black dry
pastels at places where dirt, grim would accumulate, or even to simulate the
distinctive staining around the gun area. A matt coat gave the Desert Falcon its
final shade.
The transparencies were hand painted and attached, whereas the intake mounted
navigation lights were represented by red and green blobs of Humbrol clear
paints
The model was mounted onto a custom stand (basically an aero engine gear with a
rod welded, then chromed plated) and posed at a lightly ascending/banking
position, before calling it done!
| CONCLUSIONS |
The venerable
Airfix 1/72 F-16A/B is an old mold but solid kit of this important plane, with
good general shape and acceptable fit. Its details are on the simplistic side,
especially at the key areas of cockpit landing gear. Intake and exhaust should
have been deeper and the intake should feature the distinctive central
supporting strut. Ordnance is adequately provided, in order to make a mean armed
Falcon. While decals featured plenty of stenciling, their registration could be
better (something that has been solved at recent Airfix re-releases, where the
decals are perfect).
This is not a difficult model, even a novice modeler can put it together and
experiment in painting those gray shades! Whereas newer and more detailed F-16
kits nowadays exist, this regularly reissued kit is by no means obsolete. If you
have one, or find one at a good price, it might not be a bad idea to build it
and come up with a nice early Falcon.
Happy modeling!
20 May 2022 Copyright ModelingMadness.com. All rights reserved. No
reproduction in part or in whole without express permission. If you would like your product reviewed fairly and
fairly quickly, please
contact
the editor
or see other details in the
Note to
Contributors.