Academy 1/48 F-16C Falcon
| KIT #: | 1688 |
| PRICE: | €15.00 |
| DECALS: | One option |
| REVIEWER: | Spiros Pendedekas |
| NOTES: |
| HISTORY |
 The Lockheed
Martin F-16 Fighting Falcon is a single-engine multirole fighter, originally
developed by General Dynamics for the USAF. Designed as an air superiority day
fighter, it evolved into a successful all-weather multirole aircraft. Since
1978, over 4,600 aircraft have been built. Although no longer being purchased by
the U.S. improved versions are being built for export customers.
The Lockheed
Martin F-16 Fighting Falcon is a single-engine multirole fighter, originally
developed by General Dynamics for the USAF. Designed as an air superiority day
fighter, it evolved into a successful all-weather multirole aircraft. Since
1978, over 4,600 aircraft have been built. Although no longer being purchased by
the U.S. improved versions are being built for export customers.
Key features include a frameless bubble canopy for better visibility,
side-mounted control stick to ease control while maneuvering, an ejection seat
reclined 30 degrees from vertical to reduce the effect of g-forces on the pilot,
and the first use of a relaxed static stability/fly-by-wire flight control
system that helps to make it an agile aircraft. The F-16 has an internal M61
Vulcan cannon and 11 locations for mounting weapons and other mission equipment,
justifying the term “one plane air force” that has been assigned to it.
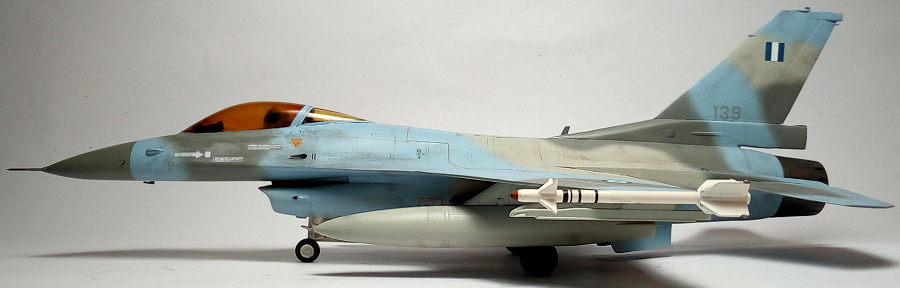
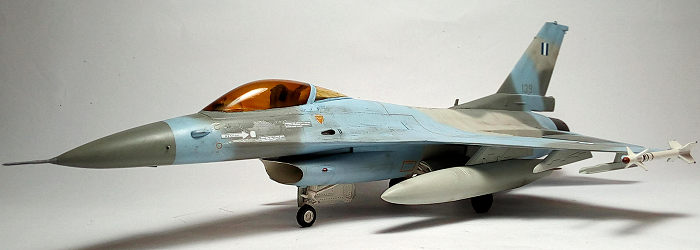
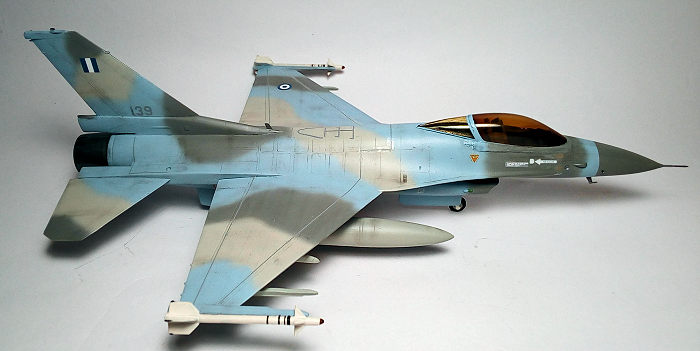
The Hellenic Air Force received 40 F-16 Block 30 in 1998, within the “Peace
Xenia I” armament program. Special features of the HAF Block 30 aircraft were
the enhanced landing system, the installation of a drag chute at the fin base
aft area, a night interception “police” light at the starboard front side and,
of course the very effective (and very beautiful) “Aegean Ghost” scheme, derived
from a similar USAF Aggressor one.
| THE KIT |
Introduced in 1990, it
is more than obvious that this kit is a clone of the venerable 1983 Hasegawa
kit, which is not a bad thing at all, as the Hasegawa is a still a nice,
classic, solid kit.
The Academy kit comes in a good quality top opening box, with a beautiful
dramatic boxart of a CO’s USAF F-16, carrying a C/L tank (though no C/L is
provided in the kit, only wing tanks!). Inside you find 5 well cast, flash free
light gray sprues, packed in three bags. Details are engraved and really nice!
If you are familiar with the Hasegawa kit, then you more or less know what to
expect. Cockpit detail may be not up to current standards, but is acceptable,
with a very nice pilot figure included, that can be placed inside, so that the
cockpit looks will be beefed up! Landing gear is convincing and the bays look
ok, with also room for super detailing. All underwing pylons attachment holes
are pre-opened (and they are quite massive ones!) t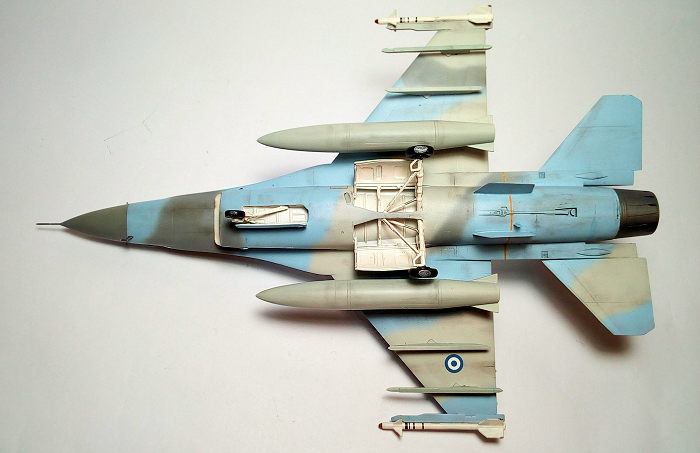 o
the under wing halves so, if you do not wish to install some pylons, you should
fill them.
o
the under wing halves so, if you do not wish to install some pylons, you should
fill them.
A lot of ordnance is provided, but no AMRAAMs, which is not incorrect for
earlier Block F-16s, as this model clearly represents. The lack of centerline
drop tank is also noticeable, especially as it is prominently portrayed at the
boxart, however the commonly used wing tanks are there. One area that this kit
(same for the Hasegawa) looks less sporty is the intake, a most prominent
feature of the F-16: the assembled result is far from being smooth and
homogenous at the inner bottom side: a step is very noticeable there, needing
some delicate work to look acceptable.
Transparencies are thick, but well molded and crystal clear. Since all F-16
single seaters seem to carry “gold” tinted canopies, I would not object if
Academy molded the transparencies with that hue (HUD glass and navilights would
be then wrongly tinted, but I could live with it). Assembly instructions are
clear, but only generic color callouts are provided during assembly.
Only one decal scheme is provided, admittedly a beautiful one, representing s/n
84-1286 bird, a 512 TFS, 86 TFW plane, carrying a specially decorated fin,
seemingly the CO’s plane. Camo instructions really fail here: no color callouts
at all, not even camo lines, only decal placement is provided (which, at least,
is comprehensive). By netting, I discovered that the depicted plane was a long
fin base USAFE Block 25 bird, based in Lakenheath AFB, as it stood in October
1986. It was not that difficult to come into painting instructions for the
scheme through the net, but Academy should have provided them. Decals are the
old style Academy ones, looking thin and well registered, but their general
behavior and the red’s opacity have to be realized. Some stenciling is provided,
which is nice.
I had this kit in my stash for a good 15 years, as well as the extra decal
sheet, when a good friend asked me to build a HAF bird for him. I thus jumped
into the build!
| CONSTRUCTION |
 I
first attached the instrument panel and foot pedals onto the cockpit tub, which
was then affixed to the upper fuselage half from the inside. Similarly, the
3-piece MLG bay was attached to the bottom half, with the two fuselage halves
(which contain the wing halves) joined immediately after. I then attached the
2-piece long fin base (a short one is optionally provided), followed by the nose
cone, the fin and the rear circular fuselage section, with the good looking
turbine face trapped inside. The MLG bay splitter was attached, followed by the
middle outer skin part. Fit was very good, with the exception of the wing
joints, where some serious gaps and mismatches emerged. No weight was added.
I
first attached the instrument panel and foot pedals onto the cockpit tub, which
was then affixed to the upper fuselage half from the inside. Similarly, the
3-piece MLG bay was attached to the bottom half, with the two fuselage halves
(which contain the wing halves) joined immediately after. I then attached the
2-piece long fin base (a short one is optionally provided), followed by the nose
cone, the fin and the rear circular fuselage section, with the good looking
turbine face trapped inside. The MLG bay splitter was attached, followed by the
middle outer skin part. Fit was very good, with the exception of the wing
joints, where some serious gaps and mismatches emerged. No weight was added.
I then assembled the air intake. As stated above, the intake trunking bottom
looked unrealistic, with the lower styrene sheet presenting a “step”, where it
should be nice and smooth. To even things out, I first applied liquefied styrene
at all lengths of the protrusion, then patiently sanded it, until it looked
smooth enough. I carefully installed the typical intake mid strut, through a
hole I had previously opened at the NLG bay, then faired the hole with liquefied
styrene. The intake was painted white and finally attached to the fuselage, with
some gaps and mismatches arising there, as well.
The main landing gear struts were assembled and had brake lines attached onto
them, made from stretched sprue, to add some extra realism.
 The whole
model was subsequently coarse sanded, filled with Humbrol putty and smooth
sanded. Only then did I attach the sensitive stabilators, ventral strakes and
the tip launchers, with a nice Falcon shape emerging!
The whole
model was subsequently coarse sanded, filled with Humbrol putty and smooth
sanded. Only then did I attach the sensitive stabilators, ventral strakes and
the tip launchers, with a nice Falcon shape emerging!
HAF Falcons utilized a drag chute, located at a housing aft of the fin base. To
replicate it, I used the (kit provided) short fin base, of which the most
suitably looking part was separated, sanded and hollowed with my Excel knife at
its rear part (in order to look like in reality). I then removed the (wrong for
my version) rear part of the fin base and attached the fabricated "right" one,
which was faired with liquefied styrene and went through successive filling
sessions, until it looked ok. A small mini antenna-like protrusion on top of the
chute housing was replicated with a piece of stretched sprue. I then had a nice
scratch built chute housing!
HAF Block 30s also sport a “police" night interception light at the starboard
fuselage front. A hole was drilled at the corresponding position, aiming to
replicate it with Clearfix at later stages.
The whole model was treated with its final filling and sanding session and
headed to the paint shop!
| COLORS AND MARKINGS |
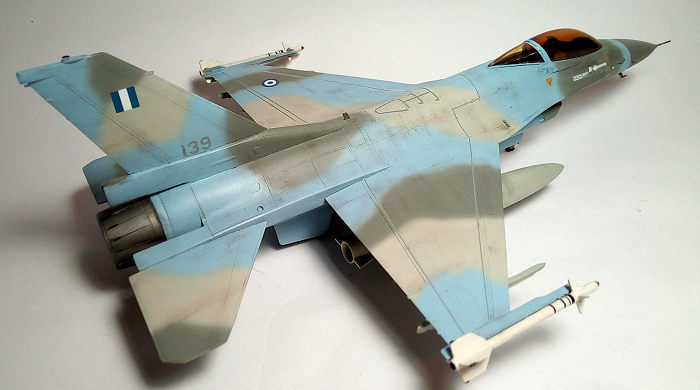
I first applied an allover coat of a leftover Molak 36251 neutral gray
enamel, which sprayed on nicely. Cockpit and seat took the same color, too, as
it will be their basic color. After a protective coat of Future, with my Revell
Vario at its finest settings, I freehanded the camo pattern of Hu28 Light Gray,
followed by my home made pale blue (a few drops of Hu25 Blue in Hu130 Satin
White, until it looked “right to the eye”). A
 corrective
spraying loop of the two grays took place, in order to have well defined camo
borders, and a coat of Future prepared the model for decaling. Wing tanks and
all pylons received the same Hu28 Light Gray, as observed in reality.
corrective
spraying loop of the two grays took place, in order to have well defined camo
borders, and a coat of Future prepared the model for decaling. Wing tanks and
all pylons received the same Hu28 Light Gray, as observed in reality.
For the HAF insignia, I used the Cartograf printed generic Kalfakis/Afterburner
sheet (sadly, no more in production).The Cartograf printed HAF insignia went on
like a dream. For the stenciling, I used the kit provided decals. Same for the
codes, as I modified kit provided “286” to become “139” - a HAF bird code - (“6”
became “9”, “8” was cut to “3”, “2” ‘s long portion became “1” – talk about “El
Cheapo”!!!) Having experienced some interesting times with Academy decals, I was
extra careful during application. To my partial relief, they detached quickly
from their backing paper and adhered solidly, with minimum silvering. I did not
take any more risks and very quickly sealed them under a coat of Future, which
additionally helped reducing silvering effect even further.
| FINAL BITS |
I used the very nice kit decals for the instrument panel and side
consoles. I then attached the side stick to the right and throttle grip to the
left console. Be careful here, as instructions call for the wrong (reversed)
positions. The seat was painted gray, with black cushions, light green oxygen
bottle, dark drab top parachute head, yellow/black eject handle and had
green/gray seat belts added, made from doped masking tape. It was then affixed
into place. Front and rear anti glare areas were painted black.
I then attached the landing gear legs, followed by their doors and all
retraction arms. Fit was positive all-around, with the exception of the main
doors retraction arms, which needed to be bent a tad, in order to follow
the doors' contour. The use of (plenty available at the net) comprehensive
3-views is strongly recommended, in order to set all the above parts at the
correct angles. All landing gear parts, bays and door innards were white, the
oleos painted chrome with my Pilot silver pen. A silver dry brush was performed
to bring out the “metallic” details, followed by a weathering black/brown wash.
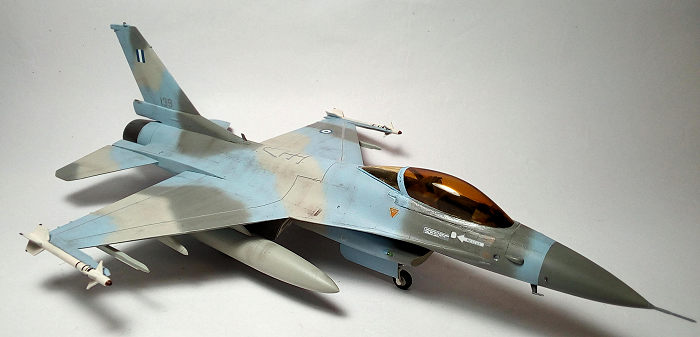
HAF Block 30 Falcons sported black rims for the main wheels only (the nose was
“standard” white), so it was like this that the wheels were painted and
attached. They were filed a tad to look slightly weighted, as is the normal
plane’s posture. I then attached the wing tanks and the remaining four underwing
pylons. Two sidewinders were attached at the tip pylons, a correct setup for an
early 90’s bird, like this one. The sidewinders were the kit supplied ones: they
were painted white with gunmetal fin rollers and a blob of clear yellow to their
nose, to represent the seeker glass. They had their nozzles drilled and painted
burned metal, to look more realistic and were decorated with the kit supplied
decals.
 The drag
chute was represented by a piece of my sons’ modeling clay stuffed into the
housing, painted dark olive drab and “drybrushed” with khaki. It looked
convincingly uneven. The exhaust nozzle was painted Testors Burned metal,
buffed, received a black wash and sealed with Future. Its innards were painted
Hu196 Light Gray, to represent the ceramic coating, then heavily weathered with
black dry pastel chalks. The turbine face and trunking were painted Testors
Burned Metal, as well.
The drag
chute was represented by a piece of my sons’ modeling clay stuffed into the
housing, painted dark olive drab and “drybrushed” with khaki. It looked
convincingly uneven. The exhaust nozzle was painted Testors Burned metal,
buffed, received a black wash and sealed with Future. Its innards were painted
Hu196 Light Gray, to represent the ceramic coating, then heavily weathered with
black dry pastel chalks. The turbine face and trunking were painted Testors
Burned Metal, as well.
The pitot was attached, its tip painted gunmetal. The (snapped off at earlier
stages) fin base fillet antenna was fabricated of styrene sheet and attached as
well. The two intake mounted navigation lights were attached and had their front
halves painted clear red and green (the rear halves in fuselage color). The top
fin light was also represented by a mini blob of Humbrol clear red. The “police
light” was represented by a blob of Humbrol Clearfix into its already opened
hole at the starboard side, then a touch with my Pilot silver pen, followed by a
final Clearfix coat that came flush with the fuselage.
F-16s sport two characteristic AOA sensors, which are needle-like small
protrusions bilaterally of the radome aft section. They are not provided by the
kit. Feeling that they are a prominent feature of the Falcon, I replicated them
by drilling two small holes and attaching two tiny pieces of needle, painted gun
metal.
Since the scheme depicted is quite early, I did not apply too much weathering,
mainly some sooting around the gun area and some general all-around dirtying.
The Falcon then received its final matt coating (80/20 % Humbrol matt/gloss).
The clear HUD was affixed then onto the dashboard with white glue and had its
frame painted black, with the bottom projector lens hole filled with Humbrol
clear green paint. The 2-piece canopy had its innards brush painted Humbrol
clear yellow, to represent the tinted effect one notices at the Falcon canopies.
The effect was stronger than I expected, but I decided to call it “passable”. I
finished by attaching the positively fitting transparencies, the presented gaps
faired with white glue.
I then called this “Aegean Ghost” beauty done!
| CONCLUSIONS |
The “latest and greatest” (and more expensive) quarter-scale F-16s are
done by Tamiya and Kinetic, which come in many variations: having built neither
of them, I can only echo builders reviews, stating that the Tamiya builds
superbly, the Kinetic being more difficult to put together. By judging net pics,
both result in excellent models, even out of the box! Since there are many
variations in F-16 models (two styles of intakes – for GE or PW engine, exhaust
nozzles, antennas, etc.), the modeler might have to properly research if the
specific kit accounts for those specifics.
The Academy F-16C kit, being an almost identical clone of the venerable and
still in production Hasegawa kit, is a classic, solid kit, with precise general
shape, acceptable detail, clear instructions and good fit at most places. A nice
model can be produced out of it, even by a novice modeler, the main concern
being the non-seamless intake that needs some work in order to become homogenous
at its lower side. The Academy decals offer only one option. Should you use
them, extra care is needed, since albeit being definitely improved over earlier
ones, they might still easily detach once applied - seal them as quickly as you
can! The kit is regularly reissued and offered at amazing low prices. There is
aftermarket, in order to beef it up, but then the net price might surpass the
Tamiya or Kinetic kits that have “everything inside”…
The Academy kit can quite efficiently represent an early days Block 30 Hellenic
Air Force Falcon, the only serious modification needing is the fabrication of
the rear drag chute (I modified the kit provided “F-16A” extra fin base, but
have spotted some nice and more accurate resin ones at the Net). Should you
decide to tackle it, the result will be a very interesting looking ghost schemed
Falcon, which is by many considered one of the most charming F-16 camos!
Happy modeling!
19 November 2021
Copyright ModelingMadness.com. All rights reserved. No reproduction in part or in whole without express permission.
If you would like your product reviewed fairly and fairly quickly, please contact the editor or see other details in the Note to Contributors.