Skunkworks 1/48 F-16XL
| KIT #: | 48026 |
| PRICE: | $39.99 |
| DECALS: | Five options |
| REVIEWER: | Dan Lee |
| NOTES: | What-if camo pattern, Royale Resin Wheels/Radome/Antenna, Aires exhaust, Tamiya canopy/F-16 PE set and True Details Seat |
| HISTORY |
The F-16 Falcon (or Viper as it is known among those that fly it and maintain it) is one of the most successful modern jet designs ever. Based on the recommendations of the father of the OODA loop, John Boyd, the F-16 was initially a simple highly maneuverable day fighter armed with IR missiles. It evolved into something more than just a cheap compliment to the F-15 Eagle.
Among the developments was the F-16XL which started life in 1977 as a prototype for proving the feasibility of supersonic transport design concepts in military aircraft (aka the SCAMP - Supersonic Cruise And Maneuverability Prototype - Program.) The F-16 design was stretched out and the wings were changed to a cranked arrow delta wing configuration which combined with the F-16’s natural instability and computer powered flight controls eliminated the issues of the delta wing (drag at low speed and high landing speed.)
 With the
help of NASA, General Dynamics realized the potential of the F-16 as the added
lift and stretched fuselage allowed for a massive jump in payload capacity (a
max of 15,000 pounds) and 40% more range compared to the F-16A without much loss
to the F-16’s stunning maneuverability. By 1979, the USAF encouraged General
Dynamics to further pursue this design and GD did in 1980 by funding and
building a pair of in-house prototypes based on the 3rd and 5th F-16 production
frames provided by the USAF (one each of the single seat and two seat F-16s.)
With the
help of NASA, General Dynamics realized the potential of the F-16 as the added
lift and stretched fuselage allowed for a massive jump in payload capacity (a
max of 15,000 pounds) and 40% more range compared to the F-16A without much loss
to the F-16’s stunning maneuverability. By 1979, the USAF encouraged General
Dynamics to further pursue this design and GD did in 1980 by funding and
building a pair of in-house prototypes based on the 3rd and 5th F-16 production
frames provided by the USAF (one each of the single seat and two seat F-16s.)
In 1981 the F-16XL flew off against the F-15D in the Enhanced Tactical Fighter program to replace the F-111 Aardvark. The USAF liked the 27 hard point equipped F-16XL, but it lacked the two engines of the F-15 which improved survivability and the USAF realized that the F-16XL would need more money, manpower and energy to put into production unlike the F-15E as the F-16XL did not have a lot of common parts with the F-16s currently in service. The F-15E won the competition and the F-16XLs were placed into storage in 1984 at Edwards AFB.
Both airframes were pulled out of storage in 1988 as NASA decided to use the F-16XL as a testbed for a series of experiments based on new designs. They flew a variety of different experiments including accidentally flying supercruise when fitted with a F-110 engine till 1999 when they put into storage. In 2007, NASA planned to fly the F-16XL single seater, but stopped it in 2009 when both airframes were put back into storage at Edwards AFB.
| THE KIT |
Skunkworks Models is related to Kinetic models much in the way that HobbyBoss and Trumpeter are so it explains why this is a mostly brand new kit but has many of the Kinetic F-16 weapons sprues. There are a large number of sprues jammed into the Skunkworks box some 18 or so including two clear sprues with each sprue separately bagged to prevent damage during shipping.
The airframe itself is made up of two very large
pieces (one for the top and the other for the bottom) and it looks to my rather
uncritical eye that the airframe surface detail is pretty good. However, one
thing I don’t like is the two piece F-16 nose cone mostly because dealing with
the seam destroys the fine rib detail (which was
 my
experience with the Tamiya F-16CJ.) For those who are resinholics like myself
you should be aware the F-16XL was based on the F-16A meaning that it has the
small mouth intake and the original exhaust nozzle. Any F-16C parts you want to
add may require some surgery.
my
experience with the Tamiya F-16CJ.) For those who are resinholics like myself
you should be aware the F-16XL was based on the F-16A meaning that it has the
small mouth intake and the original exhaust nozzle. Any F-16C parts you want to
add may require some surgery.
As I mentioned above, the kit contains several sprues of weapons of decent detail. I won’t list them all, but there is enough to arm the plane for a long war and a variety of air to ground and air to air missions if one chooses. I lost track of the number of parts and gave up, but I think there is somewhere around 300 parts in total for this kit.
The canopy parts are not tinted and you will have to do your own tinting to emulate the tint on the real life canopy. The high quality and beautifully done decals are printed by Cartograph and include five sets of markings including two that were actually worn by the F-16XL and three what if markings.
| CONSTRUCTION |
In early 2017 I started off with tradition, the cockpit. It was painted first dark dull grey and then the consoles were brush painted with the fine details dry brushed or painted with the tip of a sharp toothpick using flat white, grey, silver, yellow and red.
Next I glued together the intake parts. The two part intake had some rather prominent interior seams that needed to be filled and sanded repeatedly with CA glue and various grades of sandpaper. It was tedious and difficult to get the interiors of the intake parts sanded smooth. Once done, they were sprayed flat white. The face of the jet engine was painted silver and glued on at the other end of the rear part of the intake.
 The
reason I went with a resin exhaust instead of the kit one was that the kit
exhaust is a two piece tube which has a prominent seam. If the Viper exhaust
wasn't so visible then I normally wouldn't replace it with a resin version. The
Aires exhaust has much nicer detail than the kit exhaust. Careful cleaning and
painting brought that out. Although my exhaust nozzle needed some repair as some
of the delicate detail fell off (transit or otherwise.) It didn't take long to
complete the resin exhaust. One thing I noticed was that the fuselage required
some modifications due to the resin exhaust. It was designed for the Hasegawa
F-16A not the F-16XL and it needed the removal of about 12mm of plastic aka the
engine mounting ring. I hacked that off, sanded it smooth and then discovered
that there was also a prominent step that needed to be sanded down. The step was
mostly sanded down.
The
reason I went with a resin exhaust instead of the kit one was that the kit
exhaust is a two piece tube which has a prominent seam. If the Viper exhaust
wasn't so visible then I normally wouldn't replace it with a resin version. The
Aires exhaust has much nicer detail than the kit exhaust. Careful cleaning and
painting brought that out. Although my exhaust nozzle needed some repair as some
of the delicate detail fell off (transit or otherwise.) It didn't take long to
complete the resin exhaust. One thing I noticed was that the fuselage required
some modifications due to the resin exhaust. It was designed for the Hasegawa
F-16A not the F-16XL and it needed the removal of about 12mm of plastic aka the
engine mounting ring. I hacked that off, sanded it smooth and then discovered
that there was also a prominent step that needed to be sanded down. The step was
mostly sanded down.
I glued the top and bottom halves of the fuselage together using Tamiya extra thin glue. Once done I added the intake parts and the fuselage portion of the intake. Next I modified the nose portion of the fuselage to easily fit the Royale Resin replacement radome by carving out enough interior plastic around the join to remove any steps or gaps. The detail of the resin radome is much better than the plastic and without that annoying seam which requires extra careful sanding to avoid removing the fine detail. It had the additional bonus of adding weight to the nose which mean I only added a 1/8 oz steel sinker into the interior (glued in place with a lot of CA glue.) The resin radome was glued in place with CA glue. I did my best to avoid the dreaded Kinetic nose droop and any gaps were dealt with using Vallejo plastic putty.
I added more resin detail from the Royale Resin set including the bird shredder
IFF antennas and AOA sensors as if it were an operational bird and not a
prototype of an aeronautical dead end. Kinetic deserves some credit for using
panel lines for the seams. I did not need to do much sanding and filling of the
exterior fuselage (intakes being the exception.) The tail was glued
together and stuck in place. It was time to work on painting it.
| COLORS & MARKINGS |
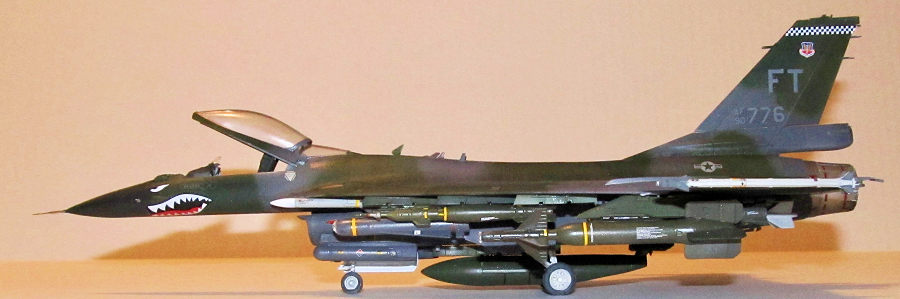
 I went for
something unorthodox for a Viper. Instead of the usual 50 shades of grey, I
tried my hand at recreating an approximation of the Charcoal Lizard Scheme for
my What-If F-16XL which was a variation of the Euro I scheme that was used on an
early F-16s in the late 70s and when the USAF was trying desperately to replace
the A-10 in the close air support role with the A-16 in the late 1980s.
I went for
something unorthodox for a Viper. Instead of the usual 50 shades of grey, I
tried my hand at recreating an approximation of the Charcoal Lizard Scheme for
my What-If F-16XL which was a variation of the Euro I scheme that was used on an
early F-16s in the late 70s and when the USAF was trying desperately to replace
the A-10 in the close air support role with the A-16 in the late 1980s.
I used Tamiya NATO black, Tamiya Dark Grey to represent FS36081, Tamiya IJA green instead of FS34079 mostly to provide a more obvious contrast with Tamiya NATO Green which I used instead of FS34102. The scheme was painted freehand with an airbrush. Only the nose was painted NATO black. The landing gear wells were masked off and painted flat white.
The various bombs, fuel tanks and missiles were glued together at this point. The seams on the many missiles and bombs were dealt with with tedious filling/sanding. They were painted according to the instructions except the fuel tanks which were painted NATO Green.
The canopy suffered an accident where it got stomped on. I replaced with an extra Tamiya Canopy which I had in the spares box. The centerline seam was sanded off and polished. I ended up tinting it with thinned Tamiya smoke and when it was dry, I masked off the glass and airbrushed on the interior color then exterior colors. When the paint was dry, I sprayed on a gloss coat of Future in anticipation of the decals.
The F-16XL comes with a number of varieties of
markings. I opted for a hypothetical F-16XL flying for the famous 23rd TFW (aka
the Flying Tigers) which comes with a colorful sharkmouth. Being a modern jet,
this required a lot of work to add over 100 decals. Funny enough, the decals
that gave me the most anxiety was the s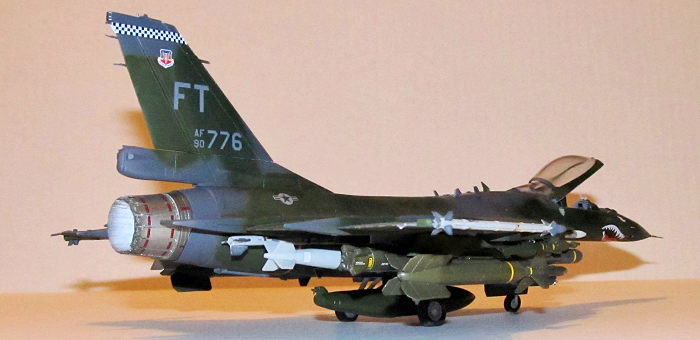 harkmouth
as I worried that it would be ruined by all the resin ECM bumps I added on the
nose. That annoying worry stopped me for almost two weeks. Turns out that worry
was completely unfounded as it fit perfectly (it is an unfortunate mental tick
of mine where I fuss over an issue/problem/annoyance enough that it causes me to
pause and stop building a model.)
harkmouth
as I worried that it would be ruined by all the resin ECM bumps I added on the
nose. That annoying worry stopped me for almost two weeks. Turns out that worry
was completely unfounded as it fit perfectly (it is an unfortunate mental tick
of mine where I fuss over an issue/problem/annoyance enough that it causes me to
pause and stop building a model.)
The decals needed some Microsol and Microset solution to get them to snuggle into place. I only needed a little bit of Solvaset for one or two really stubborn decals.
I used a watercolor wash (black, burnt sienna) to dirty up the plane a little bit. More out of habit than for “authenticity” as I find modern jets kind of funny looking with pristine paint. The excess was removed using damp Q-Tips. I sprayed on two coats of Tamiya Flat Coat for the final coat.
| FINAL CONSTRUCTION |
Once the painting was done, I added the landing gear where unfortunately I soon discovered that the plastic landing gear was pretty weak. The portside main landing gear and the nose wheel gear both bent and broke. I was quite surprised it happened as I had not put much stress (that I can recall) on the model landing gear. Annoyed, I threw the model back into the box where it would sit for more than almost a year.
Fast forward to June 2018 when I realized that my to
be built pile far outnumbered my completed pile. I pulled this kit out of
mothballs and carefully pried out the main landing gear and wheel wells. I
purchased a set of SAC white metal landing gear and when it arrived I began to
rebuild the wheel wells/landing gear. These were pretty much d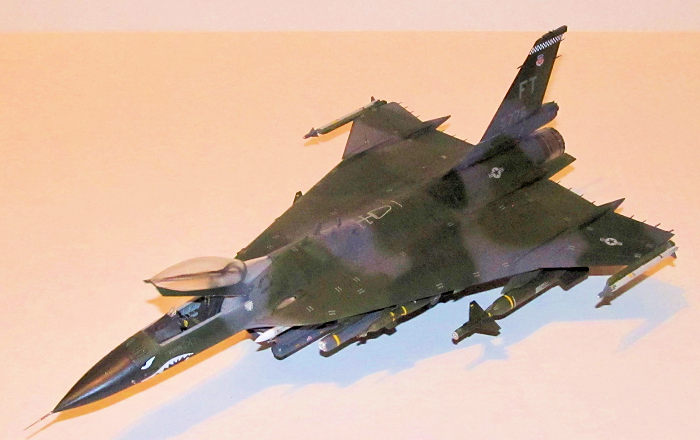 rop
in replacements for the weak plastic landing gear and didn't require that much
fuss. Next up I worked on the many pylons. The weaponry alone makes for a lot of
work.
rop
in replacements for the weak plastic landing gear and didn't require that much
fuss. Next up I worked on the many pylons. The weaponry alone makes for a lot of
work.
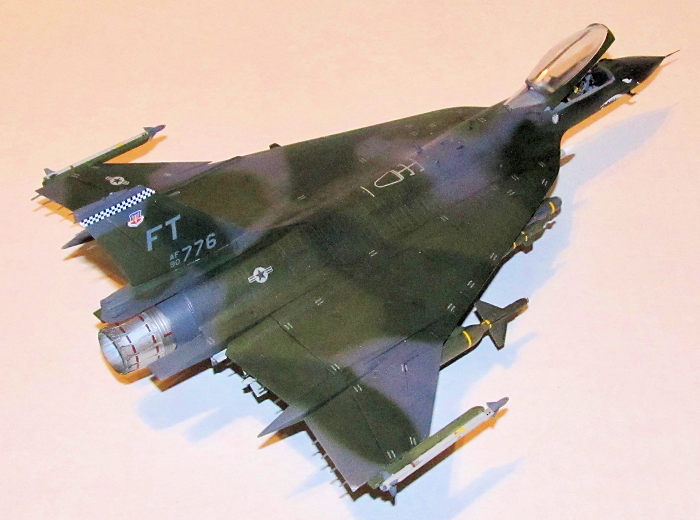
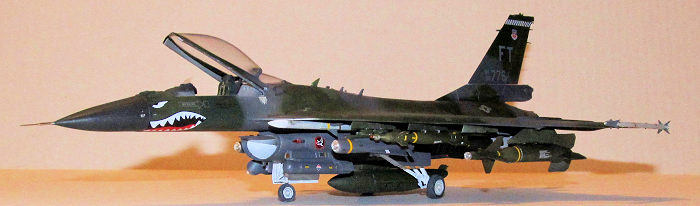
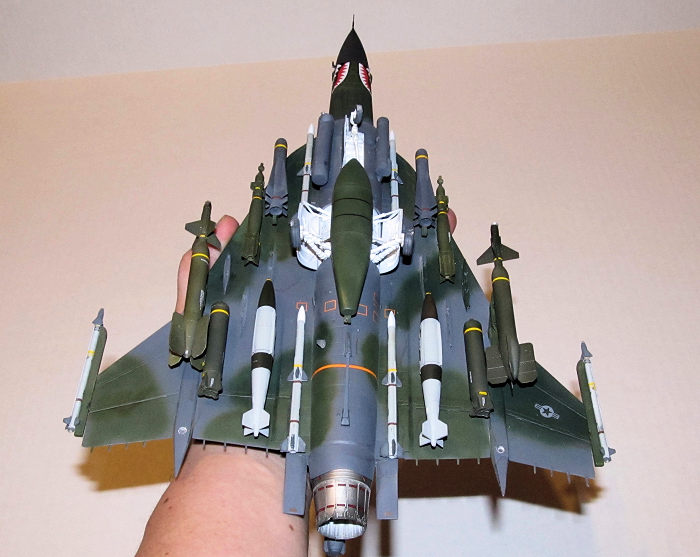
The weapons load proved to be a bit of a headache as well. It turns out that all those hardpoints aren't spaced enough to add as many of the bigger weapons on. I could have used a weapons load of mostly Mk82 Snake-eye bombs, but I wanted my what-if F-16XL to be loaded for pretend serious bear. I had to play with the various bombs/tanks to figure out what to fit where. Eventually I figured out a weapons mix that made sense (for example it is not a good idea to place a Maverick missile in front of a fuel tank) and could fit. In the end it was configured for long range strike with Paveway III LGBs, two MK84 GPS guided bombs, two AGM-65 Mavericks, three fuel tanks, a pair of cluster bombs and finally four AIM-120s and two AIM-9Xs on the wingtips for self protection. I assembled, sanded, filled and glued on the LANTIRN pods (painted Dark Grey) to each side of the intake.
The various painted resin antennas and landing gear doors were added to give it the look of an active plane. Next the canopy was added in open position and the painted True Details seat was added with a small dab of CA glue to secure the seat in place. Lastly, the metal pitot tube and painted resin wheels were glued in place.
| CONCLUSIONS |
The Skunkworks F-16XL requires a lot of work if you want to make it look like an operational bird. It is probably easier to build as a prototype or NASA bird. This kit is more towards the more experienced builder rather than the beginner due to the complexity of the build and the quirks of the Kinetic F-16 kit it is based on.
It was a fun and satisfying build that had moments of anxiety and headaches although I do recommend that you replace the kit landing gear with white metal replacements.
23 April 2019
Copyright ModelingMadness.com
If you would like your product reviewed fairly and fairly quickly, please contact the editor or see other details in the Note to Contributors.
Back to the Main Page Back to the Review Index Page Back to the Previews Index Page