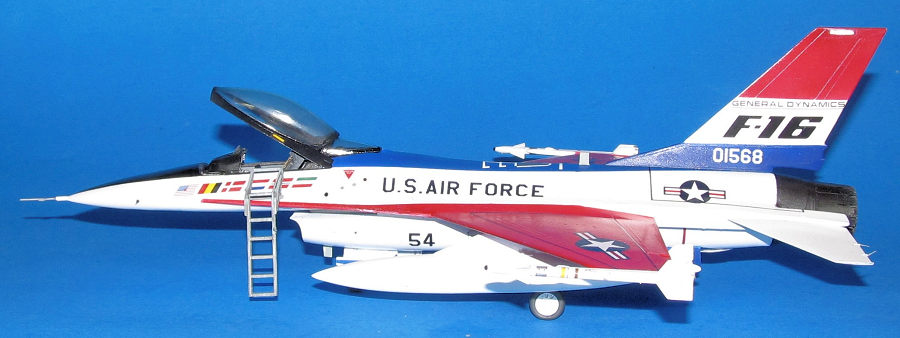
Monogram 1/48 YF-16 Fighting Falcon
| KIT #: | 5421 |
| PRICE: | $ |
| DECALS: | Two options |
| REVIEWER: | Dan Lee |
| NOTES: | Caracal Decals for Early F-16s, AIRES ESCAPAC Ejection Seat, AIRES F-16A Exhaust, AIRES F-16A Main Gear Well, Resin F-16 Small Intake, Quinta 3D Decals for F-16A/B, Parts from Tamiya 1976 F-16A Kit, Entex 1976 F-16A Kit, ResKit Early F-16 Wheels, Hypersonic Update Set for early F-16As and SAC Metal Landing Gear F-16A Hasegawa |
| HISTORY |
The General Dynamics YF-16 first flew accidentally in January of 1974 during a taxi test. It was the winner of the Light Weight Fighter competition over Northrop’s YF-17 Cobra which would become the F/A-18 Hornet. The Light Weight Fighter or LWF was born out of the air force’s realization that it could not afford enough F-15s to do all the missions it was required to do for WW3 instead they opted for High/Low mix of aircraft (same as the Navy) which the F-16 became the “Low” side of the mix.
Designed in the theories and requirements of John Boyd and the USAF’s “Fighter Mafia” of a cheap, highly maneuverable, simple day fighter with limited attack capability, no radar and a high thrust to weight ratio. To Boyd’s dismay, the USAF and Pentagon made sure F-16 got a radar and attack capability from some 11 hardpoints which removed cheap and simple from the equation as well as increase the weight of the F-16.
 Although
named the Fighting Falcon, the F-16 Is more well known as the Viper (named
after the Battlestar Galactica’s fighter spacecraft). It would become the
basis of NATO’s next generation fighter replacing Lockheed’s F-104G as
Norway, Denmark, Belgium and the Netherlands would be among the first Viper
Customers. The first combat missions would be flown by Israel in 1979 and
would stun the USSR’s top brass with its abilities/capabilities including
the infamous 1981 Osirak Nuclear Reactor strike where bomb armed F-16As
destroyed the French designed Iraqi nuclear reactor.
Although
named the Fighting Falcon, the F-16 Is more well known as the Viper (named
after the Battlestar Galactica’s fighter spacecraft). It would become the
basis of NATO’s next generation fighter replacing Lockheed’s F-104G as
Norway, Denmark, Belgium and the Netherlands would be among the first Viper
Customers. The first combat missions would be flown by Israel in 1979 and
would stun the USSR’s top brass with its abilities/capabilities including
the infamous 1981 Osirak Nuclear Reactor strike where bomb armed F-16As
destroyed the French designed Iraqi nuclear reactor.
Over the past 50+ years, the Viper has been one of the USAF’s best exports as over 2100 have been produced for itself and many allies. It was so good that it caused the F-20 project to be cancelled (to Northrop’s dismay) as an export fighter in the Pentagon’s world wide Military Assistance Program and shipped to various US allies/client states during and after the Cold War. In the 90s, the General Dynamics aircraft division was sold off to Lockheed Martin during the post Cold War drawdown.
Thanks to upgrades like the AMRAAM AAM, LANTIRN pods and conformal fuel tanks that don’t cause serious drag issues have kept the F-16 flying for the past 50 years as front line fighters. The 45+ year old F-16s retired by various NATO countries are currently engaged in combat against the Russians as part of the Ukrainian AF in the current war between those two nations. Despite their age, they have managed to destroy a few modern Sukhoi jet fighters in air to air combat as well as shooting down a lot of drones/missiles.
It looks like that the Viper will still be flying for at least 20 more years till drones take over.
| THE KITS |
The first kit I obtained was the Entex/Otaki F-16A. It was made of hard grey plastic (very brittle due to age I suspect) and it was a very very very simple example of the F-16. It had the narrower nose profile I was looking for as they designed it from the YF-16 and it had the prototype’s dual door nose wheel configuration. The surface detail was simplified but had a lot of engraved details. However, the cockpit had the proper depth, but lacked the instrumentation detail that the F-16 cockpit had (even the original configuration without the radar.) One thing I didn’t notice, but would haunt me early in the project was the hump behind the cockpit which was more pronounced compared to the other kits. The rear of the Entex/Otaki F-16 was less than impressive as the prominent main wheel well lacked any useful details and the exhaust was very wrong. The decals were in very poor shape and were immediately tossed. It also includes ordinance (Mk82 500lb bombs on simplified bomb racks, fuel tanks and “Sidewinder” missiles of unknown models (the F-16 prototypes did carry weapons for weapons testing, but flew mostly clean for the demonstration flights.)
 The 2nd
kit I would buy was the 1976 Tamiya F-16A kit. This kit was considerably more
accurate than the Otaki and I can see how Tamiya laid out the parts would appear
in their much newer 2006 Falcon kits. The cockpit was very simple and the seat
was of questionable value. Like its 1970s counterpart, the detail in the wheel
wells was very simple and the back end was better than the Entex/Otaki kit with
a mix of engraved and raised details. The canopy was a two piece affair that
showed the limitations of 1970s injection molding as the bulged F-16 clear
canopy was separate from the frame and meant to be kept in closed position. I
wanted an open canopy so the Tamiya nose wasn’t going to cut it. Again, the
decals were old and had to be junked.
The 2nd
kit I would buy was the 1976 Tamiya F-16A kit. This kit was considerably more
accurate than the Otaki and I can see how Tamiya laid out the parts would appear
in their much newer 2006 Falcon kits. The cockpit was very simple and the seat
was of questionable value. Like its 1970s counterpart, the detail in the wheel
wells was very simple and the back end was better than the Entex/Otaki kit with
a mix of engraved and raised details. The canopy was a two piece affair that
showed the limitations of 1970s injection molding as the bulged F-16 clear
canopy was separate from the frame and meant to be kept in closed position. I
wanted an open canopy so the Tamiya nose wasn’t going to cut it. Again, the
decals were old and had to be junked.
The 3rd kit would be “just right” sort of. It was the late 1980s re-release of the original Monogram 1976 1/48 scale kit. Same as the other kits with the narrower profile nose, limited details, but all raised surface detail which would make polishing the paint/primer difficult. The cockpit was bigger than both the other kits and had some better detail compared to the other two kits as at the time Monogram was the king of cockpit detail. Unlike the other two kits, it didn’t have the prototype markings, but rather from 388th Tactical Fighter Wing that initially introduced the F-16 into service.
| CONSTRUCTION |
I started with the Entex/Otaki kit early F-16A kit. It had a lot of the shapes I needed (empty radome, narrower nose profile) but weak/incorrect detail of the engine exhaust and the poor intake wasn’t going to be easily replaced with the resin replacements so Plan A went out the window.
After a few months, I purchased the old Tamiya F-16A kit from 1976. Based on the layout of parts, I felt it was easier to modify with the resin exhaust and small mouth intake, but the cockpit/canopy was even worse than the Otaki one (it seems that based on the molding technology of the time aka 1976 they couldn’t get the correct bulged profile on the canopy) so the glass and the coaming were split into two parts and only in the closed position which was not what I wanted. After some thinking, I thought I could carve the nose of the Otaki with the back end of the Tamiya kit. I did some more thinking to figure where I could cut them to minimize my headaches. Some quick cuts with a hobby knife and an hour with a handsaw/Miter Box, I had my two halves and FrankenViper 1.0 was going to happen!
There was one small teensy tiny hitch. The side profiles of the Otaki and the Tamiya were incompatible. The Otaki designers made the nose section of the F-16 more hunchback in profile compared to the more accurate lower hunchback of the Tamiya so there was a ¼ inch step between the forward and rear parts of the fuselage. Not only would this work be a pain, but it would wreck all the raised detail of the Tamiya back end in the process making my job even harder. For a week I was thinking I was going to do it, but then I finally regained my sanity. It meant that FrankenViper 1.0 wasn’t going to happen and I had ruined two older/cheaper kits in the process of doing so. The remains of FrankenViper 1.0 went into the garbage along with Plan B.
 I was helped
by a friendly clerk at the LHS when he suggested that I get the old Monogram
F-16A instead. He then told me that he had sold the kit they had on consignment
the week before which wasn’t very helpful. I ended up buying one on an auction
site for about the same price as a Hasegawa F-16A as I went to Plan C.
I was helped
by a friendly clerk at the LHS when he suggested that I get the old Monogram
F-16A instead. He then told me that he had sold the kit they had on consignment
the week before which wasn’t very helpful. I ended up buying one on an auction
site for about the same price as a Hasegawa F-16A as I went to Plan C.
Turns out the shallow exhaust for the Monogram was just a butt join to the rear of the fuselage of the F-16 kit. This meant I could easily carve out an opening and shove the resin pipe in (ha, not that simple.)
The original Monogram canopy was a two piece assembly (coaming and glass) but it allowed the modeler to pose it open. I found the quality of the clear part not that great and of questionable shape. I dug thru my spares boxes and found the newer Tamiya F-16 canopy (I had an extra tinted one) fits almost perfectly into the canopy opening so I had a ready replacement.
I had to do major plastic surgery on the lower part of the fuselage to get the resin intake to fit and there was a rather large gap between the intake and original main landing gear well. I first carved out the old intake as well as remove the main landing gear well then trimmed more of the lower fuselage to make sure the resin intake could fit in tight. I measured several times and cut out a ¼ inch portion of the lower intake section that is right next to the main landing gear well.
I put the small mouth resin intake into the gap with the correct alignment and sealed it up with a lot of CA glue. After the glue was cured, I jammed in the Aires main landing gear well as well as the plastic extension. For once all my calculations worked out the first time and all the parts fit reasonably well. I also took the time to drill out the holes for the SAC metal landing gear.
The various gaps were sealed in with CA glue and I sanded the area as smooth as I could get it.
Next I worked on the cockpit. Monogram cockpits were the best in class when I was a mere lad, but I wanted something more modern/accurate/feed my AMS/empty my wallet. Kinetic recently produced an early F-16A kit and Quinta came out with a 3D decal set for it. On top of that, Hypersonic models out of Japan two years ago had a replacement 3D printed IP for the Kinetic early Viper. When I had some money, I purchased the Quinta set and the Hypersonic 3d printed set.
I carefully carved out the raised detail on the Hypersonic IP and glued the Quinta 3d decals onto it. They lined up perfectly.
Next I sprayed the cockpit interior ADC grey and then measured out the Quinta parts to the Monogram cockpit. It turned out that the Monogram guys were pretty accurate in terms of the size and the parts fit without any modification.
Two things that I was lacking was the prominent HOTAS (throttle) and the control stick. The Hypersonic improvement set does not have any because it assumes that you are going to use the parts from the Kinetic kit. As I didn’t have one, I had to improvise.
 I took an
extra control stick from the spares bin that was the relatively correct shape
and cut everything but hand controller portion off. The HOTAS was made with a
piece of 20 thou plastic card and the Otaki’s version of the control stick. I
did not add these parts till after painting. They were painted with a brush
using gloss black for the base color, grey and red for the various switches and
buttons.
I took an
extra control stick from the spares bin that was the relatively correct shape
and cut everything but hand controller portion off. The HOTAS was made with a
piece of 20 thou plastic card and the Otaki’s version of the control stick. I
did not add these parts till after painting. They were painted with a brush
using gloss black for the base color, grey and red for the various switches and
buttons.
The top half of the fuselage and bottom half were jammed together using a combination of Revell AG Contacta and CA glue. Next I filled the nose cone with steel shot fishweights and then glued it to the fuselage. The seams were filled with CA glue and then carefully sanded down.
I inserted the exhaust tube ring and found out that it was not the perfect fit as there were gaps all around. I used Tamiya liquid filler aka their version of Mr Surfacer to fill in the gaps. It took three layers of filler to get everything to a certain level. Then it was a lot of sanding with 400-2000 grit sandpaper to get the contours just right. However, there were some bubbles and divots that needed filling so I used CA glue instead. More sanding and filling were done to the exhaust ring to fuselage join was nice and smooth (till the primer coat.)
Meanwhile the Aires exhaust was assembled. Unfortunately, the exhaust petals weren’t in the proper position and had to be glued (using CA glue) to the exhaust nozzle to get into the correct shape. Also had to grind out much of the back of the resin exhaust ring in order to get the entire exhaust tube to slide into the rear of the F-16. At this point, the exhaust assembly exterior was painted Tamiya Metallic Grey and Gun Metal while the interior was painted flat white.
The tail was glued together, the seam sanded smooth and resin ailerons were removed from the casting blocks. To ease painting and prevent breakage I would leave these off till the end.
It was then I noticed that I didn’t modify the nose wheel well to reflect the notched front of the prototype nose wheel well. I cut two pieces of plastic 1/8” thick strip into squares, glued them in place with CA glue then sanded it smooth.
| COLORS & MARKINGS |
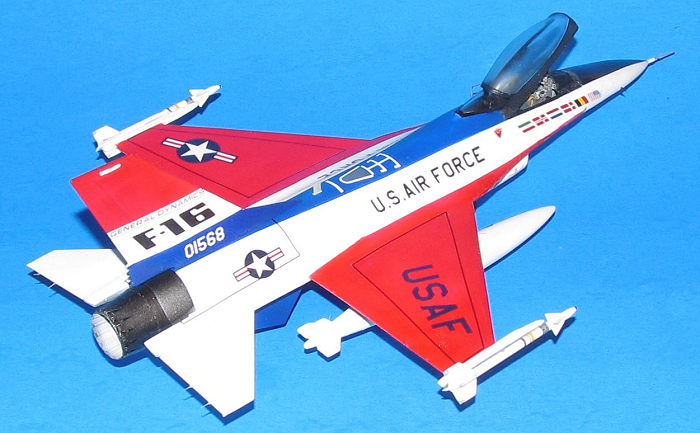
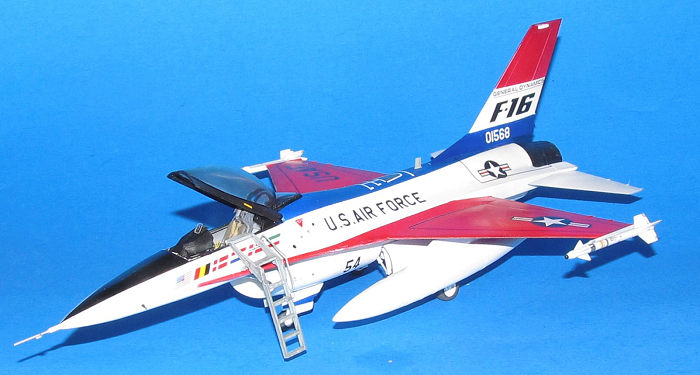
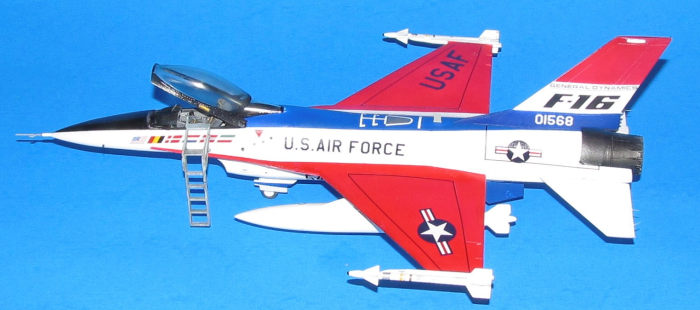
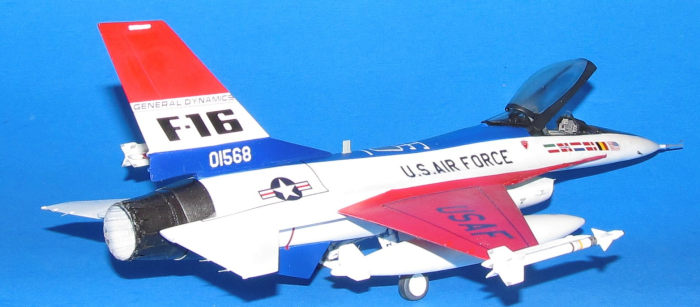
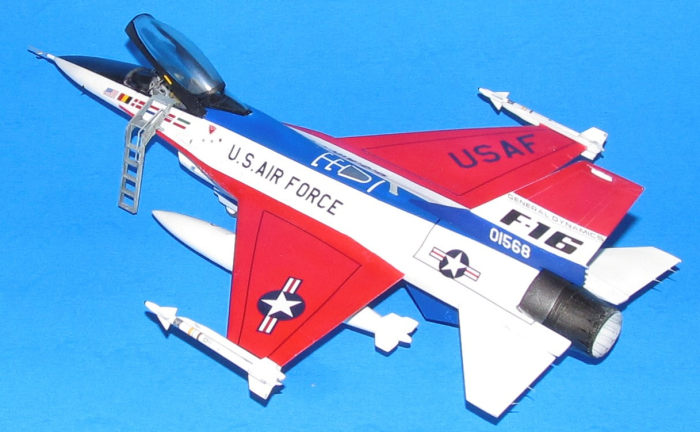
The YF-16 had one of the more difficult paint schemes ever devised by man… a glossy red, white and blue scheme with a black glare panel. I started off with priming the whole thing with Badger Grey primer. It turns out that you forget a lot of things when you haven’t airbrushed in almost two years like checking the pressure on the compressor and making sure the model was free of mold release so the first primer coat didn’t go well. I ended up having to fine sand away a lot of the primer coat. I didn’t use anything higher than 800 grit because of the raised panel lines.
Thanks to the primer coat, I noticed a few areas where there wasn’t enough filler or gaps especially around the resin intake. I used Tamiya’s version of Mr Surfacer fill in or plug the gaps.
 A lot of
sanding/grinding down stuff. Several fill and sand sessions happened. I ended up
using a new acrylic primer called Kaliedo Acrylic. It has better pigment
coverage than Badger Stynylrez and was roughly 1200 grit filler so it filled in
all the minor scuffs that came with sanding the primer coat. Once the black
primer coat was dry, I lightly sanded it smooth using 2000 grit sanding sponges.
This process was repeated twice as I had to deal with the gaps and areas I
didn’t sand well.
A lot of
sanding/grinding down stuff. Several fill and sand sessions happened. I ended up
using a new acrylic primer called Kaliedo Acrylic. It has better pigment
coverage than Badger Stynylrez and was roughly 1200 grit filler so it filled in
all the minor scuffs that came with sanding the primer coat. Once the black
primer coat was dry, I lightly sanded it smooth using 2000 grit sanding sponges.
This process was repeated twice as I had to deal with the gaps and areas I
didn’t sand well.
It took me a long damn time to get the paint scheme right. I had a lot of overspray to deal with. First I sprayed on the white coat using a coat of Tamiya Flat White then when it was dry Mission Models white gloss (one of the good things about Mission models paint is that it sprays on relatively smooth and requires less sanding with fine grit sponges/sandpaper.)
Next came the blue areas which were masked off. First I used Mission Models blue, but I found it to be too dark. I replaced it with Gunze Bright Blue. Despite my best masking efforts I had some red, white and blue overspray. It took several spray sessions to get the demarcation lines and fix the overspray. Once it was done, I sprayed on a Vallejo clear gloss to prep for the decals.
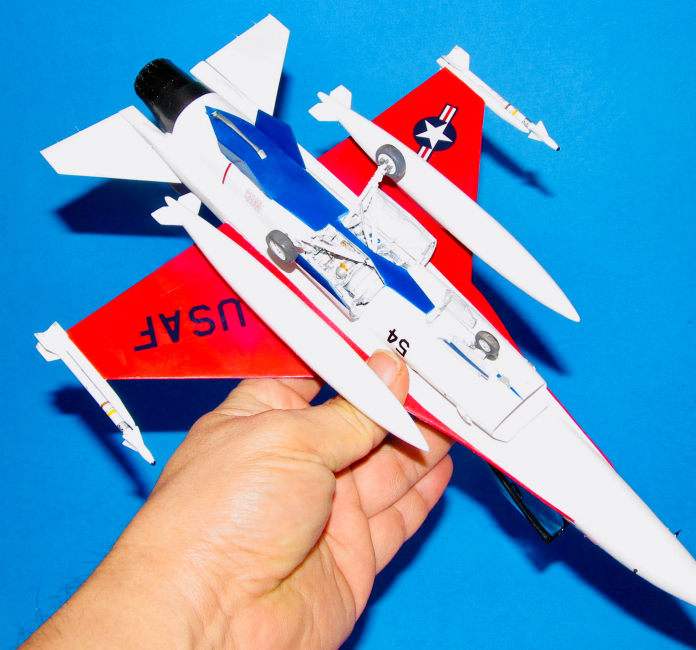
The various doors, bits and pieces were painted at this time including painting and masking the blue markings on the underside of the YF-16.
I used the Caracal Models Decal set 48160 F-16: The Early Years to replace the old and terrible decals that come with these early kits. I selected the YF-16 1568 European/Middle East Tour markings from 1975. My experience with Caracal decals is pretty good and these added to that good experience. They went on without major issues (except the headache of measuring all those black line markings for the wings and fuselage to ensure proper fit) and little to no silvering even without decal solution.
Once they were dry, I wiped down the model and sprayed on another layer of Vallejo gloss for the final coat.
| FINAL CONSTRUCTION |
I took the painted metal landing gear from SAC and glued them into place (done before decals) and attached the various resin parts including the doors/actuators from the Aires Main Wheel Well Set to complete the interior. I used the original Monogram nose gear doors which are split twin doors that had the prototype rather than the single piece door everyone is familiar with. I used spare actuators painted flat white and silver from the spares box to represent those door actuators.
The Reskit wheels were removed from the Resin stubs cleaned, primed and painted. I drilled out the holes so they would attach to the landing gear. A tiny dab of CA glue to each wheel holds them in place. They look a lot better than the original kit wheels.
 I glued
on the painted nose pitot tube from the Otaki kit as it is the one that
looks most like the prototype’s pitot tube. Also drilled out two holes at
the side of the nose in the approximate locations of the AOA sensors on
1568. Added two brass AOA sensors and carefully brush painted them gloss
black.
I glued
on the painted nose pitot tube from the Otaki kit as it is the one that
looks most like the prototype’s pitot tube. Also drilled out two holes at
the side of the nose in the approximate locations of the AOA sensors on
1568. Added two brass AOA sensors and carefully brush painted them gloss
black.
The cockpit parts I didn’t add during construction were glued in place.
Next I cut up the old Monogram canopy coaming and modified/cut into smaller shapes and used them as the internal canopy framing for the Tamiya canopy. I glued each half to the interior of the Tamiya canopy and then mounted it into the mounting holes. I had an extra canopy frame from the Tamiya kit, but it would require a lot more modification to the Monogram F-16 fuselage.
The rear canopy was glued on using white glue.
The fuel tanks and Sidewinders (I chose the ones that looked the closest in form to the AIM-9D) were painted and decaled using spare decals from various kits then attached to their mounting points.
The last pieces added were the exhaust nozzle/tube, ailerons with ESD wicks, arrester hook and the underside tailplanes.
| CONCLUSIONS |
Franken Viper was finally done. It involved a lot of parts to cover a lot of detail and jamming it together without too many issues thanks to learning many painful lessons over the two plus decades I’ve been building models as an adult.
My initial goal was to complete it by F-16’s 50th anniversary, but I learned (repeatedly) that if you want the universe to laugh tell it your plans. I had other things I had to deal with that were way more important as life really got in the way (which is why I’ve been quiet for well over a year). I waited till I had some time off from my 2nd first year of university (2nd career, hooray!) to start building again and completed it roughly 2 years later than I initially hoped.
Unless someone decides to make a new version of the YF-16, the way I went is pretty much the only way you can build a reasonably accurate YF-16 to a modern standard. I had a lot of fun building this kit (except the painting which is odd because that’s usually what I enjoy the most.)
25 September 2026
Copyright ModelingMadness.com. All rights reserved. No reproduction in part or in whole without express permission from the editor.
If you would like your product reviewed fairly and fairly quickly, please contact the editor or see other details in the Note to Contributors.