Fine Molds 1/72 F-15DJ Eagle
| KIT #: | FK01 |
| PRICE: | 4050 yen |
| DECALS: | One option |
| REVIEWER: | Dan Lee |
| NOTES: | Kelik 3d Cockpit Decals |
| HISTORY |
The F-15 Eagle was designed in response to a late 1960s USAF specification called F-X which was to replace the F-4 Phantom with the capability to dogfight as well as engage in beyond visual range engagements with radar guided missiles. It was designed around the Hughes Electronics APG-63/70 radar which was one of the first with a look down/shoot down capability which means that the radar could ignore ground clutter to engage low flying targets.
 All of the
major plane manufacturers of the time entered this potentially lucrative
competition with their variations of the F-X spec. When the dust cleared,
McDonnell Douglas won with their version of the F-X which became the F-15. The
F-15A first flew in 1972 and started joining operational squadrons in 1976. In
the late 70s, the single seat F-15s were sold to Israel, who would be the first
nation to fly the Eagle into combat, and then later to Saudi Arabia and Japan.
All of the
major plane manufacturers of the time entered this potentially lucrative
competition with their variations of the F-X spec. When the dust cleared,
McDonnell Douglas won with their version of the F-X which became the F-15. The
F-15A first flew in 1972 and started joining operational squadrons in 1976. In
the late 70s, the single seat F-15s were sold to Israel, who would be the first
nation to fly the Eagle into combat, and then later to Saudi Arabia and Japan.
The F-15C variant was introduced in 1978 with a major upgrade in the mid 80s of the radar, electronics and engines including the ability to fire the AIM-120 series of missiles. It is equipped with two TF-100 engines (performance varying on model), can carry a warload of eight AAMs (AIM-120s, AIM-7Ms and or AIM9M/X) and a 20mm M-61 Vulcan Gatling gun in the starboard wingroot. Unlike the earlier A model, the C model can use conformal tanks which greatly improve the range and not have as big a drag/performance penalty as conventional drop tanks.
In the mid 1970s Japan wanted to replace their F-104J and F-4EJ with the latest fighters and looked at the F-15 Eagle among others as a potential replacement. After evaluating various fighters, the JASDF picked the F-15 Eagle and requested the majority of the aircraft be built in Japan. After some wrangling with US Congress, the Japanese were allowed to built the majority of the F-15Js in Japan, but had some conditions placed on them. The J and DJ models are structurally the same as USAF F-15C and F-15D models except in terms of ECM, threat warning receivers, weapons and has no nuclear capability.
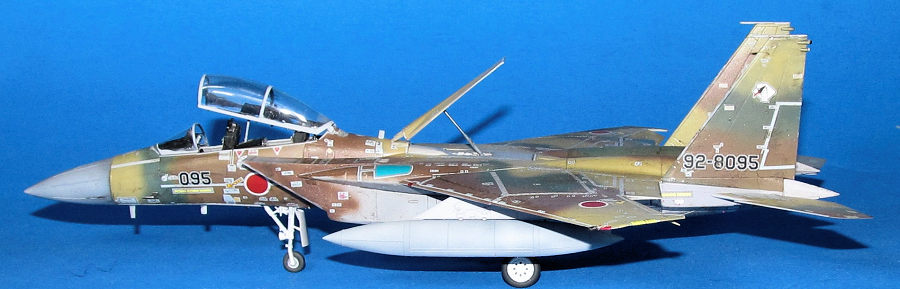
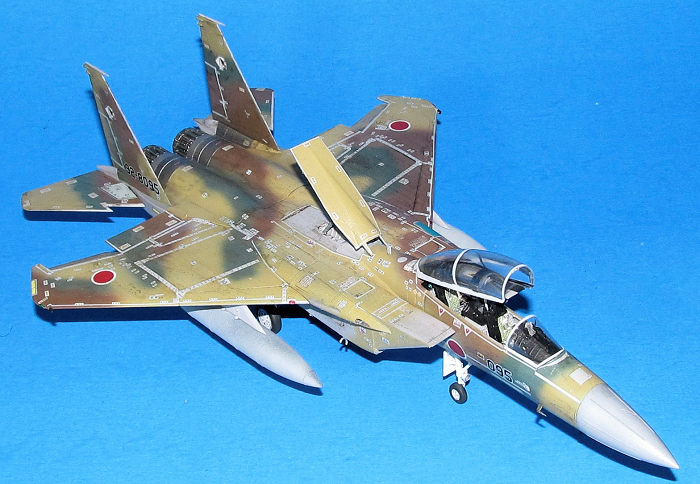
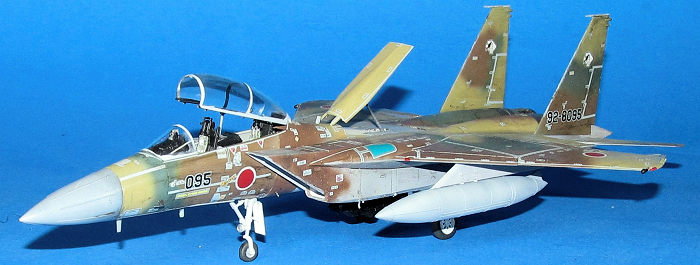
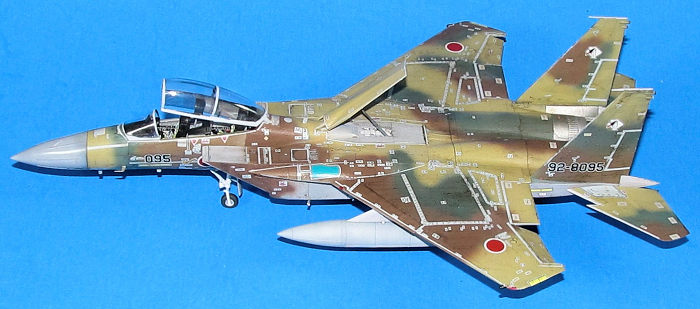
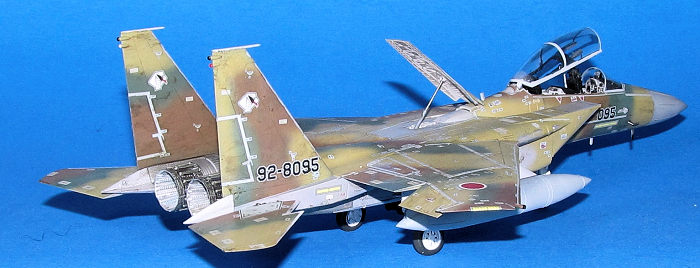
Some 37 F-15DJ trainers were built for the JASDF to pair up with the F-15Js flown by Japan. Many of these are used for Aggressor training and are quite famous for having unique camouflage patterns.
| THE KIT |
 Fine Molds
kit of the F-15DJ comes with a total of 14 sprues in light grey and one in
clear. The parts have crisp fine detail and almost no flaws except mold marks
from the injected plastic manufacturing process. The sprues are organized based
on the element of the plane so no hunting around. There are sprues for
duplicated exterior parts and burner cans, single sprues for the interior of the
fuselage, cockpit, top of the fuselage, bottom of the fuselage, nose, etc, etc.
Fine Molds
kit of the F-15DJ comes with a total of 14 sprues in light grey and one in
clear. The parts have crisp fine detail and almost no flaws except mold marks
from the injected plastic manufacturing process. The sprues are organized based
on the element of the plane so no hunting around. There are sprues for
duplicated exterior parts and burner cans, single sprues for the interior of the
fuselage, cockpit, top of the fuselage, bottom of the fuselage, nose, etc, etc.
The instruction booklet is well written and lays out each of the steps. They even mention at what point you should paint the model before resuming construction. Added bonus, they realized that their kits are very popular outside of Japan and added English to them for those that can't read Kanji.
Finally, decal sheet is well done with the stencils being almost readable in 1/72 scale.
| CONSTRUCTION |
It all began with the cockpit. I painted the interior with Xtracrylix Aircraft Grey and let it dry before I added all the Kelik 3D decals for the various console and instrument panels. Some folks might consider this cheating, but my close up eyesight isn't the same as it used to be AND I'm not that good at painting tiny details in 1/72 (I'm barely competent in 1/48 scale) so I prefer to use the 3D decals if they are available.
 Next I
removed certain side wall details with wood carving tools before adding the 3D
decals as per instructions. I used CA glue or white glue to hold each of the 3D
decals in place. Certain parts like the IPs were added as per instructions while
I left off the remaining pieces like control sticks that usually fall out from
the rough handling due to construction.
Next I
removed certain side wall details with wood carving tools before adding the 3D
decals as per instructions. I used CA glue or white glue to hold each of the 3D
decals in place. Certain parts like the IPs were added as per instructions while
I left off the remaining pieces like control sticks that usually fall out from
the rough handling due to construction.
Once the cockpit interior was done, I glued the two halves of the nose together using Tamiya Extra Thin Cement because there are zero seams that needed to be filled/sanded down. I have to marvel at the design work by Fine Molds here.
Next I painted the interior portion of the top and bottom halves of the intakes and engine (flat white for the intakes and burnt metal for the exhausts) as well as the intake fan blade pieces (silver) and exhaust faces (steel) before I glued them all together. The only major seams were in the exhaust tubes which I tried to deal with by clamping down the top and bottom halves together using C clamps as the glue dried. The seam is still there, but you need to look real close with a penlight to see them which is fine with me.
I assembled the rest of the fuselage and wings, but did not attach the tailplanes or nose to the rest of the model together as per instructions as leaving them off makes things easier to paint. The intakes are the trickiest part of the build, but as long as you follow the instructions, assembling them is okay.
Meanwhile I assembled the smaller assemblies like the landing gear doors, the landing gear, fuel tanks, pylons, ECM pod and various other bits as I prepared for painting it.
| COLORS & MARKINGS |
I first masked off the cockpit and intakes, inserted trimmed sponges (I use packing sponges that come with aftermarket sets which don't react with acrylic paint unlike makeup sponges) into the wheel wells, exhausts. Next I primed the model and the various parts using Badger Stynylrez Grey acrylic primer because I'm using Mission Model and Vallejo Air paints (among others) which don't grip the plastic well even with low tack tape (found out the painful way.)
Once the primer coat on the various parts were dry, I had to polish the first coat with micromesh polishing pads to smooth out the usual blemishes and oopsies that happen. I did end up spraying a final coat of primer and after some touch ups, the model assemblies were ready for painting.
I first sprayed with my airbrush Vallejo Air Aluminium for the exposed metallic sections of the engine compartment both top and bottom. When it was dry I sprayed on some thinned Vallejo Air Steel to distort the aluminium coat and mottle up the finish. After the paint was dry I masked off those areas and sprayed on Mission Model light ghost grey on the underside and side sections in light coats and built up the paint layer slowly to mottle up the paint. Over several days, these areas were masked off and I sprayed Tamiya XF-60 Dark Yellow as the topside base coat in the same way (light coats built up while attempting to mottle the paint.) This was later followed by the Vallejo Air Dark Green and Tamiya XF-64 Red Brown in similar fashion, but I free handed the paint scheme without masking by keeping the paint light and air pressure on my airbrush down. I ended up having to do some touchups though, but not as much as I usually do when freehanding a complex scheme like this.
The other parts were painted in similar fashion while the nose and intake area got sprayed with dark ghost grey while the canopy bits were masked, painted with flat black and then the exterior dark ghost grey.
Finally, I sprayed on Vallejo Acrylic Gloss all over to prep for painting and seal everything in.
 I did one
small bit of construction in this step as I glued the nose/canopy to the
fuselage after painting. It took some gentle clamping to prevent any gaps
between the fuselage and the nose. I was impressed how Fine Molds did it (they
designed the nose to connect to the fuselage with an attachment plug) versus
what Hasegawa did with their their F-15 Eagle (designed as a butt join that
required a lot of internal bracing to keep the nose in place which was identical
to what I had to do for all of their US “teen” series of fighter kits in 1/48
scale.)
I did one
small bit of construction in this step as I glued the nose/canopy to the
fuselage after painting. It took some gentle clamping to prevent any gaps
between the fuselage and the nose. I was impressed how Fine Molds did it (they
designed the nose to connect to the fuselage with an attachment plug) versus
what Hasegawa did with their their F-15 Eagle (designed as a butt join that
required a lot of internal bracing to keep the nose in place which was identical
to what I had to do for all of their US “teen” series of fighter kits in 1/48
scale.)
Once the gloss coat was cured, I added the decals following the decal placement diagram. Thanks to the many stencils that modern aircraft have, it took a couple of days to place all of the decals. The most difficult decals to put on were the grey ones that line the canopy and the leading edges of the wing. I used MicroSol and Set to help the decals settle onto the surfaces.
After I assembled the model, I dirtied up the plane using Flory's Grey and Dirty Washes (made with clay and can be removed with water instead of harsher chemicals like mineral spirits or enamel thinner) just to highlight the panel lines and certain areas like the engine compartment.
Once it was dry, I sprayed on a light coat Vallejo flat varnish for the final coat and removed the masking for the canopy.
| FINAL CONSTRUCTION |
I attached all the painted pieces that I didn't add during painting like the tail fins and ailerons, landing gear, wheel well doors, control sticks, the painted fuel tanks, missile racks and the air brake. The tail fins were a bit fiddly as I had to clamp them in place to reduce the gaps.
Next I painted the various probes and antennas then glued in them in place. I mostly used CA glue because once it cured enough, the probes would stay firmly in place.
The ejection seats were assembled, painted and 3D decals added to them before they were placed into the cockpit. I used CA glue to hold them in place.
 The canopy
parts were fairly easy to add as long as you let the glue cure first (especially
the canopy actuators.) I made that mistake with my earlier F-4E build so this
time I installed the actuators first, let the glue cure for a day and then added
the canopy. Basically it was my own impatience that got the better of me (like
it has for more models than I'd like to admit.)
The canopy
parts were fairly easy to add as long as you let the glue cure first (especially
the canopy actuators.) I made that mistake with my earlier F-4E build so this
time I installed the actuators first, let the glue cure for a day and then added
the canopy. Basically it was my own impatience that got the better of me (like
it has for more models than I'd like to admit.)
The afterburner cans were easy to build, but required a lot of work painting and weathering. I used the Tamiya weathering set to dirty up the interior of the afterburner (whose base color is flat white.) It took a little longer than I thought to build up the afterburner cans because I misplaced one of the afterburner petals while moving boxes around (surprised right?) When I was about to finish the afterburners, I noticed I had nine, not ten petals. I spent a good two hours hunting around where that petal might have gone and finally found it in the carpet next to my chair where I inadvertently dropped it while putting the parts into the box! Major lesson is count how many parts actually end up in the box before putting it away.
Finally I added painted nose cone. I used a small dab of Tamiya thin cement to hold it in place and I was finally done my F-15DJ Aggressor.
| CONCLUSIONS |
I'm happy with how this turned out despite some issues with the decals around the canopy area (next time I'll paint them than use the kit decals.) Fine Molds has done an amazing job with their F-15 Eagle series. Like the F-4, it is probably the best available and easiest kit to build in 1/72 scale. The way they designed the parts and set up the construction process makes painting some of the F-15 Eagle's more complicated paint schemes easier to paint. This is now my favorite Eagle kit. Anyone from a beginner to an expert can turn out a really nice model with this kit. Highly recommended.
Dan Lee
8 July 2025
Copyright ModelingMadness.com. All rights reserved. No reproduction in part or in whole without express permission from the editor
If you would like your product reviewed fairly and fairly quickly, please contact the editor or see other details in the Note to Contributors.