Monogram 1/48 F-16AM MLU
| KIT #: | 6658 |
| PRICE: | CAD$80.00 (two kits) |
| DECALS: | Four options |
| REVIEWER: | Pablo Calcaterra |
| NOTES: | Aztec Decals D-102 |
| HISTORY |
Argentina had been looking at replacing their supersonic fleet many years before the last Mirages were retired in 2015. You can go back as far as the early 1990s when under the Government of Carlos Menem the Condor II mid range missile program was killed and in return the Air Force got 36 Skyhawks M that were modified to the AR standard. They were a significant leap compared to the previous B and C models and with radar and capabilities that the Mirages did not have. But they still lacked supersonic capability and the US never sold Argentina any armament except for, I believe, only 4 (!) Sidewinders to be used during a meeting of all the presidents of the American continent in the 2000s…At the time of the purchase of the ARs Argentina wanted F-16s but the US denied this option.
While the Air Force suffered a never ending cut of funds and the pilots flew less and less hours (never attaining the training level of those that flew in the 1982 war) political swings (or should we say interference) prevented any serious progress in this matter.
 As a
consequence of the studies done in the 2010s to replace the Mirages there were 3
options on the table: F-16s from Denmark, the Chinese JF-17 (which did not meet
the AF criteria but the leftist Governments of Kitchner and Fernandez wanted to
acquire due to their close ties to China) and the HAL Tejas from India (which
was not possible because it has British components and thus the offer was
blocked by the UK Government).
As a
consequence of the studies done in the 2010s to replace the Mirages there were 3
options on the table: F-16s from Denmark, the Chinese JF-17 (which did not meet
the AF criteria but the leftist Governments of Kitchner and Fernandez wanted to
acquire due to their close ties to China) and the HAL Tejas from India (which
was not possible because it has British components and thus the offer was
blocked by the UK Government).
Even at the last moment the Fernandez Government wanted to close the deal with the Chinese but was unable to do it. When Javier Milei won the elections in late 2023 his right wing government immediately got aligned with the US and was able to close the deal with Denmark in April 2024 with the support of the US who gave Argentina a credit for the purchase. Argentina had requested 36 planes but the US approved the sell of only 24. Total cost for 24 F-16 AM/BM MLU Block 10/15 with spares, engines, simulators and a 25th plane for ground training was in the order of USD 300/540 million depending on the sources. Another USD 941 million was also approved for armament including 36 x AIM 120C-8, 102 Mk-82 500 lb bombs, 50 GBU-12 Paveway II, Sidewinders AIM-9M, chaff and flare cartridges among others. The in development Argentine flying bomb Dardo III could one day be also launched from the 16s.
The planes had received the latest upgrades in Denmark including tape 6.5, MLU strengthening of frame and avionics upgrades. The planes could be upgraded to tape 6.6 and they are painted in HAVE GLASS V.
The program is called Peace Condor. It not only involves the planes and armament but also the upgrade of the Area Militar Rio Cuarto (the main Repairs Depot of the Air Force) and BAM Tandil (where the Mirages were based). These include runways, taxiways, bunkers, new buildings to have the simulators and training…
 The first 6
planes (2 x AM single seat and 8 x BM two-seat) arrived in flight from Denmark
via 2 stops in Spain and 1 stop in Brazil on December 05, 2025. Pilots were from
the RDAF. A flypast over Buenos Aires took place 2 days later and people
celebrated on the streets. There is a video on line filmed from the cockpit of
one of the two seaters that allows you to have a 360 view of the flypast. It’s
really excellent.
The first 6
planes (2 x AM single seat and 8 x BM two-seat) arrived in flight from Denmark
via 2 stops in Spain and 1 stop in Brazil on December 05, 2025. Pilots were from
the RDAF. A flypast over Buenos Aires took place 2 days later and people
celebrated on the streets. There is a video on line filmed from the cockpit of
one of the two seaters that allows you to have a 360 view of the flypast. It’s
really excellent.
Training of a group of pilots is taking place right now in the US. When these return to Argentina mid 2026 the armament should be delivered. Then these pilots will train the 1st batch of pilots in the country and by December 2026 this 2nd group should be ready to fly the planes. On the same month time the 2nd batch of 6 planes should also arrive in flight. Deliveries will proceed at a rate of 6 planes per year till the 24 are delivered.
The slow implementation of the program is because the jump in technology is massive and no step can be bypassed. The Air Force is going from a 3rd generation fighter to a 4th generation with capabilities never seen in the country. It involves a dramatic change to the mind set, skills and operational culture.
It remains to be seen if the ever financially struggling country will give the Air Force the funds to properly use these plains and give the pilots the hours of flight that are needed…else it will be the same as with the Skyhawks AR…more planes than pilots and most of the planes mothballed while the pilots had a basic/limited capability built in.
As one Danish pilot told an Argentine one: “you have purchased and elephant…now you have to eat it!” when talking about the challenge to incorporate such an advanced system.
| THE KIT |
 The combo was
issued in 1997 according to Scalemates. It has a Blue Angels F-18 (which I used
to build Steve Nierlich’s CF-188 participated in the record breaking RCAF
involvement in William Tell in 1996…see
review) and a F-16 of the Thunderbirds.
The combo was
issued in 1997 according to Scalemates. It has a Blue Angels F-18 (which I used
to build Steve Nierlich’s CF-188 participated in the record breaking RCAF
involvement in William Tell in 1996…see
review) and a F-16 of the Thunderbirds.
As such it is molded in white plastic, represents a block 25 plane and has raised panel lines. The wheel bays are very simple and empty. Though the kit is for the demo team it includes the AMRAAM and Sidewinder 9-M missiles and a ventral drop tank. Decal sheet does not have many stencils and is very big with all the decals needed for this Demo team.
There are tiny plastic containers with the paints, a small plastic glue tube and a single pretty coarse plastic brush.
| CONSTRUCTION |
With Argentina on track to purchase their 16s I bought the combo a couple of years ago or so. When the planes I arrived in the country on December 05, 2025 on that very same day I pulled the kit from the stash and started to work on it. More than 30 years of wait for the F16s had ended and I wanted to celebrate by building one.
After reading Scott’s comment somewhere that the panels lines on the wings are fictitious (actually, they represent the areas where the rivets are….) I decided to re-scribe all the panel lines, access doors…everything. Using scale plans and a newly purchased scriber tool I re did all the panels in roughly one week. Those lines on the wings were replaced with rivets done with the riveting wheel.
As the cockpit is pretty bland in details, I decided to upgrade it by creating my own decals using pictures found in the net (side and main panels)
 I picked one
of the two ejection seats that come with the kit (actually a decent
representation) and painted it following images I found in Internet.
I picked one
of the two ejection seats that come with the kit (actually a decent
representation) and painted it following images I found in Internet.
The canopy can only be presented closed. In this case it had never been in a separate bag and was badly scratched. I used the Tamiya polishing solutions and cloths (x3) and ended up marvelled by the end result. NO need to use Future!
The air intake was primed and painted white while the back of the intake was painted black (there is no engine supplied). I found online the shape and size of the MLU reinforcements. Very thin Evergreen came to the rescue instead of purchasing a photoetched set that is available. The missing throttle was made up with pieces from the spares box. With all these pieces ready it was time to start to put the plane together.
Cockpit hub glued to the top half of the fuselage. I drilled a hole for the cannon. I also drilled the premarked hole on the left side of the nose for the searchlight (called Russian Light) and similar in context as those in use in the Canadian CF-18s. There’s even a clear part in the kit to use with the light. Once this was attached from inside there was some Tamiya putty needed to give the proper shape to the searchlight.
Then the bottom half was attached with the air intake next. Very little to no putty was required. The forward looking RWR “beer cans” were made with 1 mm diameter Evergreen round plastic which was inserted on the border of attack thru a slot I made with a file. Front of the RWR was somehow rounded and the body was merged with the wings using putty.
Looking at pictures of the F-16s sold to Argentina and while in service in the European country I found that there were some vents and intakes missing in the kit. I made these with Evergreen cut, sanded, shaped as needed.
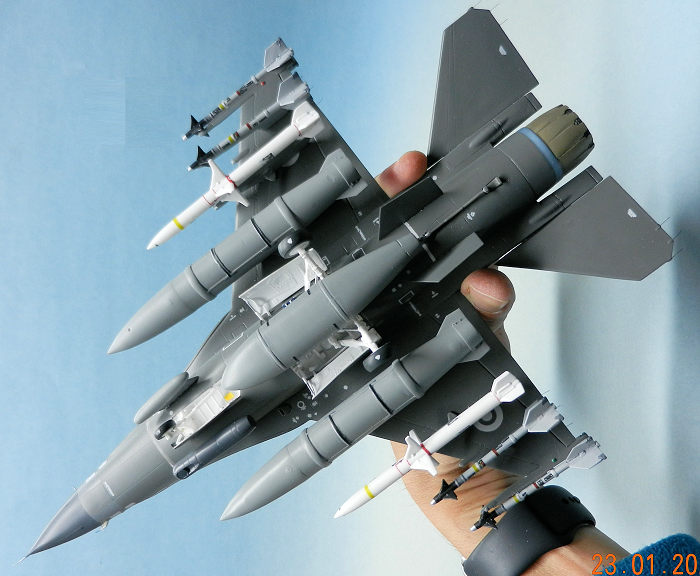
Missile rails were found in the box of spares along with another set of Sidewinders from Monogram/Revell to be used in stations 2 and 8. The idea was to do the following configuration
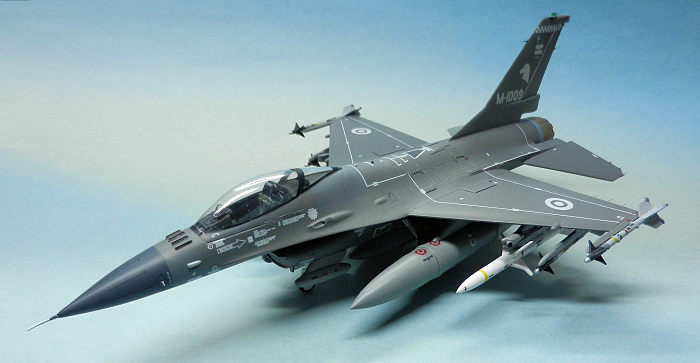
Station 1 for Sidewinder, 2 for Sidewinder, 3 for AARM, 4 to 6 for drop tanks and then inverse order from 7 to 9. Stations 5R and 5L were for the guidance system for the EG/FLIR/TF.
The HARM target designator was made with a Mk82 and the tip and nose using a Trumpeter Wellington British bomb shaped as needed. The HARM supplied by Monogram is very small, has the wrong shape…and the instructions call them (x2) ‘air intakes”!
The beacon on top of the tail is pretty good but the little “wings” under it are too thick. I removed both and made a new set of wings. Radar warning on the base of the tail is too tall and I cut it short.
Thanks to my always pushing friend Fabian Vera I decided to scratchbuilt most of the little boxes, pipes, frames, vents etc present in the wheel bays. I used references from the web to make most of these parts.
 Another part
I had to scratchbuilt was the IFF located just ahead of the nose bay as the
Danes had a sort of squared/diamond shaped one.
Another part
I had to scratchbuilt was the IFF located just ahead of the nose bay as the
Danes had a sort of squared/diamond shaped one.
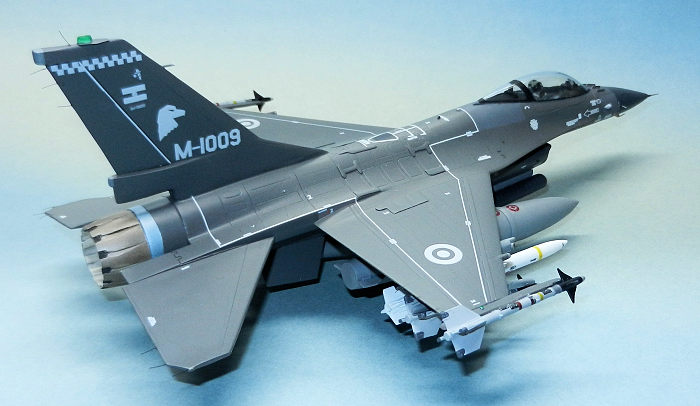
Then it was time to attach the tail. But then I found it was too long and it was running over some of the MLU reinforcements. Looking at a picture on my tablet that I had expanded to scale I realized that the front part of the vertical surfaces was too long. I cut it, sanded it and then it had the right length. I glued it in place…only to have this feeling that something was wrong…I looked at pictures of the Danish/Argentine 16s and turns out that the base of the tail is much narrower than the one supplied in the kit. Ah! That’s because it is a block 25 and not a 10/15! So, before the glue had dried, I pulled the tail off. The following day I looked for a tail in my boxes of spares that had the length and thickness I needed. I found one made in resin and cut it as needed. Problem is that at the same time 50% of the base of the tail had to be thinned out/remade. I had no solution that to cut out that thick base and glue it again forming a V (tip of the V is forward) with most of the surface matching the tail itself. With this dry and the resin front part attached with cyano I spent a couple of nights sanding, adding putty, sanding again and then rescribing the panels until the tail was smooth and ready. Then when I presented it, I realized that I had sanded out too much from the bottom of the front portion and the top of the tail was not horizontal but sloped down towards the nose…A new set of small and thin pieces of Evergreen were used to push up the front of the base of the tail. Putty and sand paper to the rescue again. THEN it was ready to be glued. Some putty was used to improve the union of tail and fuselage.
The exhaust “petals” were painted in a light cream colour (inside) and put together with the back of exhaust was painted black with details highlighted in aluminum. Some black washes were used to make the internal surfaces dirty.
Area around the cockpit was painted black. I made the actuator (?) for the canopy that goes behind the seat with a couple of parts taken from spares (this is the part that has 2 different positions depending on canopy opened or closed). I glued the canopy which left a thin gap on the back. I used some Vallejo Plastic Putty for it. There’s a panel in front of the windshield of these planes that is missing and that I added.
The bird slicers are also missing and I made them with very thin Evergreen.
Missiles were put together and the wing drop tank were 3D printed by a colleague in the IMPS SW Ontario using plans I purchased online.
The hard points for the tanks and missiles had to be made using parts in the spares. Most of them came from those not used for my CF-18s but required modifications. The most significant one was the sensors present in the TERMA pods that Argentina has contracted to be installed. These sensors were made with rods of Evergreen plus a bomb that was cut in half and attached to the front part. It was sanded, filled, sanded again till the shape was acceptable.
The plane was finally ready for priming and painting.
| COLORS & MARKINGS |
I primed the model with Vallejo Light Grey Primer after I had primed in white and masked the air intake and the wheel bays.
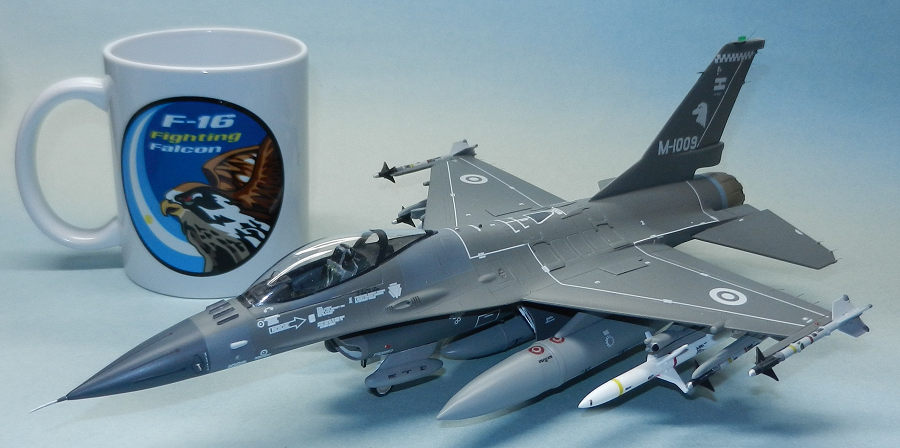
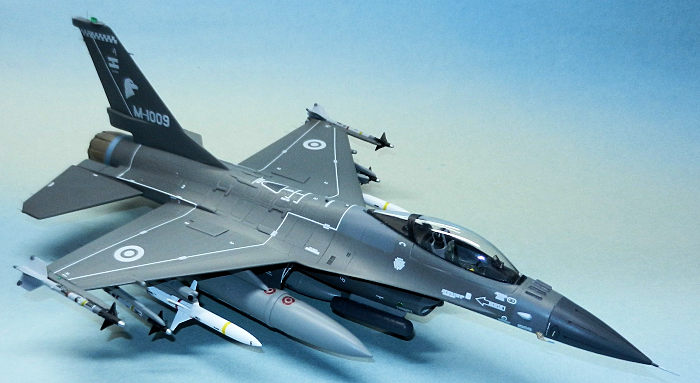
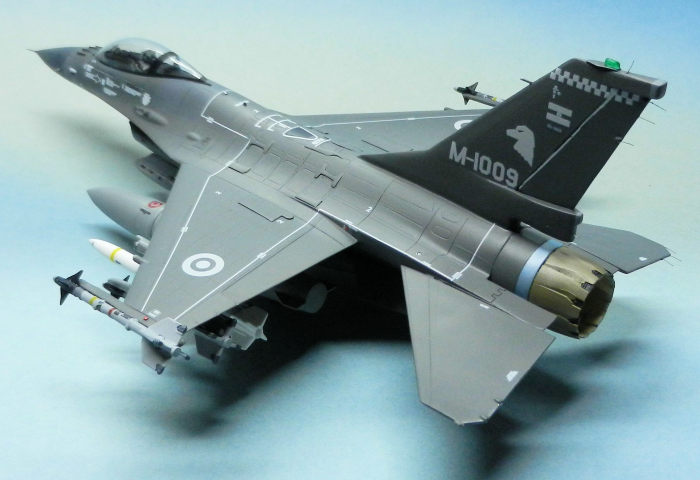
M-1009, one of the two single seaters that arrived on December 5, shows that there are some panels around the cockpit that have been overpainted in a different tone of grey that is also not as satin like the rest of the plane. For these I used Vallejo 70.992. I masked these and then a mix of Vallejo HAVE GLASS V with 71.280 + Black + Chrome Silver were used for the entire plane in the proportion 36:3:1
Lips were painted with Vallejo Color 991. Same colour
was used for the sides of the fuselage by the flaps. Hard points, drop tanks,
RWR and HAARM were painted Model Master FS36270. Sidewinders were painted Model
Master FS36375. Radar radome Vallejo 71.047 with
 black (10:2
ratio). All the details in the wheel bays were painted accordingly with a brush.
black (10:2
ratio). All the details in the wheel bays were painted accordingly with a brush.
The collar before the exhaust was painted with a mix of Chrome Silver and some drops of blue Vallejo 70.889 (5:2). The exhaust itself with Model Master exhaust.
Once all the parts were painted, I gave the model a very thick (too thick and for the first time runny!) coat of Quick Shine. Some retouches were needed because of my mistake applying it…
Then it was time for the decals. These Aztec decals are out of register with the white background showing behind the light grey. It took a while to get an answer from Aztec. They apologized and offered a refund. I asked them for a new set with the colours in register. Two weeks later I received an email asking for my input regarding the transaction…clearly the requested in register decals were never going to arrive. I was forced to use what I had in hand.
The decals are very thin, tend to get glued pretty fast and sometimes are very brittle. But they conform to the panels very well and are released from the backing paper very fast. There are some errors in the instructions, some stencils missing and the M-1009 at the base of the tail is probably 20% too big…oh well…
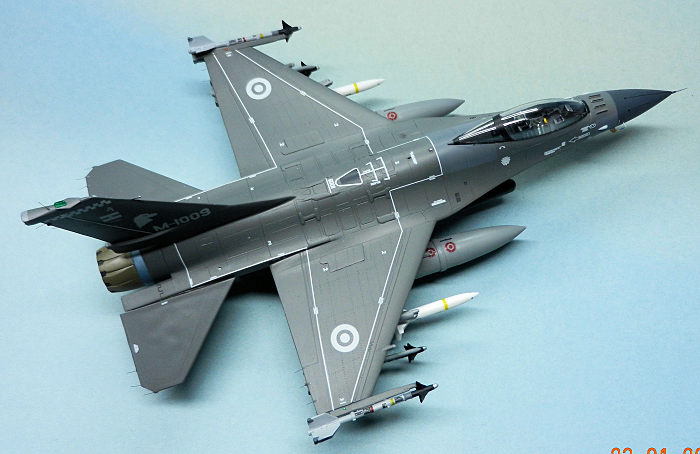
I designed and printed the strips around the radar dome (which I understand are to prevent damage due to lightning).
The serial number under the flag is missing. This is quite a prominent feature. I tested some greys in my printer and when I found one that was a good match I typed the number over it, printed it on clear decal paper, put small rectangle of white decal in position and the serial number was then put in place. Not perfect but better than having nothing there!
All decals for missiles and drop tanks were custom made by me using images from the net, applied and then covered with Model Master satin.
The chaff dispensers (?) on the hard point from TERMA were made in clear decal paper using the picture of the device found in their official website.
I sprayed a light coat of Model Master Matt clear on the small panels that have a different grey around the nose. Then I masked these carefully (not wanting to pull a decal by mistake later on) and sprayed the entire model with Model Master Satin. I removed the masks for the panels and the canopy and everything was good!
| MORE CONSTRUCTION |
Placing the plane upside down I started by adding the wheels followed by the landing gear doors with scratch-built actuators and reinforcements. The landing lights on the nose door were made using clear plastic parts from the spares and painted (silver behind followed by black covering the silver and making the front of the lights themselves).
Then it was the turn of the ventral tank and I moved outwards till I reached the wingtip Sidewinders. Hard points were attached using tiny rods of Evergreen that were inserted in holes I made on the hard points and on the wings, trying to ensure a better firmer presentation. The quite heavy 3D printed tanks were glued with cyano, the rest with standard plastic glue. The items on station 5 L and 5 R were glued in place (one was scratchbuilt as explained above, the AN/AAQ-14 came from the HobbyBoss F-18 that I have in the stash)
 Once the
bottom of the plane was ready, I carefully flipped it upside down and started
adding small details on the top of the model. These include the pitot (from
scratch and painted basically in Model Master exhaust but with the thin part in
a mix of silver and blue to represent the effects of the heat), the two tiny
sensors on the sides of the radar dome, the pitot on the nose, the lights I had
drilled on top of the fuselage besides the tail where painted in chrome silver
and then a drop of Kristal Klear was applied (same was done to the Russian
Light). The window of the “donated” AN/AAQ-14 was also covered in Klear.
Once the
bottom of the plane was ready, I carefully flipped it upside down and started
adding small details on the top of the model. These include the pitot (from
scratch and painted basically in Model Master exhaust but with the thin part in
a mix of silver and blue to represent the effects of the heat), the two tiny
sensors on the sides of the radar dome, the pitot on the nose, the lights I had
drilled on top of the fuselage besides the tail where painted in chrome silver
and then a drop of Kristal Klear was applied (same was done to the Russian
Light). The window of the “donated” AN/AAQ-14 was also covered in Klear.
Navigation lights were painted in Chrome Silver and then clear red and green. The beacon on top of the tail was made with a clear part from spares, shaped and glued in place. The I painted it with clear green. Formation light under the tail RWR was made with a very tiny piece that came from the spares.
The final touch was to add all the static wicks using very thin black plastic thread. Once these were in place (quite a challenge to get something so thin to get in place at a decent position…) my F-16 was finished.
| CONCLUSIONS |
There you have it as Scott says. An armed to the teeth Argentine F-16 which now is just fantasy because….there is not such armament in the country!
Though old and with raised panel lines the Monogram/Revell kit is a very good starting point for a modern F-16. I was gladly surprised with the good fit of the parts and the extras present in the box.
I remember how in the early 90s we modelers (and for sure Air Force members) were eagerly waiting for the Air Force to be able to purchase their first F-16…we had to wait more than 30 years for that moment…But finally there the first 6 are (I mean…there in Argentina!)
Dedicated to my old friend Ricardo Galfione. His collection of aviation books is what inspired me when we were kids. And he is the one who recently sent me to Canada the Argentine F-16 mug adorning one of the images.
24 February 2026
Copyright ModelingMadness.com. All rights reserved. No reproduction in part or in whole without express permission.
If you would like your product reviewed fairly and fairly quickly, please contact the editor or see other details in the Note to Contributors.