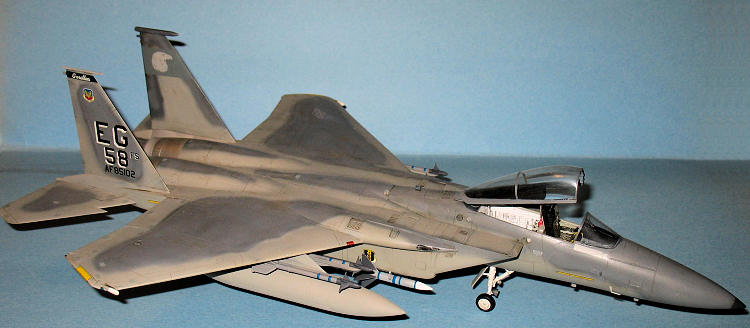
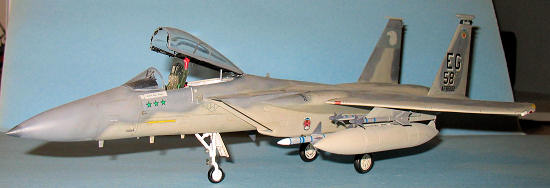
Hasegawa F-15C '58th Fighter Squadron'
| KIT #: | 09492 |
| PRICE: | CDN $75.00 |
| DECALS: | Two Options |
| REVIEWER: | Dan Lee |
| NOTES: | Includes internal/external PE |
| HISTORY |
The F-15 Eagle was designed in response to a late 1960s USAF specification called F-X which was to replace the F-4 Phantom with the capability to dogfight as well as engage in beyond visual range engagements with radar guided missiles. It was designed around the Hughes Electronics APG-63/70 radar which was one of the first with a look down/shoot down capability which means that the radar could ignore ground clutter to engage low flying targets.
All of the major plane manufacturers of the time entered this potentially lucrative competition with their variations of the F-X spec. When the dust cleared, McDonnell Douglas won with their version of the F-X which became the F-15. The F-15A first flew in 1972 and started joining operational squadrons in 1976. In the late 70s, the single seat F-15s were sold to Israel, who would be the first nation to fly the Eagle into combat, and then later to Saudi Arabia and Japan.
The F-15C variant was introduced in 1978 with a major upgrade in the mid 80s of the radar, electronics and engines including the ability to fire the AIM-120 series of missiles. It is equipped with two TF-100 engines (performance varying on model), can carry a warload of eight AAMs (AIM-120s, AIM-7Ms and or AIM9M/X) and a 20mm M-61 Vulcan Gatling gun in the starboard wingroot. Unlike the earlier A model, the C model can use conformal tanks which greatly improve the range and not have as big a drag/performance penalty as conventional drop tanks.
Its combat performance was almost dominant as seen in it s (at the time of writing) air to air kills to losses to enemy aircraft ratio of 104:0. The majority of the kills have been racked up by the Israeli Air Force, mostly Syrian flown fighters over Lebanon while the USAF F-15s destroyed 34 aircraft in the 1991 Gulf War and several over the former Yugoslavia during the late 1990s.
Not much is known about the Israeli F-15 Mig Killers but in the USAF, the highest scoring F-15 unit is the 58th Fighter Squadron The Gorillas with a total of 16 kills including five Iraqi Mig-29s.
Today, the F-15 still serves as a front line fighter even after some 30+ years, but it was being slowly replaced by the extremely expensive and now no longer production due to budget cuts F-22 Raptor in the USAF.
| THE KIT |
This particular boxing of the F-15 is more pricy than the standard one because it contains an extra PE fret of parts to provide a extra level of detail. The fret contains parts for the canopy, HUD, PE Seat belts and parts for both Turkey feather and Turkey featherless engine nozzles.
 Otherwise, the standard F-15C kit is about 10-15 dollars cheaper.
The parts are typical stiff Hasegawa grey styrene with good detail and little or no flash. The clear parts have a little flash, but it is par for the course on clear styrene. The missiles have as about as much detail as the ones found in the Hasegawa weapons sets (not great, but not totally devoid of detail either like the old RM missiles were.)
The decals are typical Hase, a bit thick and with Ivory instead of white and contain the markings of two planes from the USAF s 58th Fighter Squadron, the Gorillas.
| CONSTRUCTION |
As per usual, the parts were cleaned with a soft used but clean toothbrush in warm water and dish soap. Once dry, I started on the cockpit first which was painted in Gunze H57 Aircraft grey as the interior color for an Eagle are different than the standard USAF color of Dark Gull Grey. The cockpit is complex enough to show details which I marked out using toothpicks dipped in white, silver, yellow and red paint while the consoles were brush painted in flat black.
The electronics bay behind the cockpit was done next. I glued 30 gauge wire that was cut/bent/twisted into shape based on photos to represent conduit and various details. I could have added more electronics boxes, but most of it would be hidden by the canopy so I left that out. According to photos, this area was originally painted in a metallic teal color similar to metallic blue green of Aotake. However, the electronics bay can also be done in flat white according to the few references I have which state that this area was painted white in upgraded F-15s. Being somewhat lazy and not in the mood to mix metallics and clears, I opted for a flat white interior of the electronics bay. I then took a 00 brush to pick out details in flat black, silver, dark blue and grey. I then took a thin black watercolor wash to add shadow and depth to the area even though most of it will be hidden by the canopy deck.
Once the paint was dry, I took the nose and cockpit parts (which included the nose gear well) and glued them together. No noseweight is required.
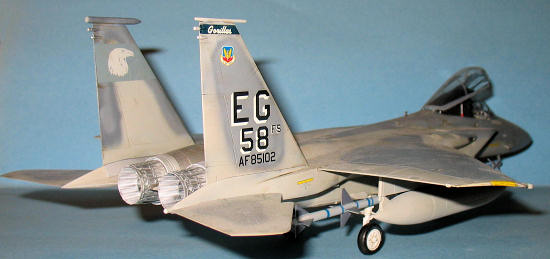
Next I tackled the engine nozzles. In this particular kit, Hasegawa provides PE actuator arms and turkey feathers for the engine nozzles instead of the usual one piece plastic part for more detail. I opted for the non turkey feather option which meant that I spent a couple of really tedious hours attaching the various PE bits for the actuator arms to the engine nozzles with CA glue. It took a mere 10 minutes to paint the entire assembly flat white for the interior, aluminum (Tamiya Flat Aluminum and Talon Aluminum) and metallic grey for the various sections of the exterior. One thing I have to point out is that the metal used for Hasegawa s PE is not as soft as Eduard s and requires careful removal to prevent PE pieces from flying around (and a lot more knife blades.)
All the Hase Teen Fighters follow the same build pattern. The nose/cockpit is separate from the the rest of the fuselage. This means that the join can be very weak and problematic if you don t do something about it which I did as I had to change the build order from the instructions to improve the join.
I cut two thin strips of 40 thou plastic sheet and glued them to the lower half of the fuselage where the cockpit is supposed to go. Next I glued the nose/cockpit to the lower half of the fuselage and then took some CA Glue and poured it on the join to reinforce the strength. I didn t use any accelerator and let it sit for an hour before doing anything else because the strength of CA glue weakens with accelerator.
Due to the shape of the Eagle, I ended up filling and sanding the gaps on the underside before attaching the top half of the fuselage.
 Next I glued all the intake parts in place. Intakes are a pain to work on
because they re so difficult to sand and I must admit that I like using resin
seamless intakes when I can for that reason. However, I don t think there is a
need to use resin replacements with the Eagle because the intakes are pretty
deep and any detail can not be seen without help from a penlight. As I m not
building for competition, I filled the areas that were somewhat visible with
Tamiya Surface Primer, equivalent of Mr Surfacer, and then wet sanded with 400
and 600 grit till it was somewhat smooth.
Next I glued all the intake parts in place. Intakes are a pain to work on
because they re so difficult to sand and I must admit that I like using resin
seamless intakes when I can for that reason. However, I don t think there is a
need to use resin replacements with the Eagle because the intakes are pretty
deep and any detail can not be seen without help from a penlight. As I m not
building for competition, I filled the areas that were somewhat visible with
Tamiya Surface Primer, equivalent of Mr Surfacer, and then wet sanded with 400
and 600 grit till it was somewhat smooth.
Once the forward part of the intakes were done to my satisfaction, I glued the painted engine faces at the end of the intakes and then glued the upper half of the fuselage on. I was careful with the cockpit/fuselage join so as not to break my previous work (CA glue does not have good give. ) Once installed, I carefully glued everything I could and then clamped them together with a combination of C-Clamps and clothes pins.
There are seams that needed a lot of attention. In particular the rear area of the fuselage, and the area where upper half of the fuselage meets the lower half at the intakes, the sides of the fuselage at the wing root and the nose area (especially around the underwing antennas.) I used CA glue which was air cured to sand/fill in all the gaps except the sides of the intakes where I used Vallejo Plastic Putty instead.
I found some gaps where the intakes attach to the fuselage and took care of those gaps with Vallejo acrylic putty (which was removed with wetted Q-tips.)
The tailplanes and stabs were left off to ease painting.
The last thing I did to the fuselage was cut off the starboard aft tip and replace it with what looks like an ESM antenna/RWR (?) as per instructions. It took a bit of CA glue to remove the join and careful sanding to smooth it without wrecking the detail there.
One thing to watch out for are shallow ejection pin marks on the landing gear and missiles. I did not find the ejection pin marks on the landing gear till I painted them flat white. They were fixed with a bit of CA glue, 20 minutes drying time and some careful sanding.
The rear canopy is pretty good except there is a mold seam mark running down the middle that needs to be dealt with. I used 400 grit sand paper to remove the mold seam and then increasing fine grades of polishing clothes to buff away the scratches. I then polished it with Novus 2 scratch remover and used the Novus clear coat to make it shine.
| COLORS & MARKINGS |
Paint
The F-15 was preshaded with flat black along the panel lines first and then in a random pattern everywhere else. The wheel wells, landing gear and inside of the gear doors were sprayed with three thin coats of flat white.
The canopy bits were masked off using Tamiya tape at this time.
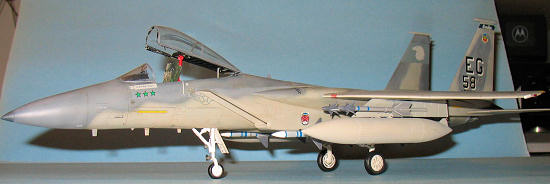
The kit markings require the newer camouflage scheme known as Mod Eagle which is FS36176 and FS36251, both colors not readily identified in various lines of pre mixed acrylic paint at this time.
For the lighter color, I used Tamiya XF-20 Medium grey due to the TLAR principle as it is close to the lighter color FS36251. I added this first in several light coats to the Eagle, tailplanes and stabs as the base color.
The darker color proved to be more difficult. I initially used XF-24 Dark
Grey thinking it would be light enough. I opted not to use masks as I set my
compressor to 10 Psi and kept my airbrush in a tight pattern. This proved to be
too dark. Disappointed, I then went to plan B and used a 50/50 mix of XF-24 Dark
Grey and XF-20 Medium Grey which passed under the Close Enough Because
 I
Didn't
Want to Do This Again Principle when compared to the photo on the box.
I
Didn't
Want to Do This Again Principle when compared to the photo on the box.
The area surrounding the engines was masked off and a light coat of Tamiya Flat Aluminum XF-16 sprayed on as the base coat, Talon Aluminum for the top coat and then went over the area with cross sectional thin bands of Tamiya Platinum Silver to emulate variations in the metal.
Once dry, the entire plane was sprayed with a coat of Future for the decals.
Decals
I used the 58th Fighter Squadron CO decals which includes three kill markings as well as the squadron badge. They are typical of Hasegawa decals of the era, a little thick and the white is ivory. I used Micro Set mostly, but went to Solvaset for the ones that silvered or were stubborn. No real issues except the tedious number of stencils that modern jets come with.
Weathering and Final Coat
I decided for to use a little weathering on the plane to highlight the panel lines. A light watercolor wash of black, burnt sienna and raw umber mixed with a drop of dishsoap was used. Once dry, the excess was cleaned off with slightly damp Q-tips and sealed with two thin coats of Vallejo Flat (first time using this clear coat.)
The interior of the engine nozzles were done in a combination of a flat black wash and pastels to emulate the stains of an in use after burning jet engine.
| FINAL CONSTRUCTION |
At this point, I discovered I made a similar mistake I made with the Hasegawa P-40E. I assumed that a seam line was really panel line. Unfortunately, I discovered that there was no panel line midway through the intake and decided to stare intensely at the model till my glue fume addled brain could find a solution. Several years later (just kidding), I realized that my only solution was to cover over the decals using Post It Notes and CAREFULLY fill and sand the seams. I thought there were no casualties till I noticed that I had inadvertently scraped off the slime light decals on the wing tips.
I brushed on Citadel yellow paint to emulate the wing tip slime lights. The rest of the lights were done with a combination of Citadel Silver, White, Tamiya Clear Red and Clear Blue.
The completed landing gear and gear doors were added at this stage. The doors do not have the best fit (a little small) and it took some careful gluing to cement them in place without large gaps. I did add brake lines to nose gear based on walk around photos using 30 gauge wire (attached with CA glue) and painted black.
The tail planes and stabs were glued on with CA glue and were aligned just before the glue hardened.
This upgraded Hasegawa kit provides a thin clear acetate sheet for the HUD as well as PE parts. The HUD requires a steady hand and light touch to assemble. Krystal Kleer glue was used for assembly and to glue it onto the model.
 The canopy was unmasked, the various PE bits including mirrors and handles
were painted (mostly flat black with silver mirrors) and then glued with Krystal
Kleer to the clear piece while actuators were painted as per instructions. Just
be warned, the canopy is rather fiddly and you need to play with the actuators
to get them in the right position. The windscreen was glued in place with white
glue and the rear canopy using CA glue.
The canopy was unmasked, the various PE bits including mirrors and handles
were painted (mostly flat black with silver mirrors) and then glued with Krystal
Kleer to the clear piece while actuators were painted as per instructions. Just
be warned, the canopy is rather fiddly and you need to play with the actuators
to get them in the right position. The windscreen was glued in place with white
glue and the rear canopy using CA glue.
I did not use the kit seat and decided to go with a True Details seat instead. I cut off the sensors that stick out from the sides of the head rest and the center handle and glued them to the resin seat. It was painted according to the instructions and glued in place.
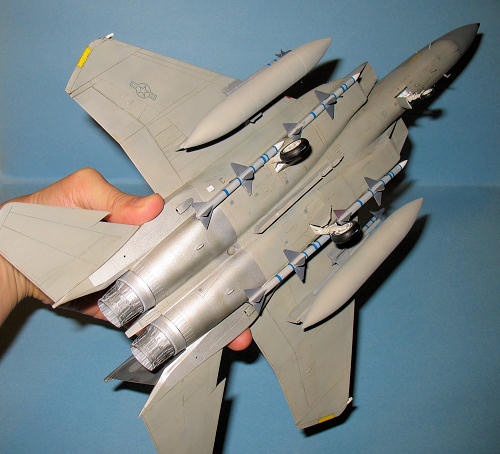
The various missiles, pylons, and fuel tanks were cleaned up, assembled and painted (missiles were done in flat white, steel and Light Ghost Grey) while the tanks/pylons were painted in Tamiya XF-20 Medium Grey. Unlike many other Hasegawa kits, the F-15C Eagle has all the weapons required for a complete warload. The missiles were then gloss coated, decaled and then a final flat coat was done.
I finally had an F-15 Eagle in my model collection.
| CONCLUSIONS |
The Hasegawa F-15 is a nice straight forward kit that has few vices (nose and canopy assembly in particular) and can be easily built by a modeler who has built a few kits. Experience with PE is not required though but recommended with this particular version of the kit.
Definitely, the easier of the two Hasegawa Teen Fighter I have attempted to build (the other kit being the still uncompleted Hase F-14.)
June 2009
Copyright ModelingMadness.com. All rights reserved. No reproduction in part or in whole without express permission.
If you would like your product reviewed fairly and quickly, please contact the editor or see other details in the Note to Contributors.
Back to the Review Index Page 2021