| KIT #: | PT 24 |
| PRICE: | $43.98 MSRP |
| DECALS: | Two options |
| REVIEWER: | Dan Lee |
| NOTES: | Easy Build |
| HISTORY |
The Grinch who bought a Helicopter
Background
The AH-64 Apache was born from of the experiences of Vietnam and the failures of the too early for its time high tech AH-56 Cheyenne. The US Army wanted a helicopter that was more survivable, carried more firepower and was faster than its Vietnam era fleet of choppers. Boeing previous known as McDonnell Douglas previously known as Hughes Helicopters was awarded the contract in 1974 to design a next generation attack chopper. After a lengthy test and preproduction process, mass production started in 1984 and ended in 1994.
 The
various mods of the Apache has served in every conflict that the US Army was
involved in from Panama to the current GWOT or whatever they’re calling it these
days. It got into the public eye during Desert Storm as one of the wonder
weapons that slew the Iraqi Army (along with the M-1, the Patriot SAM and the
F-117.)
The
various mods of the Apache has served in every conflict that the US Army was
involved in from Panama to the current GWOT or whatever they’re calling it these
days. It got into the public eye during Desert Storm as one of the wonder
weapons that slew the Iraqi Army (along with the M-1, the Patriot SAM and the
F-117.)
The AH-64A has been upgraded in the current US Army to the more sophisticated Longbow D version with its radar guided Hellfire missiles.
For more detail, a simple google search will yield more info that I have here.
A little disjointed background and commentary here (oh lord why?) I like the holidays as long as I’m nowhere near a mall or shopping center in December. Why? It’s that particular time and place where I cease being a quiet bespectacled nerd and morph into a pathetic version of the Incredible Hulk who will fight anyone to the death to protect his several-miles-away-from-the-mall parking spot and that last remaining overpriced kiddie toy on the shelf (Hulk NO LIKE YOU TAKE LAST FASHION BARBIE DOLL! HULK SMASH! HULK BASH!)
Many of you readers might get an idea that I might somewhat dislike the North American holiday shopping season. The holiday insanity (mine or anyone else’s) is why I try to do most of my holiday shopping in Oct/November. It was during one of my recent fall shopping jags when I wandered by the local mall’s hobby store to see what I could get for my, uh, mom…
 Something led him down the
aisles of the store
Something led him down the
aisles of the store
Right to the dusty box
And he only paused a moment when
He heard it holler stop (yup, no insanity there!)
There always are certain kits no one wants and spend years, even decades, on the store shelves. The neglected kits seem nice enough, but they don’t capture most modelers’ interest like the usual suspects of Bf-109s, Corsairs, F-16s and Mustangs. It seems that the Hasegawa 1/48 AH-64A Apache is one of those kits determined to collect dust (at least where I live.) Chopper/helo things generally don’t get me to open my wallet like things that go zoom & boom or zap so why would I buy something like this? Perhaps it was a desire to do something different than single engined warplanes from 1935-1975 or rage inducing SF kits. Or I probably watched Merry Christmas Charlie Brown too many times as a kid and the kit reminded me of the tiny pathetic Xmas tree that no one wanted but Charlie Brown. For whatever insane reason, I put my money down and clutched the kit to my chest, enlarging my heart several sizes while shrinking my wallet down several sizes at the same time.
My own experience with helicopter models begins and ends with a 1/72 scale Matchbox Huey Cobra AH-1G (I think) built some 25 (yikes!) years ago. I remember that I put it together in less than an hour and it only took me only 30 seconds to wreck it. The rotor separated from its fragile mount (consisting of 3 styrene pins) after I spun it as I ran around the room making the (incorrect) whoop whoop helicopter sounds from M*A*S*H. Normally, it took me several hours of crash landings to wreck my models while high on model glue/paint/thinner fumes which is why my ten year old self found this so upsetting. Hmmm, I wonder how long it’s going to last this time?
| THE KIT |
This particular kit is almost identical to the 1/48 scale Apache AH-64D as previewed by our editor (minus the large radar lollipop at the top, certain cockpit details and some minor D related bits.)
At least in the kit I bought, I found that there is a lot of flash you have to remove (a lot for a Hasegawa kit, anyway.) Most of the flash was on the clear parts, but there was some on the standard plastic grey bits as well.
| CONSTRUCTION |
I decided to do something I normally don’t do when it comes to models, I took my time with it and actually followed the instructions (also helped that I built much of it during my Christmas vacation.) I did not want a repeat of my last helo/chopper experience because I was determined that this was going to last at least a few hours before someone (me) broke the main rotor.
 I began with the cockpit which
was pretty simple to assemble. I didn’t bother to paint the side consoles or
the portions of the instrument panels that were covered by decals because of all
the bumps and ridges. I recommend that you use Solvaset to ensure the decals
stay down.
I began with the cockpit which
was pretty simple to assemble. I didn’t bother to paint the side consoles or
the portions of the instrument panels that were covered by decals because of all
the bumps and ridges. I recommend that you use Solvaset to ensure the decals
stay down.
Everything assembled quickly and I sprayed the interior with thinned Tamiya Flat Black. The seats had harnesses molded on so I hand painted the harnesses tan with dry brushed silver for some of the raised details. The cushions were painted Gunze Khaki green. I’m not sure if this is really accurate, but what’s done is done. The cockpit raised detail and the various parts of the interior were dry brushed silver.
The cockpit (and attached rotor mount) went in without any difficulty into the fuselage. I managed to slap the fuselage together and then found myself staring at something I hadn’t seen too often on a Hasegawa kit, a long big seam on the underside of the fuselage.
Usually, I would just load up on
superglue and start filling and sanding. But this case was rather different as
I didn’t want to sand off the multitude of raised detail. Fortunately, a
birthday present came to save the day. Master Modeler’s DVD set of Floyd Werner
 building a Bf-109G (reviewed
several months ago by Scott and also add my own personal recommendation that
this is a good pick up for any skill of modeler) showed a bunch of techniques to
fill small gaps without sanding/losing detail using Mr Surfacer and Mr Thinner.
I used the technique to fill the gaps, but it took several applications of Mr
Surfacer and removal with Mr Thinner to fill in the seams sufficiently. It is
still tedious, but not as bad as say losing my mind redoing surface detail.
building a Bf-109G (reviewed
several months ago by Scott and also add my own personal recommendation that
this is a good pick up for any skill of modeler) showed a bunch of techniques to
fill small gaps without sanding/losing detail using Mr Surfacer and Mr Thinner.
I used the technique to fill the gaps, but it took several applications of Mr
Surfacer and removal with Mr Thinner to fill in the seams sufficiently. It is
still tedious, but not as bad as say losing my mind redoing surface detail.
I used this technique several times to fill in other gaps during construction such as between the winglets and fuselage, and the fuselage and the landing gear wells. The only time this failed me when I had to install the bottom part of the front fuselage. I filled it with superglue and sanded a little bit while trying to keep most of the raised rivets. Didn’t work as I ended up sanding off some of the detail, but no one is going to notice unless for some reason I bring it to a model show and run into those people who have the mental equivalent of a 1000 year old Douglas Fir lodged up where sun don’t shine and love counting rivets with the aid of a dental mirror.
Once the gaps were done, the general construction was done quickly and by the numbers.
| COLORS & MARKINGS |
Painting
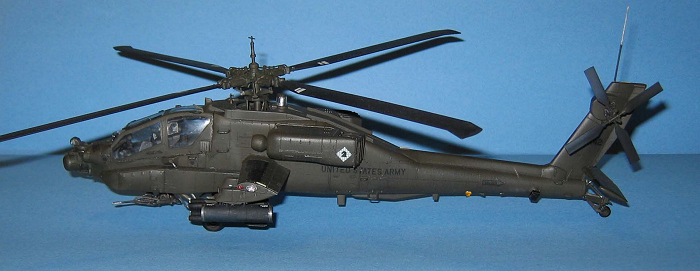
Modern military helicopters, like modern jets, are very simple (or boring) to paint if you want an operational bird with none of the associated issues of masking and color bleed thru that occurs when modeling the more colorful periods of military aviation. Some flat black and a shade of really dark green is all you really need.
I preshaded the Apache with flat black over the rivets and panel lines.
 The base color was from the
misnamed Testor Acryl Army Helo Drab. It might not be the most accurate color
for this chopper, but it was close enough for lazy me. I sprayed on several
thin coats to get a subtle blotchy effect.
The base color was from the
misnamed Testor Acryl Army Helo Drab. It might not be the most accurate color
for this chopper, but it was close enough for lazy me. I sprayed on several
thin coats to get a subtle blotchy effect.
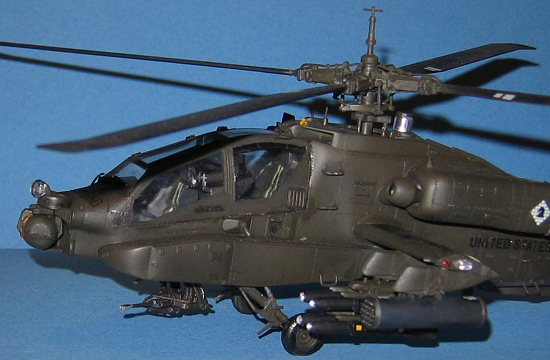
I wanted to have an open cockpit with all the hatches raised. It was more difficult than normal because I had to mask both sides of the plastic. Fortunately, Hasegawa put detail on both sides of the open doors which makes things easier.
Decals
Once the paint was dry, I put on two thin coats of 50/50 Future and Rubbing alcohol as a base gloss coat for the decals. I set the model aside and waited a couple of days before I started decaling. The Hasegawa decals were rather thick and the white was ivory, but I had no problems till I got them on the model.
I used MicroSol on the decals and let it work its magic while I went to bed. The next morning, I was surprised to see lots of bubbles and silvering everywhere. Why? Did I not use a gloss coat? Check. Did I take my time placing the decals? Check. Did I not use the wonder chemical of MicroSol? Check. What caused it? Well, the multitude of raised rivets. If you paid attention then you’ll realize that I didn’t take my own advice and use Solvaset instead. It took me several attempts with Solvaset and a pin (to poke holes in said decals) to get the decals mostly nice and snug over the raised details (especially the big black area decals on the winglets and the tailplane.) If I build another one, I would mask and paint the black area markings instead of using a decal.
| FINAL CONSTRUCTION |
I attached the many tiny bits on the Apache and hand painted them after I glued them on. This was probably the most painful part of the assembly as I spent much of my time on my hardwood floor looking for parts that flew out of my tweezers. I was lucky that I didn’t lose any parts, but discovered I needed to clean my floor more often.
I really didn’t like the clear disco light IR jammer that Hasegawa provides and replaced it with a filed piece of ¼” aluminum tube similar to what was done in an earlier review of the Monogram version of the AH-64A.
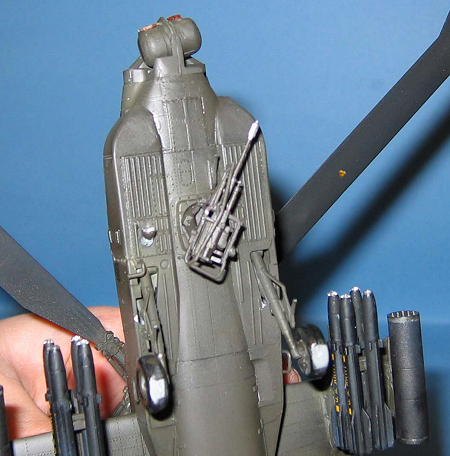 The 30mm chain gun was easy to
assemble, but proved to be a pain in the rear to get it mounted on the bird. I
was not happy with the alignment of the chain gun mounting hole and the bottom
part of the fuselage (I’m not sure if this is a problem with the kit or my own
clumsiness.) It was off by a millimeter and it was enough that I ended up
shaving part of the chain gun’s mounting pin to get the gun in. Be very careful
inserting the chain gun in as the assembly is very delicate.
The 30mm chain gun was easy to
assemble, but proved to be a pain in the rear to get it mounted on the bird. I
was not happy with the alignment of the chain gun mounting hole and the bottom
part of the fuselage (I’m not sure if this is a problem with the kit or my own
clumsiness.) It was off by a millimeter and it was enough that I ended up
shaving part of the chain gun’s mounting pin to get the gun in. Be very careful
inserting the chain gun in as the assembly is very delicate.
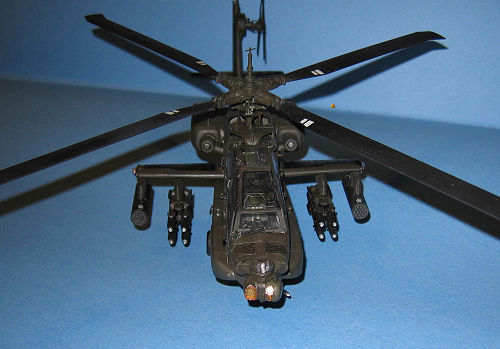
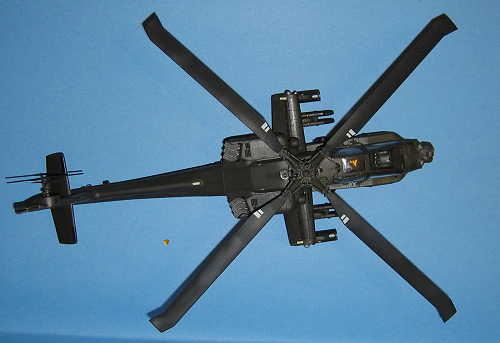
Surprisingly, Hasegawa supplies the weapons for the AH-64A—a typical warload of eight Hellfires and two 70mm Hydra rocket pods—so I will avoid my usual ranting about their weapons sets. The weapons were easy to assemble and painting was easier. Especially since they were mostly painted flat black except for the front and back covers of the rocket pods which I painted Gunze Steel and the mounting holes for the clear missile seeker heads which were hand painted silver. I sprayed my 50/50 Future mix on the Hellfires and rocket pods to prep for the decals. The weapons decals were as easy to do although I only put the Hellfire stencils only on the visible sides (yup, I’m a lazy SOB and a stupid one too because the reason why I did so was I had absent mindedly glued the missiles to the racks the day before applying the decals…) I used a bit of superglue to attach the racks and pods to the pylons.
I sprayed two thin coats of Gunze Flat Clear to remove the gloss.
The clear bits went on next. I had to thin the Kristal Kleer a bit with water to get it all on the mating edges. I did find that the right side of the windscreen needed a gentle 20 minute squeeze to get it to mate with the fuselage. Once the canopy was mounted and glue was dried, I took a 0 brush with some thinned Army Helo Drab and ran it along the seam to prevent light from bleeding thru the translucent glue.
There is one glaring fiddly part of the Apache. I found that the mounting the starboard hatches open is a PAIN in the rear. I spent an hour fiddling with the damned things and then gave up after they fell to the ground for the 10th or 14th time. Instead of doing my Hulk imitation, I took a deep breath and put the hatches in the closed position while I cursed the Hasegawa designer who thought a large hatch held up with just a 1/8 sliver of plastic was a good idea.
 I don’t know about any of you,
but I have a habit of forgetting to do one small step in my models and I don’t
find it till when it’s most inconvenient to correct (Murphy really hates me) and
it sometimes ruins what I consider an excellent (for me) model. This time, I
forgot to do the trim around the canopy windows with a shade of very light grey
(Gunze H338 according to the instructions.) I saw some photos of Apaches that
didn’t have this done or it was barely noticeable, so I decided to wear my
modeler’s dunce cap proudly and not bother to paint the trim as the pain of
messing up the installed canopy would hurt a lot more than being 1% less
accurate than someone else.
I don’t know about any of you,
but I have a habit of forgetting to do one small step in my models and I don’t
find it till when it’s most inconvenient to correct (Murphy really hates me) and
it sometimes ruins what I consider an excellent (for me) model. This time, I
forgot to do the trim around the canopy windows with a shade of very light grey
(Gunze H338 according to the instructions.) I saw some photos of Apaches that
didn’t have this done or it was barely noticeable, so I decided to wear my
modeler’s dunce cap proudly and not bother to paint the trim as the pain of
messing up the installed canopy would hurt a lot more than being 1% less
accurate than someone else.
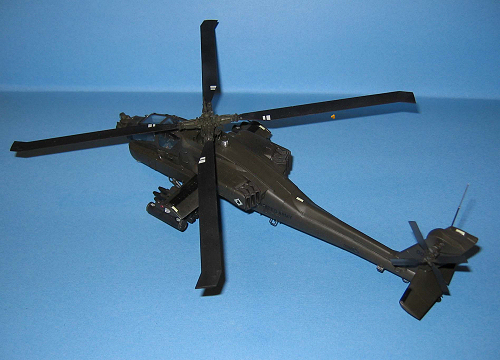
My final task was to gently push in the main rotor into its mount. Once done, I ran around the living room for a while making whoop whoop sounds. This time I didn’t break the rotor.
| CONCLUSIONS |
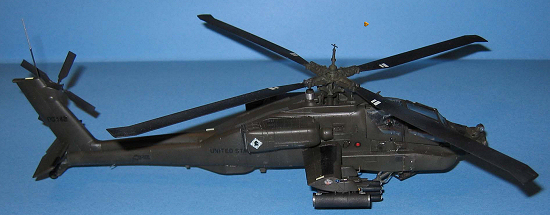
I enjoyed my foray into rotorhead land even though helos, er, choppers, uh, whirlybirds aren’t my normal mug of beer. The Hasegawa kit is sort of vice free (as long as you close up the canopies) in terms of buildability with the exception of the bottom part of the forward fuselage. I can’t say anything about its accuracy as compared to the real thing except that it looks okay to me.
One warning I have for anyone interested in building this kit is that it is a very delicate model and should be kept out of the way of curious grabby (both child AND adult) hands and fingers if you want it around for a while.
Now, it’s off to clean my floor.
April 2006
Copyright ModelingMadness.com. All rights reserved. No reproduction in part or in whole without express permission.
If you would like your product reviewed fairly and fairly quickly, please contact the editor or see other details in the Note to Contributors.